Decorative stone is a facing material for exterior and interior decoration, which is rapidly gaining popularity. Finishing with stone gives the room an original and presentable look and well complements the interior of different styles. Decorative stone is resistant to wear, practical and easy to clean. The only thing that can confuse you is the high cost of the material. But if you consider that it is not necessary to stone all the walls in the room, then the costs will not be so great. In addition, today artificial types of decorative stone are actively used, which are much cheaper than natural rocks.

Decorative stone in the interior
Most often, this decorative facing material can be found in living rooms, spacious kitchens, dining rooms and hallways. Making doorways, niches and entire walls with stone allows you to achieve the effect of monumentality, and in combination with living plants brings natural naturalness to the room.

Decorating the hallway with decorative stone is practicality and convenience. A large amount of dirt accumulates in the hallway and corridor, which is brought into the apartment from the street. An artificial material that imitates masonry perfectly tolerates wet cleaning with detergents and has dirt-repellent properties. In addition, this design will be very durable and will not lose its attractive appearance from frequent touches.

Complete decoration of the hallway with decorative stone can have a “pressing” effect, so the best solution would be a fragmentary finish with the allocation of certain zones:
- doorways and arches;
- viewed angles;
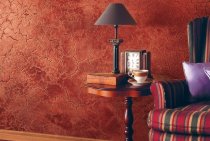
- areas around furniture and separately located decor elements (lamps, paintings, mirrors);
- contact zones (hangers, racks, shelves, wall sections above the plinth);
- ledges and niches.

Tip: Decorative masonry is able to fully express itself only with good local lighting. In low light, wall decoration with decorative dark stone will look gloomy. If it is impossible to provide suitable lighting in the corridor, it is necessary to give preference to light-colored material and reduce the size of the cladding area, limiting, for example, the doorway.

Types of decorative stone
The following types of this natural material are used in decorative finishing:
- sandstone;
- limestone;
- slate;
- marble;
- granite;
- cobblestone.
With independent interior decoration, only the first two types are usually used. Sandstone lends itself well to processing and has a pleasant color palette. Limestone has a high hardness, so it must be purchased in sliced form.
Currently, artificial decorative material with a different composition is much more often used.
- Concrete base material. It is made from cement, sand and various additives: pigments, plasticizers, reinforcing components and natural fillers. The most common type applicable to any surface.
- Porcelain tile. Consists of clay, minerals, pigments, has high strength. It looks a little like a natural rock, more like a multi-colored glass tile.
- Conglomerate. Made from marble and granite chips with the addition of quartz sand, limestone and colorants. It has increased strength and reliability, in appearance it is closest to natural stone.
- Acrylic. It is light in weight and comes in a variety of colors, is easy to process and does not require the use of detergents for cleaning.
- Quartz. Strong and durable material, easy to use, cut with diamond blades.
- Gypsum.It is very light weight and easy to apply. This material resembles sandstone in appearance. The main advantage of gypsum facing material is the possibility of its self-production using special forms.

Depending on the appearance, the following types of decorative stone are distinguished:
- rubble - imitates natural pebbles or boulders;

- chipped - has the appearance of raw rock;

- sawn - combines an unpolished front surface with a clear geometry;

- mosaic - the elements form a certain geometric or color composition;

- tiled - has a polished front surface, is an imitation of natural polished marble or granite.
Working with decorative stone
When choosing a decorative stone in the form of a facing material, first of all, you will have the following questions:
- Is it possible to finish without the participation of a specialist?
- What tools will be needed during work?
- How to lay decorative stone?
- What composition can be used to glue the facing material on the wall?
- How to decorate the arch with a decorative stone?

Let's find out the answers to these questions and consider each in detail.
DIY decorative stone trim
Decorating with decorative stone on your own is a very real task. Works with different types of this facing material have a different level of complexity, but in general, any novice master can handle the laying of stone.
Required Tools
To work with decorative finishing material, you will need the following set of tools:
- trowel or spatula for applying glue;
- rubber mallet;
- grinder with a disc for concrete;
- container for mixing the solution;
- ruler-triangle;
- cords for horizontal beacons;
- plumb lines;
- metal brush;
- roulette;
- level.
Composition for gluing
The cladding material can be glued to the wall using tile or silicone adhesive, liquid nails, stone adhesive. In some cases, it is permissible to use a cement-sand mortar with plasticizers or polyvinyl chloride construction adhesive.
The best choice is tile adhesive or a specialized composition for decorative stone.

Important Points
When working with a stone, you need to take into account several nuances, the observance of which will ensure a high-quality result.
- It is possible to glue decorative facing material only on aligned and carefully primed wall. Can be used for alignment plaster or drywall.
- When choosing a natural cladding material that has a lot of weight, you need to fix it on the wall reinforcing mesh.
- When sheathing walls with drywall, the sheets must have a thickness of at least 12.5 mm and be fixed in length along at least three transverse lines.
- Maintaining relatively even rows improves the appearance of the finished surface.

Sketch development and markup
Before you start gluing masonry elements, it is necessary to determine the size of the area to be covered, select the type of seams, make a sketch and mark on the walls. The sketch is necessary for the reason that it is desirable to lay a solid stone on the wall, and you should try to place it so that you do not have to cut and prick it, since these actions can damage it.
After creating a sketch, the laying scheme must be transferred to the wall and marked using beacons. In places where an even edge will pass, it is necessary to fix the limiters in the form of profiles or corners.
Work order
During operation, follow the instructions below.
- Before you begin gluing the stone to the wall, go over the back of the stone with a wire brush to enhance adhesion surfaces.
- Remove any burrs on the front side with a file.
- Apply mortar or glue to the wall with a trowel or spatula along the width of the first row, cover the reverse side of the stone with the compound. The adhesive layer should be 5-10 mm.
- You can lay the elements end-to-end, applying them to the wall, pushing them tightly against the profile and the elements of the bottom row, and then adjusting them with a rubber mallet.

- To form the seams, you can use wedges, lay pieces of drywall between the rows for wide seams or scraps of cardboard for narrow ones. After the adhesive has dried, the auxiliary materials must be removed.

- Elements in a row must be laid with an offset, as when creating brickwork. This is necessary for a more natural look and increased strength.

- After laying several rows, it is advisable to take a break to prevent the array from sliding.
- Finishing the arch with a decorative stone involves gluing elements not only on a vertical wall, but also on a vault. For the best quality masonry, tap the laid elements for possible voids. If they are found, the stone must be removed, the glue removed and laid again.

- Facing arches, doorways and finishing corners in an apartment often requires pruning stone. Even cuts look unnatural, so with the help of pliers, a knife and a file, you need to make a variety of chips that will give the stone that makes up the opening a more natural look.

- A few days after the end of the work, you can start grouting, remove the wedges and fill the seams with a special grouting solution.