A few simple ways to organize watering
Several options for drip irrigation through bottles have been developed, which are successfully applied in practice. All of them work quite effectively and allow you to forget about the problem of plant moisture for 2-3 days.
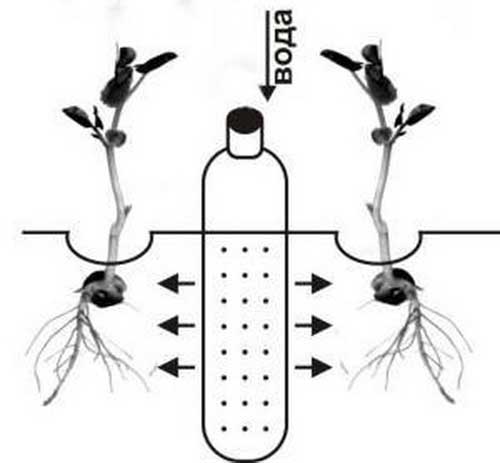
Underground root irrigation
To organize irrigation in this way, you will need a plastic container with a volume of 1.5–2 liters. You need to make several holes in it with an awl or a gypsy needle at a distance of 3-4 cm from the bottom. The number of holes depends on the type of soil, for example, two are enough for sandy soil, and at least four holes will have to be made for loamy soil. For watering moisture-loving plants, small holes are pierced over the entire surface of the bottle.
Dig a container upside down between the plants to a depth of about 10-12 cm, while the neck should remain above the ground. Pour water through it with a watering can and screw on the lid, in which make a hole in advance for air to escape.
How plants are watered
Another option is to dig the bottle into the ground with the neck down, after making several holes in it and screwing the cap on well. The bottom of the container is cut off in such a way that a kind of lid is obtained, which will prevent the evaporation of water. This method of irrigation is more convenient, since the reservoir is filled with water through a fairly wide opening.
If necessary, the time of drip irrigation can be extended. To do this, use a container of a larger volume - five-liter plastic bottles. In this case, holes are pierced on one side of the container, and a lid is cut on the other. The bottle is placed in the ground horizontally downwards with holes.
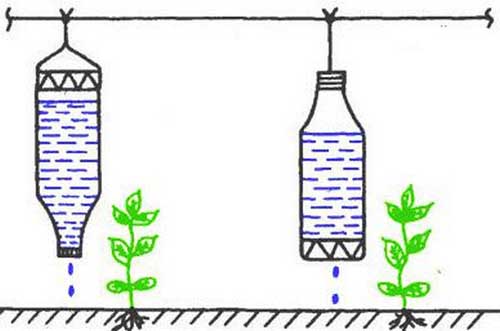
Surface irrigation scheme
Surface watering of plants
It is not necessary to bury the containers, they can simply be hung over the plants. To organize drip irrigation from plastic bottles in a superficial way, you need to build strong supports above the bushes and attach containers to them. The bottle is suspended with a lid down, after one or two holes are pierced in it, or vice versa, holes are made in the bottom and fixed with the neck up.
This method of irrigation is more convenient and of high quality, since warm, sun-warmed water is supplied to the plants.
In addition, it is possible to accurately determine the direction of the drops, it is important that they fall only into the soil, without affecting the leaves of plants. If you notice that the fertile soil layer is being washed out, move the container to another place.
You can see how to make drip irrigation from plastic bottles in the video.
Improved method of soil moisture
To organize more efficient drip irrigation, in addition to the bottle, you will need an empty ballpoint pen. From it you need to cut off the writing part and rinse well. In the resulting tube, one end must be closed with a toothpick or a match, then, stepping back from the closed edge by about 2 cm, pierce a small hole with a needle.
Now you need to make a hole for the rod in the bottle. If you install the container with the neck down, then pierce a hole at the level of the bottle hanger. If the bottom is at the bottom, then make a hole, stepping back 10-15 cm from it. Insert the rod with the closed end out and seal it well with plasticine. Pour water into the container and place it near the plant as shown in the photo.
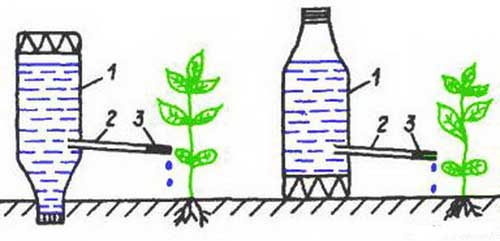
1 - water bottle, 2 - rod, 3 - closed end of the tube
With this method of drip irrigation, moisture goes directly to the roots of plants. The rate of watering is controlled by the width of the hole in the rod.Practice shows that when using two-liter containers, the soil will remain moist for five days, but on condition that no more than 10 drops of water are poured out within five minutes.
Drip irrigation using plastic bottles is a real and inexpensive way to organize an effective irrigation system for garden plants. This is ideal for areas that do not have a permanent water supply, and for summer residents who, leaving for a few days, can be sure that planted crops will not die from lack of moisture.
foam drainage
If you plan to equip drainage from improvised materials, use foam. It can be collected, or you can buy it at a hardware store at an affordable price. The material has long been known for its versatility. It is used to protect equipment from damage, to make a drainage layer for indoor plants. Sometimes foam is used to equip drainage systems in small areas.
foam drainage
Work should begin with the implementation of land work. Trenches are dug under a slope towards the location of a prefabricated well, collector or artificial reservoir. A pillow of sand and gravel is laid in the dug trenches, then a layer of pre-shredded foam. The last step is laying the soil. To increase the efficiency of the drainage system, geotextiles can be laid in the ditches.
If the site is flooded abundantly, groundwater is high, which from time to time accumulates in the basement, it is rather difficult to solve the problem using improvised materials. In small areas with a slightly high level of humidity, improvised materials cope with their functions efficiently.
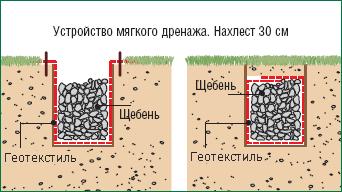
Application of modern technical textile materials
Modern technological fabric materials make it possible to independently manufacture soft drainage. Its design is based on the special membrane properties of the tecton, which allows moisture to pass only in one direction and does not allow it to go outside. You will also need geotextiles, which will form a filter layer that prevents debris, silt and soil from entering the drainage system. Soft drainage is constructed as follows:
- A drainage ditch is being dug with a slope towards water drainage.
- A tecton is laid on the bottom, forming a U-shaped profile in cross section.
- On top of the tecton, geotextiles are laid with a 40 cm approach to the edges of the pit on both sides.
- Matter is covered with rubble or other small stone;
- Crushed stone is wrapped in geotextile.
- The drainage ditch is covered with sand.
Such a drainage system is easy to manufacture, inexpensive, efficient and durable. However, the last advantages and all the other methods discussed in the article, and some manufacturing difficulties are offset by the low cost of materials. It remains for you to opt for a more suitable method - each of them will be able to cope with the task of removing excess moisture.
Installation nuances
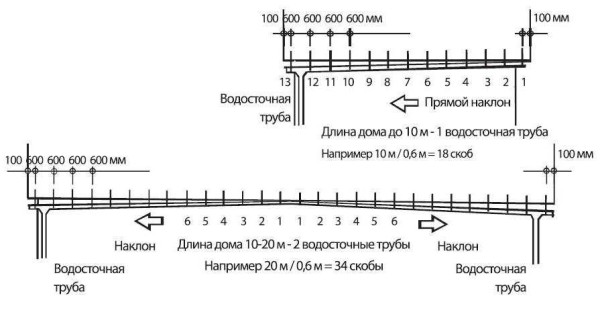
After all the blanks are made, we will consider in more detail how to equip the drainage system with our own hands. The brackets are mounted with the obligatory creation of a slope towards the funnels, when, taking into account the running meter, a vertical displacement of 5 mm is assumed. If there is a need to accelerate the flow of water, this slope can be increased to 10 mm.
If the length of the pediment does not exceed 10 m, a slope is made to one of the sides. A greater value involves the installation of an additional funnel installed in the middle with a drainpipe connected to it to form a drain. But it is also possible to make two slopes of the gutter coming from the middle of the gable.
To install gutters you need:
- fix the first bracket at the point of maximum height of the sewerage system;
- fix the second, taking into account the fact that it will be below the first, thereby creating the required slope;
- between the installed brackets, pull the twine, which serves as a guide for marking the attachment points for other supporting parts of this type.
The described process of installing storm sewers looks quite simple in terms of its implementation, but there are certain nuances. To create a slope, they are mainly guided by the horizontal, which is the front board, known as the wind board.
But is it always installed with strict horizontality? It is desirable to verify this, for example, using a hydraulic level or level. You can also use a simple version in the form of a bubble device, but only on condition that its length is 1 m or more.
PVC gutter installation
There is nothing complicated in installing this design, however, some nuances must be taken into account:
- Determination of the depth of the sewerage system depending on the area of the roof.
- The choice of one or another method of installation.
- Marking the location of the drain:
- indicate how the system will be placed, taking into account the fact that the entire volume of precipitation collected from the roof should fall into it;
- determine the location of funnels and corners;
- install the first bracket at the highest point in relation to the cone;
- using twine and a level, determine a horizontal line passing through the point where the bracket is installed, and, starting from it, set the slope;
- install the last support part and connect it to the first one with twine;
- to mount other brackets in compliance with the step of 40 cm, adhering to the marked slope line.
- Gutter installation:
- prepare a narrow channel by making segments from it of the required length;
- connect the components of the drain using the appropriate elements or glue;
- install the gutter on the brackets, using the latches and avoiding the joints of both the channels themselves and the funnels getting on these supporting elements;
- install plugs.
- Sewer system installation:
- connect the pipe to the gutter by diverting the drain;
- align the vertical of the cylindrical structure with a plumb line and square;
- fix the pipes forming the structure for the removal of precipitation in order to determine the installation locations of the clamps with a step of 1 m, but with the obligatory location of the upper part on the line of the first joint;
- fix the connecting elements on the wall, taking into account the fact that the sewer pipe after installation will be 2 cm away from the side structure of the house;
- mount the drain socket on the hatch, but without rigid fixation, so that the drain can be controlled.
We tried to touch on all the nuances of installing a rain sewer. A number of works are quite difficult to carry out alone, so it is recommended to use a partner.
Video arrangement of drainage from plastic bottles
If you want to equip a site where groundwater is too close, as a result of which the soil is excessively moist, you need to lay a drainage system. Then the plants will bear fruit and please the eye, and the buildings will not collapse.
In essence, the drainage system consists of specially equipped channels. Their task is to collect moisture and bring it outside the site. There are several types of drainage systems that differ in the way they are arranged: closed, backfill and open. Tubular drainage is found in the last two varieties. It can be made by hand.
Tubular drainage is made of perforated or slotted pipes.
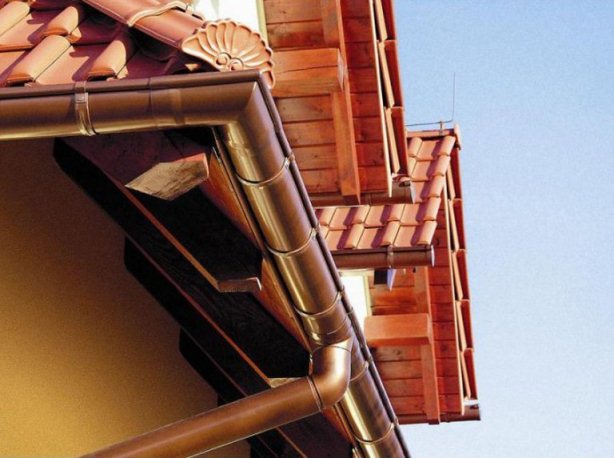
Gutter systems
The design of the gutter assumes the presence of special gutters for the removal of precipitation, which are installed along the perimeter of the roof using brackets.Due to the fact that the storm drain repeats the configuration of the upper element of the building along its base, there are both external and internal corners. In this case, all elements of the system are interconnected with sufficient tightness, which is provided by rubber seals.
Many consider such elements to be superfluous, since the option of overlapping the gutters is available, when one part overlaps another by at least 30 cm, and their connection is carried out by means of self-tapping screws.
To ensure the removal of precipitation, holes are made in certain places of the gutter, necessary for the installation of funnels. After that, sewer pipes are connected to the installed cone-shaped devices, that is, they are integrated into the overall system.
When the roof has a large overhang, a curved cylindrical product is used, which is possible with the help of additional elements in the form of knees and special rings. The downpipe is mounted on the wall of the house with clamps.
The result of such an assembly is the creation of a system of the required configuration. For self-arrangement of storm water, you will need a plan of the house with its exact dimensions. This will allow you to understand what elements will need to be purchased for the future design, as well as determine their number.
Advantages of plastic pipes
Laying tubular drainage is based on three pillars: the strength of the material from which the pipes are made; laying depth and interaction with the aggressive environment of groundwater. Plastic perforated pipes will cope with these tasks perfectly. Their advantages are that they:
- are highly durable;
- not subject to corrosion;
- sediment does not linger on smooth inner walls;
- the presence of filters prevents their clogging from the outside;
- light weight facilitates installation, you can do it yourself;
- prolonged period of use;
- low price with good quality.
How to lay drainage from plastic bottles
It is easy to assemble such a drain with your own hands. There are two ways: grid, natural outlet. The first method is suitable for small areas with low humidity. Installation is done like this: cut off the bottom of the bottle, tightly insert the neck of the next one into it. You can assemble the mechanism directly in the trench, which greatly simplifies the work. Be sure to carefully fill the bottles with sand, and then cover with a layer of earth and turf so that the drainage does not freeze.
With the second method, there is no need to cut the bottles. They are tightly closed with lids and stacked sequentially. Then everything is repeated, as in the first method.
How to make a gutter, a drain with your own hands
bend metal
The most difficult thing is to bend metal (iron) without a special device (clamp, gnushka). But, you can make and bend a gutter with your own hands, a drain. Be smart, stand with your feet on the corner or weld the device yourself. There will be no such possibility, find a construction company, a roofing team, where there is a tinsmith. Give me your dimensions, bring iron and everything will be done for you.
Choose your iron. The most average iron thickness is 0.5 - 0.7 mm, no thicker is needed, extra weight for the roof.
The length of the roof is different. When marking the gutter, fold the iron blanks (sheets) into an overlap, on top of each other, 50 mm is enough. When laying iron on top of each other, the length changes, it becomes smaller, do not forget to take this into account. Apply iron as water flows from one to another. When you bend the gutters, the gutters will more accurately fall into each other. If the length of the roof is large, do not forget to number the workpiece (sheet).
Marking is marked in blue. Shown here is an approximate size ratio in mm (millimeters). You can have your own, if you like.
Attention! A gutter or drain can be made without a slope at your discretion
Holder
Making a bracket or holder for gutters, make gutters from a strip, stronger and more reliable.You will attach to the crate, do not forget to set the holders with a slope.
paper sketch
Make a sketch in a reduced form, from paper, before starting work. There will be less time spent in the future. Measure and compare all the work, because paper will endure everything.
Remember it's better to ruin paper than metal.
 The drainage system involves the collection and removal of precipitation, as well as melt water, but the possibilities of such systems do not end there, since they can be used to direct the liquid directly into the storm sewer. As a result, atmospheric precipitation does not fall on the walls, while ensuring the safety of the blind area. In addition, the accumulation of water near the foundation and in basements is excluded, which guarantees an extension of the life of the building.
In this article, we will look at some types of rain sewers, and also learn how to make them yourself.
The simplest drainage on the site
With your own hands, you can equip surface drainage. Making it simple:
- we dig a trench 50 cm wide, 60 - 70 cm deep;
- we make the walls of the structure at an angle;
- we line them up according to the pattern of rainwater runoff;
- water from the trench is collected in a special sump or in an artificial reservoir.
Trenches can be ennobled by laying them out with beautiful pebbles. The number of ditches is calculated as follows: 1 m of drain per 10-20 m2 of allotment area. The order of the drains is as follows: first, the main one is laid, then the secondary ones are brought to it at an angle. The distance between the secondary ones is determined, depending on the quality of the soil. For clay and loamy - 4-12 m; for sandy - 20-30 m.
Many site owners face a high level of groundwater in the garden. This creates corresponding difficulties in growing most crops, both vegetable and ornamental.
When we bought our garden plot (in the Leningrad region, near the Beloostrov station), it looked like a swamp with a large puddle in the middle.
It became clear that in the garden it was necessary to ensure that excess water drained into the side drainage ditches that led to the main wide gutter.
The result of our work on the drainage system in the garden was not long in coming. After the first heavy rain, the garden soil quickly dried out, which made us very happy!
A huge difference became visible between the state of the soil surface in the garden “before” and “after” the drainage device, especially with an abundance of precipitation during the garden season.
And in the process of snow melting in spring, melt water is now quickly discharged through the drainage system into the main and boundary ditches.
Our drainage system has been tested for years, 5 years have passed since its installation.
During its creation, the surface of the soil in the garden was leveled. There was an opportunity to beautifully equip the site and grow any plants here.
In the photo in the article: the soil of our site in May and July last year (2010).
In the spring, our site dries out quickly, since all the water (melt, ground and rain) successfully flows into the ditches.
My husband Alexander and I are satisfied with the results of our work and we advise you to follow our example if you have a similar problem in the garden with the removal of excess water. With such a drainage system, your garden will become more suitable for plant life.
It's also important for your own enjoyment.
I wish all gardeners success, strength and desire to make their garden even more convenient and attractive!
Nadezhda Semyonovna Dunaeva (St. Petersburg)
To site to site
site
Weekly Free Website Digest website
Every week, for 10 years, for our 100,000 subscribers, an excellent selection of relevant materials about flowers and gardens, as well as other useful information.
Subscribe and receive!
Video arrangement of drainage from plastic bottles
If the site requires the arrangement of a drainage system, but there is no money to purchase materials, you can try an alternative option - to equip the drainage of the site with improvised means.
The problem of flooding the territory during the period of snowmelt or heavy precipitation is familiar to many. If it is not resolved in a timely manner, there is a risk of facing very unpleasant consequences.The fact is that moisture undermines the foundation of the house and outbuildings, adversely affects the root systems of plants and urban crops.
Polyethylene film drainage
If you are wondering what material can be used for drainage, the answer is unequivocal - one that allows the passage of water. Most often, the following available materials are used to create a drainage system:
- plastic bottles;
- Styrofoam;
- branches;
- fascines;
- car wheel;
- construction garbage;
- stones;
- old things.
How and from what to make cheap drainage

Many summer residents are thinking about how to make drainage when faced with the high cost of modern materials. The question is correct, which means that, first of all, you can buy affordable surface drainage from us, in the company of the manufacturer Kamp. It is also possible to use materials that simply lie underfoot. And they are waiting for drainage to be made of them. In this article, we will consider modern kamp-eu drainage systems, which are not expensive and can drain up to 5 l / s and withstand loads up to 25 tons. And also what materials the drainage system can be made of, practically for nothing. Using only their own labor.
The use of plastic bottles for arranging the drainage system.
For arranging pits and ditches for drainage, a variety of objects themselves are useful, often mistaken for garbage, but can find their new life in drainage systems.
For instance:
- old used tires
- plastic bottles
- branches
- stone, rubble
- broken brick
- fragments of construction waste left after construction (or repair)
The main rules that a person should be guided by when considering a drainage system project are the correct configuration of the drainage, and its throughput.
Is it possible to build a drain from used plastic bottles?
- It is necessary to determine the lowest places on the site.
- It is impossible to make water flow upwards without the use of energy. Let it flow to the bottom, we will help her.
- Ideal drainage has the structure of a river. Actually the main channel, and streams flow into it. It would be nice to have the same in our area.
- Marking on the ground. You can lay out rubble, pull the ropes. And even then you can start digging the ground. If grass is planted, use PET film so as not to litter. Or collect used stretch film from large supermarkets.
The sequence of work on the arrangement of a plastic drainage system is as follows:
- PET with closed plugs is placed on the bottom.
- PET must be laid out on the ground in such a way that it is buried at half its depth.
- A layer of drainage is laid on top of the earth layer.
- They tamp with their feet, or with a tamping machine.
- Fall asleep a layer of soil
The plastic drainage is made by this method, oddly enough, and durable. PET bottles take centuries to decompose, so this system will last for years. And from above, the earth can be used, built or planted whatever.
Proven ways to finish the drainage system.
Once again, we will raise the question of what else can be used to equip drainage. Plastic bottles are not the only material that comes in handy in this situation.
There is a very large number of materials that can replace crushed stone when arranging installation. You can use for example a stone.
We need crushed stone, large.
We put a large one on the bottom, and we put the walls of the trench with a small one (depth 1m.)
The use of modern geofabrics. When using modern fabric materials, you can independently make soft drainage. The basis of its design is based on special membrane properties and Tecton, which is able to pass moisture only in one direction, and does not allow it to go outside. It will also be necessary geotextile, which will form a filter layer, does not allow debris, silt and soil to pass into the drainage system.
Such drainage is arranged as follows:
- A drainage ditch is dug with a slope to the side, into which water is drained.
- A geofabric is laid at the bottom, which is laid with the letter U.
- From above, the geotextile is enclosed in a geotextile fabric with a spade on the edges of the pit, up to 40 cm from all sides.
- The fabric is then covered with gravel.
- Crushed stone is wrapped with geotextile.
- The drainage pit is filled with sand.
www.kamp-eu.com
Dehumidification using modern textile materials
Production of soft drainage from technological fabric materials. The modern design of the tecton is based on membrane properties, the essence is that moisture is allowed to pass only in one direction, moisture does not pass in the opposite direction.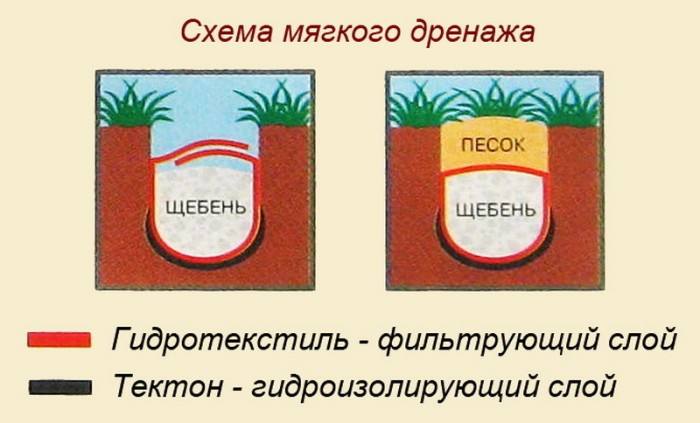
For implementation, geotextiles will be required. It forms a filtration layer that will not allow debris, soil and silt to enter the ebb system. Such a drainage system is performed as follows:
- A ditch is dug, the slope of which coincides with the direction of water drainage.
- It is necessary to lay a tecton on the bottom, so that a U-shaped view is formed when viewed from across.
- Next is a layer of geotextile with a gap of 40 cm along both edges.
- Matter is filled with small stone or rubble.
- The edges of the geotextile are wrapped.
- The entire structure of soft drainage is covered with sand.
The article discusses various methods of drainage with your own hands, you are left to choose the appropriate method of drainage system yourself.
If the site requires the arrangement of a drainage system, but there is no money to purchase materials, you can try an alternative option - to equip the drainage of the site with improvised means.
The problem of flooding the territory during the period of snowmelt or heavy precipitation is familiar to many. If it is not resolved in a timely manner, there is a risk of facing very unpleasant consequences. The fact is that moisture undermines the foundation of the house and outbuildings, adversely affects the root systems of plants and urban crops.
Polyethylene film drainage
If you are wondering what material can be used for drainage, the answer is unequivocal - one that allows the passage of water. Most often, the following available materials are used to create a drainage system:
- plastic bottles;
- Styrofoam;
- branches;
- fascines;
- car wheel;
- construction garbage;
- stones;
- old things.
Kinds
Drainage systems may differ in the method of installation and the material used. In the first case, the water drainage facility is classified as home-made and industrial, and in the second - as plastic and metal.
Homemade drain
An independent solution to the issue of arranging rainwater drainage has certain advantages. Such a system can turn out not only beautiful, but also original. You can realize almost any fantasy in terms of creating a structure to protect your home from water. In this case, it is worth considering some nuances.
A home-made system requires significant costs and regular maintenance, since its arrangement is usually carried out using galvanizing, which quickly begins to rot
In addition, it is necessary to take into account the certain complexity of joining some elements.
We tried to take into account the frequent mistakes of the masters and below are the installation rules.
Factory drain
Buying a factory rainwater system will save you from many problems of non-compliance with standards and parameters. When purchasing certain elements of the gutter from one manufacturer, you do not have to worry that they will not fit each other, since the factory is distinguished by the release of standardized products.
Plastic drain
Plastic-based systems are glued, which involves the installation of storm sewers with glue, and glueless, assembled using rubber seals. Regardless of the choice of installation method, plastic gutters have the following advantages:
- resistance to ultraviolet radiation;
- no corrosion;
- strength;
- light weight;
- wide operating temperature range - from -40 °C to +70 °C;
- the possibility of creating a drain of any configuration, which is due to a rich assortment of components;
- lack of need for regular care;
- ease of installation;
- variety of color solutions.
However, plastic also has a number of disadvantages, including the following:
- poor resistance to mechanical stress, which excludes the possibility of installing a plastic structure on high-rise buildings;
- regular replacement of rubber seals, which can be carried out exclusively by disassembling the problem area and reassembling after the malfunction has been eliminated;
- the inability to restore one or another destroyed tool, which characterizes such systems as insufficiently repairable;
- significant linear expansion of plastic elements.
metal drain
Storm sewers made of metal differ from each other in that they can be galvanized, copper and with a zinc layer supplemented with a polymer coating. The choice of a particular type of design is based on characteristics such as price and service life. In any case, metal gutters are good because they:
- durable;
- reliable;
- resistant to environmental influences, for example, loads caused by the accumulation of a large amount of snow;
- are not affected by high temperatures, the source of which may be combustion;
- retain their dimensions during operation;
- are able to ensure their functionality at temperatures from -60 °C to +130 °C.
The disadvantages of such systems include:
- significant weight of the gutter structure as a whole;
- a small number of components, which makes it difficult to install such systems on roofs that have angles other than 90 degrees;
- installation complexity;
- high price;
- a small selection of colors;
- susceptibility to corrosion (except for copper systems);
It is quite difficult to determine which drain is better, since a lot depends on various factors, for example, operating conditions. At the same time, it is necessary to understand that it is not the cost of the structure that is of primary importance, but its compliance with the quality parameters.
Which pipe to choose
In order for the drainage system to serve for a long time, and to solve the problem effectively, it is necessary to find out what kind of soil prevails on the site: sandy, clay, crushed stone, loamy (mixed). Having decided on the soil, you can choose pipes.
For sandy soil, drainage should be done with pipes equipped with a non-woven fabric filter. For crushed stone, a filter is not needed. If the soil is clayey, you can do without a filter, but you need to sprinkle crushed stone around the pipe. Pipes equipped with geotextile filters are suitable for loam.
When laying drainage, structures made of various materials are used. These are plastic, asbestos cement, ceramics and pottery analogues. But now preference is given to plastic counterparts from a variety of derivatives:
- low pressure polyethylene (HDPE);
- polypropylene (PP);
- polyvinyl chloride (PVC);
- high density polyethylene (HDPE).
Depending on the amount of groundwater, the diameter of the pipes is determined.