Radiator connection diagrams
How well the radiators will heat up depends on how the coolant is supplied to them. There are more and less effective options.
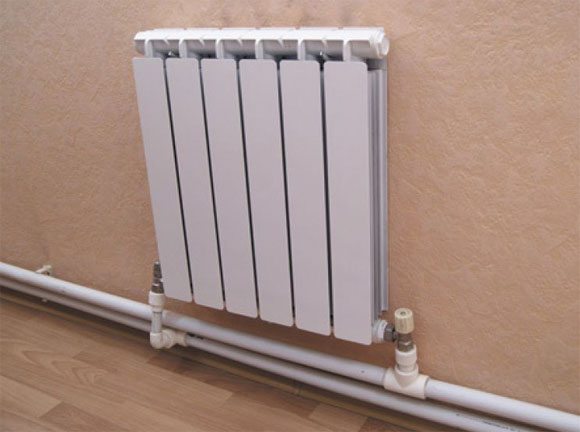
Radiators with bottom connection
All heating radiators have two types of connection - side and bottom. There can be no discrepancies with the lower connection. There are only two pipes - inlet and outlet. Accordingly, on the one hand, a coolant is supplied to the radiator, on the other hand it is discharged.
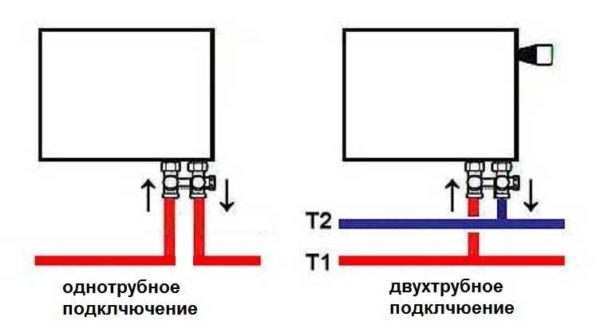
Lower connection of heating radiators with one-pipe and two-pipe heating systems
Specifically, where to connect the supply, and where the return is written in the installation instructions, which must be available.
Radiators with side connection
With a lateral connection, there are much more options: here the supply and return pipelines can be connected to two pipes, respectively, there are four options.
Option number 1. Diagonal connection
Such a connection of heating radiators is considered the most effective, it is taken as a standard, and this is how manufacturers test their heaters and the data in the passport for thermal power - for such an eyeliner. All other connection types are less efficient at dissipating heat.
Diagonal connection diagram for heating radiators with a two-pipe and one-pipe system
This is because when the batteries are connected diagonally, the hot coolant is supplied to the upper inlet on one side, passes through the entire radiator and exits from the opposite, lower side.
Option number 2. Unilateral
As the name implies, pipelines are connected on one side - supply from above, return - from below. This option is convenient when the riser passes to the side of the heater, which is often the case in apartments, because this type of connection usually prevails. When the coolant is supplied from below, such a scheme is used infrequently - it is not very convenient to arrange pipes.

Lateral connection for two-pipe and one-pipe systems
With this connection of radiators, the heating efficiency is only slightly lower - by 2%. But this is only if there are few sections in the radiators - no more than 10. With a longer battery, its farthest edge will not heat up well or even remain cold. In panel radiators, to solve the problem, flow extensions are installed - tubes that bring the coolant a little further than the middle. The same devices can be installed in aluminum or bimetallic radiators, while improving heat transfer.
Option number 3. Bottom or saddle connection
Of all the options, the saddle connection of heating radiators is the most inefficient. Losses are approximately 12-14%. But this option is the most inconspicuous - the pipes are usually laid on the floor or under it, and this method is the most optimal in terms of aesthetics. And so that the losses do not affect the temperature in the room, you can take a radiator a little more powerful than required.
Saddle connection of heating radiators
In systems with natural circulation, this type of connection should not be done, but if there is a pump, it works well. In some cases, even worse than the side. Just at some speed of movement of the coolant, vortex flows arise, the entire surface heats up, and heat transfer increases. These phenomena have not yet been fully studied, therefore it is still impossible to predict the behavior of the coolant.
How to connect a heating radiator with a polypropylene pipe
Connecting a radiator to polypropylene pipes is a process consisting of several stages:
- Drafting, marking.
- Fastening batteries to the walls using brackets.
- Installation of pipes, connection of individual parts.
- Pipeline testing.
There are several ways to connect the battery to the pipes:
- Bottom connection. The tubes are connected on both sides of the radiator at the bottom. Suitable for installation of a single-circuit pipeline horizontally.
- Side connection. On one side of the battery there are two holes for the fluid supply, the withdrawal of mining.
- diagonal connection. The classic option for connecting radiators to pipes. The openings for the supply and output of the coolant are located on both sides in the lower and upper parts.
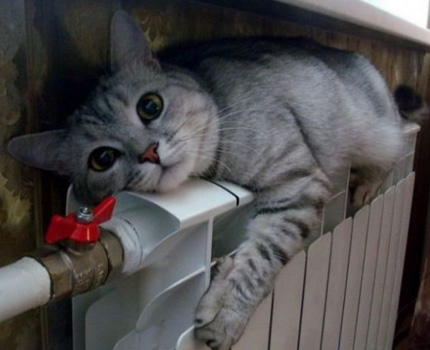
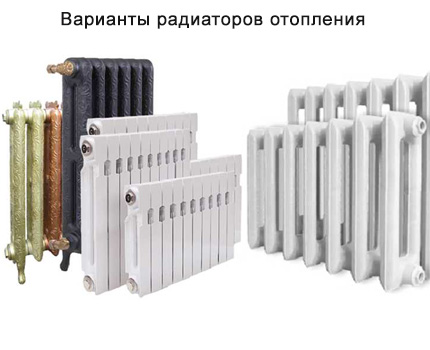
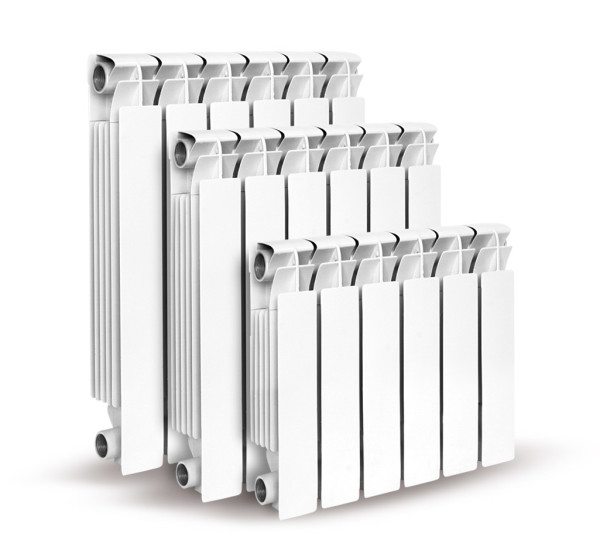
Types of radiators
Radiators for the manufacture of heating pipelines are popularly called batteries. New models are made of different metals, which are superior in terms of technical characteristics and aesthetics to cast iron products. Types of radiators:
- Aluminum - efficient batteries that are installed in new multi-storey buildings. They quickly fail if the coolant contains alkalis, acids.
- Steel - are sectional, tubular. The level of heat transfer does not depend on the shape of the battery.
- Bimetallic - the most effective in space heating. Made from a mixture of aluminum and steel.
Any of the presented types is relevant when assembling a heating circuit with polypropylene pipes.
Classification of heating systems
The main criterion for separating heating systems is the number of circuits. On this basis, all heating systems are divided into two groups:
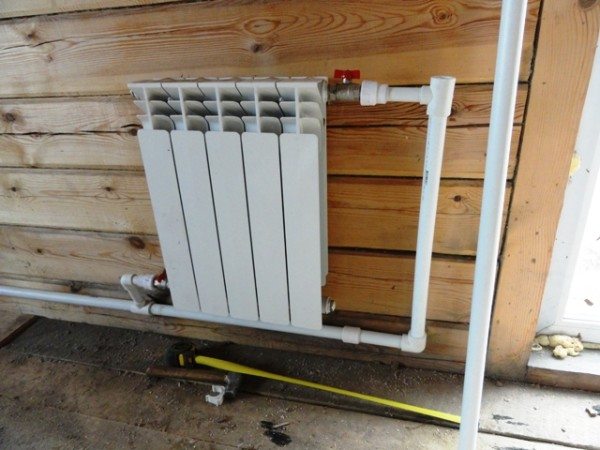
The first option is the simplest and cheapest. This is, in fact, a ring from the boiler to the boiler, where heating radiators are installed in between. If it comes to a one-story building, then this is a justified option in which you can use the natural circulation of the coolant. But in order for the temperature to be uniform in all rooms of the house, some measures must be taken. For example, to build up sections on the extreme radiators in the circuit.
The best option for such a pipe scheme is to connect the battery using the Leningradka method. In fact, it turns out that an ordinary pipe runs through all the rooms near the floor, and radiator batteries crash into it. In this case, the so-called bottom tie-in is used. That is, the radiator is connected to the pipe through two lower pipes - it enters one coolant and exits the other.
Attention! Heat loss with this type of battery connection is 12–13%. This is the highest level of heat loss
So before making such a decision, weigh the pros and cons. Initial savings can turn into big costs during operation.
In general, this is a good connection scheme that justifies itself in small buildings. And in order to evenly distribute the coolant over all radiators, you can install a circulation pump in it. The investment is inexpensive, and the device works perfectly and requires little power consumption. But the uniform distribution of heat in all rooms is ensured.
By the way, a single-pipe piping scheme is very often used in city apartments. True, the lower battery connection can no longer be used here. The same should be said about the two-pipe system.
What can be the binding
The main stage of the installation of the heating system in the house is the binding of the heating radiator with polypropylene. During this process, you need to install parts that allow you to adjust the heat transfer.
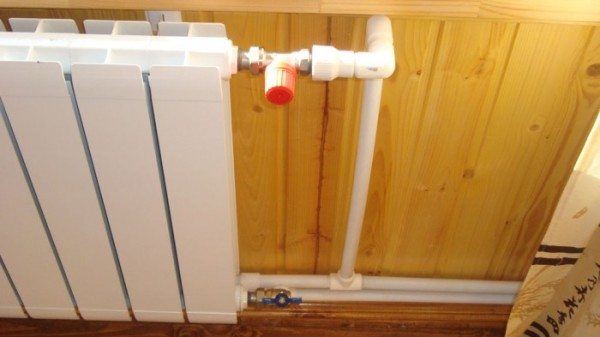
Shut-off valves
There are several types of valves that are suitable for piping heating radiators:
- Throttles with the possibility of thermal control. To adjust the heat transfer, you need to set the parameters. After that, the mechanism will work automatically. Regardless of what temperature changes will occur outside, the same temperature regime will be maintained indoors. Throttle - a valve designed for manual adjustment of heat transfer.The temperature begins to change two hours after changing the position of the valve.
- Valves - a part that is installed in front of the battery. Designed to shut off the coolant supply.
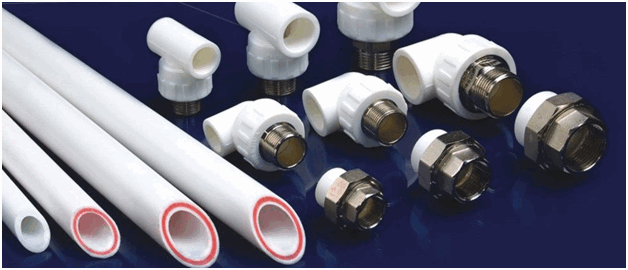
Fitting
To connect the battery to the pipeline, you need to use fittings:
- American couplings, with the help of which shutoff valves are connected. With a union nut, the heat exchanger can be quickly dismantled.
- Triple couplings - suitable for connecting pipes for supplying heat transfer fluids simultaneously with control valves.
- Tees that have vias.
The choice of connecting part depends on the complexity of the water supply.
Tools
To assemble a polypropylene heating system, you will need a set of tools:
- special soldering iron for welding plastic;
- a tool for removing the reinforcing layer from the tubes - a shaver;
- wrench with hooks for installation of valves;
- scissors for cutting polypropylene.
Additionally, you will need measuring, marking tools.
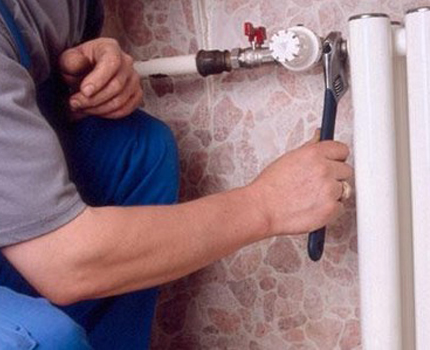
Stages of connecting heating radiators
Installation of radiators with polypropylene pipes is carried out in several stages:
- Marking the laying of tubes, battery installation sites.
- Fixing heat exchangers to the wall. For small models, two brackets are enough, for large ones, one per section.
- Installation of shutoff valves.
- Pipe connection.
- Installation of jumpers, compensators.
The last step is to connect the pipeline to the battery. To make the joints more airtight, you can use sealants that are resistant to prolonged exposure to high temperatures.
To heat the premises in an apartment, a private house, it is necessary to install radiators in each room. For their operation, it is necessary to correctly connect the heat exchangers to the heating pipeline.
What you need for efficient battery life
An efficient heating system can save you money on fuel bills. Therefore, when designing it, decisions should be made carefully. Indeed, sometimes the advice of a neighbor in the country or a friend who recommends such a system as his is not at all suitable.
Sometimes there is no time to deal with these issues. In this case, it is better to turn to professionals who have been working in this field for more than 5 years and have grateful reviews.
Proper connection is guaranteed to ensure comfortable living in the house of all family members. After all, when choosing a scheme, you need to take into account a number of features of your home
Having decided to deal with the connection of heating radiators on your own, you need to take into account that the following indicators have a direct impact on their effectiveness:
- size and thermal power of heating devices;
- their location in the room;
- connection method.
The choice of heating appliances strikes the imagination of an inexperienced consumer. Among the offers are wall radiators made of various materials, floor and baseboard convectors. All of them have a different shape, size, level of heat transfer, type of connection. These characteristics must be taken into account when installing heating devices in the system.
Among the models of heating devices on the market, it is better to choose, focusing on the material and heat output indicated by the manufacturer
For each room, the number of radiators and their size will be different. It all depends on the area of the room, the level of insulation of the external walls of the building, the connection scheme, the heat output indicated by the manufacturer in the product passport.
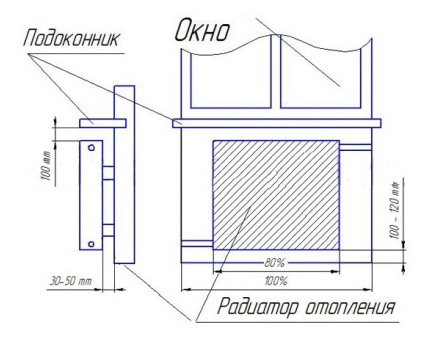
Battery locations - under the window, between windows located at a fairly long distance from each other, along a blank wall or in the corner of a room, in the hallway, pantry, bathroom, in the entrances of apartment buildings.
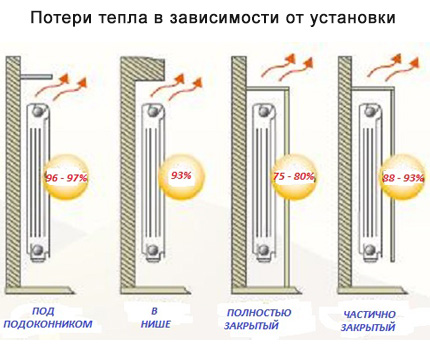
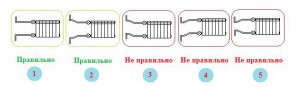
Depending on the place and method of installation of the heater, there will be different heat losses. The most unfortunate option - the radiator is completely closed by the screen
It is recommended to install a heat-reflecting screen between the wall and the heater. It can be made with your own hands, using for this one of the materials that reflect heat - penofol, isospan or another foil analogue. Also, you should follow these basic rules for installing the battery under the window:
- all radiators in one room are located on the same level;
- convector ribs in a vertical position;
- the center of the heating equipment coincides with the center of the window or is 2 cm to the right (to the left);
- the length of the battery is at least 75% of the length of the window itself;
- the distance to the window sill is at least 5 cm, to the floor - not less than 6 cm. The optimal distance is 10-12 cm.
The level of heat transfer from appliances and heat loss depends on the correct connection of radiators to the heating system in the house.
Having observed the basic norms for the placement of radiators, it is possible to prevent the penetration of cold into the room through the window as much as possible.
It happens that the owner of the dwelling is guided by the advice of a friend, but the result is not at all what was expected. Everything is done like his, but the batteries do not want to heat up. This means that the chosen connection scheme did not fit specifically for this house, the area of \u200b\u200bthe premises, the thermal power of the heating devices were not taken into account, or annoying errors were made during installation.
We connect the heating radiator to polypropylene pipes
In the private sector, in the houses of the old housing stock and in new buildings, work is currently underway to re-equip heating systems. Old heating equipment, steel and cast iron radiators are replaced with new appliances. Modern industry produces bimetallic, steel heating devices with improved parameters and characteristics. Accordingly, in parallel, the old steel pipelines through which the coolant circulates are replaced with new consumables. Today, polypropylene pipes take the first positions in the creation of a heating circuit.
Accordingly, in view of such a large-scale modernization of heating systems, reasonable questions arise. How is the distribution of the water circuit made of polypropylene at home carried out? How does the connection of a heating system radiator to polypropylene reinforced pipes look like? We will understand in detail and consider what constitutes the connection of polypropylene consumables to heating sources in detail.
Is it worth it to use a single-pipe heating system
When laying pipes, a 2-pipe heating system is often used. Schematically, it can be represented in the form of 2 circuits, one is responsible for supplying hot water to the radiators, and the second for removing the cooled coolant and supplying it to the boiler. This approach allows you to organize the circulation of water of the same temperature in all batteries.
A significant disadvantage of this method of organizing heating is the financial cost of pipes (the price of such a heating device will be about 1.5-2 times more than a single-pipe one), and the labor intensity increases. In addition, pipes will be more difficult to disguise.
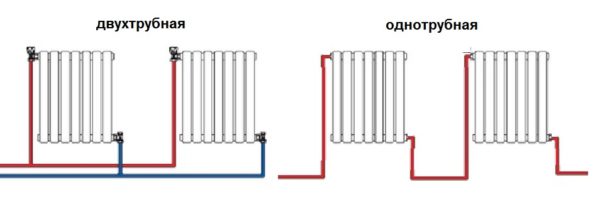
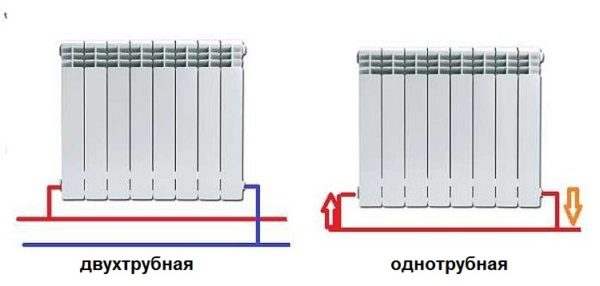
The single-pipe scheme does not imply the presence of a separate riser for the removal of the cooled coolant, that is, the pipes will need about half as much. Schematically, it can be represented as a closed circuit, and the connection of radiators with a single-pipe heating system is made in series.
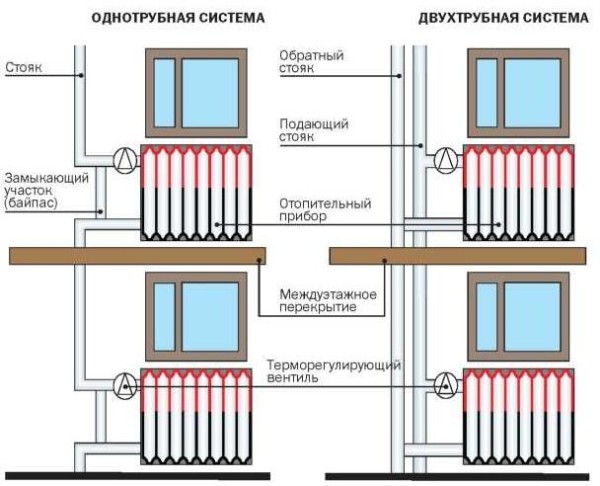
Comparison of one- and two-pipe heating systems
Such a system began to be massively applied during the construction boom back in the USSR, at the same time its significant shortcomings were discovered:
the main thing can be considered that the last batteries in the circuit receive a coolant with a temperature of about 30-50% lower than those closest to the boiler, this leads to the fact that the rooms are heated extremely unevenly;
Note! This shortcoming can be easily solved by increasing the number of sections of the last radiators. But when building a large number of objects, this will lead to an increase in calculations, which is not very convenient.
- you will need a fairly powerful pump, it will not work to organize the movement of the coolant by gravity;
- it is characterized by large heat losses;
- the start-up of the system takes longer than in the case of a two-pipe system;
- when doing work with your own hands, the risk of air pockets during operation is especially high. It's just that quite often it is not possible to maintain the necessary slopes along the entire length of the pipes.
The listed list of disadvantages is typical for a conventional single-pipe heating system. Today, most of these shortcomings are successfully eliminated by installing simple devices. For example, it is already possible to regulate the temperature in individual batteries, and the installation of balancing valves will make it possible to achieve almost the same operating conditions for all batteries in the circuit.
Given the significant savings on materials, such a scheme of the heating system definitely deserves attention.
Video on connection diagrams for heating batteries
A video about the difference between natural and forced circulation of the coolant in the heating system:
A video that clearly demonstrates the differences between different schemes of the heating system:
Scheme of effective connection of heating batteries in a two-pipe system:
The heating efficiency directly depends on the choice of the battery connection scheme for your home. With the right option, heat loss is minimized. This allows you to get the maximum effect with the least use of fuel. Battery installation can be done by hand
It is important to take into account the features of your home so that cold batteries do not interfere with a comfortable life in a cozy home.
Please tell me what to do if my radiator pipes directly “stick” to the wall of the house, is this a minus? For example, when I was already doing puttying myself at home, I noticed that it was not convenient, since I could not properly straighten the walls. And is it worth replacing old Soviet cast-iron radiators with new, but more beautiful steel or cast-iron appliances?
Free consultations of a technological network engineer Ask your question
Join the social networks
- Climate company
- Company "Vip Sphere"
Add company
Popular from this category
- How and how best to close the heating battery: options for masking radiators
- How to paint a heating battery: radiator painting technology
- Calculation of heating radiators: how to calculate the number and power of batteries
- How to choose an infrared carbon heater: an overview of the various designs
Visitors are now discussing
Cellar ventilation: technology for installing the right ventilation system Design and calculations
Rainwater harvesting system: how to arrange storage for water use in the house
SMS socket: how a gsm-controlled socket works and is installed Sockets and switches
Ejector for a pumping station: the principle of operation and installation rules
We connect heating radiators correctly
Regardless of the type of radiators chosen and the connection scheme suitable for them, it is important to calculate and install everything correctly. In each case, the optimal system will be
For expensive houses of a large area, it is advisable to contact specialists who can offer the best project. It's not the kind of thing to skimp on
In each specific case, its own system will be optimal. For expensive houses of a large area, it is advisable to contact specialists who can offer the best project. This is not an issue to skimp on.

In order to properly install and connect heating devices in a complex design scheme, it is better to use the services of professionals
For small residential houses, you can independently choose the appropriate scheme and install heating devices. Be sure to take into account the features of your home, the rules for installing batteries and the feasibility of using a particular scheme.
When installing radiators, one should not forget that the type of material for the battery itself and pipes must be the same. Plastic pipes connected to cast iron heaters will bring many problems, ruining the heating system.
Being engaged in self-assembly of heating batteries, one should not forget to install ball valves to bleed air and an inlet regulator
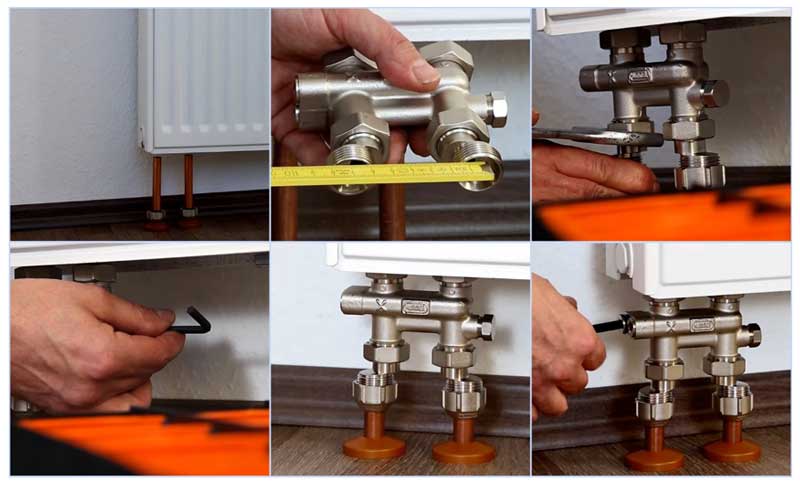
Installation of radiators with bottom connection
Attaching the nodes of the panel heater is carried out with the simplest tool in the form of a wrench, if adjustment is made, a hexagon or a flat screwdriver is used. Since all branch pipes are equipped with sealed fluoroplastic or rubber seals, the use of threads, tow and other waterproofing materials is not required. When connecting from below to a common XLPE pipeline, proceed as follows:
-
- They put a Eurocone coupling with a union nut on the end pipe outlets, its difference from standard compression fittings lies in the fact that the polyethylene sheath is pressed to the inner fitting through the outer ring with a slot, and the connection to the binoculars branch pipe is made by one union nut. The cone at the end of the connector with a rubber gasket fits snugly and tightly into the reciprocal mounting hole when the nut is tightened.
- The H-shaped assembly is screwed to the bottom of the radiator with an American nut using ordinary and conical gaskets included in the installation kit of the thermostatic fitting, the radiator is installed on the floor or hung on the wall at the desired height.
- Attach the union nuts of the Eurocone coupling from the pipe ends to the inlet pipes of the lower connection fittings with a wrench.
When carrying out work, the main thing is not to pinch the connections with a wrench, which can cause an irreversible rupture of the gaskets and loss of tightness, it is better to tighten all the nuts manually with maximum effort, and after supplying water at the leaks, slightly tighten with an adjustable wrench.
Rice. 10 Example of mounting a radiator on bottom fittings (Hummel)
Although the heat is distributed evenly, this detail reduces the aesthetics of the look and one of the main advantages of the bottom eyeliner is lost. The use of built-in bypasses, temperature controllers, control and shut-off valves in the inlet fittings makes it possible to effectively use the lower inlet device in one-pipe and two-pipe heating systems.
Coolant circulation methods
As you know, water, and usually it is poured into the heating system, can circulate by force or naturally. The first option involves the use of a special water pump that pushes water through the system. Naturally, this element is included in the overall heating circuit. And it is installed in most cases either near the heating boiler, or is already its structural element.
The system with natural circulation is very relevant in places where there are frequent power outages. The circuit does not provide for a pump, and the heating boiler itself is non-volatile. Water moves through the system due to the fact that a cold coolant is displaced by a heated column of water. How the connection of radiators will be implemented under such circumstances depends on many factors, including the need to take into account the peculiarities of the passage of the heating main and its length.
 Any of the four connection methods can be implemented if there is a circulation pump in the heating system
So, let's look at these options in more detail.
Method number 1 - one-way connection
Such a battery connection involves the installation of a supply pipe (supply) and a discharge pipe (return) to the same section of the radiator:
Thus, uniform heating of all sections of each individual battery is ensured. A one-way heating system is a rational solution in one-story houses if it is planned to install radiators with a large number of sections (about 15). However, if the accordion has more sections, then there will be significant heat loss, which means it is worth considering another connection option.
Method number 2 - bottom and saddle connection
Actual in those systems where the heating pipeline is hidden under the floor. In this case, both the coolant inlet pipe and the outlet pipe are mounted to the lower branch pipes of the opposite sections. In such a connection of batteries, the “weak” point is low efficiency, since in percentage terms, heat loss can reach 15%. Logically, the radiators heat up unevenly in the upper part.
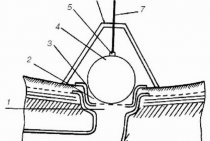
Method number 3 - cross (diagonal) connection
This option is designed to connect batteries with a large number of sections to the heating system. Due to the special design, the coolant is evenly distributed inside the radiator, which ensures maximum heat transfer.
 The direction of movement of the coolant when cross-connected (1-faucet Mayevsky; 2-plug; 3-heating radiator; 4-directed movement of the coolant)
The answer to the question of how to properly connect a heating battery in such a situation is extremely simple: the supply is from above, the return is from below, but from different sides. With a diagonal connection of radiators, heat loss does not exceed 2%.
We tried to reveal the topic of possible schemes for connecting heating radiators in as much detail as possible. We hope you will be able to evaluate all the pros and cons of each of the described options, and choose the most relevant in your particular case.
Types of strapping, or how to properly connect a heating battery
Providing a house or apartment with heat is the number one task in the cold season. Therefore, every inhabitant strives first of all to create an efficiently operating system, which would be economically justified. And since for the most part heating systems are of the radiator type, the question of how to properly connect heating batteries is one of the most relevant.
For many, this does not mean anything, especially for those who are faced with the problem of tying the heating system for the first time. But those who have already dealt with the creation of such schemes perfectly understand what is at stake.
There are not so many classifications of types of piping and wiring of the pipe system, especially when it comes to piping radiators. Therefore, it will not be very difficult to understand this issue. Most often, it is the piping that affects the nature of the connection of battery radiators. Therefore, it is necessary to consider the classification of various heating systems and determine which of them is best suited for one or another connection.
The choice of radiators
Paired with polypropylene, aluminum sectional radiators are traditionally used.
Aluminum radiators with different piping spacings.
What is the reason for such an unambiguous instruction?
What is worse than cast iron, steel or bimetallic products?
- The price of aluminum radiators is lower. than any analogues, except perhaps the registers made by hand from steel pipes.
- Due to the high thermal conductivity of aluminum, all the fins of the sections have the same temperature. which ensures maximum heat transfer with minimum dimensions of the heater.
- Overpaying for a bimetallic radiator with comparable thermal characteristics is meaningless. since the strength of any circuit is equal to the strength of its weakest link. In our case, polypropylene will be the weak link.
Connecting aluminum radiators with polypropylene pipes implies their complete set with shutoff valves. What and why?
The simplest and cheapest option is a pair of valves. Better - ball: unlike screw and cork, they are extremely reliable, always maintain tightness and do not require maintenance. The valves perform a single function - they allow, if necessary, to completely turn off the heater for repair or replacement.
The battery is equipped with a pair of ball valves.
An advanced option is to complete the battery with a choke or a pair of chokes.
What are they needed for?
- The throttle allows you to manually reduce the heat output of the device at a high temperature in the room.
- A pair of throttles are used in cases where a two-pipe system requires not only adjustment, but also balancing - flow restriction through radiators closest to the boiler or pump. For balancing, a choke is usually used on the return supply, to adjust the temperature in the room - on the supply.
Finally, the most convenient (but also the most expensive) option in terms of ease of use is to connect the radiator to a polypropylene pipe using a thermostatic valve and a thermal head.
The thermostat uses the thermal expansion of some media already familiar to us: when heated (and the linear dimensions of the bellows in the thermal head housing increase), it closes the valve, limiting the flow of coolant; when cool, the valve opens. This ensures a constant temperature in the room with any change in external conditions - the weather outside or the parameters of the coolant.
The thermostat must not be placed in an updraft of warm air from a radiator or plumbing.
Note: in a two-pipe heating system, the thermostat is often equipped with a balancing throttle on the second supply line.
In addition to shut-off and control valves, with a lower connection, the radiators are equipped with air vents - valves for bleeding air after the circuit is discharged.
Air vents can be:
- Mayevsky cranes. Their advantages are compactness and low cost.
- Ordinary valves or taps installed in the upper radiator plug. They are convenient with high throughput: air is bled through the valve much faster.
- Automatic air vents that remove air bubbles from the circuit without the participation of the owner.
What fittings and how to connect a heating radiator with a polypropylene pipe?
Insertion into horizontal filling is carried out through a socket tee with a diameter transition. A typical filling diameter in a circuit of reasonable length with forced circulation is 25 - 32 mm; the outer diameter of the connection to a separate heater is 20 mm.
The tie-in to the filling is made by socket welded tees.
- 1/2" weld socket adapters allow the connection of valves, throttles or thermostatic valves.
- To connect shutoff valves with radiator plugs, American women are used - quick-release fittings with union nuts and rubber gaskets. They allow you to reduce the time of dismantling the radiator to 30 - 45 seconds.

In the photo - a combined solution: a ball valve with an American.