Design features of the washer reservoir
A tank with water or "anti-freeze" is a white container installed in the engine compartment and designed to store washer fluid. At the same time, the tank itself is one of the elements of the windshield washer system.
In addition to it, the device includes the following components:
- Jets (nozzles) washer.
- A pressure pump that pumps liquid to the windshield from a container.
- Tubes between the jet and the motor (water or antifreeze is supplied through them).
- A special sensor that monitors the fluid level in the system and gives the appropriate signal to the driver.
- Mounting bracket, as well as the stopper of the tank.
- Special tee.
Toilet cistern, flush mechanism
Photo-8. Unscrew the nut of the intake valve float.
The inlet valve float is attached to the tank with a plastic nut and a rubber gasket. There is a special hole in the tank body for mounting this device.
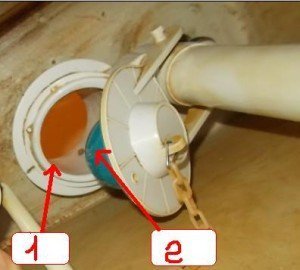
Photo-9. Unscrew the nut fastening the drain valve.
Just like the inlet valve float, the drain valve is attached to the tank with a plastic fastening nut. A special hole is provided in the tank body to install the drain valve.
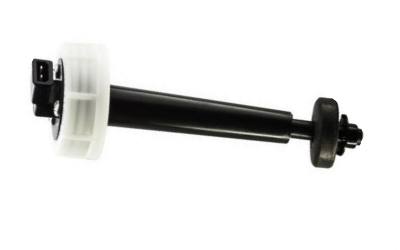
Photo-10. Inlet valve float.
 For this toilet model, the inlet valve float has the following form, and for fastening, as you already know, there is a hole in the bottom of the tank. The inlet valve float is responsible for the inlet of the water pressure in the tank and shuts off the pressure when the water in the tank has reached a certain level. Position The float can be adjusted for any required water level in the tank. To do this, the float (in photo-10, position 3) moves along the lifting arm of the lever (see photo-10, position 5) and is fixed at the required level using a metal device (see photo -10, position 4). The following positions are indicated on photo-10:
1-rubber gasket; 2-inlet valve body; 3-float; 4-float locking device; 5-lift lever arm; 6-pipe water supply to the tank.
Photo-11. Drain valve.
The drain valve is responsible for draining water from the tank when the shutter button is pressed. The device consists of:
1 flush lever or trigger buttons; 2-Overflow pipe; 3-pear; 4-lift chain of the flush lever.
Photo-12. Flush valve seat.
 The flush valve seat is hermetically sealed with a pear. Under the pressure of the water of the filling tank, the pear reliably closes the valve seat and prevents unauthorized drains of water from the tank into the toilet bowl. Photo-12 shows the following positions:
1-Water flush valve seat; 2-pear.
After I disassembled the entire toilet cistern and reassembled all its components in reverse order, the leak was fixed. It's just that the first time I installed the toilet, I did not correctly install the mounting bolt gasket. Therefore, when installing the toilet, take your time and install all the details of the cistern right.
Where is the washer fluid reservoir located?
Novice car owners often do not know where the washer reservoir is located. They often confuse it with a coolant or brake fluid container. In fact, finding the tank of interest is not difficult.
Suppose in VAZ cars it is located under the hood, on the left or right side of the engine, depending on the model, and there may also be two, on the rear and front windows. And on foreign cars, it can stand under the front bumper.
If the level of water or non-freezing liquid in the tank is insufficient, it is enough to top up. But what to do when the glass washer reservoir burst? In such a situation, the only salvation is the replacement of a failed device.
How to replace the washer reservoir:
Raise the hood and find the sensor that controls the washer fluid level (not available on all cars). Disconnect the connector that fits this device. Also, from the electric pump that pumps the washer fluid, disconnect the blocks with wires. At the same time, dismantle the wires from both pumps - for the windshield and for the rear.
Then dismantle the washer tank from the mount, and remove the tubes from the fittings of both pumps. Take the electric pumps out of the tank. To do this job, you will have to overcome a certain amount of force generated by the sealing sleeves.
Carefully pry off the mentioned bushing (you can use a flat screwdriver or something similar), and then remove it from the opening of the container. Evaluate the state of the sleeve for the fact of elasticity
If it is damaged, replace it.
Unscrew the plug and remove the sensor from the container that controls the level of washer fluid (unless, of course, your car has one). Check the performance of the sensor. To perform this task, connect a test lamp to its connectors, then power the device with 12 volts.
If the float is at the bottom (that is, it indicates the absence of liquid), the light should glow. Now raise the float up and control the behavior of the light bulb - there should be no glow. If the algorithm is not the same as described above, the sensor needs to be replaced.
This completes the removal of the washer reservoir. Next, you need to decide whether you will change the device or try to make repairs, that is, to seal it. The first option is more preferable. And the cost of the product is not so high as to save.
Now put the container back in place and follow the reverse order. If there are problems with the installation of electric motors, and they are difficult to get through the seals, use soap to lubricate the edges.
Once the tank and motors are mounted, return the nozzles of the jets to their place. To simplify the process of mounting the tube on an electric motor, heat the tip of the tube with a lighter, after which they are easy to put on. During installation, ensure that the motor is securely fixed.
Instructions for disassembling the tank
First you need to close the shut-off valve on the pipe that supplies water to the toilet. Attention! If the communications in your house are very old and have not changed for a long time, then you need to be careful with rusty valves: they are difficult to unscrew and you can make a flood. This is where a little help from a plumber may be needed.
Next, you need to drain the water from the tank. To do this, you need to carefully remove the lid of the toilet bowl, since ceramic is a fragile material, and lids are not sold separately. Toilet bowls with lateral water supply are easily disassembled (this, as a rule, applies to Soviet models of the toilet bowl). If your toilet lid is attached to the base of the tank, then you need to inspect the flush button and unscrew it, or pull out the button and unscrew the screw under it.
After we removed the cover, we inspect the internal mechanisms. There are two of them: this is a float mechanism with a filling valve, with the help of which the tank is filled with water to a certain level, and a drain mechanism that works to drain water when we press the button.
To remove the filling valve that fills the tank, use pliers or a wrench to unscrew the nuts on the hose that brings water to the tank body, and on the wall of the tank that holds the entire mechanism.
We remove the fittings for draining water. To do this, first of all, remove the tank attached to the base of the toilet with two bolts: plastic and iron. Plastic ones are unscrewed without much effort, while the latter can rust.If acetic acid or oil does not help to unscrew them (these are little tricks), then we resort to careful sawing with a hacksaw without damaging the base of the toilet bowl.
Then we disassemble the fittings for draining, attached with a plastic nut at the bottom of the tank. We unscrew the nut with one hand, hold the armature with the other. On the cisterns of modern toilet bowls, the valve rests on the o-ring, where there is a thread, so it can be easily unscrewed. There is no such weak link in the whole system as a cuff. The rest is practically the same.
Innovations in plumbing disassemble and repair the microlift
A modern modification of a conventional toilet lid, called a microlift, has its own features that are easy to appreciate as soon as you start using them. The main purpose of this design is the smooth raising and lowering of the lid, completely eliminating the possibility of sharp blows to the sanitary ware from which the toilet bowl is made. This will prevent its preliminary spoilage, which can significantly reduce costs from the family budget.
Design features and benefits
The principle of operation of a toilet bowl with a lid that has a built-in micro-elevator is akin to a conventional door closer, which is so familiar to most modern people. The microlift is usually already pre-installed in the lid, so it is hardly possible to purchase it separately. They make a microlift from durable plastic or its analogue, a material called duroplast. It is completely a polymer, although in appearance it can be confused with metal or even with ceramics, and in terms of properties it is closer to it.
Such a mechanism implies a rigid fixation to the toilet, but the designers did not forget about air cushioning either. On the lid there are necessarily compartments with shock-absorbing silicone.
- Polymeric sitting and cover for a toilet bowl.
- A special rod that fixes the lid on the toilet bowl.
- A metal or duraplast spring that regulates and balances the weight of the entire structure.
- Microlift, that is, a hinged mechanism, which ensures a smooth change in the positions of the cover.
You need to know that in more expensive designs, instead of rods and springs, pistons and cylinders of special design can be used in which they go. Such models are generally considered non-separable, they operate on the basis of pneumatics or hydraulics, and are only subject to replacement, not repair.
Just remove the toilet lid with microlift
Contrary to expectations, almost all toilet lids are equipped with conventional, standard fasteners, which makes it easy to remove them from their place and replace them. The design can be sky-high complex and even equipped with electronics, but the fasteners remain traditional.
- Raise the toilet lid as if you are going to use it. That is, the lid must be raised, while the toilet seat remains in place.
- On the left and right bottom of the bowl rim there are special fasteners, which can be plastic, metal or also duroplat. Unscrew the fastening nuts, first on one side, and then on the other side.
- Gently pull the toilet seat towards you to release the pins from the holes and remove the lid.
As you can see, removing the toilet lid with a microlift is not at all difficult, at least not more difficult than a regular one, so even a complete novice in plumbing can handle it. In the same way, but in reverse order, you can easily install a new toilet lid, with or without a closer.