How to install a corner acrylic bathtub
The corner installation differs from the usual one only in the dimensions of the bathroom and the frame. The installation itself is not much different from installing a conventional bath and does not take more time. The corner bath will be more rigid, as they always come with a screen.
The only difficulty will be the preliminary alignment of the corner in which it will be installed. If the angle is slightly more or less than 90 degrees, then the bathtub will not fit snugly against the wall, which means that the mounting strips will soon become unusable and the walls of the acrylic bathtub will be damaged.
So, putting up an acrylic bathroom with your own hands is not so difficult. Light weight and detailed instructions will allow you to assemble it without a master in just an hour.
Installing a bathtub on a homemade frame and bricks
The most famous method of attaching acrylic bathtubs is the combined method, when the installation is carried out on a metal frame made of aluminum profiles, and ordinary bricks are used to prevent the bottom from bending or deforming. In order to build such a structure, you will need:
- bricks that will support the bottom of the font;
- for the manufacture of the supporting structure, a metal or aluminum profile is required;
- in order to fix the brickwork, cement mortar is required;
- to seal the seams, it is recommended to use a sealant;
- self-tapping screws will help to assemble the frame;
- for stirring the cement mortar, use a special container and a trowel.
Worth remembering! When working with sharp and heavy objects, care should be taken, since an accidentally dropped tool can easily make a hole in the bathroom, thereby damaging the product. It is better to take precautions in advance by covering the font with thick paper or thick film
In order to properly install an acrylic bathtub on the wall, it is necessary to note what its future height will be, starting from which we will form the height of the brickwork. We measure from the floor to the indicated line, from the results obtained we subtract the height of the bath itself, and what happened will be the thickness of the brick lining on which the bath will be mounted.
It is recommended to start installing an acrylic bathtub against the wall by mounting a metal profile, which will subsequently serve as a support for the bathtub. Then, along the lower level of the edge of the edge of the bathtub, you need to install a metal profile around the entire perimeter with the help of dowels, where the bathtub will come into contact with the wall. It is on him that the sides of the bath will rest. Next, before installing the acrylic bath, we make a brick pillow along the bottom of the bath of the required height.
Need to know! Before fixing acrylic bathtubs in this way, everything must be calculated so that during installation it exactly lies with its sides on the previously installed profile, and the bottom slightly touches the brickwork along it. Attachment to the wall in this situation is done with the help of a sealant, which is applied to the profile, and at the same time is a sealant preventing the flow of water.
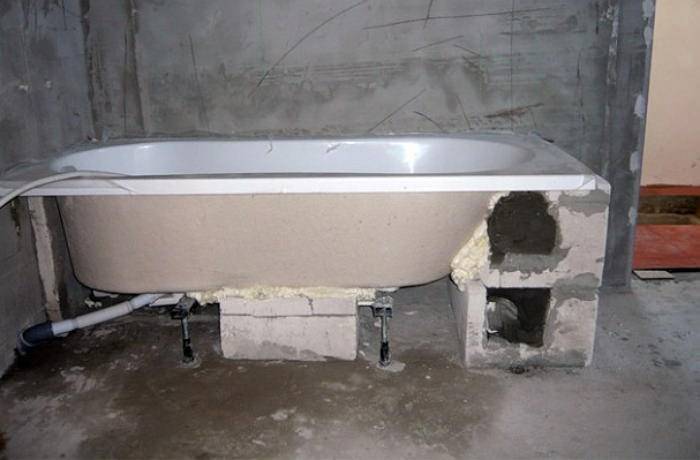
Thus, the manufacture of the frame can be considered complete, but it is possible to create a front protective screen from the same metal profile. This screen will make it possible to hide the inside and be able to provide additional protection for the outer side, as well as make it possible to make a special hatch for the repair and maintenance of the siphon. You have learned how to properly install an acrylic bath on a do-it-yourself frame.
How to assemble an acrylic bath frame
Mounting method on a brick podium
In the event that there are no metal supports for a certain model, the installation is done on a brick podium. According to experts, this method is in no way inferior in terms of reliability to the previous version, the only thing it differs in is that this method takes more time, while it is somewhat “dirtier” than the previous version. Installation of an acrylic bathtub on the podium is done using a saw, mounting foam, bricks, mortar and moisture-resistant plywood.
Installation is done following the following technology:
- The bath is temporarily placed in place, while the protective film should not be removed from it, after which the place where the drain hole will be located is marked. This operation is needed in order to leave a gap in the podium to connect the drain.
- Under the entire supporting part, with the help of a mortar, brickwork is made to such a height that the sides would be at a height of 60 cm relative to the floor level. You also need to consider that there will still be 2-3 cm of mounting foam between the masonry and the bathroom.
- Around the brick podium, a frame cut from moisture-resistant plywood is assembled. In this case, it should be borne in mind that the height of the plywood should be higher than the podium by the thickness of the foam layer.
- We evenly fill the brick podium with one layer of mounting foam, after which this layer is covered with a sheet of moisture-resistant plywood of the appropriate size.
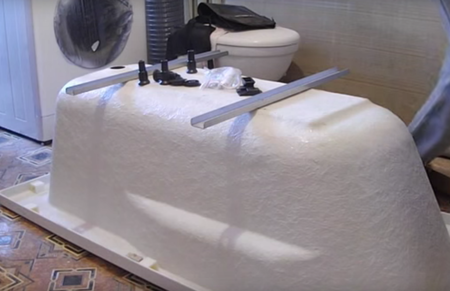
- The bathtub is turned over, mounted on the podium, after which, using the building level, they check how evenly the bathtub is placed.
- The bath is filled halfway, closing the drain, this is done to evenly solidify the foam. The period of foam drying is 12-24 hours.
- The bath is connected to a drain with overflow, mounted on a podium and attached to 3 walls with hooks and a metal corner.
Worth considering! Nowadays, acrylic baths have a sloping bottom, which accelerates the outflow of water into the drain, so during installation it is not necessary to install the bath on a slope.
Variety of shapes and options
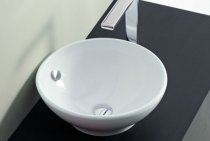
Acrylic bathtubs can be of different shapes: rectangular, round or oval, angular, asymmetric. A rectangular font will fit well into a small standard room. The container is equipped with a simple frame and one side panel. Options, for example, hydromassage, are very rare on such models, since it is difficult to install them on a bathtub with one approach, and in the future to maintain and carry out repairs.
Corner bowls are right-handed and left-handed. The approach side can be convex or concave, straight or rounded. This product option is suitable for equipping large and medium rooms.
Round and oval containers take up a lot of space. They are installed in spacious rooms, giving these luxury to the setting. Often these models are equipped with hydromassage.
An asymmetric bathtub is ideal for installation in a complex room, although it will require a considerable amount of space. Such products often have hydromassage equipment.
When buying an acrylic bath, you should pay attention to a large selection of options that will give you pleasure and increase the comfort of taking water procedures. However, the products will cost more and require additional maintenance.
Usually there are such functions:

Installation on a metal frame
A more reliable installation method is to install an acrylic bathtub with your own hands on a metal structure. The main thing is to follow the sequence of assembly of the product according to the instructions:
- First of all, you need to assemble the frame with self-tapping screws.
- Turn the tub upside down.
- Install the frame on an acrylic product, observing the distances relative to the center of the bottom. Attach the legs to the base.
- Fix two supports - in the central part of the frame and along the wall, and three racks - along the outer edge of the font.
- Then adjust the legs to a height of no more than 65 cm for convenient and safe use of the product.
- Then turn the tub upside down. Using the building level, check the correct position of the container.
- Connect siphon and overflow.
- For structural strength, the bath is fixed with hooks and metal corners.
- At the end of the work carried out, a decorative screen is mounted.
Product selection criteria
With a huge range of goods, it is sometimes difficult to choose any model. Following the recommendations, you can purchase a product of fairly high quality for the appropriate design and size of the bathroom:

It is necessary to check the strength of the frame under the bath. It is usually made by welding or assembled with bolts, has a rectangular shape, is installed under the bottom of the bowl and must withstand the weight of water and a person. The frame of a more complex structure of a non-standard shape has additional elements that give strength to the walls around the entire perimeter. The skeleton for an acrylic bath matches the shape of the product, but it should not be too complicated, as this indicates poor rigidity of the container.
How to install an acrylic bath on a brick base
If for some reason you did not have a metal frame and legs in the kit, or you are physically unable to use them, we will consider how to install an acrylic bathtub on a brick base.
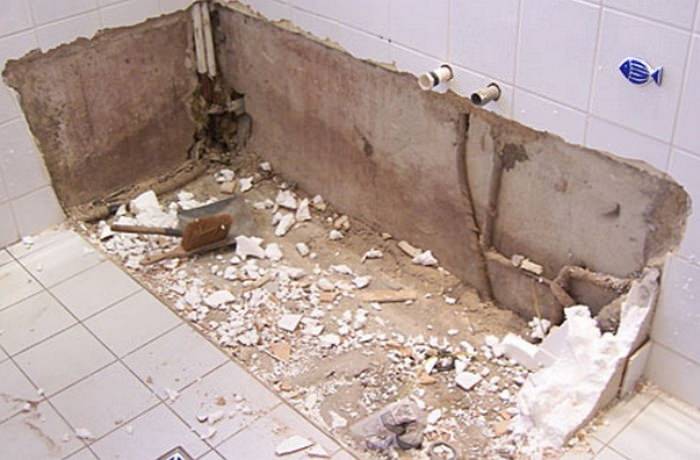
Before proceeding with the installation of an acrylic bath on a brick base, you should prepare the place for its installation. Dismantle the old bath and clear the place of debris.
Next, lay out the base in half a brick. We put a bathtub on top with the expectation that there is a gap of approximately 1 cm between the bottom of the font and the brickwork, which is then filled with mounting foam. This is necessary for a tighter fit of the bottom of the bathroom to the brick base.
You can install the bath on a brick base with or without mounting brackets. 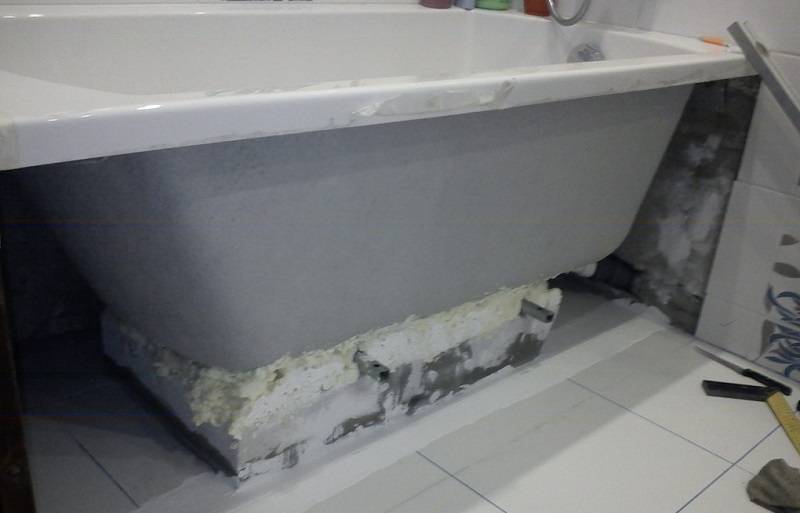
How to install a bathtub on brick supports
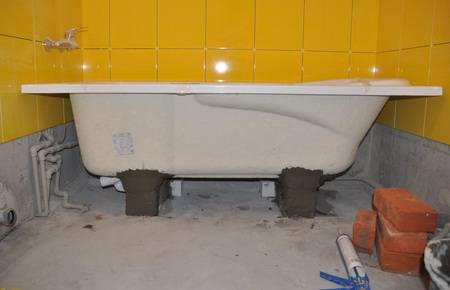
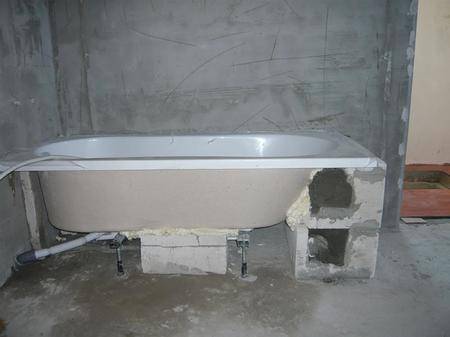
In the event that a metal frame is not available, the installation of an acrylic bath is done on a brick podium. This method is not economical, despite the fact that the construction is particularly durable, due to the fact that it requires a huge amount of bricks. Moreover, an excessive load is created on the floors, due to the rather large weight of the finished podium. To reduce the cost of construction, as well as to reduce the load on the floor, it is recommended to install an acrylic bath on brick columns. To create such a design, you can get by with a small amount of mortar and 12 bricks.
Installation is carried out in the following sequence:
- Without removing the protective film, the bath is brought into the room and installed at the place of future installation, after which the location of the columns is marked.
- According to the length of the bath, they mark where 2-3 columns will be located, where one is located in the middle of the bottom, and the other two are at the edges of the bend of the bath.
- After they take out the bath, they start laying out columns 17-19 cm long so that the height of the bath above the floor level is not more than 60-65 cm.
- The masonry is allowed to dry for 12-24 hours, after which a siphon is connected to the bath and pushed tightly against the wall, it is installed on the previously made posts.
- Using silicone sealant, fill the gap between the posts and the bottom of the tank.
- With the help of metal hooks and corners, the edges of the bath are attached to the wall.
Experienced experts recommend that, prior to installation, apply mounting foam to the lower surface of the acrylic bath, this little trick will reduce the thermal conductivity and resonant ability of the material. Also, the use of mounting foam during installation reduces the likelihood of damage to the bottom of the acrylic bathtub by brick supports.
Options for a homemade bath frame
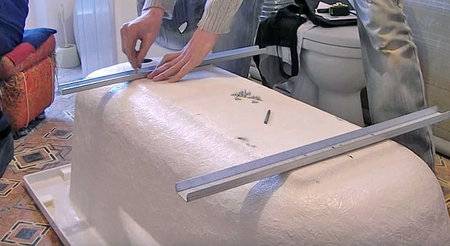
What material is most often taken to make a bath frame? The usual profile for drywall. It is plated with zinc, which means it is quite durable and reliable.And will last a long time. It can be used under the frame of an acrylic and steel bath.
Before starting installation work, it is necessary to level the walls, dilute the sewer and water supply pipes.
Let us trace the entire procedure for the construction of this structure step by step.
We prepare equipment and make markup
First of all, turn the bath over. We fasten profiles for legs on self-tapping screws. To do this, the design of the bath provides for strengthening the bottom with a plywood sheet. And already on the profile we fix the legs. Without departing far from the bath, we install a drain and overflow system.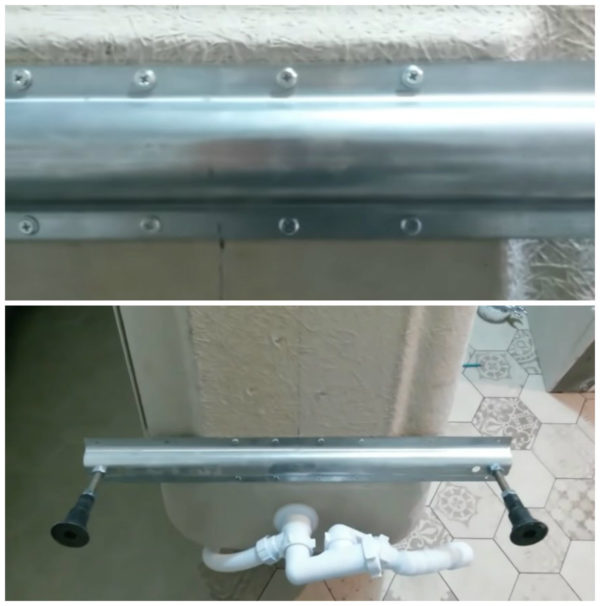
Now you can bring the structure into the room and, having adjusted the legs in height, put it in place. On the lower edge of the side we apply markings for mounting the frame.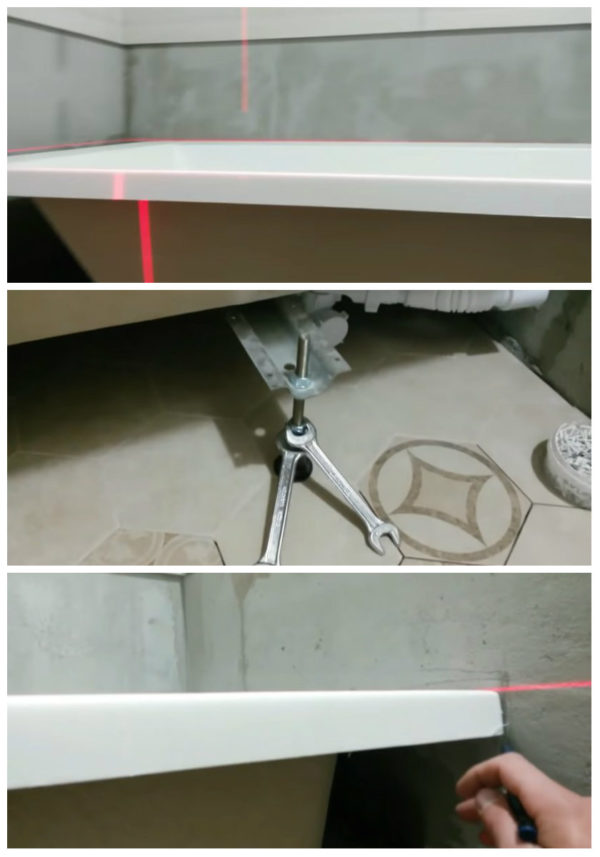
Next, again, you need to pull the bath out of the room and start assembling the frame.
Frame assembly
To make a frame from a metal profile, it is enough to do a few manipulations:
- Cut the profile according to the marks. Holes are made in the cut segments so that they can be fixed on the wall.
- Apply sealant to the shelf adjacent to the wall. Next, following the marks, we fasten the profile to the wall. If the wall is made of brick or concrete, then we drill holes and insert dowels. No dowels are needed in the gypsum board, self-tapping screws hold perfectly.
- Next, install the side racks and the lower screen rail.
- Apply sealant to the top of the profiles. Bring back the bath, install and connect it.
Now you need to make a stand on which the bottom of the bowl will rest. You can take brick, cinder block for these purposes. We put in several rows and fasten with the usual cement mixture.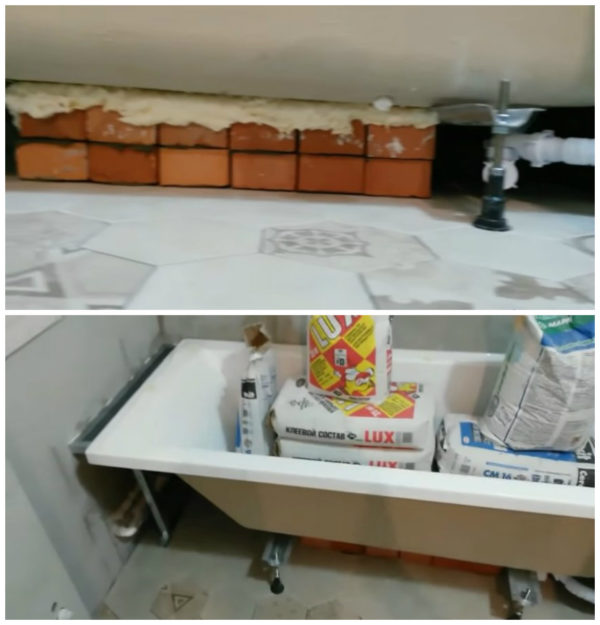
After the foam has hardened, we proceed to the installation of the frame under the screen and hide it with a sheet of drywall.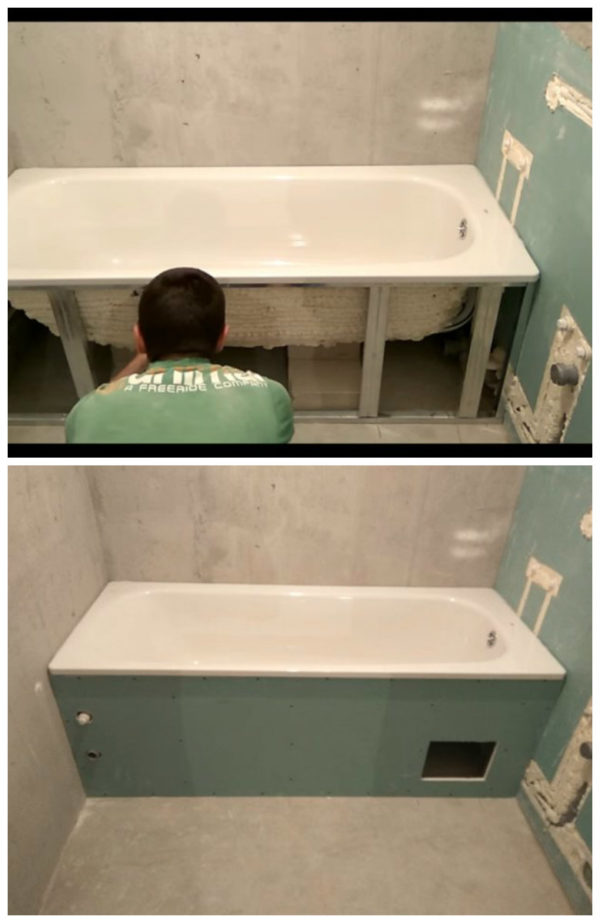
Wooden frame
To create a frame for a bathtub, wood is not as good as metal. In rooms where people bathe: in bathrooms, baths, saunas, it is always very humid. As you know, moisture for a tree is the worst enemy. To protect our structure from the harmful effects of moisture, care should be taken to protect it.
The material must be impregnated with an antiseptic or other protection that will repel water and protect against fungus and mold. We assemble the frame from bars with sides of 50 by 50 millimeters. We do this in the same way as a frame is assembled from a metal profile. Let's go through the main points:
- we level and prime the walls, after which the frame can be fixed;
- to give additional rigidity, we supplement the horizontal slats with vertically standing slats;
- as soon as the frame is assembled, we cover the beams with a waterproofing solution; if the walls located behind the bathroom are not planned to be tiled, then it is better to cover them with waterproofing.
When the waterproofing composition dries, you can put and connect the bath. To make it more stable, a support is made of brick under it. A foam layer is arranged between the support and the bottom of the bowl. Next, the screen and its casing are mounted.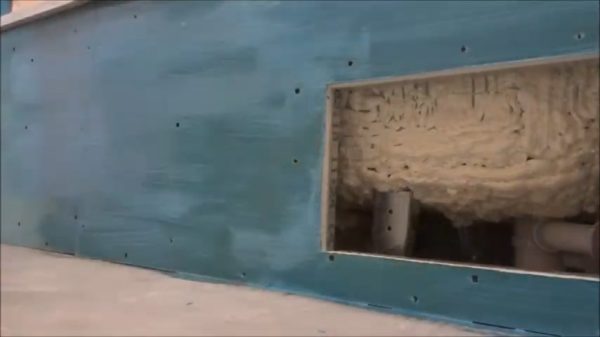
Welded metal frame
Naturally, you can weld a metal frame. For this design, a profile pipe is suitable. In fact, this is a metal rectangular object that does not look like a pipe. Such a frame can be arranged both for an acrylic bath, and for a cast-iron or steel bath. Its strength is such that it can withstand any weight. This design allows, in addition to the bath itself, to install a glass screen for the shower.
How to make a frame using welding? Consider the main points:
- first you need to make all the measurements and draw a diagram of the future design;
- cut blanks of the required length;
- by welding to connect the base of the frame - these are three supports, with two guides fixed to them, the bottom of the bath will “rest” on the guides;
- install the legs - we select small sections of the profile pipe and weld them to the support legs;
- at the lower end we weld a washer and a nut to it, suitable in diameter to the screw;
- when all the elements are assembled, the frame can be set horizontally and vertically;
- now you need to weld a stand located vertically, and install horizontal crossbars on it, on which the lower part of the side will rest;
- to be able to sheathe the front side of the bath, we weld the front racks.
We install the assembled structure in the room, align it and put the bath itself. We connect, test the operation of the drain and overflow systems. We sheathe the frame with a sheet of drywall.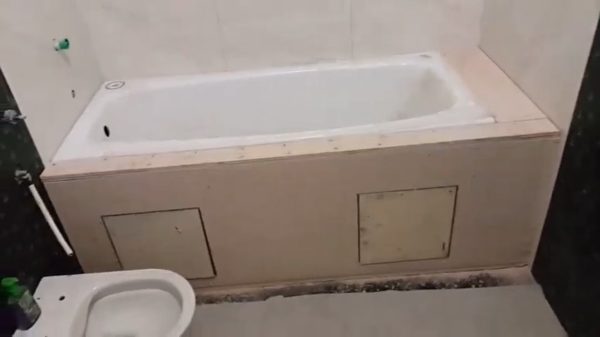
Preparatory work and installation options for an acrylic bath
Before you install an acrylic bath with your own hands, you need to prepare the place and the bath itself for installation, remove all unnecessary items from the bathroom, dismantle old equipment, prepare the necessary tools and materials for installation work. You will need:
- bath;
- legs or frame on which the bowl will be attached;
- hammer;
- Bulgarian;
- perforator;
- assembly sealant;
- level;
- wrench;
- insulating tape;
- mounting tape (construction tape);
- corrugated pipe;
- spare parts for attaching an acrylic bath to a wall or floor.
Before you install a new acrylic bathroom, you need to do some preparatory work:
- first turn off the water supply to the central tap;
- then dismantle the old bath;
- then crack or cut out the old drain;
- clean the sewer hole;
- insert a new corrugated pipe into the sewer socket;
- coat with sealant the joint of the corrugation and the sewer hole;
- level the floor for an acrylic bath.
Now you can proceed directly to the installation of new plumbing.
Installing a new acrylic bathtub is carried out by one of the following methods:
- on a metal frame;
- on support legs;
- on brick supports;
- on a brick podium;
- combined mounting method.
Acrylic sanitary ware installation rules and regulations allow any of the above methods to attach a bathtub to a wall or floor, based on its type and model. So, if there is a metal frame in the kit, then it is better to install the font on it, while using the attached instructions. And if special legs are sold along with the bathtub, then an acrylic bathtub must be installed on the legs, since such a support is designed specifically for this model, taking into account the areas of greatest stress.
Let's take a closer look at how to fix an acrylic bathtub in each of the 5 listed methods.
How the frame is arranged and what it is made of
Frames for acrylic bathtubs can be divided into two types:
- Metal carcass;
- brick frame;
Let us consider in more detail what and how the metal frame is made of - it is made of a shaped square or rectangular pipe assembled using welded joints. Such a frame, as a rule, is painted with corrosion-resistant paint, and it also has adjustable legs.
 Preparation for the manufacture of the frame for the bath
Metal frames are made most often for rectangular standard bath sizes:
- 150x70;
- 170x70;
- 185x70.
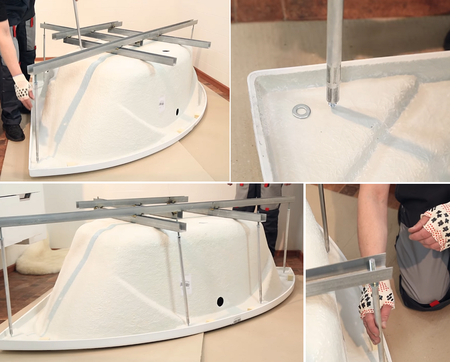
For bathtubs with a non-standard shape, the frames can be sold as a set, if the frame is not included in the kit, then you will be offered to buy it separately or make it individually.
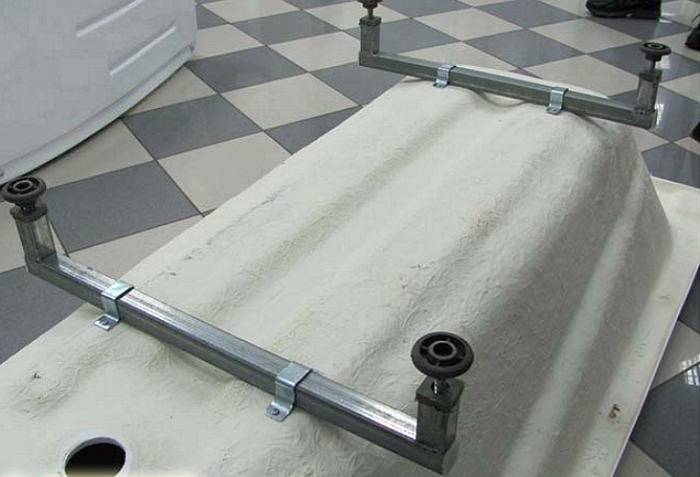
The frame itself should include the following: a frame around the entire perimeter of the side of the bath, regardless of its shape. Support posts with adjustable legs are welded to such a frame at the corners and to the longest sides in the middle. There must also be at least two support bars for the bowl itself.
In addition to its main bearing function, the frame also plays the role of the basis for fixing decorative panels, behind which it will be possible to remove various accessories for.
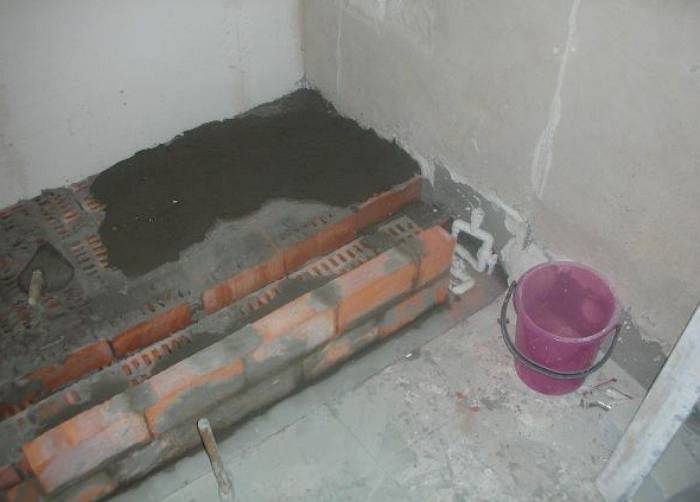
Now consider such a question as installing a bath on bricks.The device of such a frame consists in the fact that instead of a metal bearing part, two brick partitions are laid out, on a cement-sand mortar, the bath itself is installed on these partitions. Although this method is much more reliable, it is worth noting that it is much more complicated.
So, in order to properly install the bathroom on a brick, you must first markup. To do this, put the bath next to the place where it will be installed. The marking is carried out as follows, on each side of the edge of the bowl it recedes by about 20 cm - these will be the points from which the brick will be laid as a result. When the markings are done, it is necessary to prepare a brick and mix the cement mortar. When you start laying, remember that the thickness of the seams in the partition that is closer to the drain must be made thin, and in the one that is further away, thicker. This is necessary to create a slope towards the drain. After when the supporting partitions are laid out on the edges, it will be necessary to lay the halves to create stops.
The next step is to install a siphon on the bath, knead the solution again, put it in a thick layer on the partitions and install the bath on top. Using a level to control the slope. It is also necessary to ensure that the sides fit as closely as possible to the walls. After all, after it will be necessary to seal these joints. We wait about a day for the solution to solidify, and then you can proceed to further work, for example, installing a decorative screen.
How to remove, dismantle an old acrylic bath
Before installing a new bath, we will definitely need to dismantle the old bathroom. And so in order:
- Remove the bathroom screen if you have one. As a rule, it is mounted on magnetic mounts or clips. Typically, clamps are located at the top and bottom of the tub.
- After removing the screen, disconnect all plumbing, do not forget that water remains in it. Don't flood the neighbors.
- Carefully tear off the sealant from the walls with an old knife or trowel.
- Further, depending on the attachment, we begin to carefully detach the bathroom. First, make sure that there is nothing else holding the tub against the wall. And if so, then move it away so that you can conveniently approach it from all sides.
- If the bathtub is mounted on a frame, then it is usually attached to the acrylic bathtub using small self-tapping screws. These screws are most often located in the corners. Unscrew them and you can detach the bathroom. Also, in addition to self-tapping screws, there are options for attaching the frame to the bath with a sealant or other substance.
- If the bathroom is on the podium, then we simply carefully dismantle it from the podium, slowly rocking it.
- After dismantling, we clean the place, if necessary, tile the floor under the bathroom and prepare for the installation of a new one.

Frame under the bath what material to make it
A do-it-yourself bath frame can be made from different materials - the only condition according to which they can be chosen is the ability to accept high loads and successfully withstand high humidity. Such materials include wooden timber, pre-treated with water-repellent impregnation, galvanized profile for plasterboard structures, as well as an iron profile pipe. You can’t imagine better than these materials, and it is them that we will consider for suitability for the manufacture of a frame for a bath.
- Wooden beam. Excellent material, but has one drawback - it rots over time. In addition, the tree is largely subject to deformation depending on the ambient temperature and humidity. In principle, this problem is solved with the help of modern impregnations, which can make wood resistant to water and temperature, as well as protect it from decay.The advantages of using a wooden beam include ease of processing - in order to build a frame for a bath with it, you do not need a special tool. If desired, you can easily get by with a hacksaw and a screwdriver.
- Profiles for drywall constructions. The main disadvantage of this material is its low strength. Let's face it - the profiles are not designed to withstand such a load, which usually falls on the bath frame. Therefore, this material is used for the most part for the manufacture of a decorative or auxiliary frame - in such situations, the main load from the weight of the bath and the water in it falls on the legs. If we talk about a full-fledged supporting frame made of this material, then it needs to be strengthened, and this is done using the same wooden beam. You yourself understand that acquiring two materials at the same time is, at least, wasteful.
-
Metal frame for a bathtub, made of a profile pipe. In my opinion, this is what you need - depending on the pipe used, even a heavy cast-iron bath can be placed on such a frame, if, of course, such a need arises. This material has one significant drawback - to make a bath frame from it, you will need welding equipment and the skills to use it. The disadvantages include perhaps the susceptibility of the metal to corrosion, but this problem is quite simply solved by means of modern primers.
In principle, the question of how to make a frame for a bath can be solved with the help of other similar materials, there are a lot of them in the modern world.
When choosing these materials, be sure to pay attention to the strength characteristics and correlate them with the load that the bath will exert on them.
How to assemble a bath on a frame is shown in the video.
https://youtube.com/watch?v=Ckp-btoi4UI
Joint sealing
The use of silicone sealant for processing joints between the acrylic edge of the product and the wall is not sufficiently reliable. No matter how tightly the bathtub fits against the wall, the gaps still remain. In building materials stores, you can purchase a special tape that is attached to the joints with silicone. In addition to tightness, it will give a more aesthetic and complete overall appearance of the structure.
Plastic corners with rubber inserts on the edges will help improve the impermeability of the joints. They prevent the ingress of water, and also hide irregularities and minor defects. A wide range of skirting boards of different shapes and colors is available for sale, so you can easily choose an additional element to any bathroom design.
There is one feature of the interaction of acrylic containers with sealant - before applying it, the bath must be filled with water and wait until the substance hardens. Otherwise, subsequently, under loads on the sides of the product, the silicone will be covered with microcracks, into which water will constantly penetrate.
Making a frame for an acrylic bath with your own hands
Modern bowls are often so far from the usual forms that they cannot be installed directly to the wall. Therefore, how high-quality and reliable the frame will be, the bath will be used for so long.
Preparatory work to create a frame
As an example, consider the simplest and most classic option that can be found when opening the door to any bathroom - an oval shape. We use tiles for decoration, but it can be safely replaced with another material that you like more and fits the design of the room. 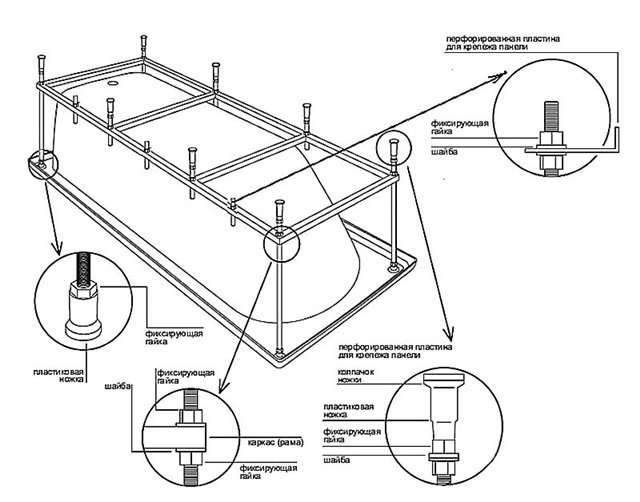
The installation technology of the structure is not difficult:
- we lay the base of the frame rack along the perimeter;
- then we make vertical supports;
- put boards;
- above we lay a sheet of moisture-resistant plywood, in which a hole is cut that repeats the contours of the bathroom.
Preparing the frame base
We put boards around the entire perimeter of the bath.This will be the foundation. Fasten with self-tapping screws with "crocodiles". To facilitate our own work - we drill holes in the right places on the floor.
We put racks, if they fit well to the wall - we fix them. Racks should be placed at each corner and around the entire perimeter, fifty centimeters apart.
Frame installation
As soon as the corner posts are finally fixed, we begin to work around the perimeter.
To make the racks easier to attach and to give special strength to the entire structure, we use wooden bars or metal corners.
Similarly, we fix the upper part of the frame on the racks, and where there is contact with the wall, we fasten the boards to the screws.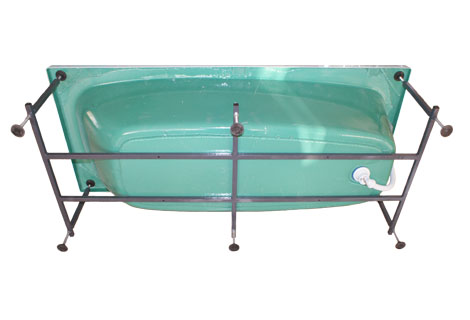
When the entire supporting structure is installed, we put a plywood sheet on top
The options may be different, it is only important that there is high reliability, because almost a third of the total weight of the bath will fall on this plywood sheet. We fasten self-tapping screws around the entire perimeter
Cut a hole for the tub
Most of the models that are available in stores have a mounting template in their kit. Thanks to him, all the markup is done quickly and easily. If you don’t have one, we measure it ourselves using a tape measure. With an electric jigsaw, we cut a hole of the desired shape and given dimensions.
Installing the bathtub on the frame
When all the work on creating the structure came to an end, it was time to put the bath in its rightful place. You need to act based on the size of the room and so that it is convenient. There are no special rules, the main thing is to correctly make a pallet of cement, which will significantly remove the load from the bottom of the bath.
We act as follows:
- fill the desired space with a cement mixture;
- we wait for the whole mixture to harden;
- when the hardening is over, we install the bath on the frame and bring all communications.
frame decoration
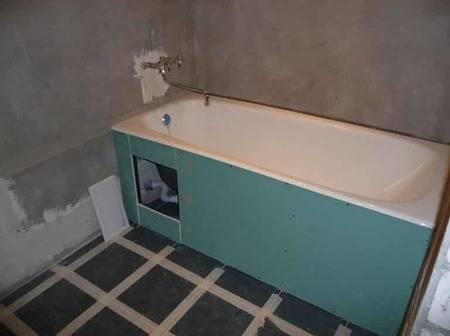
Finally, the frame is assembled and installed. It housed a bath, which was even connected and tested. It is almost possible to climb into it and wash. But don't do it right now. First you need to decorate. How beautifully and efficiently we will cope with this part of the work, it will be so pleasant to be in the bathroom.
First, we determine the color and material. We are preparing the substrate, which will carry the entire cladding. It can be drywall, wood boards impregnated with moisture protection or plywood.
We fix our base with screws. Choose them with a special coating - this will avoid trouble with corrosion in the future. The side parts of the base can be completely closed, or you can make them drop-down. For this, it is necessary to provide a special door. So you get an additional place where you can store all the bath accessories. Do not try to make a door on your own. It is better to buy it in a store or on specialized sites.
Having fixed the entire lining, seal the holes with sealant. It is better if the sealant is with antiseptic additives.
That's all. All our work has been completed. If everything is done correctly and accurately, then the bath will last a long time and will not need to be repaired or replaced. As you can see, there is nothing complicated in assembling the frame on your own. Therefore, you should not spend money on calling specialists who will ask for an expensive job, and they can screw up.
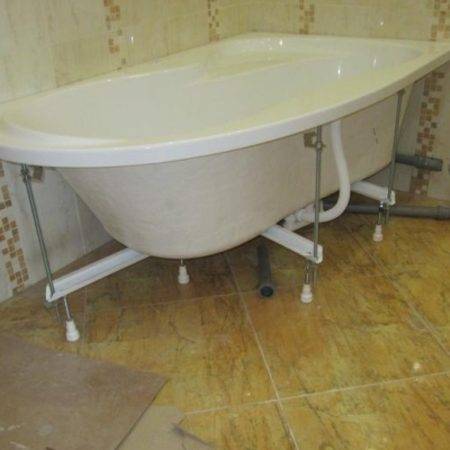
Mounting on legs
Due to its light weight, unlike metal models, you can properly assemble an acrylic bath with your own hands, without involving specialists. There are several types of installation:
The first way to install the font yourself is the simplest, requiring no special training. The instruction that comes with the product will greatly facilitate the work.If during installation it becomes necessary to drill a bathtub, you need to use a wood drill, and make holes at slow speeds. Installation of the product consists in screwing the support legs and adjusting them on the spot:
First, the bath is installed against the wall and the required height is set using the legs. Then the horizontal position is leveled with a level that should be placed on board the product, and with a wrench, twisting the supports up or down. After the result is achieved, the legs are fixed with nuts.
Installing an acrylic bathtub on support legs
This is the fastest and easiest installation method that does not require a set of tools and special skills. The assembly of the bath with legs is easy if you use the instructions that are attached to the product. If, according to the instructions or during installation work, it becomes necessary to drill the font, then this should be done with a wood drill at slow speeds. Mounting on the support legs consists of screwing the legs to the bowl and adjusting them in place.
- Screwing legs. On the lower part of the bath body there are special seats marked with stickers or corresponding symbols. To facilitate self-assembly of an acrylic bathtub, some manufacturers supply products with pre-drilled holes. And if they are not, then you need to make these holes yourself. Then the legs are screwed into these holes, otherwise the load will not be distributed evenly and the bath will quickly fail.
- Support adjustment. Almost all bathtub legs are designed with the ability to adjust the height of the support in order to attach the bowl at the desired slope using a level. First, the bath is installed against the wall, and then the legs are twisted, setting the desired height. After that, proceed to horizontal alignment, when the level is set on the side of the bath in a horizontal position. If necessary, the legs are twisted up or down with a wrench.
When the optimal performance is set, the legs are fixed with nuts in the desired position. Sometimes, for greater reliability, the bathtub is screwed to the wall with special plastic or metal hooks, which are pre-mounted strictly horizontally around the entire perimeter of the bathtub into the wall at the same distance from each other. The hooks are screwed up to the wall cladding.
Advantages of acrylic bathtubs
Acrylic material is characterized by good plasticity, which makes it possible to make models of various designs, shapes and sizes from it. To ensure the strength of the products, the outer layer is coated with epoxy resins, and the installation is carried out on a solid metal frame.
Buyers are increasingly opting for an acrylic bathtub. And this is no accident. Compared with cast iron or steel, these models have more advantages:
However, there are also disadvantages, as with any other product. The disadvantages of acrylic bathtubs include:
Advantages and disadvantages of the frame
Self-creation has both positive and negative sides. Let's try to consider the pros and cons of this design.
The frame allows you to firmly fix the bath. A similar design can be applied not only to cast iron options, but also to models made of acrylic or steel.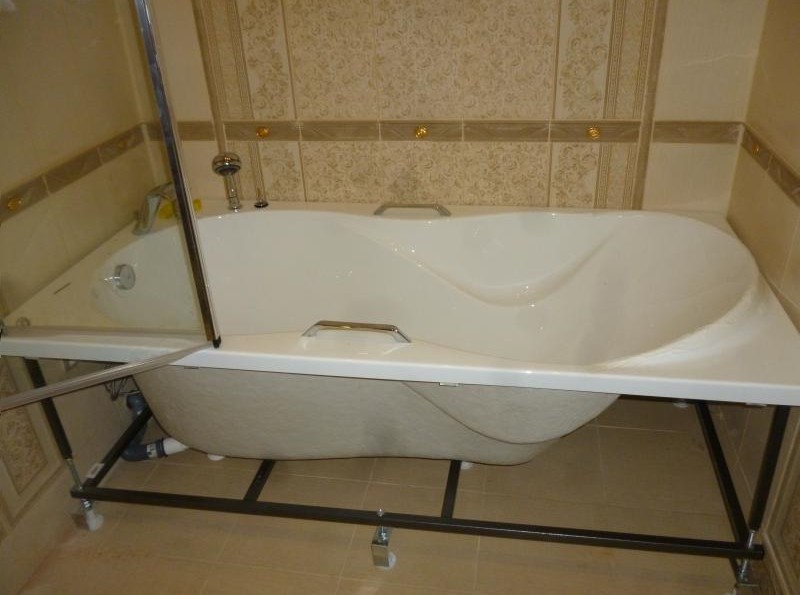
For any bowl options, their own frames have been developed, and you can also use a variety of materials. When installing an acrylic bath, you will need to stock up on pine or maple slats, no more than five centimeters thick.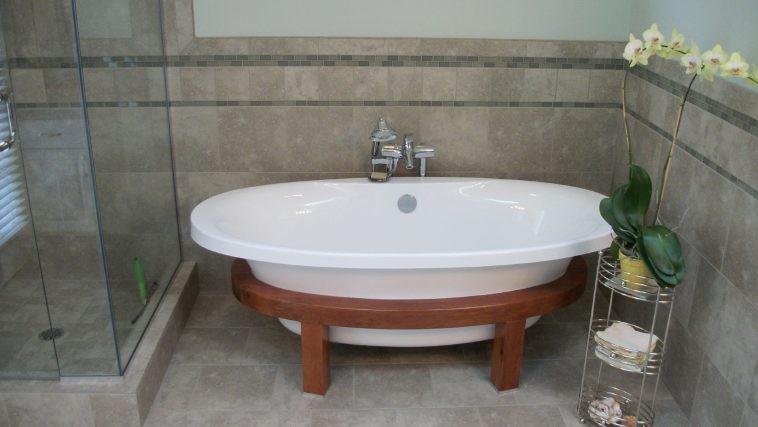

The lower part of the bath gets a beautiful design. On the frame, which has sufficient strength, drywall sheets are easily attached. They put tiles on it.
The main disadvantage is a lot of weight. Basically, it gives a massive brick support. In addition, installation is complicated.Before doing anything, you will have to develop a detailed plan that will take into account everything, and most importantly, the dimensions of the room and the dimensions of the entire structure.
Brick frames have already ceased to be made in modern urban high-rise buildings. They create additional pressure on the floors. Most users choose wood or metal.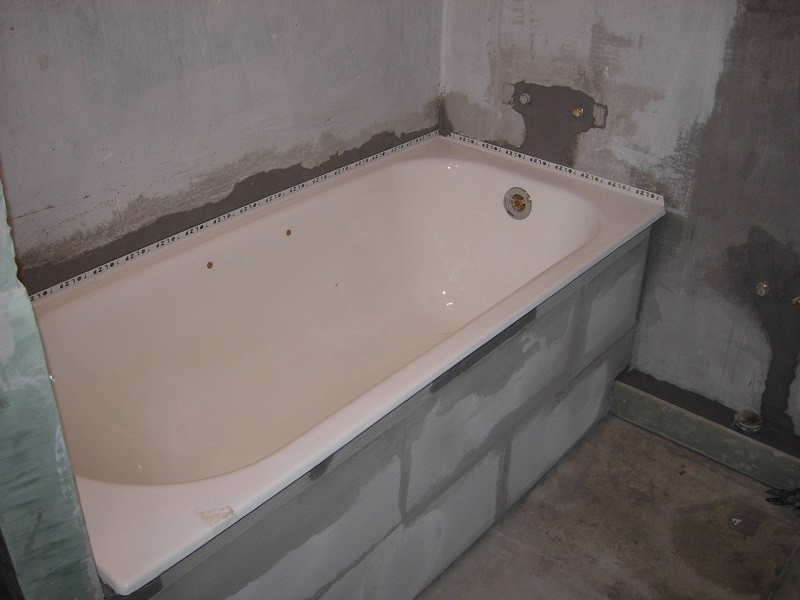
The metal profile, as the basis for the frame, is beneficial to use for acrylic bathtubs. This design weighs a little, and has strength. In addition, all metal elements of the frame are coated with a special composition that protects against moisture and corrosion.