PCB manufacturing, soldering of radioelements
If everything is purchased and prepared, we can roll up our sleeves and start creating a booster from a bunch of all sorts of different things. First I had to decide how I would make the board itself. I settled on the “laser ironing method” (LUT), which is widely and in detail described in many different sources on the net. So, the first step was to get a pattern of tracks on the textolite. To begin with, I drew how the radio components would be located, when viewed from above.
Next, this is what the PCB will look like from the side of the tracks.
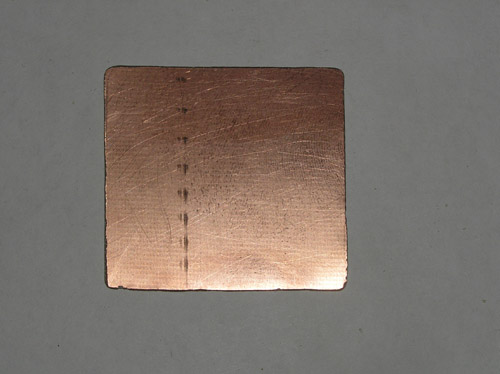
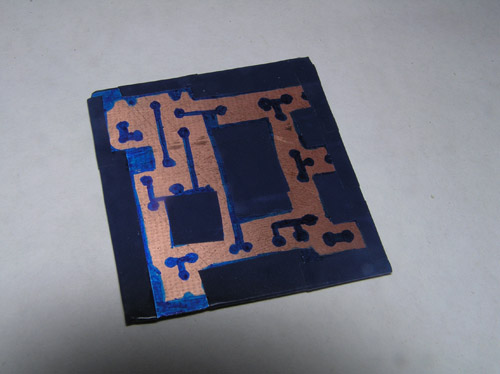
For LUT in some simple program, we create a mirror image of the tracks. I use sprint-layout 4.0 - this program is quite simple - in half an hour the most noob will be able to draw paths. The only difficulty is the dimensions, for the sake of simplicity, I personally added a new grid with a side of 1 mm in the program. So, we draw a mirror image of the tracks, making gaps in them, equal in size to the size of the radio component, which must be installed in a specific place. All art must be printed on a laser printer. Next, we cut out a blank from textolite, slightly larger in size than our board is supposed to be. I got a board 42X45mm. We process the workpiece with zero, then wash it with soap and a cloth, then wipe it with a degreaser. As a result, we get something like this:
Next, follow the points of LUT, apply the printed drawing to the textolite, smooth it with an iron from the heart, then lower it into plain warm water and tear off the soaked paper. At the moment when I was creating my circuit, unfortunately, there was no laser printer at hand and there was nowhere to print, so I somehow, using electrical tape and a waterproof marker, applied the drawing to the textolite.
Then I diluted the ferric chloride solution. We don’t need much - by eye, so that the water turns brown. Personally, I diluted in water at a temperature of about 50 degrees. We mix and lower the board there. After a few hours, the board is ready, we clean it from the marker and everything else with a common solvent or alcohol.
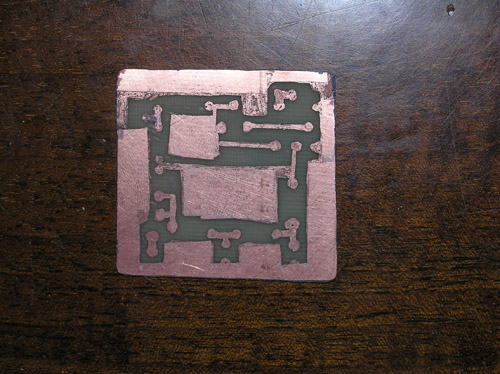
As you can see, there are errors in the board, places where the protection was insufficient and ferric chloride seeped through it a little. We will fix this by tinkering. Tinning lies in the fact that taking quite a bit of solder on the tip of the soldering iron, we simply drive along the board
ATTENTION!!! You need to take very little solder so that it does not freeze with drops on the board - this will look unpresentable and may complicate the subsequent installation of radio components. The solder will fall only on the tracks, the places between them where the ferric chloride etched out the copper will remain intact, you need to be careful in places where the distance between the tracks is small
A better result can be obtained by first coating the board with flux (I used phosphoric acid as a flux). There are a lot of fluxes, but each serves a specific purpose. Orthophosphoric acid is good in that it is used when soldering on oxidized copper (in fact, this is the material of our tracks) and on stainless steel (we will encounter soldering on stainless steel later, when connecting to the mono-input and output board). Also at this stage, I made holes for the subsequent installation of elements.
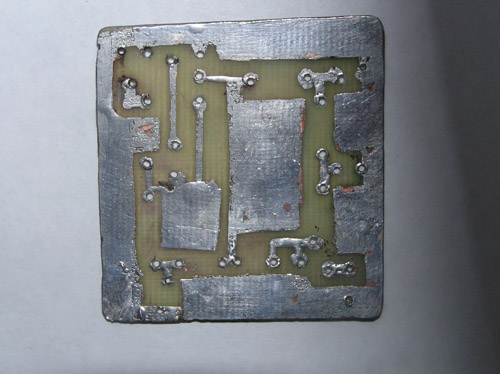
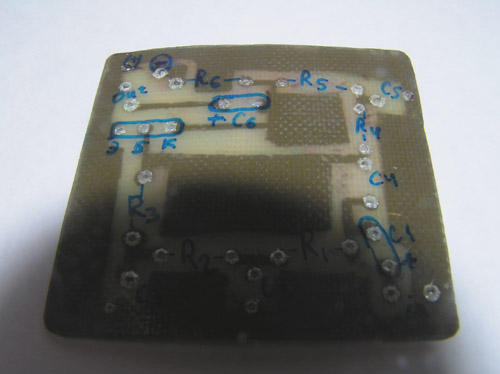
The next step is the installation of radio elements. I started with resistors, followed by capacitors, transistor and contacts. Pay close attention to the exact places of the parts on the board. I signed for myself the destinations of the elements, the polarity for C1 and C6, as well as the places of the emitter, collector and base of the transistor. In total we get:
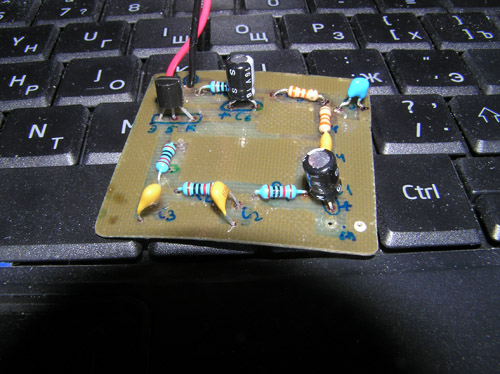
Now let's take a look at our exits. To begin with, I cleaned with a file the contacts 1 - which is connected to the circuit and 2 - which will go to the ground of the circuit (in the guitar this contact goes to the body.

Having covered the contacts with flux-acid, we tin them.
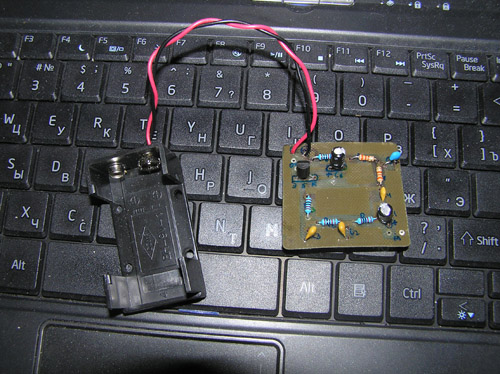
Then I tinned the ends of the mounting wires and soldered them to the contacts.
We solder the input and output to our board with wires and get the finished device.
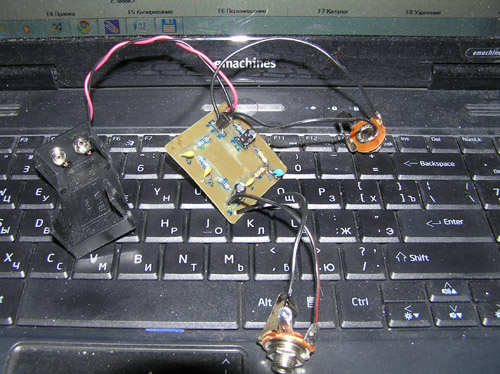
Done.
Do-it-yourself flushing of the gas boiler heat exchanger
Regular inspection and preventive maintenance of gas equipment will significantly extend its service life, reduce energy consumption, reduce the cost of replacing individual elements and assemblies, reduce the frequency of repairs, and prevent excessive emissions of carbon monoxide into the atmosphere.
One of the most important stages in ensuring the smooth operation of the equipment is flushing the heat exchangers of gas boilers.
Why is it worth flushing the gas boiler heat exchanger?
- It is this part of the gas equipment that is most susceptible to destructive factors.
- Impurities contained in the water circulating through the heat exchanger, in particular magnesium and calcium salts, accumulate over time on the walls of the heat exchanger, gradually forming a fairly thick layer of deposits.
- If untimely care is taken to remove them, the heat exchanger tubes may become clogged, which will initially lead to a loss of work efficiency, a decrease in water permeability and, as a result, to failure of the gas boiler.
- the formation of microcracks on the inner surface of the tubes.
- danger of breakage or accident.
In addition, deposits on the heat exchanger tubes lead to a gradual increase in gas consumption by 15%, which entails significant financial costs.
Do-it-yourself flushing of the gas boiler heat exchanger
Maintenance of gas equipment should be carried out in compliance with the necessary safety measures and in accordance with the recommendations of the manufacturer.
The documentation for the boiler should indicate the preferred or only possible way to clean the heat exchanger.
It is understood that cleaning can be carried out with a complete disassembly of the system and gaining access to the treated surface, or without removing the heat exchanger from the gas boiler and running the reagent through the heat exchange system.
The first stage, from which do-it-yourself washing of the gas boiler heat exchanger begins, is the removal of mechanical impurities from its surface.
This can be done with a vacuum cleaner or a soft brush, very carefully so as not to damage the thin plates covering the heat exchanger tubes.
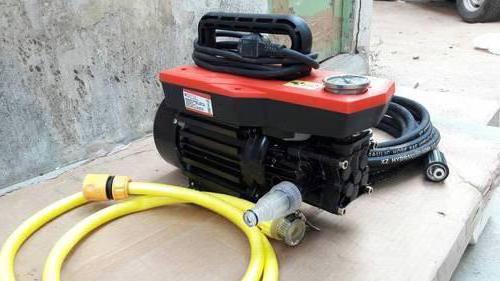
- Filling liquid into the booster (This is a special system for cleaning the boiler, the easiest and most effective way to rid the system of dirt, it can be purchased in specialized stores)
- Connecting the booster to the heating system,
- Open the lid of the booster and don't forget to plug it in,
- The cleaning process begins and the liquid is pumped into the system,
- Until the dirt comes out, do not stop cleaning,
- After cleaning, disconnect the booster from the system and let the water flow by itself,
- The final step will be flushing the entire system with plain water.
The most important rule that must be observed for safe work when repairing any equipment is to completely disconnect it from all sources of energy, gas and water supply before inspecting and disassembling.
It is also necessary to dismantle the heat exchanger very carefully so as not to damage the sealing elements of the boiler, the violation of which will lead to leakage and equipment failure.
It is also necessary to dismantle the heat exchanger very carefully so as not to damage the sealing elements of the boiler, the violation of which will lead to leakage and equipment failure. Flushing the gas boiler heat exchanger itself does not require special skills, compliance with the rules and caution is what you need
Flushing the gas boiler heat exchanger itself does not require special skills, compliance with the rules and caution is what you need
Chemical flushing of the heat exchanger
Doing a chemical flush on your own, using special flushing fluids for heat exchangers, is not a simple undertaking.
For such work, you will need a device - a booster. This method is simplified and therefore it is necessary to know the features of its implementation. It is easier to carry out, since there is no need to dismantle the boiler and remove the heat exchanger from the unit.
It is necessary to disconnect two pipes, connect a hose to one of them, pouring the agent for washing the heat exchangers into the device. The composition should come out of the opposite pipe, to which a hose is also attached. As a result, the reagent will move in a circle inside the booster and heat exchanger.
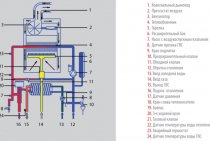
Apparatus for flushing heat exchangers - booster consists of the following elements:
- reagent tank;
- circulation pump;
- electric heating element. It is not available in all devices, but experts recommend using just such boosters. Thanks to this element, the reagent for washing heat exchangers heats up and more effectively destroys various types of deposits, both mud and salt.
Chemical solutions for washing are freely sold in the distribution network. When choosing a reagent, one should take into account the degree of contamination, the types of deposits formed and the material of manufacture of the heat exchanger.
Typically, consumers use solutions based on acids - hydrochloric or sulfuric, less often - nitric or phosphoric. These chemical compositions manage to remove dense and thick deposits. This is especially true for layers formed by ferric salts.
When the pollution is insignificant and the frequency of washing the heat exchangers is observed, it will be sufficient to use compounds based on adipic or sulfamic acids. On sale there are not only liquid solutions, but also gels diluted with water.
Types of restraints
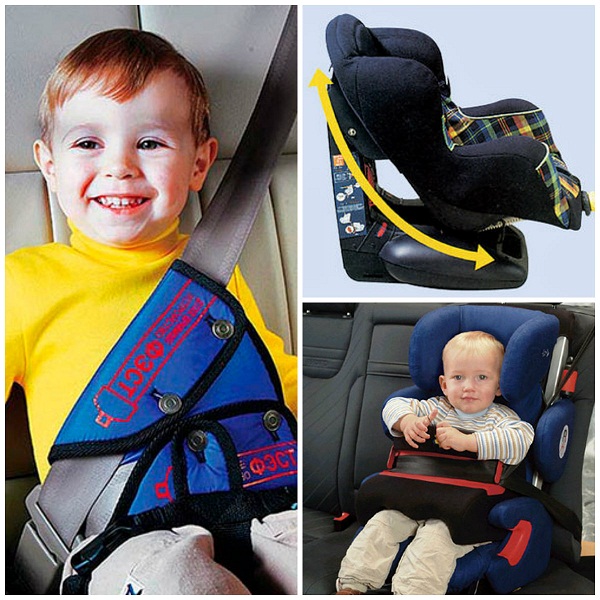 Types of restraints
A child restraint is purchased for a child according to their age, height and weight. On this basis, car seats are divided into several groups:
- Group 0 - a car seat in the form of a cradle for children from birth to six months. Installed sideways in the direction of travel. The weight of the child is up to 9 kilograms.
- Group 0+ is usually a portable car seat. They can often be seen in the hands of young mothers - equipped with a special carrying handle, they are very convenient for transporting a child to a store or clinic. Suitable for children up to a year weighing up to 13 kilograms. The child rides backwards in it.
- Group 0+/1. Pretty economical car seat. From birth to two or three years. The maximum weight of a child is 18 kilograms. A prerequisite is that the chair must be able to be installed against the direction of travel. In children under one year old, the neck muscles are still very weak, it is difficult for them to hold the weight of a rather large head. Therefore, the chair for their transportation must be installed backwards, otherwise fatal injuries (up to hidden decapitation) are possible in an accident.
- Group 1 - for children 1-4 years old, 9 - 18 kg. The car seat is installed in the direction of travel.
- Group 1/2/3 - a car seat that holds the child with standard seat belts. Adjustable headrest and armrests allow you to change the configuration, adjusting the device to the height of the child. For children 1-12 years old.
- Group 2/3. For children 3 - 12 years old weighing 15 - 36 kg. The chair is placed in the direction of travel. Boosters can also be included in this group.
Booster - child restraint, seat with grooves for a seat belt. Some parents, instead of a booster, use various do-it-yourself linings:
- chair seats,
- ottomans,
- pillows.
This is wrong, because only a special child restraint guides the seat belt correctly and protects against chest injuries during heavy braking.
Popular chair models
The buyer is now offered a variety of different car seats, from very expensive to the most budgetary.
 Popular chair models
It would seem that here is a chair - one for 10 thousand, the second for one and a half. Why overpay? It is not that simple. The main way to evaluate a restraint is to conduct crash tests. The higher the score, the better the car seat. Our "Mishutki" and "Pandas" are cheap, but these chairs have not passed any tests. They only help to fix the child and prevent him from falling out of the seat in the event of a collision. Foreign analogues in this regard are much more reliable.
The companies with the best crash test scores are currently:
- romer,
- Recaro,
- Britax,
- cybex,
- Maxi Cosi,
- Konkord,
- Kiddy.
Britax-Romer First Class plus. Armchair group 0+/1. A special soft pad for babies allows the youngest passengers to travel in comfort. The chair is installed for babies against the direction of travel, upon reaching the age of one and a weight of more than 9 kg - in the direction of travel. It has two tilt positions - vertically and reclining. The chair is equipped with reliable seat belts, protected from side impact. Safety standard ECE R44/04. This car seat is a great option for those who don't need a carrycot.
Maxi Cosi Cabrio Fix. Car seat 0+, for children up to 12-15 months. Safety standard ECE R 44/04. A very comfortable and lightweight portable car seat weighing only 3.5 kilograms has three-point seat belts, a removable headrest, and enlarged sides. The sun visor, if necessary, can be straightened and the baby will be protected from rain or sunlight. A convenient handle will allow mom to carry a sleeping child without any problems without taking it out of the chair. This chair is a great solution for mobile mothers.
Implementation of mechanical flushing of the gas boiler heat exchanger
To flush the gas boiler by mechanical flushing, it is necessary to dismantle the entire heating system to disconnect the contaminated part. This requires manual and automated devices, you can also use special installations for mechanical washing. Disassembly of the system is necessary to provide direct access to the surface to be cleaned.
The easiest way is to remove plaque from the inner surface with a special scraper or brush during mechanical cleaning after disassembling the system. If the parts are very dirty, they can be put in an acid wash for a while, which will help remove the smallest and thinnest deposits.
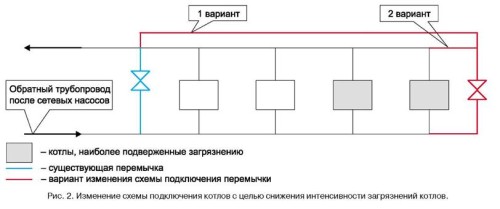
Boiler connection scheme in order to reduce the intensity of pollution.
Mechanical cleaning is a rather expensive method, as it is associated with disassembling the system, but, on the other hand, thanks to flushing, it is possible to exclude the replacement of equipment and its overhaul in the event of a high percentage of plaque and scale. It is necessary to observe safety precautions when washing the heat exchanger with your own hands.
For example, before turning on a gas boiler, washing it with a chemical reagent, it is necessary to pass clean water through it several times to remove all acid residue, otherwise this may destroy the heat exchanger and require repair of the entire system as a whole. Hydrodynamic flushing of gas boilers is also used. According to this technique, the mechanical removal of plaque and scale is carried out by the action of high-pressure water jets. This is one of the most effective flushing methods, since when using it there is no danger of damaging the system, and plaque is removed from all types and types of gas boilers.
In order to flush the gas boiler, it is necessary to completely turn off the heating system. To simplify the procedure, you need to install special shut-off valves during the installation of the heating system. To do this, you can use valves or taps on the return or supply pipelines. Hoses from the flushing device will be connected to them. If it is not possible to connect hoses, work should be done to organize flushing units.These activities may result in additional costs.
Washing chemicals
They are used to obtain the maximum effect from flushing heat exchangers and heating systems with copper pipes. Chemicals are also suitable for steel products. With installations for washing heat exchangers, red liquids are used, which, reacting with contaminants, change their shade. Depending on the volume of dirt, the amount of the product is adjusted. Along with special fluids, hydrochloric or phosphoric acid is also used. These substances will help to rinse the “pipe in pipe” or any other heat exchanger as efficiently and quickly as possible.
For high-quality cleaning, from 10 to 30 percent of chemicals are pumped into the system. The use of aggressive substances allows not only to clean the various elements of the system, but also protects against corrosion, water foaming, and increases the life of the boiler.
It is necessary to choose the right booster
Before you buy a starting device, you need to study what voltage your battery produces.
Most often this is 12 volts, but if you need a booster to start the engine of a truck, please note that in many tractors the battery produces a voltage of 24 volts. Accordingly, the device needs another, capable of delivering amplified current
The parameter that has the most significant value is the starting current. Each battery has its own indicator, you need to study the model you have installed. Usually the necessary data is applied to the body of the device, so there is nothing difficult to find out the indicators. In addition, the starting current may differ depending on the conditions in which the vehicle is operated. For example, if it is cold outside, the current power often drops, since low temperatures negatively affect the performance of the power unit.
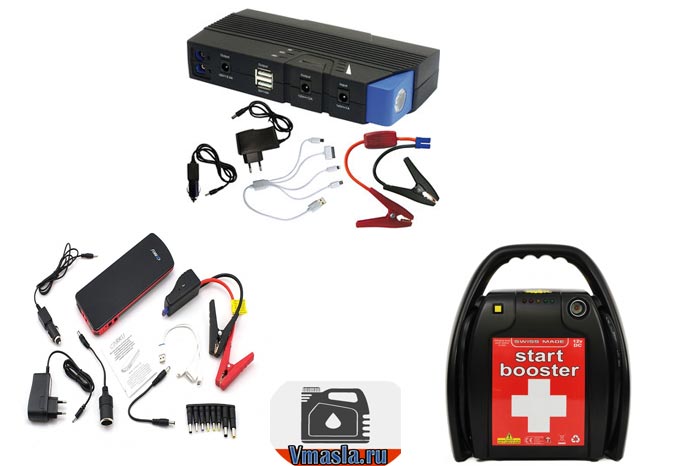
After that, they begin to select the starting device of the desired volume. It depends not only on what capacity you need to charge the battery, but also on how often you plan to use the booster. If you need it for a car, it will be more convenient to use a compact portable model that is easy to take with you. However, the charge in it will not be very large. For an SUV or tractor, it is recommended to use a more powerful device that can come in handy several times in a row. If you do not have a goal to save money, you need to buy the most powerful car booster to start the engine.
Signs of pollution
When does a heat exchanger need to be flushed? This can be determined by the following signs. So, the fuel consumption for the boiler increases significantly. The boiler often stops, heat transfer drops, the batteries do not warm up enough. Also, the need for flushing is indicated by the rapid clogging of the filters.
If flushing is carried out regularly using installations for flushing heat exchangers, then pipelines and other elements of the system get rid of blockages, as well as violations of the coolant circulation processes.
The use of such equipment helps to prevent accidents, failure of radiators, the need for major repairs or complete replacement, and an increase in energy costs.
In boiler equipment, the heat exchanger is a critical and responsible unit. It is on him that the efficiency of space heating, as well as the correct course of technological processes, depends. Flushing should not be abandoned, especially if experienced specialists declared it necessary after the diagnosis. Cleaning using a heat exchanger flusher using hydrochemical technology is much cheaper than a major overhaul or complete replacement of heating equipment.
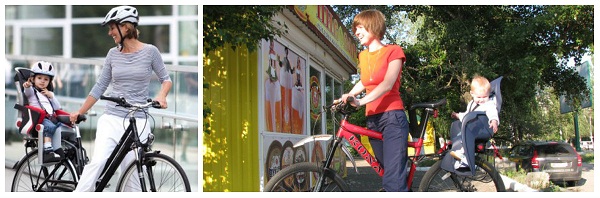
Children and bicycles
To transport a child as a passenger, the bicycle must have a child restraint - a bicycle seat.No matter how great the temptation to put the child on the frame in front of you or on the trunk, you must remember about possible accidents that can be fatal. A bicycle seat will help to avoid problems.
Now for enthusiastic cyclists and their children a wide range of products is presented. The bike seat is made of durable plastic, mounted either on the seat frame or on the frame in front of the cyclist. Almost any holding device of this kind can be fixed by the owner with his own hands with or without tools.
The chair is selected individually for each child. You can purchase a universal children's bike seat, which will be adjusted according to the growth of the baby, but then you need to remember - any device has its own strength limit. Fixings and structural integrity should be checked regularly.
Also read about how to make a children's chair for a baby with your own hands.
The bicycle seat should protect the child well when falling and when turning
Particular attention should be paid to the protection of the legs - when driving, the child's legs should not get between the spokes or under the wheel. To do this, the bike seat has side plastic sinuses that cover the wheels of the bike.
When going for a walk, you need to take care of helmets - this is a mandatory requirement for transporting children. The bike seat is equipped with seat belts, but in the event of a fall, this will not protect the child's head from injury.
 How to equip a playground with your own hands - find out in our material.
The playground has its own rules and special conditions. An interesting article on our website has all the information on this topic.
You will learn how to equip a space for children in kindergarten in our material at https://karuselkin.ru/detskaya-ploshhadka/pochemu-tak-vazhno-oformlenie-ploshhadok-v-detskom-sadu/ link.
 Child restraint - bicycle seat
Foreign manufacturers offer a relatively new child restraint for our compatriots - a bicycle trailer. A special trailer for the child, clinging to the parent's bike. An interesting option for walking through quiet parks and alleys, but completely unsuitable for traveling around the city. Our motorists may simply not notice the trailer, so for trips through busy roads it is better to use a more familiar bike seat.