Types of paint
Here is a list of some of the leaders in this type of product:
- Paint for a sauna stove made of metal "Termal" from the Finnish company "Tikkurila", is produced in black or silver from alkyd resin. The coating is guaranteed not to be damaged for 3 years. When the oven surfaces are heated to 200 0, the paint completely hardens within 60 minutes. Poured in containers of 330 g.
- Hansa paint has high heat-resistant properties and is available both in aerosol cans and in liquid form. 16 shades of color are produced. Does not lose its properties when heated to 800 0 , can be applied to stainless steel.
- One of the best representatives of organosilicon enamel, which can withstand temperatures up to 600 0, is the domestic coating of the Kudo brand. Available in aerosol cans with a capacity of 520 mg.
- Paint produced only as a spray coating with heat resistance up to 650 0 - "Bosny". During operation, it does not crack, does not change color and does not fade. With its help cover glass, metal, ceramic surfaces. Packed in cans of 400 mg. For glass it is produced with heating temperature up to 200 0 .
- Hammerite paint protects steel surfaces and can be applied over rust. When preparing, it is not recommended to use gasoline or diesel fuel as solvents. Withstands heating up to 600 0 . On the surface it is applied with a roller and a brush in 1 layer, immediately painting over the surface of the structure.
- Enamel "ELCON" has high anti-corrosion and heat-resistant characteristics. Withstands heating up to 800 0 and sudden changes in temperature. Produced as an aerosol paint in 0.5 l cans and poured into cans.
Coloring instructions
Having learned how to paint the stove in the bath, you can purchase paint and prepare the stove for painting.
Tools and materials
To do the work yourself you will need:
- paint, preferably in aerosol cans;
- if liquid paint is used in cans, you will need to purchase a roller and brush;
- sandpaper to remove a layer of rust;
- metal brush;
- when cleaning large areas, use a grinder;
- solvent for degreasing parts;
- for painting, you can use an airbrush and a compressor, especially with large dimensions of the structure;
- rags;
- paper or old sheets to protect the surface of the walls and floor when painting.
Having dealt with the question of how to paint an iron stove in a bathhouse and having prepared the materials necessary for work, you can begin to carry out the preparatory work.
Surface preparation
To do this, you need to perform a number of simple works. But the preparation of surfaces must be approached with full responsibility, it depends on how the paint will fall on the metal and how long its layer will withstand high temperatures:
- with a metal brush, we clean the stove from adhering dirt, soot and rust;
- We clean the finished surfaces with fine sandpaper. Such work will make the surface smooth, remove minor scratches and bumps;
- we sweep and remove dust from the details of the furnace;
- having abundantly moistened a rag with a solvent, degrease all surfaces;
- if stainless steel or galvanized parts are installed on the furnace, there is no need to paint them. Therefore, we will apply a layer of grease or other lubricant to the parts;
- we close the surface of the floor and walls next to the heater, paper or cloth.
Paint application algorithm
We know how to paint an iron stove in a bathhouse, the necessary preparatory operations have been completed, now we can proceed to the main stage of work. This does not require much time and effort. All work is carried out in the following sequence;
- open and stir the paint well. If it is thick, it can be thinned with a thinner suitable for this enamel.Be sure to read the instructions and dilute the paint only with the indicated mixtures. Otherwise, you will just throw away a can of expensive paint;
- if an airbrush is used to apply the layer, the paint is diluted to a more liquid state, then poured into the airbrush through a paint sieve or the wife’s old tights;
- first apply a layer on all inconvenient places and edges of the oven and only then treat the surfaces, slightly overlapping the previous layer. When painting with a brush, work is carried out in a similar way;
- the paint is applied in 1 layer, so avoid gaps by painting all surfaces evenly.
Work is done. Now leave the oven until the enamel hardens completely.
At the same time, it is important to close all doors and windows so that dust does not enter the room. Some paints will require you to light the oven, they harden only when heated fork
Therefore, carefully study the instructions and strictly follow the specified rules.
How often should you paint in the future?
The paint for the sauna iron stove will serve for the period specified by the manufacturer
It is necessary to pay attention to this characteristic when buying enamel.
Expert opinion
Pavel Kruglov
Baker with 25 years of experience
The minimum period of high-quality surface coating for most manufacturers is 3 years
But the frequency of use of the furnace and the conditions of its operation are of no small importance.
In any case, if the oven is made of thin metal, it may fail before the paintwork of the surfaces. Paint is a short-lived coating, so every sauna owner should be prepared for repeated work to protect the stove.
Is it possible to achieve a durable protective layer of the heater surfaces? Yes, in this case, a simple operation on the galvanic method of protecting the metal will help.
Which one is better to use
How to paint a metal stove in a bath? To do this, it is imperative to buy heat-resistant or organosilicon enamels, varnishes that can withstand heating up to 6000. The layer must maintain its solidity and prevent the formation of rust on structural steel, from which inexpensive bath "aggregates" are made.
As a rule, dark colors are used, up to black. It increases the level of heat transfer of the furnace. Aluminum based paint is not recommended. Silicone enamels from Russian and foreign manufacturers are most in demand. In its composition:
- resin organic;
- aluminum powder;
- organic radicals;
- silicon base and oxygen.
Now let's go through specific brands:
- The leader among domestic brands is Cetra. Available for various heating temperatures. Black enamel is able to withstand heating temperatures up to 9000.
- Another heat-resistant paint produced in cans and having good properties at a low price is heat-resistant Kudo brand enamel.
- Among foreign manufacturers, the Finnish "Termal" from the company "Tikkurila" can be distinguished.
How to paint a metal stove in a bath from the inside? To do this, it is better to use refractory paint. Its only downside is its high price.
Requirements for paints for iron sauna stoves
The stove for a bath differs from a conventional fireplace in that a number of negative factors constantly act on the metal in this case, both from the inside and outside:
- cold and hot water;
- steam evaporation;
- increased humidity of the room;
- high temperatures due to burning wood or coal.
As for the material from which the device is made, stainless steel is usually taken. But even in this case, it is necessary to cover it with a special paint composition in order to increase the service life.
The main factors to consider when choosing a paint and varnish coating:
- resistance to constant temperature changes;
- corrosion protection;
- water-repellent properties of paint;
- low toxicity.
Attention! You should not buy paint of dubious production, on which the standard properties and composition of the components are not prescribed. Buying such a fake can lead to oven repair
Heat resistance
Regular exposure to high temperatures is one of the most important characteristics that you should pay attention to when choosing a coating. The product certificates must specify the maximum possible heating temperatures.
Metal corrosion protection
There are special paint compositions that are resistant not only to high, but also to low temperatures, which is a definite plus.
After all, the stove is not heated every day, so it is advisable to take this factor into account when choosing a protective coating for the winter period.
When the furnace is heated, the metal expands, so it is desirable that the components of the paint in the form of special additives significantly increase the service life of the furnace.
Important! The usual composition of the paint can withstand temperatures up to 80 degrees, and the heating of the oven for a bath can reach 200 or more, consider this when choosing a paintwork
Water repellency
Constant exposure to steam, cold and hot water, alternate heating of the furnace, especially in the steam room of the bath, greatly affects the strength of the metal. Therefore, moisture resistance is the most important characteristic in the selection of paint.
Composition safety
High temperature, acting on the paint, provokes the release of toxic fumes, so you should opt only for high-quality and certified paint and varnish compositions. The absence of a certificate may threaten health deterioration or poisoning.
You will also be interested in:
Lime painting preparatory stage
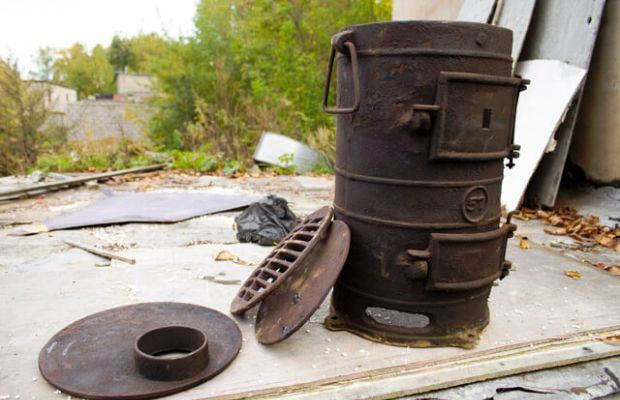
Rice. 1. Potbelly stove made of metal.
Potbelly stove can be made of metal. Such a design is shown in Fig. 1. Also, the oven can be made of bricks. Furnaces can be painted using different finishing materials. So, for finishing brick structures, an affordable and fairly high-quality material called lime is often used. To paint the potbelly stove yourself, prepare the following required materials, fixtures and tools:
- Brushes and rollers;
- Bucket;
- Solvent (can be replaced with alcohol);
- Enamel in aerosol;
- Lime;
- water;
- Dyes;
- Glue.
The device of a potbelly stove made of metal.
Before you paint the potbelly stove, you need to prepare a suitable solution for this. Take a bucket or other container, put lime and pour the same amount of water. After that, mix the mixture thoroughly and add animal glue to it. You can purchase this glue at a store that specializes in selling a variety of painting supplies. It will take relatively little glue - about 100 g per 10 liters of solution. Before you add glue to the lime mortar, be sure to dilute it in some separate container (an ordinary bucket will do) with a little water.
To understand if a lime-based solution is ready, you need to do the following: take a small piece of glass, fix it vertically and apply a little solution. If the paint spreads no more than 3 cm, then everything was done correctly, you can start finishing the furnace.
If you want to paint the potbelly stove not in white, but in some other color, then you will need to add a little dye to the solution. Potassium permanganate, blue or synthetic paints can be used as a dye. The specific option is selected depending on what shade you want to get.
Bath equipment coloring
Elevated temperatures, high humidity, frequent heating and cooling cycles cause rusting not only of the sauna stove, but also of other metal structures in the steam room. First of all, this concerns a tank designed for hot water.It must be painted not only from the outside, but also from the inside, since the water in it will cause corrosion.
Tank painting is carried out according to the same rules that are listed above. The only difference is that it needs to be coated with paintwork at the manufacturing stage. When it is installed, such work will not work.
In addition to the tank, it will not be superfluous to paint the heat exchange system and the chimney, which rusts quite quickly. It is better to paint boilers and other metal surfaces, which the steam room is rich in, at a time. When answering the question of how to paint the tank and other metal surfaces of the bath, the already indicated coatings should be mentioned.
In addition to other advantages of painting furnaces, tanks and other structures, it is necessary to highlight the fact that hot metal (especially cast iron) can crack when in contact with water. Thus, the painted oven can be safely operated in a room with high humidity.
Types of paints and their differences from each other
You can use different paints for applying a protective coating:
- water-based acrylic;
- organosilicon;
- polyurethane.
Water-based acrylic paint material is very convenient and affordable. The downside is that it can only be used for stoves located in a room with low humidity, so this option is not suitable for saunas.
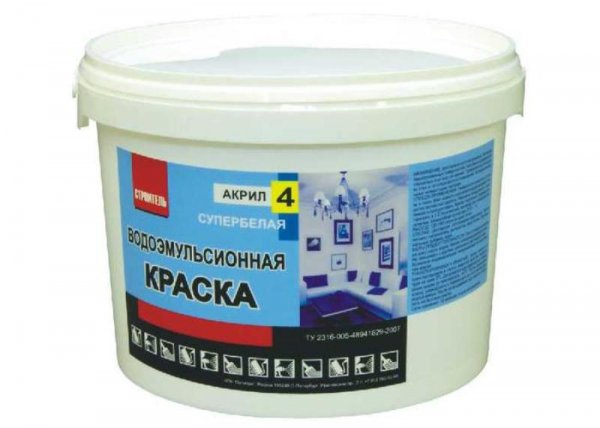
Photo 1. A can of water-based acrylic paint in white. Producer "Builder".
Polyurethane paints are more heat resistant and can withstand heat up to 600 degrees, it all depends on the constituent elements and additives in the paint. Learn the ingredients in detail
Please note that polyurethane mixtures may change color when heated.
Silicone lacquer enamels are considered the most environmentally friendly and durable. They are able to withstand temperatures up to 800 degrees. The composition does not contain toxic substances, so their use is safe. The only downside is the high cost.
Varieties of paints
As already noted, not every paint will withstand the test of a hot surface and high humidity. Therefore, intending to paint the stove and water tank, you should be very careful in choosing the coloring composition. Special products are based on silicone or other substances containing silicon. With sufficient heating (up to approximately +150°C), polymerization occurs, as a result of which the paint fuses into a durable film that can withstand all types of external influences and prevent rust. The most famous compositions include the following types:
Advantages of paint KO-8101
- Paint KO-8101. The most affordable option, guaranteeing a service life of up to 15 years.
- Lacquer KO-85 based on organosilicon. Shows excellent results in conditions of high humidity, is not afraid of rust, but the maximum withstand temperature is only 250 degrees, and this may not be enough.
- Enamel KO-8111. A high-quality composition that not only provides the necessary level of protection, meets environmental requirements, but also pleases with a wide range of shades.
- Heat-resistant paint "Certa". Quite popular in the CIS countries, has the additional name OS-82-03T.
- Enamel KO-8222. Coating with the best thermal stability up to 800°C. Because of this advantageous property, it has a high price.
In addition to painting the sauna stove, you need to take care of the hot water tank, special attention should be paid to processing it from the inside. There are several "grandfather" methods for this:
- The application of aluminum powder provides not only protection against rust, but also environmental safety.
- A solution of lime with cement in equal proportions. The water tank is coated inside with this mixture and dried.
- Processing with iron minium, which can be easily purchased in stores.
A number of modern tools have been developed with which you can forget about the problem of rust forever:
- ZFES No. 2 anti-corrosion compound containing zinc powder and ethyl silicate.
- The already mentioned heat-resistant "Certa". The service life of the coating in a bath is 7 years or more.
- Zinc-containing enamel "Ekotsin". It additionally protects against mechanical damage, which is a considerable plus: the tank walls will not be scratched when you are trying to get rid of scale.
- Enamel KO-422. Processing with such a composition is called "cold galvanizing".
Should I paint or is there an alternative?
It is far from always that the owners of home-made metal stoves resort to painting them, apparently believing that this is done solely for the sake of the beauty of the appearance, and if the stove is not visible under a brick screen, then it is not worth spending money on painting it.
In principle, any metal burns out over time. After all, why cast-iron stoves live for a long time - their wall thickness is many times greater than that of steel ones, and therefore they burn out longer.
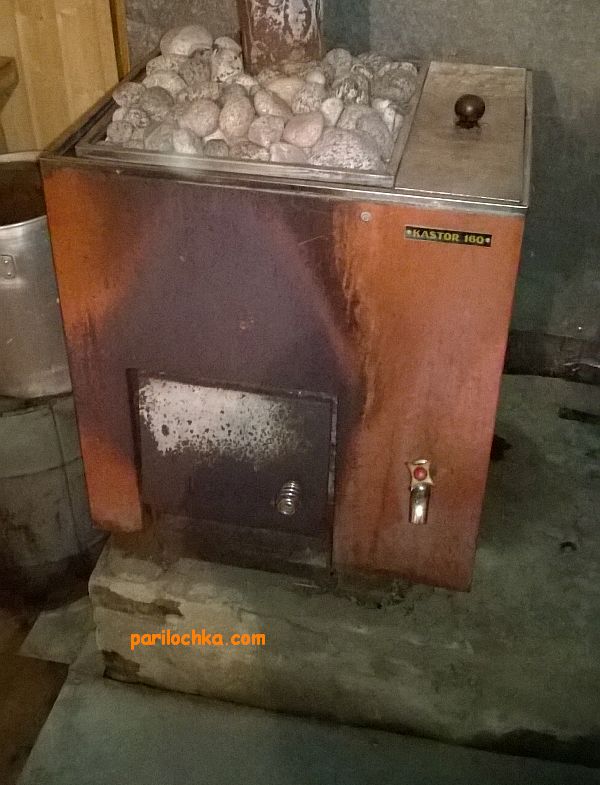
Castor stove - factory paint burnt
The paint layer prevents not only the rusting of the metal from water, but also its fading (also corrosion, by the way). Therefore, painting, in general, is profitable, but such a coating also does not last forever (although there is a guarantee for many years). Therefore, let's put it this way: if it is cheaper for you to weld a new furnace than to paint, then it is clear that you will not paint it.
Unfortunately, by supplying water to the stones, you still contribute to the oxidation of the metal. Steels rust quickly, and even stainless steels without certain additives oxidize under the influence of high temperature. And black (carbon) steels rust in general instantly.
But organosilicon paints did not always exist, was there some kind of alternative?
Yes, there was. Metal can be burnished. And this applies to both steel and cast iron. With the help of various reagents or reagents and high temperature, a protective film of oxidized iron is formed on the surface. It is logical to assume that ordinary rust should also then be considered protection - this is partly true, but it is loose, therefore it does not interfere with the further penetration of oxygen.
The film obtained by burnishing (= blackening) the metal is much stronger. It can be obtained with acids or alkalis. One of the ways is the following:
15 grams of tartaric acid and 280 grams of concentrated phosphoric acid should be poured with a liter of water. Treat the metal surface cleaned to a shine with the resulting solution. Wash off excess acid with laundry soap.
And then heat the stove to 150 degrees and apply a layer of caustic soda (NaOH) on the surface - you can spray it with a spray gun, but with great care - caustic soda leaves chemical burns not only on the skin, but also on the respiratory organs
IMPORTANT! When working with chemicals, protect your skin, eyes, nasopharynx!
After an hour the surface will be black. Be sure to preheat the oven!
There are, of course, ways of cold bluing, but there are other ingredients. If you can get antimony trichloride, mix it in half with olive oil and rub it into the surface prepared with acid and laundry soap (as described above). The paste is applied once a day, the next day it is completely removed and a new layer is applied.
If all these procedures seem too dangerous and time-consuming to you, you can simply cover the stove with either a stainless or brick screen, but this will not help much to save it from corrosion. Therefore, either unsafe bluing, or expensive thermal paint.
1 What does a potbelly stove consist of, everything ingenious is simple
The potbelly stove has an extremely simple design. In fact, it is a metal container, divided by a grate into two chambers - a combustion chamber in which the fuel burns out, and an ash pan. The latter usually serves as a blower.

As a rule, the combustion chamber and the ash pan have separate doors.However, sometimes the design is simplified by installing one large door for two chambers. In this case, the ash pan cannot be used as a blower. Due to the fact that the walls of the potbelly stove are metal, they quickly warm up and transfer heat well. As a result, even a small stove is enough to heat a medium-sized garage. And if you provide the design of the hob, then on the stove you can also boil water or heat up food.
Army stove potbelly stove
Blueing of a metal furnace
Burnishing is a chemical treatment of the surface of iron. Using a similar method, they achieve protection of the metal from rust, give a certain decorative look.
For burnishing metal you need:
- Clean the surface until a characteristic shine appears. The service life of the decorative layer depends on its purity.
- Remove oxides. To do this, you can dilute 4 grams of butyl alcohol and 150 grams of phosphoric acid in a liter of water.
- Remove acid residue. Dilute 50 grams of laundry soap in a liter of water and wash the surface with this solution.
- Heat the oven to 150 degrees.
- Apply caustic soda. The preferred method is spraying.
After the surface dries, the iron will be protected from the effects of corrosion.
Video: how to make caustic soda yourself?
Popular types of coatings for sauna stoves
Paint for a metal furnace is quite in demand, so it is not difficult to find it on the modern market. The most popular are the following refractory paints:
- Organosilicate, have long been known to a wide range of consumers, as they are used for various jobs. People who ask themselves the question: “How to paint the stove?” First of all, they remember these paints. They can withstand temperatures up to 600 degrees.
- Some types of spray paint are characterized by increased heat resistance. They withstand temperatures up to 650 degrees and can be applied in almost any environment, such as sub-zero temperatures or in an electrostatic field. Heat-resistant spray paints are perfect for painting the boiler in the bath.
- The sauna stove can be painted with electrically conductive coatings, but it should be remembered that they have one significant drawback: the ability to reduce heat transfer.
If you want the decorative finish to maintain high aesthetic performance for a long time, then painting the sauna stove should be done with products of well-known brands that have been on the market for a long time. Popular manufacturers value their reputation and sell products that have the characteristics stated on the packaging.
3 The second option is cutting the pipe can also heat
An excellent material for a potbelly stove is a pipe cut with a diameter of 53 cm, a length of 100 cm and a wall thickness of 0.9 cm. Such pipes are usually used for water conduits and other industrial pipelines. Due to the large thickness of the walls, the stove is durable and with a large heat capacity.
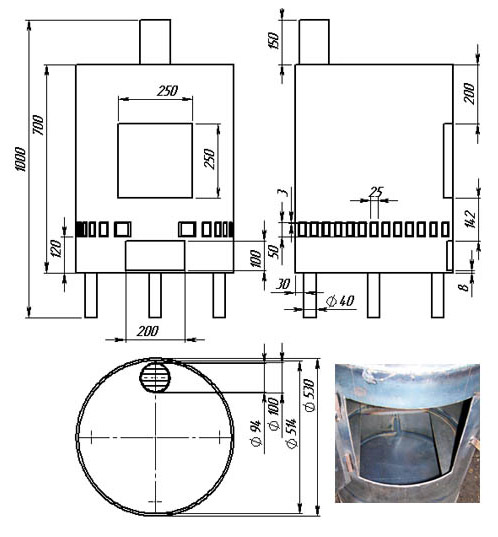
To make a potbelly stove, in addition to the pipe, prepare the following materials:
- two sheets of steel with a thickness of at least 9 mm and a size of 53x53 cm;
- metal corner;
- reinforcing bar 1.4 cm;
- a rod with a diameter of 1 cm;
- a piece of pipe for a chimney pipe with a diameter of 10 cm;
- 4 canopies.
We begin work with marking the pipe. To make the design take up less space in the room, it is more expedient to make it vertical. To do this, divide the pipe into four parts and draw a line on the border of the first (lower) and second parts. At the marking level, weld the reinforcement bars in increments of 1.5–2 mm - this will be a grate. Then mark up, marking the combustion chamber door and the ash pan door. The door of the combustion chamber should have dimensions of approximately 25x25 cm, so that it is convenient to load fuel into the furnace through it. The ash pan door can be made smaller.
We cut a hole for blowing, and then it's up to the small
Then the doors need to be cut out according to the markings. It is advisable to use a plasma cutter so that the cut line is smooth and neat.Hinges need to be welded to the cut-out doors and then welded to the walls of the potbelly stove. Attach handles to each door by welding, which can be made from a rod with a diameter of 10 mm. Then weld steel sheets (bottom and lid) on both sides of the potbelly stove and cut them along the contour of the pipe. After that, attach the legs of the structure to the bottom, and cut a hole from above and tightly fix the chimney pipe.
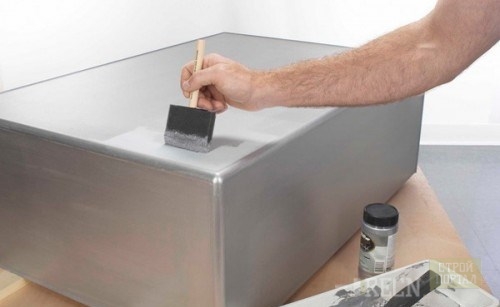
Painting order
Now you can start painting the potbelly stove. Before applying a silicone-based heat-resistant enamel, make sure that the prepared solution is not too thick. If you cover the surface with a viscous compound, it will not absorb well into the surface. In addition, it is quite difficult to work with such paint. Therefore, pre-dilute it using a solvent specially designed for organic materials. In the event that you do not have such a solvent, you can dilute the paint with ordinary turpentine.
When the required density is reached, proceed to painting the potbelly stove. The paint should be applied in a fairly thin layer and wait until it is completely dry. Then you need to apply a second layer. If the enamel lays down in an even layer through which the brick will not be visible, you can finish painting at this stage. If the bricks are still visible, then it will be necessary to apply an additional layer, and after that, paint the cast-iron structural elements.
Painting an iron stove
High temperature, excessive humidity, cycles alternating heating and cooling, all this affects the metal structure - actively destroying its surface. It is clear that paintwork materials must endure all this without losing their physical properties, while maintaining an aesthetic appearance and protecting the metal from corrosion.
What paint
Heat-resistant silicone enamel is well suited. Its abbreviation begins with the letters - "KU". Next come the numbers. There are brands that remain resistant to temperatures of six hundred to seven hundred degrees. In addition, the heat-resistant silicone enamel confidently tolerates moisture, steam, and rapid heating and cooling cycles. In addition, the effect of high temperatures improves the adhesion to the substrate.
There are also special fire-fighting paints. However, their purpose is to protect or maximize the time until the surface ignites. Therefore, such paints are not designed to create a particularly aesthetic appearance. They are certainly effective, but the price ...
The “favorite” color covering most stoves is black or close to it. This is due (and not without reason) to the fact that such a color scheme provides better heat transfer. Well, maybe someone remembers the term - "absolutely dark body" (this does not apply to people from the African continent). Therefore, most heat-resistant paints have a dark color. By the way, there are enamels that can be applied at negative temperatures. This expands the usability.
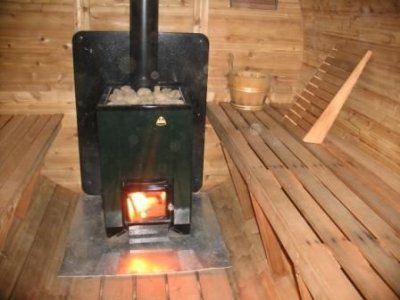
“For information: the temperature inside the furnace of an average sauna stove does not exceed 800 °.”
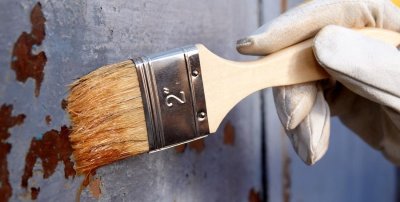
Preparatory stage: If there are traces of dust, dirt on the surface, remove it. Rinse with soapy water, scrape, etc. After that, degrease the surface. For this, acetone, white spirit is suitable. If there is rust or scale, carefully go over with an iron brush, sand and treat with a solvent. Wait for complete drying. When using organosilicon enamel (KO), use "classic" type P-646 and similar analogues, or turpentine as a solvent.
“If the oven is new,“ freshly brewed ”- heat it. This will “burn out” the remnants of fats, lubricants and other debris accumulated in the pores and micro-sinks, from where it is problematic to get them with a regular rag.”
How to paint
The paint is applied in 2-3 approaches. Try to make a thin layer, this will eliminate the formation of smudges. Before proceeding to the next layer, try to "tack off".Complete drying of the paint occurs during the first firing of the furnace, and at 150-200 ° begins its polymerization or, more simply, sintering. After that, it gains its maximum strength.
How to save a can during the heating season or a stove from a flask
The easiest way to make a stove is to remake a 40-liter steel can (flask). On the farm, these containers are usually used to store diesel fuel, motor oil, drying oil and other similar liquids. In addition to the can, you will need some other materials:
- metal corner;
- armature 1.4 cm;
- a piece of pipe 15–20 cm long, the diameter depends on the diameter of the chimney, which is put on the pipe.

To convert a can into an oven, you will need a minimum of actions. First of all, weld a grate on small legs from reinforcement. It should pass freely through the neck of the can. Then cut the metal corner into four segments 20 centimeters long - these will be the legs of the potbelly stove. Weld them to the wall of the can, which will be located horizontally. Fasten the legs so that the structure is stable. Next, in the bottom of the can, you need to cut a hole along the diameter of the pipe, at the level of the combustion chamber, and then weld the pipe itself.
Yesterday they kept mixed fodder in this can, and today they make pilaf on it
6 The fifth option, we start working out
All of the above designs are designed to run on solid fuels. However, motorists usually have large quantities of used oil. Even if you don’t have work, you can buy it, as they say, “for a penny.” Therefore, finally, we will consider how to make a furnace that works on mining.

For this we need the following materials:
- pipe with a diameter of 355.6 mm with a wall thickness of 6 mm;
- sheet steel 4 and 6 mm thick;
- pipe 100x4-5 mm;
- steel corners.
Every motorist should know how to cook a potbelly stove for working out
The design will consist of two containers connected to each other by a perforated pipe. Start by making the bottom oil tank - cut the 355.6mm pipe to get a 115mm length. Then weld a bottom 4 mm thick to this segment. Weld four legs made from a corner to the bottom. Then you need to prepare the lid of the container - make a hole with a diameter of 100 mm in its center. Closer to the edge, make another hole with a diameter of 50–60 mm, through which oil will be poured and preliminary ignition will be carried out. Above this hole, make a valve, securing it with a rivet or a small bolt. Weld the finished lid to the container.
Now let's make the top container. For it, you need a piece of pipe with a diameter of 355.6 mm and a length of 10 cm. A bottom 4 mm thick is welded to it, in which a hole is made for a branch pipe with a diameter of 10 cm, located closer to the edge. Then make the top cover 6mm thick. In the center of the top cover, weld a jumper 70x330, which will trap hot gases and thereby increase the efficiency of the potbelly stove. The thickness of the jumper should also be 6 mm.
Closer to the edge of the cover, make a hole with a diameter of 10 cm and weld a pipe to it to connect to the chimney. Weld the prepared lid to the container. Next, you need to complete the middle chamber. To do this, you need a pipe with a diameter of 10 cm and a length of 36 cm. Drill 48 holes in it with a diameter of 9 mm, as shown in the diagram above. Then weld the perforated pipe over the hole in the bottom tank. Next, weld the top container to the perforated pipe. On this, the potbelly stove is ready, it remains only to install it in the garage and connect it to the chimney. Using the oven is quite simple:
- 1. fill the oil into the lower container through the neck;
- 2. Pour a small amount of fire starter fluid on top of the oil;
- 3. Moisten the wick in this liquid, then dip it into the container through the neck and set it on fire.
First, the oil will light up, as a result of which it will warm up and begin to boil. Oil vapors will rush up through the perforated pipe, where they will be mixed with oxygen. In the upper part of this pipe, the afterburning of vapors will begin. The final combustion of gases occurs in the upper tank, where the highest temperature occurs. Never add oil to the lower container until it has completely burned out.