Popular thermal insulation options
Next, you need to decide on the most suitable option for warming the concrete floor of the apartment on the ground floor. Of the methods proposed below, it is best to choose the one that will combine the required level of efficiency, the acceptable level of financial costs and the ability to complete all the work independently and quickly.
Basement
With this option, foam panels are best suited, because in the basement the appearance and thickness of the insulation are not so important. The work is carried out in several stages:
- in case of high humidity in the basement (especially if sewer pipes are flowing or liquid is accumulating in the basement for other reasons), a penetrating waterproofing composition can be used. The procedure for applying it is quite lengthy, but with its help you can completely protect yourself from dampness of the floors;
- the foam itself is very simply glued to the concrete surface of the basement ceiling. To do this, you can use any assembly and construction adhesive mixture;
- cracks and gaps that may form between foam sheets are filled with construction foam.
Thus, with free access to the basement under the apartment, it is quite simple and inexpensive to provide hydro- and thermal insulation of the concrete floor in the entire apartment located on the ground floor.
Concrete floor on joists
The most common option today is floor insulation along the logs, in which you can effectively use different insulation materials. Such insulation is carried out in the following stages:
Log installation. If necessary, you must first lay the floor with a waterproofing material, and then, using self-tapping screws and dowels, attach wooden beams in increments of 40-60 cm. expanded clay, etc.
Insulation lining. Insulating material is laid between the lags, on top of which it is necessary to lay a waterproofing layer of polyethylene.
Laying a rough or finishing floor covering. Boards, chipboard, plywood and other materials can be used here
It is important to leave ventilation gaps along the edges of the room, which will then be covered with skirting boards.
The only drawback of this method of insulating the concrete floor of an apartment on the ground floor is hiding the height of the living space, which, depending on the material chosen, can be from 8 to 15 cm.
Warming in low rooms
If it is not possible to allocate so much space due to low ceilings, then a less effective, but more suitable for low rooms, method of floor insulation using GVL can be used:
- Having leveled the floor concrete base, we lay a waterproofing layer with an overlap on the walls.
- Next, we lay the first layer of GVL sheets, which should be 12 mm thick.
- The second layer of GVL is laid on the mastic, arranging the sheets so that their joints do not coincide with the joints of the sheets of the first layer.
- Similarly, we lay the third layer, on top of which the flooring is mounted.
In low rooms, such modern material as isolon can be used quite effectively. If you buy it foiled on both sides, then you can simply lay it on a leveled concrete floor surface without waterproofing. The joints between the strips of isolon are glued together with construction tape, after which the flooring can be laid.
Thus, due to the presence of a variety of materials, you can choose a good option for warming the concrete floor for any room.
It is important not to forget, with each method of insulation, to create a waterproofing layer, as well as to ensure ventilation of the underground space where the insulation will be located. Ventilation is achieved very simply: gaps are left along the walls, which are then closed with skirting boards, leaving ventilation holes
Repair of an old wooden floor in an apartment
Floor boarding in ideal conditions of an apartment can stand for a long time, at least 30-35 years. For apartments on the first floor, the service life of a wooden floor is reduced to 15 years. In the absence of a basement or basement, insulating and waterproofing layers, which is often found in "Khrushchev", wooden floors, even in an apartment, rot in a maximum of 10 years.
Replacement and repair of floorboards
The most common way to repair a wooden floor is to cull and replace the floorboards. Spot or local repair is considered economically justified only if the following conditions are met:
- If no more than 15% of boards are subject to repair in a room or apartment;
- There are no signs of fungus and insect damage on the wooden floor;
- The lag system is in a satisfactory condition;
- There are no water leaks, traces of condensate, floor ventilation provides the necessary level of humidity in the underground.
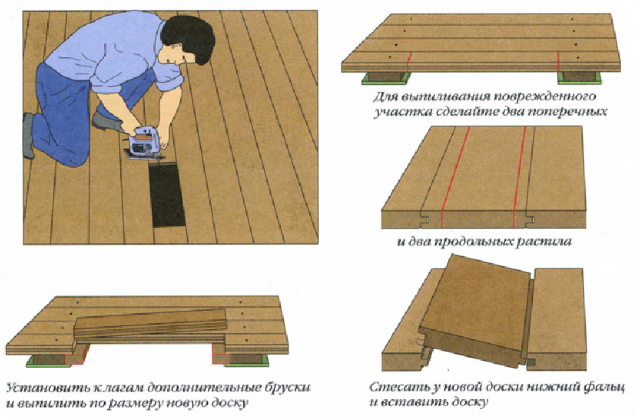
The boards to be replaced are freed from nails, the side seams are cut with a hacksaw or a jigsaw, after which the floorboard is removed from the row. If grooved boards are used in the device of a wooden floor, then the joint can only be cut from one side, the grooved side.
Through the opened hole, with the help of a flashlight and a mirror, the log beams are examined and the need for repair of the wooden floor support system is determined.
A patch prepared and pre-treated with an antiseptic is laid on a wooden floor so that there is a gap of at least 1 mm between the floorboards, otherwise the boards will creak after a set of uterine moisture in the apartment. Blanks for repair with tongue-and-groove boards are subjected to additional processing - they cut the lower edge of the groove-lock.
To fix the patch, nails 50-70 mm are used, hammering them “obliquely”. If the floorboards are carved from oak, ash or old pine, then the place of driving is wiped with a piece of laundry soap, or a nail is beaten directly through the soap bar.
Dealing with loose and buckled floorboards
Most often, the repair of raised floorboards is carried out by simply breaking nails. As in the case of laying patches or repair boards, swinging floorboards are fixed in new places by hammering nails at an angle of 60-70 degrees to the horizon.
Such repairs are enough for two to three years, provided that the wooden floors in the apartment are subjected to moderate stress. Next, the nail heads rise, and periodically you have to drive them into place. At the same time, experts categorically do not recommend hammering fasteners with grease from glue or alkyd varnish, most often such repairs lead to floorboard breakage.
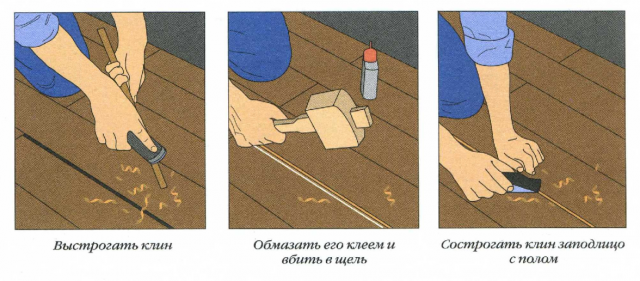
In a situation where, due to the deflection or destruction of the lag beams, the floorboards begin to sag in the center of the board, repairing the apartment with nails is useless. To repair the deflection of a wooden floor, the old-fashioned way of installing support pins is usually used.
To begin with, a line of passage under the board of the supporting lag beam is determined. Next, with the help of a brace and a thick, 20-25 mm drill, a hole is drilled in the floorboard so that it does not coincide with the log line.
The swinging floorboard is unloaded to ensure the leveling of the board, and a wooden pin is hammered into the hole so that the installed piece of wood reaches the concrete floor. As a result of the repair, the problematic floorboard has an additional support that can withstand any furniture in the apartment.
If the wooden floor in the apartment has sagged so much that it can be seen with the naked eye, it will be necessary to remove the boards and restore or repair the log beams.Replacement is carried out in a standard way, or old logs can be reinforced with a patch on the side surfaces of additional boards.
Sometimes apartment owners discover an unpleasant surprise when, during repairs, it is discovered that the log beams turn out to be sewn boards resting on bricks stacked in a column. This happens in old houses built in the 70-80s of the last century.
In this case, it is necessary to disassemble and restore the entire system of lags, and lay out the bricks in accordance with all the rules on the masonry mortar.
Final finishing step
The overhaul of wooden floors is completed by scraping the surface with an electric machine. Seams and joints are sealed with adhesive-based putty, best of all on carpentry glue, dried to a state of stone and polished to a smooth surface.
Before painting, fresh wooden floors are primed, you can use a special mixture or diluted varnish, it all depends on the chosen future paintwork.
Other types of waterproof materials
Sprayed and self-leveling waterproofing is considered the most reliable, but the cost of materials and work sometimes goes off scale, although, if possible, it is better to do it once, but “excellently”. Also, penetrating waterproofing has proven itself quite well: it stops moisture quite tolerably and serves as much as the structure itself costs. At the same time, it is quickly and quite easily applied, it can be used both under the screed and on top, both on the floor and on the walls. The cost of the material is much lower than sprayed and bulk formulations.
 The choice of flooring and the method of waterproofing the floor is a matter of taste for everyone
The choice of this or that method and material is a matter of taste for everyone. Let's just say one thing: not doing waterproofing at all in the hope that the pipes will not leak is stupidity. Firstly, water tends to evaporate and settle on the walls, ceiling and floor, and it also flows down to the floor under the influence of gravity. Secondly, laundry is often dried in the apartment, from which water drips; water drips from wet feet after a shower and splashes from a washstand. Thirdly, the drain in the kitchen sink may become clogged or the bathtub may overflow, and the hallway in winter turns into a continuous puddle ...
 Waterproofing the floor in the apartment - the key to a comfortable stay in it
There are a lot of sources of moisture in the apartment, so it’s better to take care of your comfort and health in advance, as well as prevent the neighbors from below from paying for repairs by making high-quality waterproofing of the floor. It is better, of course, to entrust this procedure to specialists who will select the most suitable material and perform the work efficiently and quickly.
Overview of insulation materials
The problem of a cold floor on the ground floor is typical for both private houses and urban high-rise buildings. To properly troubleshoot the problem, you need to find out the reasons for this situation:
- for private houses, the reason often lies in poor-quality / missing thermal insulation of the base;
- in high-rise buildings, the cold floor is the result of an unheated basement.
In the first case, everything is quite simple - you need to get rid of the cracks in the floor. For this purpose, the base is checked, and all detected gaps are sealed with mounting foam. Next, the floor is insulated in one of the possible ways.
Filling cracks in the floor
The ventilation hole cannot be dismantled or sealed tightly
And if everything is clear with private houses, then with city apartments everything is much more complicated. There are a number of possible ways of warming, we will get acquainted with each of them.
Mineral wool insulation. This material has excellent sound and thermal insulation properties, it is immune to aggressive chemicals and high temperatures.
mineral wool
Types of mineral wool by density
Thermal insulation with foam. Among its advantages, it is worth noting low cost, good insulating properties and durability.The material is light, it can be laid not only on concrete, but also on tiles, wood, etc.
Styrofoam
| Styrofoam board brand | PSB-S15 | PSB-S25 | PSB-S25F | PSB-S35 | PSB-S50 |
|---|---|---|---|---|---|
| Material density, kg/m3 | 10-11 | 15-16 | 16-17 | 25-27 | 35-37 |
| Compressive strength at 10% linear deformation, MPa, not less than | 0,05 | 0,1 | 0,12 | 0,16 | 0,16 |
| Bending strength, MPa, not less than | 0,07 | 0,18 | 0,2 | 0,25 | 0,3 |
| Thermal conductivity in a dry state at a temperature of 25 (+-5 degrees), W / (m * K), no more | 0,037 | 0,035 | 0,037 | 0,033 | 0,041 |
| Humidity of plates, %, not more | 1 | 1 | 1 | 1 | 1 |
| Self-burning time, sec, no more | 3 | 3 | 3 | 3 | 3 |
| Water absorption in 24 hours, %, no more | 1 | 1 | 1 | 1 | 1 |
| Service life, years (minimum-maximum) | 20-50 | 20-50 | 20-50 | 20-50 | 20-50 |
Thermal insulation with drywall or fiberboard.
Drywall
Use of the "warm floor" system.
Electric heated floors
Expanded clay insulation. Not the most reliable, but affordable option. It is characteristic that expanded clay can not only be used for backfilling the base, but also added to the concrete screed.
Expanded clay insulation
| Material | URSA | ISOVER | IZOVOL | IZOBEL | ECOWOOL |
|---|---|---|---|---|---|
| Thermal conductivity, W/m*°С | 0,04 | 0,041 | 0,034 | 0,035 | 0,035 |
| Operational density, kg/m3 | 11 | 11 | 35 | 28 | 35 |
| Recommended layer thickness, mm | 200 | 200 | 150 | 150 | 150 |
| Insulation cost, rub/1m3 | 1347,22 | 1470 | 1800 | 1270 | 1050 |
| Insulation cost, rub/1m2 | 269,44 | 293,8 | 270 | 187,5 | 157,5 |
Popular thermal insulation materials and their features
A large selection of materials is presented on the modern construction market, the characteristics and properties of which make it possible to use them for warming the floor of the first floor. Each insulator has both a number of advantages and a certain list of weak qualities.
Mineral wool
| Those. characteristics of mineral wool | Indicators |
|---|---|
| Density | 115 kg/m3 |
| Water absorption at full immersion, no more | 1% |
| Average fiber diameter, no more | 0.2 µm |
| The content of non-fibrous inclusions in the mass, no more | 4,5% |
| Thermal conductivity at 283+1 K, no more | 0.044 W/m*K |
| Shear strength, not less than | 50 kPa |
| Ultimate compressive strength, not less than | 100 kPa |
| Tensile strength, not less than | 150 kPa |
The most popular material for warming various structures is mineral wool. Among its main advantages are:
- high thermal insulation properties;
- resistance to fire;
- good sound insulation;
- relatively low cost.
The main drawback is the weak resistance to moisture, against which it becomes necessary to equip a high-quality waterproofing layer, otherwise the insulation will collapse very quickly.
Mineral wool is produced in the form of slabs and mats, which makes it possible to choose the most convenient option for a particular situation.
Styrofoam
No less popular thermal insulation material. Advantages:
- low thermal conductivity;
- small thickness and relatively low weight;
- strength;
- durability;
- resistance to mechanical damage.
Unlike mineral wool, polystyrene foam does not require such a serious moisture protection device.
If you have enough budget, you can even buy polyethylene foam. During the production of this material, its surface is covered with aluminum foil, eliminating the need for additional waterproofing.
Ecowool
It is a cellulose-based insulation with a variety of additives that improve its fire-resistant and environmentally friendly characteristics. The structure is a loose material. Ecowool is very easy to arrange - just pour it into a pre-assembled crate and cover it with a flooring.
A significant disadvantage of ecowool is its low resistance to moisture. Under its influence, the material very quickly loses its operational properties and collapses.
Fiberglass
This heater is rapidly gaining popularity. The main performance characteristics of fiberglass are beyond praise. The material is great for warming the floors of rooms located on the ground floor. Also among the advantages of fiberglass should include an affordable price.
Types of waterproofing materials for floors
A great variety of materials are produced, we will not classify and list them all, we will name only the most effective and popular materials, and also recall some old, but extremely tenacious delusions.
So, the most popular materials:
- roll or pasting;
- coating compositions and mastics;
- special plasters;
- bulk materials;
- penetrating compounds;
- bulk mixtures;
- sprayed polymers.
If you plan to waterproof the floor with your own hands, it is better to dwell on coating and plastering options. Rolled ones are also suitable, but it is more difficult to work with them, and not everyone will be able to lay and connect such coatings with high quality.
It is quite possible to independently use penetrating waterproofing, however, you will have to strictly follow the instructions for application and subsequent care during the aging of the coating, as well as perform a number of related procedures. In addition, the use of penetrating compounds involves abundant moistening of the base, which is fraught with water leakage to neighbors.
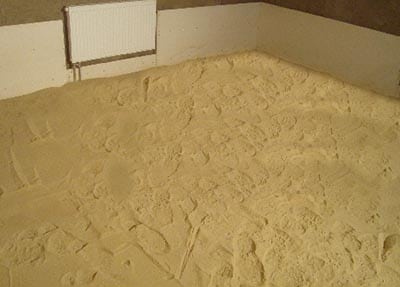 Backfill waterproofing resembles sand
Bulk waterproofing is applied under the screed. These are special granules that, when interacting with water, form a gel-like paste that prevents its further flow.
It will be extremely difficult to make bulk polymer floors (they are also called 3D floors) with your own hands, as they are very capricious and demanding on the state of the surface and following the instructions, which, without practical skill and certain devices, may seem too complicated.
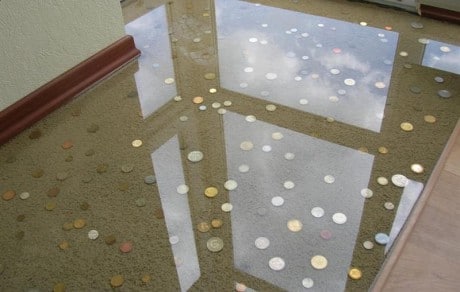 Self-leveling polymer floors do not allow moisture to pass through, but are complex and expensive in execution
Spray-on polymer coatings such as polyurea should also be applied by a professional with the appropriate equipment, clothing and experience. Sprayed insulation requires special equipment.
As for the misconceptions: floor tiles are not waterproofing, they are a finishing material. Even if you use silicone or polyurethane grout for joints, this still does not guarantee that water will not leak to neighbors in the event of a plumbing system failure. Oil paint or varnish is also not waterproofing. They are able to last no more than five years, then they crack and lag behind, especially paint.
It should also be remembered that waterproofing the floor, for example, for a bathroom, will not be enough, since the walls perfectly absorb moisture, and it flows down through the internal capillaries to the neighbors. In addition, the walls themselves, their decoration and the decoration of adjacent rooms deteriorate.
How to insulate the floor on the ground
In some private houses, the floor is mounted directly on the ground, therefore it also requires serious insulation. Thermal insulation of such structures should be considered at the stage of building a house.
When building a house, the top layer of soil is removed and removed, crushed stone and sand are poured in its place. Each layer is poured to a height of about 10 cm and well compacted. Insulation of the floor of the first floor in this case can be carried out on sand or on a concrete screed. In the first method, the heat-insulating material is laid directly on the compacted sand, in the second, a concrete slab up to 12 cm thick is first poured.
As a heater, it is best to use expanded polystyrene, which is not afraid of moisture. The perimeter of the room is treated with a damper tape, and waterproofing is laid on the insulation in the form of a polyethylene film or a vapor barrier membrane. Then, a cement screed with a reinforcing mesh is poured over this entire structure. After the solution has dried, the floors of the first floor can be covered with a decorative coating.
The scheme of insulation of the concrete floor of the first floor depends on how the floor is made:
- Floor on the ground (described in detail in the article Floor insulation on the ground, we do not consider it here);
- Floor on floor slabs (with a cold underground).
Consider all options for warming the concrete floor of the first floor on the floor slabs.
Insulation of the concrete floor of the first floor, from below, from the underground
 Insulation of the concrete floor of the first floor (from below)
Such insulation can be performed when there is a place in the underground for these works (at least 1 meter). Underground soil, while not specially closed. In the underground, air is needed (the required amount is determined by calculation). A reinforced screed is poured over the slab from above. Reinforcement from a mesh with a cell of 100x100 from a wire with a diameter of 3-4 mm.
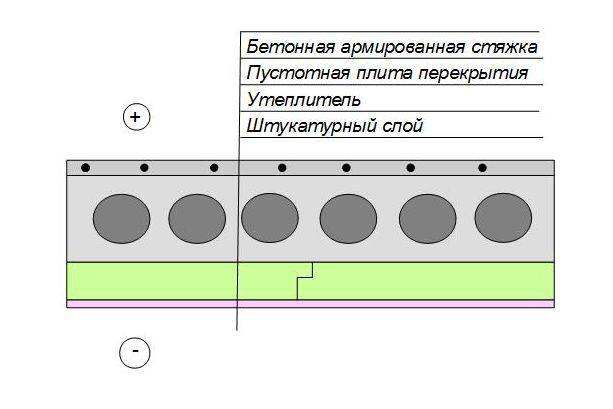
Insulation of the concrete floor of the first floor, from above from the room under the screed
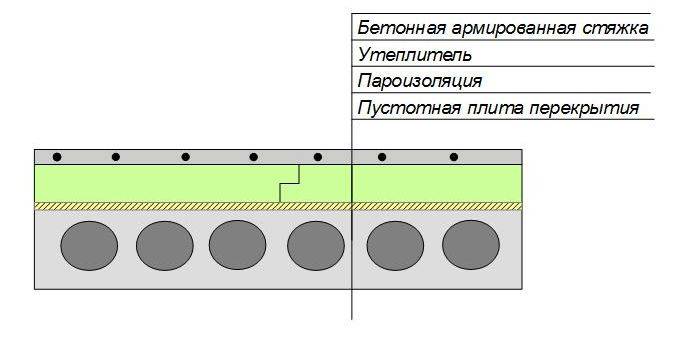 Insulation of the concrete floor of the first floor (from above under the screed)
Such a scheme is used if there is no longer access to the space under the plates. A reinforced screed is poured on top of the insulation. Reinforcement from a mesh with a cell of 100x100 from a wire with a diameter of 3-4 mm.
Insulation of the concrete floor of the first floor, from above from the room, using a log
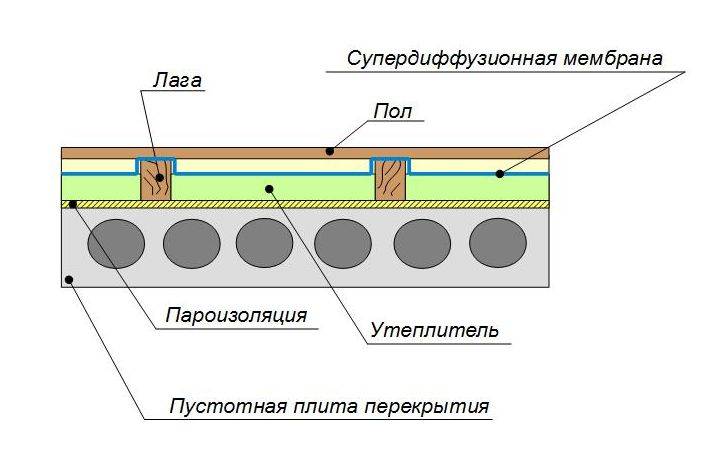 Insulation of the concrete floor of the first floor (using logs)
When there is no access to the space under the slabs, then a scheme using a lag is also applied. This design allows you not to perform screeds, all work is "dry".
How to insulate the concrete floor of the first floor
Consider insulation options for all insulation schemes (shown in the figures above).
To insulate the concrete floor of the first floor, from below, from the side of the underground (Figure 1), XPS is used, density 30-35 kg / m3. The thickness of the XPS is determined by the calculation for a specific region of construction, but not less than 50 mm. EPS from the underground can be plastered over the grid, but this is completely optional. This material is not afraid of moisture, but there is no sunlight there (EPS is not recommended to be left for a long time under the influence of UV).
To insulate the concrete floor of the first floor, from above from the room under the screed (Figure 2), XPS or foam plastic is used. XPS density 30-35 kg/m3, polystyrene with a density of at least 30 kg/m3. A vapor barrier film must be laid under the insulation on the stove. The thickness of the insulation is determined by the calculation for a particular region of construction, but not less than 50 mm.
To insulate the concrete floor of the first floor, from above from the room, using a log (Figure 3), mineral wool or fiberglass wool is used. Density for mineral wool 20-40 kg / m3 (both slab and roll positions are possible). For fiberglass, the density is 11-17 kg / m3, both plate and roll positions are also possible. A vapor barrier film must be laid under the insulation on the stove. From above, the insulation can be covered with a superdiffusion membrane (for rooms such as a kitchen). The thickness of the insulation is determined by the calculation for a particular region of construction, but not less than 50 mm.
Insulation of the concrete floor of the first floor
Why is insulation performed?
Before insulating a concrete floor, it is necessary to understand the feasibility of this event. Concrete has a high thermal conductivity. This means that it passes heat well through itself and takes it out of the room. To prevent heat loss, materials with better thermal conductivity are used.
Laying insulation as an additional layer in a private house on the floor of the first floor prevents the following problems:
- condensation on a cold surface from the side of warm air;
- the appearance of mold, fungus and other microorganisms dangerous to humans;
- violation of the temperature and humidity conditions of the room;
- high heating costs.
If you leave the concrete floor in a private house without insulation, then in addition to being uncomfortable to use, the structure will soon require serious repairs.
Floor insulation works
 Floor coverings are divided into two types - filled with concrete and made of wood. The installation of each of them has its own characteristics.
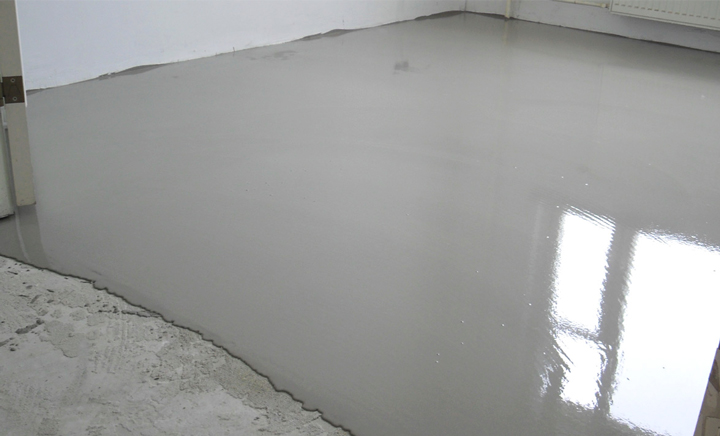
For concrete floors, bulk and liquid materials are used. The main advantage of such materials is the ability to level the surface.
For wood floors, it is best to take glass or mineral wool, polyethylene or polyurethane.
But liquid materials can cause the accumulation of moisture and, as a result, the destruction of the floor.
The main step in the insulation of wooden floors is filling the distance between the bars with material.
For installation, we need: insulation material, polypropylene film, adhesive tape, plywood or board. 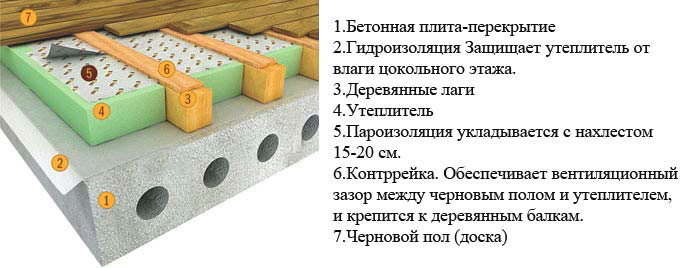
Take a vapor-insulating film with a margin, since we will put its edges on the walls. And if you are going to use mineral wool, then remember that it must be covered on both sides.
- We are dismantling the old floor. We remove the boards and thoroughly clean the entire space from unnecessary debris and dust.
- We do waterproofing. We cover the entire floor with a film and the transition to the wall by about 5 cm. If you have to use two cuts, then we lay them one on top of the other and fasten them with adhesive tape. We fasten the edges to the wall with a stapler, do not stretch the film to avoid tears.
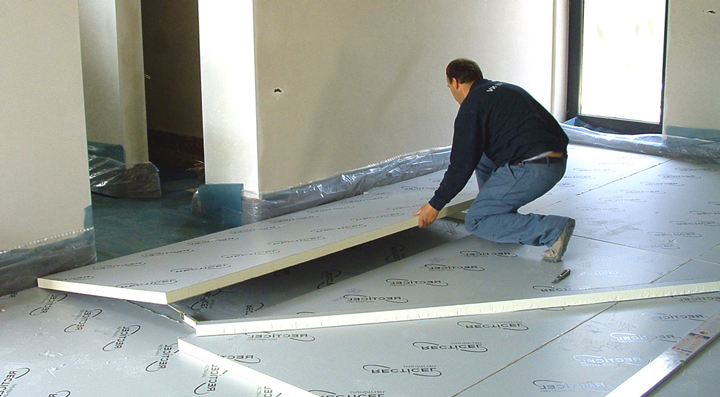
- We cut the foam into pieces so that they fit between the bars. When using mineral wool, remember that the pieces should be 2-3 cm larger in order to fill the space most tightly.
- When using expanded clay or shavings, make sure that the layer does not exceed 20 cm.
- We make installation of the second layer of waterproofing. We cover the surface with a film, glue all the joints and seams with adhesive tape.
- We cover the entire structure with primed plywood or chipboard.
- We fix the base to the lags.
How to insulate the floor in the apartment
We warm the concrete floor
- We dismantle the old floor. If pits and chips appeared in the process, fill them with a solution and wait for them to dry.
- We cover the entire floor with a vapor barrier film, raise it to the walls by 3-5 cm. If there are joints, we seal them with tape.
- We spread the insulation, and on top of the waterproofing. If we use polystyrene foam or polystyrene, we do without a second layer.
- We put a reinforcing screed on top, fix it well so that it does not move when pouring the floor.
- We prepare a solution. Usually cement 500, 400 or 300 is used. We mix cement and sand in proportions of 3:1, 2:1 or 1:1, respectively. The solution should be similar to homogeneous sour cream. We fill in a layer of 5 cm, it is advisable to do it at a time, so that everything dries evenly.
After two weeks, we proceed to the primer, and then close it with a decorative coating.
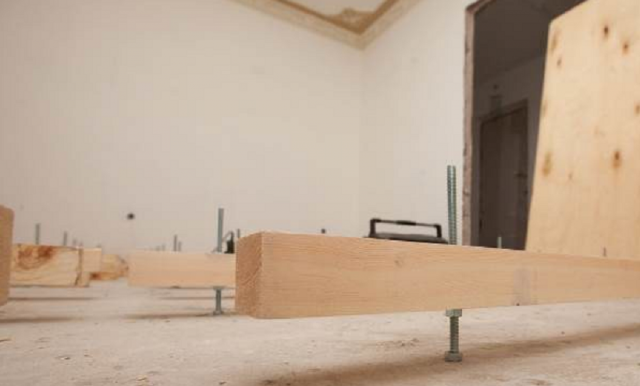
Thermal insulation along the lags
This option is very similar to the insulation of wooden floors.
We need a timber, it should be fairly even, dry and without any defects.
- We process with an antiseptic solution.
- We clear the space, level the surface of the future floor. We distribute a mixture that will protect the floor from moisture. We process the walls by 3-5 cm with mastic.
- We put the bars at a distance of 70-90 cm from each other. We check that the floor is without slope. We fix our logs with anchor bolts.
- Between the resulting lags we put material for thermal insulation.
- We cover everything with plywood or chipboard. We advise you to retreat from the walls by 1.5 cm in order to avoid disturbing the surface layer.
- If possible, lay a rough coat in 2 layers. We fix with screws to the bars.
- The base is ready, you can proceed with the installation of the decorative floor.
https://youtube.com/watch?v=nwmKCXhmtyc
Chipboard, plywood and polystyrene as insulation options
- We begin the work, as usual, with the analysis of the old floor and cleaning it of dust and debris.
- We cover the entire surface with a film, and connect the joints with adhesive tape.
- We retreat from the wall by 15 mm and lay out chipboard or plywood.
- We put another layer on top, but overlap the joints with a solid surface. We fix with anchors to the base.
- We coat well with oil paint and putty.
- Our floor is ready.
We insulate the floor in the apartment with polystyrene foam
This is the most sought after insulation in the modern world.
It has good water resistance.And it will last as long as a wooden coating, so you will have to replace it only at the next repair in 50 years.
Very compact, so when using it, the height of the floor will not change much. It can be laid on concrete, soil, even without preliminary insulation from moisture.
Warm floor
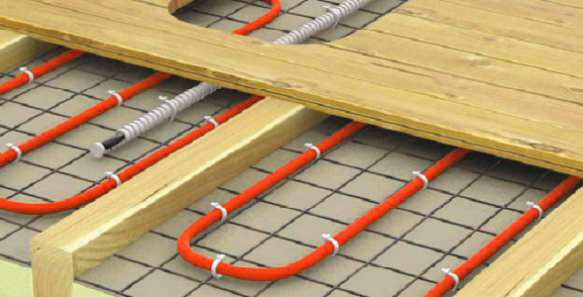
The warm floor enters our life with improbable speed. Now not only private, but also multi-storey buildings have elements of a warm floor. It is either water or electric.
Mounted in the screed or on top of it.
Do-it-yourself concrete floor repair in an apartment
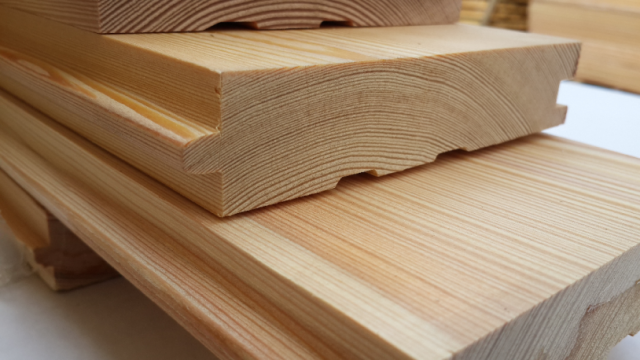
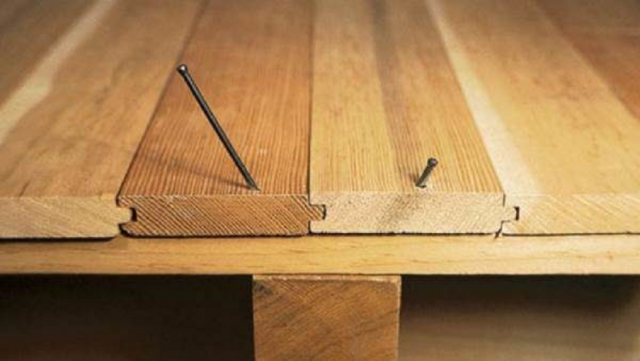
In apartments of more modern projects, wooden floors are made on a concrete base, most often in the form of a tongue-and-groove floorboard. This solution allows you to reduce the size of the underground space in the apartment, and at the same time reduce the cost of installing the coating. The boards are laid on a beam fixed on a concrete base. According to the standards, concrete must be covered with waterproofing and thermal insulation.
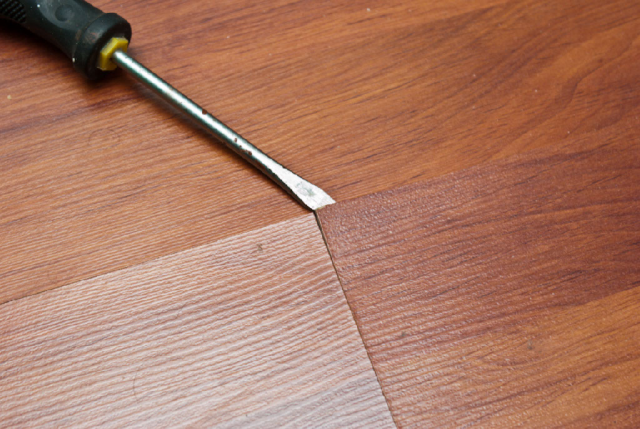
Warping of the floorboards is considered to be a common reason for repairing a wood floor on concrete. This happens due to the accumulation of water condensate under the wooden floor, respectively, the material swells and expands, rises at the herringbone joints. This happens if the apartment is regularly flooded with neighbors. The second reason is the incorrect arrangement of the heating system under the windows of the apartment; in the autumn-winter period, moist cold air, bypassing the heating radiator, penetrates under the wooden floor.
Floor restoration
If you have planned to restore the floor in a wooden house, then different options are also possible here.
For example, your house has a basement, and the floorboards of the first floor are also the ceiling for the basement.
The first thing to do is to check the condition of the lag by going down to the basement and make sure that they do not require replacement. After that, accurately determine the creaky floorboard and pull it to the log with self-tapping screws.
Repair of the floor in a wooden house can be not only on the ground floor. The installation method depends on the coating. If these are just boards, then they can be pulled to the joists by increasing the number of screws or nails.
If you have parquet laid, then check if the creak comes from the parquet boards, then it is enough to re-lay them and fix them again. If the parquet is “not to blame” for the creak, then carefully dismantle each plank, inspect the subfloor under the parquet.
Perhaps it is enough to simply pull it to the lags, or it may need to be replaced. Most often, the basis for parquet is chipboard, hardboard, plywood and similar materials, the replacement of such material is quite simple.
What if the floor is on the second floor?
When repairing a wooden floor on the second floor of a wooden house, the principle does not change. But instead of logs, it is likely that tie-ins on wooden beams or stuffed bars are used.
If bars are used, check that they are securely fastened and have no play. After that, inspect the attachment points of the floorboards themselves. In the case of using parquet instead of floorboards, use the recommendations given in the previous method.
Tip: do not use ordinary dowels to attach the log to the concrete base.
Consider the option of repairing the floor in the apartment
Most often, it is in old apartments that wooden floors creak exactly in those places where they are mostly walked on (transition from room to room, corridors, floor next to a sofa or window).
The laying technology in old houses did not provide for fastening the log, and they were simply laid on a concrete subfloor. Over time, such logs dry out, play appears and the floor begins to creak.
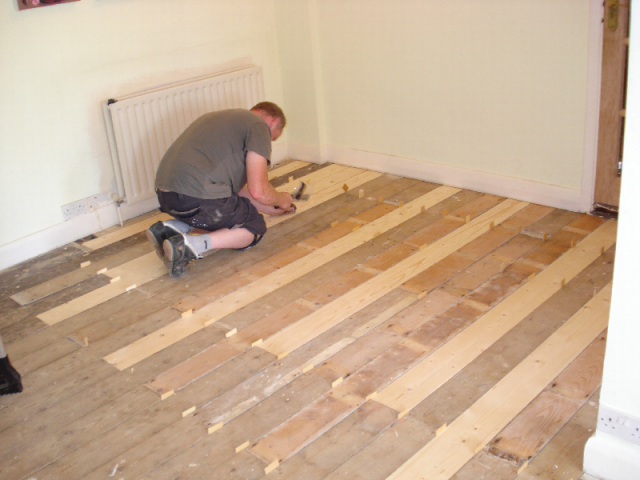
If the boards themselves are still in good condition, they can be carefully dismantled. Carefully check the logs, if they are whole and even, then carefully remove them to the side, clean the concrete surface from debris and large irregularities.
Measure so that the height of the lag along with the board is at the level of the threshold. If you plan to replace the boards with a laminate, then remember that under the laminate on the logs you need to lay a coating of chipboard or plywood, therefore, the floor height will increase.
Recommendation: Start laying all boards from the corner. The second board is inserted into the groove of the first, while the first is pre-attached to the lags by screwing a self-tapping screw into the lower edge of the open groove. The self-tapping screw is recessed to such a state that its cap does not interfere with the entry of the spike.