Selection and preparation of materials for work
The characteristic of clay walls includes not only positive properties, such surfaces have a number of features when finishing. When choosing a material for plaster, it should be borne in mind that a composition that has a lower weight is suitable for a clay surface. Therefore, work on the plastering of external walls is carried out with solutions containing lime, it is recommended to carry out interior decoration with a gypsum or clay mixture. It is strongly not recommended to plaster clay surfaces with cement mortar. This will lead to the destruction of the calving layer due to its severity.
The finishing technology provides for the application of three layers: draft, finishing and decorative. For the initial stage of plastering the walls you will need:
Clay. According to the parameters of plasticity, it is divided into light, whose indicators vary between 0.17-0.27, and heavy, for which the plasticity number lies outside 0.27. Its color also matters. Red is the most common, although white, gray, yellow, and black material is also found. Comment! Despite the natural origin of clay, sometimes it contains minerals (quartz, magnetite, etc.), which have an increased level of radioactivity.
Wood sawdust. For rough plastering of clay walls, only thoroughly dried sawdust is used.
It is important to be sure that they do not have fungal diseases. Fresh material for finishing clay walls cannot be used; at least a year must pass from the moment they are received.
Sand
Medium-fraction material will help to ensure high-quality wall plastering; it is better to weed out large inclusions.
To prepare a mortar for rough plaster, first sawdust is mixed with sand, then clay and water are gradually added.
For the second layer of plaster you will need cement, clay and sand. Due to the different properties of clay, the optimal proportions for the solution will have to be selected independently, depending on its fat content and plasticity. The approximate ratio of components is 1:1:3. The readiness of plaster for finishing clay walls with your own hands is determined in various ways:
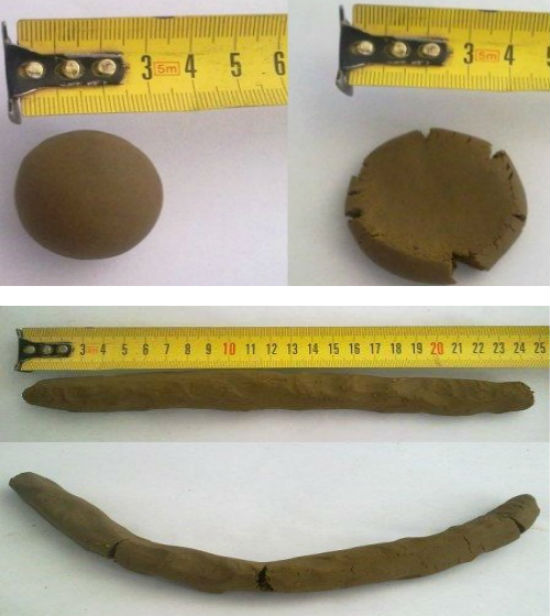
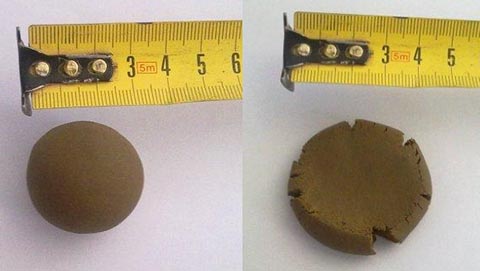
- You can roll a small ball that does not stick to the skin and crush it on a flat surface. With an ideal ratio of components, cracks on the sides should not appear.
- The second option is to form a flagellum 20 cm long with a diameter of 2 cm, and roll the ring. The correct plasticity of the wall plaster mortar is again determined by the absence of cracks.
Important! It is better not to use sawdust for fine finishing of clay surfaces. They take moisture from the solution and swell, breaking the smooth surface of the wall.
The video below will help determine the correct consistency of the plaster solution for finishing clay walls.
Advantages of home insulation with clay
Obviously, insulating a house with clay has many positive aspects that you should be aware of. And the benefits are:
- Cheapness. This material is significantly cheaper than analogues that are now available on the market. Thus, if there are any problems with the clay insulation process, you can safely abandon this idea. Like clay, sawdust can be removed with a minimum of effort. The main concern is the arrangement of insulation, and this must be remembered.
- Light weight. Again, unlike analogues, clay has a fairly modest weight. This, in turn, has a positive effect on the process of warming. Quite often, heaters are distinguished by their large weight, and this can adversely affect the state of the floor.Accordingly, there should not be such problems with clay, but just in case, you still need to carry out some tests that will allow you to establish the strength of the overlap.
- Fire safety. There is no doubt that clay is a material that will certainly not cause a fire, as well as its spread. In the event that it is necessary to choose safe insulation, then clay is an ideal option. Do not pay attention to the presence of sawdust in this heater, since they certainly do not carry any danger.
Well, again I would like to repeat that the process of arranging clay-based insulation is quite simple. In this case, we do not need to have any original devices, and even more so specialists who are involved in such events. Everything can be done by hand. Of course, an assistant in this matter will not hurt.

Clay plaster composition and recipe
There are many compositions of clay plaster, but there is no universal recipe, the quality of the composition depends on the components. And the main one is clay for plastering walls, it is divided into 2 types: light and oily, the latter is most suitable.
To check the quality, you should roll a ball of small diameter from clay, put it on a flat surface and flatten it. If the edges remain intact, then the material is suitable for plaster, cracks have begun - the composition is of little use. Another test is to roll up a flagellum with a length of 200-300 mm, a section of 10-20 mm and carefully bend it; the edges of the quality material do not crack.
Ways to check the quality of the material
Recipe table, proportions in parts:
| Clay | Gypsum | Sand | Cement | sawdust, fiber | Lime | Asbestos |
| 3 | 1 | 1 | 2 | 1/5 | ||
| 4 | 2 | 1 | 1 | 1/25 | ||
| 1 | 2 | 1 | 1/10 | |||
| 1 | 3 | |||||
| 1 | 3 | 0,5-1 |
For plastering furnaces, fireclay clay 1 hour: 2 hours sand: 1 hour should be used. cement.
Due to the fact that there are a lot of recipes, we will analyze the characteristics of the most popular:
- Sand-clay mortar for wall plastering - used for finishing, has a high thermal conductivity, therefore it is not suitable for the base layer.
- To improve the thermal insulation characteristics, finely chopped straw or sawdust is added to the solution of clay and sand, in the modern version - synthetic fibers (fiber).
- Clay plaster with sawdust, without sand. The composition dries quickly, loses elasticity, is difficult to work with, but the finish is very strong and durable.
Tip: To increase the elasticity of clay plaster, it is recommended to add dung, wheat flour. To improve thermal insulation - finely chopped straw, reed fibers, hemp, wool, cattail.
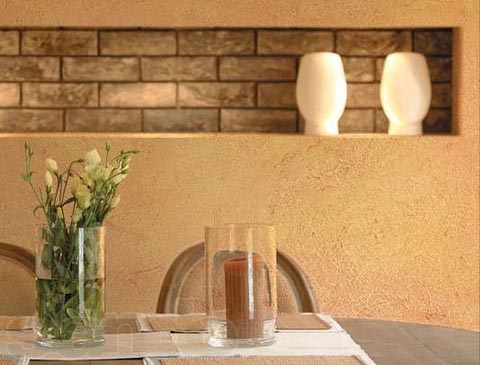
For a smooth finish layer, a clay-sand mixture is suitable
How to mix the solution
So that clay plaster does not lose its qualities, it must be prepared according to strict rules:
- Clay is crushed, placed in a container, filled with water, left for a day.
- Grind through a construction sieve, the cell is not more than 3 * 3 mm.
- It is mixed with sand and other dry ingredients are added, the composition is well kneaded so that it easily leaves the hands.
- Chopped fiber, straw, sawdust, etc. are added. The smaller the fraction, the easier it is to put the plaster on the walls, the layer will be smoother.
- Dilute with water to the desired consistency (thick sour cream).
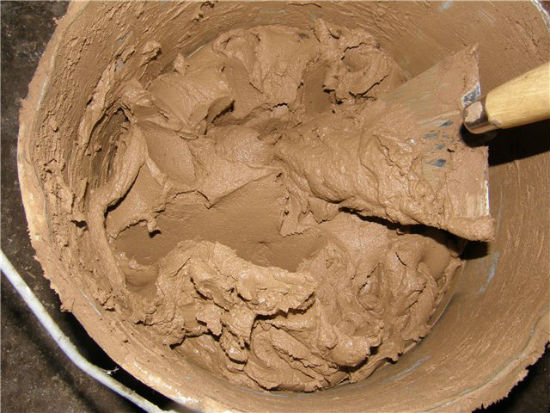
Correct material consistency
Preparation of a clay-based insulation mass
This process is the most responsible. As we mentioned earlier, any imbalances in proportion can be a serious problem.
- First of all, we need an iron barrel in which our future insulation will be mixed. In this container you need to place a certain amount of clay. In a specific case, we will use about 5 buckets of natural material.
- From above, clay is poured with a small amount of water. After that, you need to leave the mass for a while to soak.
- Stir the mixture immediately. This is done until the clay becomes like sour cream in consistency.
- Next we need a concrete mixer. About half of the mixture obtained earlier, we place there. Along with this, sawdust must also be placed in the concrete mixer. As for the proportions, here there are 2/3 buckets of dense sawdust for 1 bucket of clay. In this case, the proportions may vary slightly. In the end, we should get a dense mixture. Accordingly, if you get something very liquid, you should safely add more clay.
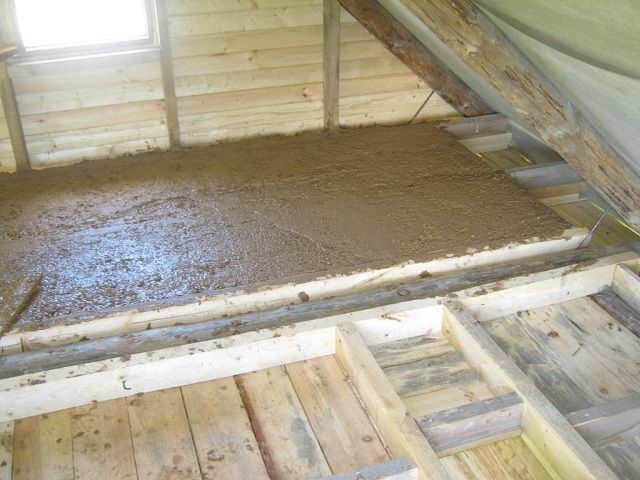
The process of insulating the ceiling with clay
It should be noted in advance that clay insulation is a rather serious process, the implementation of which must be thoroughly analyzed. Most often we are talking about the fact that the clay mass dries for a long time, so it makes sense to hold such events in the summer. Accordingly, by winter, the mass will become monolithic and will please with good efficiency. With increased humidity, the clay will remain in its original state, and you can completely forget about some thermal insulation characteristics.
Separately, I would like to say about fire safety. Before the construction process, it is necessary to take into account all the details that could affect the above aspect. Most often, problems arise after the owners insulate the ceiling with clay over electrical wiring. This cannot be allowed in any way, especially since later it will be necessary to carry out the insulation first, and this is a considerable amount of work. Accordingly, if we are dealing with wiring, you can use the tubes through which it should go.
The main process of warming includes the following steps:
- First of all, glassine is placed on the prepared surface. This material often has a small thickness, therefore it is attached to the wood surface with a stapler. If we have a concrete base, then a wide adhesive tape will do. The most important thing is to ensure a good density of the material flooring. As already mentioned, cardboard can be placed under this layer, which will improve the thermal insulation properties.
- Next comes the time to use our clay mass. It should be borne in mind that the clay dries for a long time, after the prepared mixture, you can use it the next day, and even after a longer period of time. We take the barrel in which the clay is located and fill the voids on the surface. As mentioned earlier, there must be a kind of formwork, which will become an excellent form for clay. The ideal layer thickness should be about 30 cm. Of course, many people may think that it is the thickness of the layer that decides everything here. However, it must be borne in mind that too large a mass of clay can even adversely affect the overall situation associated with the operation of the dwelling. Clay is a heavy resource that can damage the floor with its large weight. In any case, making a layer of material more than 30 cm simply does not make sense. If there is too little clay, then such insulation will not give any efficiency.
- In the event that cracks appear on the surface, it is necessary to immediately begin to act so that the problem does not take on colossal proportions. To solve it, you need to arm yourself with raw clay and try to grout the cracks.
- Approximately 2 weeks you need to wait for the clay to dry. After that, you can safely carry out all other construction activities. At this stage, the created formwork is disassembled (if necessary), after which it is possible to create a wooden floor based on a layer of clay. Obviously, there is no need for this, especially since free access to the insulation allows you to quickly get rid of all possible problems. But in the event that this surface is necessary for the movement of people, then it is still worth thinking about creating a floor.
Today, many builders greatly simplify this process. The thing is that the above formwork has a lot of problem areas.For example, after a long period of operation, it will be very difficult to remove clay. Accordingly, such work takes a lot of effort. To avoid this, you can simply create small tree forms. They can be placed on the surface and filled with clay and sawdust. Further, when it will be necessary to carry out some actions with the surface, it is enough just to extract the form, each of which has a very small weight.
https://youtube.com/watch?v=zx8WiU-qxvI
Wall insulation with straw and clay
Today, in the modern market of building materials, we have a wide selection of thermal insulation. Each of the materials has certain features and individual properties, as well as certain requirements for installation technology. But as soon as we are looking for a more environmentally friendly and at the same time effective way to insulate a wooden house, we will focus on the old, but not forgotten method and consider warming a wooden house with straw.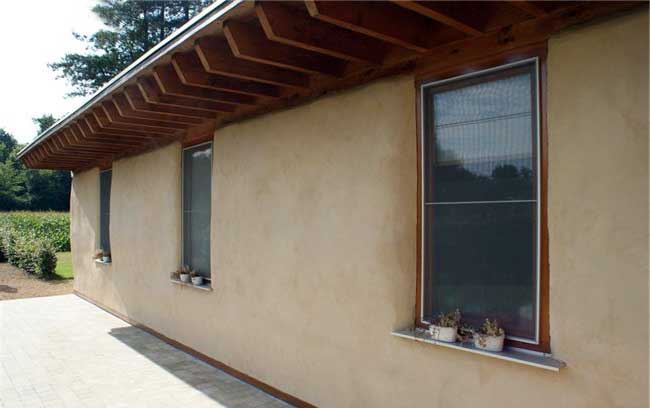
The popularity and relevance of warming houses with clay is explained by the following advantages of this method of thermal insulation:
- Insulating clay mixture is easy to prepare and apply. To insulate a frame house with straw and clay, you do not need special building skills, you can organize the whole process and bring it to its logical conclusion yourself. This insulation can be done without problems with your own hands.
Low cost clay insulation. The comparative cost of clay insulation is much lower compared to synthetic materials.
High rates of thermal insulation. This is a fairly reliable way of thermal insulation of premises. Can be used to insulate floors, ceilings, roofs, etc.
Prepared in accordance with the technology, this composition is not attractive to rodents and insects.
The environmental friendliness of this heater is beyond doubt. All leavers are of natural origin, which means they are not toxic.
The disadvantages of this method of thermal insulation include certain labor costs and duration of work.
Features of thermal insulation clay with sawdust
For home buildings, a cheap and simple insulation made of clay and sawdust has long been used, which is easy to make at home.
Clay is a sedimentary layer that was formed as a result of the destruction of rocks. In the presence of moisture, it passes from a powdery state to a plastic one. It contains minerals belonging to the group of kaolinites. Diverse in composition, as well as physical properties, it is used everywhere for the production of building materials, among which it is considered in its pure form.
The properties of clay directly depend on its composition. So, she can behave differently when coming into contact with water. In some cases, when the material is mixed with water, a dough-like mass is formed. In other cases, the result of such a procedure is the formation of a suspension. In the first case, clay has unique properties and can take any shape and keep it when it dries. It is this clay that is best suited for the manufacture of thermal insulation in combination with sawdust.
Now clay is quite widely used as a heater due to its thermal insulation properties and low cost. In most cases, walls and ceilings are insulated with clay.
The advantage of insulation using sawdust is that it is easy to manufacture and use. It is resistant to high temperatures, light, fairly low prices. The use of this material as an insulating substance reduces the risk of fires. Clay with sawdust as a heater is a great option for warming a home.
Process Technology
Insulation of walls or ceilings is carried out in approximately the same way. First, preparatory work is carried out, the surface is prepared for the application of insulation.Then they proceed directly to filling the frame with clay mortar.
Surface preparation
Walls or ceilings at the start must be covered with waterproofing material. If the film does not cover the surface in a continuous piece, the material must be overlapped. This will ensure the maximum density of the waterproofing film.

Wooden bars are attached every 30-40 cm. They will form a frame for filling with a mixture.
Clay mortar preparation
Where would you prefer to live: in a private house or apartment?
Definitely an apartment! Comfort, coziness and warmth, around people and infrastructure
754 ( 7.48 % )
Only a private house! Around the silence, peace, a lot of space and few people!
4588 ( 45.52 % )
Why choose just one? An apartment in the city, and a private house outside the city.
4306 ( 42.72 % )
I am a free Citizen of Planet Earth! I don't need a man-made cage!
431 ( 4.28 % )
Back
It all starts with the right mixture. It is this factor that is decisive. It determines the result and effectiveness of home insulation
When preparing a mixture, it is important to strictly observe the proportions. The process of preparing a solution from clay consists of two stages:
- Clay pour water, leave for a few days. The mixture should become homogeneous and resemble the consistency of thick sour cream.
- The finished mixture of clay with water must be mixed with sawdust in proportion: for 1 bucket of clay, take 2.5-3 buckets of sawdust. They must be small, without large pieces. It is recommended to use sawdust from coniferous trees or oak.

The resulting mixture can be used immediately or the next day. Since the clay dries slowly, the mixture may last longer.
The final stage is the application of the prepared insulation in the resulting gaps between the bars.

If small cracks appear during the application of the solution, they must immediately be moistened and rubbed with liquid clay. Then this thin layer can be covered with a 5 cm layer of sawdust.
After filling all the cells, you need to be patient for 2-4 weeks. Approximately so much clay will need to completely dry and harden.

Finishing wall work
After the clay mixture has completely dried, the final stages of work are carried out:
- surface plastering;
- final finishing.
The ancient method of applying clay is a great alternative to expensive materials. It has a lot of advantages and a few minor disadvantages. It doesn’t take much time and effort once to enjoy the result of your work for many years.
Looking back, we can say with confidence that the old methods of using clay in construction, although losing their popularity over the years, remain reliable, proven and safe.
Advantages and disadvantages of clay plaster
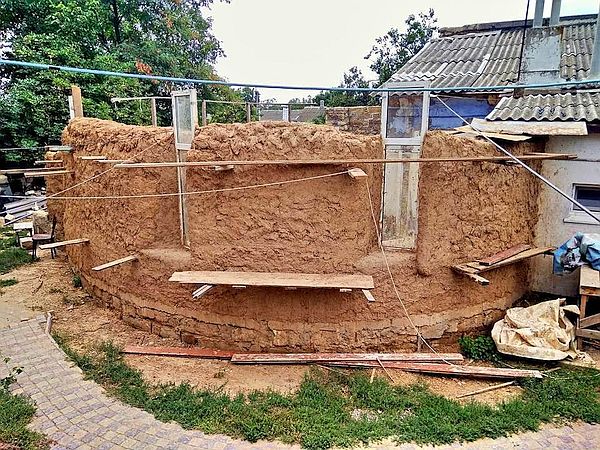
Before making a decision on finishing the walls with clay plaster, it is necessary to weigh all the positive and negative aspects of this type of plaster. Now in the villages you can still find such houses that were completely built of clay, and if all the rules were followed during construction, such a house could stand for decades without any intervention. This suggests that clay is a full-fledged building material that must be reckoned with and can be worked on now without fear that it will crumble.
Advantages of clay plaster
Having studied the properties of clay, we can say that it does not cause allergies, and during operation it does not emit substances harmful to the body. Other benefits are not obvious at first glance, but in fact there are many:
- Cheapness is a material that is everywhere;
- It does not poison the environment, it can be simply disposed of, it can be reused by soaking and adding the missing elements, or returned to nature without violating the laws of the ecosystem .;
- Breathable material, excellent vapor permeability, absorbs excess moisture from the air, regulating the humidity in the room;
- Acts as a natural absorbent, absorbing moisture along with harmful impurities from the air;
- Does not contain components hazardous to health.
If wood is used in the construction of the house, then plastering with clay on wood is a natural preservative for it, which does not require additional processing from pests.

Disadvantages of clay plaster
The main disadvantage of clay is that it is different in nature. Its properties also affect the quality of the plaster. Clay is not sand or gypsum, it does not have a constant chemical formula
The first important thing for the solution is the "fat content" or plasticity of the clay, which is why no one will tell you the exact proportions of adding sand and other elements. Need experience here
And since there are not so many specialists in this area today, you will have to independently study the methods of preparing the solution, which can help you acquire new knowledge and try to apply them.
The plasticity of clay is its ability to retain its shape when deformed, "flexibility". A good mortar will not come out of non-plastic clay, and such a plaster will not last long, it may crack all over during drying, and even while working with it will behave naughty. Furnaces and plasterers call good clay oily and bad clay thin, and have many ways to test clay. In our case, perhaps, one of the simplest ones will suffice.
To check the plasticity of clay, you just need to mix a small amount of clay in water so that it molds, but does not stick to your hands - this is its working condition. Then from this clay you need to roll the most ordinary ball, five centimeters in diameter, and crush it. If the ball is flattened into a saucer, this is good plastic clay. If the edges of this saucer are all in cracks, breaks, tears, then the size of the particles of such clay is not small enough to form a strong water film during kneading. But do not try to find one that will choke into a perfect circle - small cracks and breaks are inevitable even when using the fattest clay.
Disadvantages of using clay
There are not many drawbacks to this old, but reliable method of warming. There are only three main points:
- high labor costs;
- long drying period;
- the need to apply a thick layer of insulation mixture and plaster.
The clay insulation method, like many other options, is not without its drawbacks. However, compared with the final result, all these shortcomings are insignificant.
If you correctly approach the process, you can smooth out all the disadvantages:
- work not alone, but in a large company;
- planning construction work for the summer;
- before starting work, take into account the indicators of the area of \u200b\u200bthe room after insulation (subtract 30 cm). Only after a thorough analysis of all the pros and cons, you can begin to implement the planned plan for warming the house.
Do-it-yourself floor insulation technologies with sawdust
This material is practically not used in its pure form, without any binders. Even dry laying involves mixing with lime or pouring with a solution of boric acid.
For all methods, it is imperative to cover the subfloor with a waterproofing film - roofing material or polyethylene before backfilling. It is also necessary to think over the ventilation system, which is absolutely necessary for any sawdust insulation.
Dry backfill method
Assumes backfilling without the addition of binders:
- Sawdust for dry floor insulation should be well dried.
- Before backfilling, it is recommended to mix with slaked lime. One volume of lime for 10 - 15 volumes of sawdust. This mixture repels rodents and destroys insect larvae.
- You can also spill the mixture before backfilling with a solution of boric acid as an antiseptic. Then it will need to be dried again.
- Backfilling is carried out in two layers. The lower one is poured with chips 10–15 cm high, then carefully compacted.
- The second layer is filled with sawdust dust. It fills the voids in the chips. Final ramming is underway. The total thickness of the two-layer backfill should be at least 30 cm.
- The poured insulation should stand for 2 to 3 days. Since during this time it will settle, it will be necessary to bring it to the desired level.
- You can immediately pour the initial layer 10 - 15 cm more than required. Just at this thickness it will settle.
- Before laying the finishing floor, check whether there will be a gap for ventilation of the insulation.
Dry insulated floor
The dry method is used relatively rarely. More often, the addition of binding elements is used - cement or clay. This worsens the thermal insulation qualities, but provides protection against fire and sharply reduces the possibility of sawdust rotting.
Method of insulation with cement-sawdust mortar
Procedure:
- A sandy substrate 5 cm thick is laid out on the prepared subfloor.
- Materials are being prepared - a mixture of chips and dust, cement and water. The ratio is 1.5 volumes of cement and 1 volume of water for 10 volumes of sawdust.
- The sawdust mixture is thoroughly mixed with cement.
- Then water is added and the resulting solution is also mixed. It is better to add water in small portions to avoid poorly mixed pieces of mortar.
- Together with water, copper sulfate can be added as an antiseptic.
- The solution is unloaded onto the prepared substrate between the lags. A layer thickness of 10 - 15 cm is sufficient.
- The readiness of the hardened layer of sawdust-cement is determined by pressing on it. It should be elastic, but not pressed through.
- Laying the top layer of waterproofing and laying the final floor.
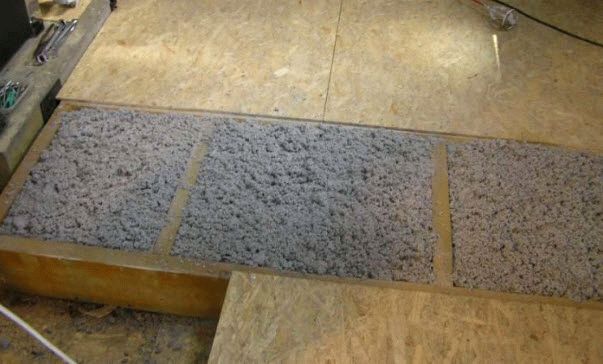
Floor insulated with cement-sawdust mixture
Insulation with sawdust and clay
The advantage of clay as a binder is that it is also a natural material. But the preparation of the clay-sawdust mixture is more complicated.
Preparing a mixture of clay and sawdust
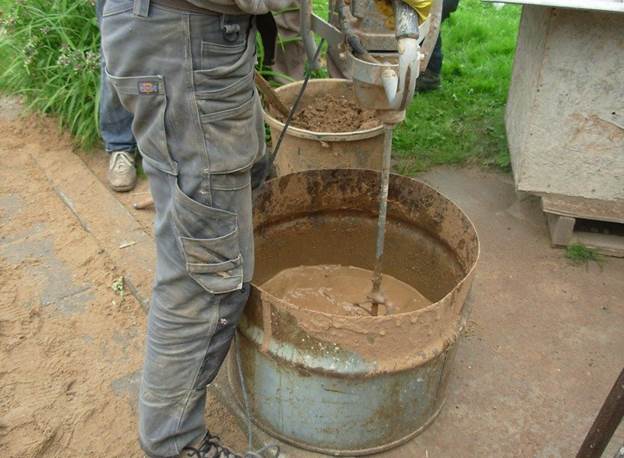
- You will need two containers - one for kneading clay, the other for mixing it with sawdust and shavings.
- It will be useful to use a construction mixer, since it is difficult to stir the clay manually.
- The clay is soaked and mixed until a thick homogeneous mass is obtained.
- The mixing of clay and sawdust is carried out in a volume ratio of 1:1.
- To improve the thermal insulation properties, technical salt is added to the solution.
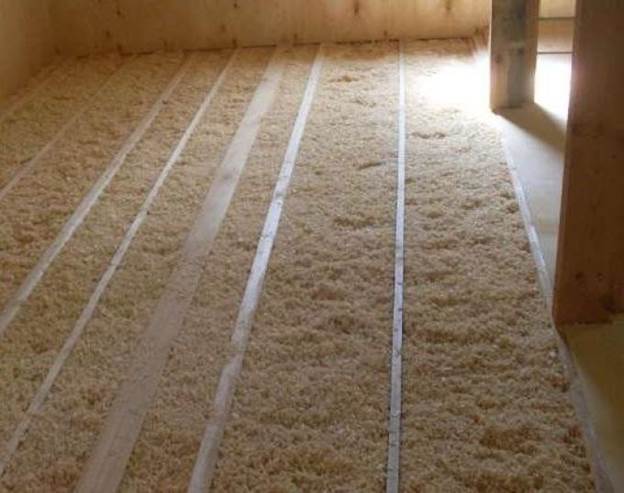
- The finished solution is laid out on the subfloor in several layers. Each new layer is added after the previous one has partially dried.
- The total thickness of the layer is brought to 10 - 12 cm. After that, it is left to dry completely.
- After the solution dries, cracks may form on it. They need to be additionally covered with a small amount of the same composition.
Laying clay-sawdust insulation
In conclusion, it should be repeated that when using wood chip waste for floor insulation, it is necessary to follow the rules for preparing the material and treating it with antiseptic agents. The very work of laying sawdust insulation, although it requires effort, is available to anyone.
sawdust types
Only in appearance it seems that all sawdust is the same. In fact, they differ significantly from each other. And for each type, their own methods of preparation and styling should be applied.
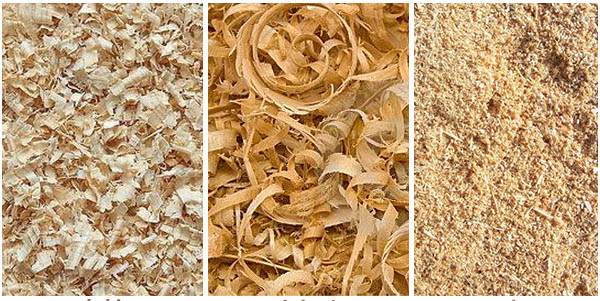
Various types of sawdust
Let's look at the main differences.
Dimensions
There are two types of fractions:
- Rubbish. These are small particles of wood that are formed when sawing wood. The exact dimensions depend on the saws used. Wood dust is also usually present in the dust.
- Shavings. This is mainly carpentry waste generated during planing and drilling of wood.
Fine dust is considered the best option for thermal conductivity. It forms a dense layer that does not allow heat to pass through and sags little over time. An insulating layer made of one chip is inferior in thermal conductivity to dust and subsequently significantly decreases in volume.
But usually a mixture of both types is used in different proportions.
wood species
The suitability of sawdust for thermal insulation also depends on the tree from which they are obtained. For insulation, it is recommended to choose those obtained from coniferous trees - pine, spruce, larch. The resin contained in their wood prevents decay and repels insects and rodents.
Beech and oak sawdust are considered good. Birch waste has low thermal conductivity. But birch wood is easier to rot than coniferous wood.
Humidity
This is an important characteristic of the material, especially for dry insulation, when backfilling is carried out without the use of additional binding agents. In this case, the humidity should not exceed 12 - 14%.
Carpentry waste has the least moisture, since dried wood is used for these works. Most of the sawdust obtained from sawing logs is not dry enough. Therefore, before use, they must be additionally dried.
Material quality
The following characteristics are taken into account:
- First of all, this is the duration of storage of sawdust after receipt. The longer they were stored, the more likely it was that they began to rot. Therefore, it is better to take sawdust immediately after receiving them.
- The presence of bark in sawdust. This is a serious deterioration in quality. The bark not only worsens the performance of thermal insulation, but also serves as a breeding ground for insect larvae and the initiator of decay.
- In some industries, wood waste may contain traces of engine oil. But apart from an unpleasant appearance, there is no other deterioration in their quality.
Disadvantages of insulation with clay
It must be admitted that clay is far from the most effective and modern material intended for insulation. Accordingly, many modern heaters produced for industrial and residential buildings insulate the room a little better. However, as you know, clay is several times cheaper than most analogues on the market.
In addition, as already mentioned, with the help of clay, experts advise to insulate only ceilings or ceilings. In other cases (insulation of walls, floors), natural material looks like a real outsider. In some cases, clay can act as an additional means of insulation.
Well, I would also like to include the disadvantages that the created insulation can easily become unusable. Therefore, in this case, it is necessary to take into account the proportions, without which the material will either begin to crumble after arrangement on the surface, or simply will not give any effect.
Formation of the draft layer
Sawdust provides reliability to the plaster solution. In their absence, for applying a draft composition to the gypsum surface, it will be necessary to attach a reinforcing nylon mesh. Fixation is best done directly with a mortar, when used to fix nails, the integrity of the wall is violated and strength deteriorates. It is practical to process clay walls with plaster with an assistant who will point out places that need improvement. The process includes the following steps:
- To work, you need a grater board or spatula.
- Two or three slides of plaster are applied to the working tool.
- The tool with the solution is pressed tightly and distributed over the surface.
- The direction of movement is from bottom to top. It is necessary to try to distribute the plaster as evenly as possible.
- The smooth surface of the wall is checked using the building level. Identified irregularities are eliminated immediately after detection.
If the wall is relatively flat, a thickness of 1 cm is sufficient for the starting layer.If there are significant irregularities on the clay surface, the plaster layer can increase up to 3-5 cm.
Advice! When processing large areas of clay walls with your own hands, it is much more convenient to apply plaster using beacons. This will speed up the whole process of work and increase the quality of the finish.
After applying a rough layer of plaster mortar, it takes time for it to dry completely. The whole process takes an average of 4-6 weeks. The approximate drying period for a layer 1 cm thick at room temperature is 5 days, while it is not recommended to speed up the process with a technical hair dryer or heaters. Therefore, it is better to plan the work for the warm period. It is optimal when the starting finishing begins in late spring - early summer, although it all depends on the region where the house with clay walls is located. Professional actions for applying plaster on the walls can be seen in the following video:
Surface preparation for clay insulation
Another important step is surface preparation. Here we will need to do everything possible so that the resulting mass is best placed on the surface and demonstrates excellent efficiency (formwork creation). Most often, we have a tree base on which all events will take place. Accordingly, we need to place a waterproofing material on this surface, which will keep the ceiling from penetrating water and moisture. There are many materials of this kind on the market. The most important thing is to properly position the waterproofing so that even after some time there is no trouble.
If the surface on which the insulation is planned to be installed is completely flat, you should think about creating small lags. These wood elements have a certain step between them, and filling such “sectors” with the resulting mass will be the most correct solution.
For additional thermal insulation, a layer of cardboard is often used, which is located under the film. But in this case, we somewhat worsen the situation related to fire safety, since this material can ignite. As you know, the ceiling must be of the highest security, especially when it comes to the threat of fire.
What is the clay mortar for plaster
So, how to prepare clay plaster? It turned out to be very simple. There are three recipes:
- sand and clay;
- sand-clay with the addition of fiber (sawdust, straw, pine needles);
- clay with fiber.
Also, the strength of the clay solution can be increased by adding lime to it. Lime is a natural component - it is obtained from limestone or chalk. In addition, it has excellent antibacterial properties, which prevents the formation of fungus.
Percentage of sand
Sand is very important for our solution, but there is no clear indication of its amount. It all depends on the plasticity of the clay. It is only known that it should be quite a lot - at least half of the entire solution. But putting more than 80% is also not recommended. Finding your share will have to be experienced. Remember to also thoroughly rinse the sand before adding it to the solution so that there are no foreign bodies and any debris in it.
Why is fiber needed?
To a modern urban dweller, the process of adding straw, needles, sawdust or horse manure to the solution (there is such a recipe) seems like shamanism and prejudice. But in fact, the fiber has many functions, it reinforces the solution (and not only the front part, like a mesh, but in all directions), increases the stability of the plaster, its wear resistance. In traditional recipes, straw plays the role of fiber, which also serves as an excellent insulation due to its thermal conductivity properties.Of course, you can choose the fiber to your taste, or even buy an industrial one, if you are not too chasing environmental friendliness and naturalness. If you still decide to stop at the straw, then make sure that it is very small, this will have a positive effect on the final smoothness of the wall. An alternative to straw, just as natural and cheap, is ordinary sawdust. They should also be small.
When working in urban areas, it is sometimes more reasonable to buy polypropylene fiber - a synthetic fiber. It is made from thermoplastic polymer. Such a fiber significantly improves the technical and operational characteristics of mortars and mixtures.