When repairing an apartment, it may be necessary to somehow hide various communications that spoil the appearance. The builders who erected houses in the Soviet period did not really care about the interior of the premises. Sewer pipes, water risers and electrical wiring elements can hopelessly spoil the impression even after the most expensive repairs. The best solution to this problem is to make a special box that will hide all these elements. It can be made of plywood, plastic, wood or chipboard, but most often boxes are made of drywall. This is a very comfortable and versatile material. How to make a drywall box? There are no special difficulties here.

In addition to ease of installation, drywall has another very important advantage over other options: a box made of plasterboard is suitable for attaching any finishing materials. That is, the design can be made in the same style as the rest of the surface, as a result of which it will not stand out against the general background.
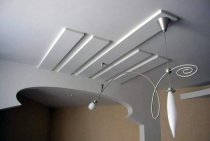
In addition to masking functions, the box can be used to place hidden lighting fixtures, design multi-level ceilings, and various ideas for interior design.

Necessary materials and tools
In order to make a drywall box for pipes or lighting fixtures, you do not need any special tools. It will be standard set when working with plasterboard:
- Measuring tool: tape measure, plumb line, square and level.
- Screwdriver or drill that has this function.
- Perforator.
- Metal scissors.

The surplus remaining after the repair may well be suitable as a material, unless this affects the quality of the box being built. Before you assemble a drywall box, you will have to purchase the missing materials. You will need:
- Guide and rack profile. Marked respectively with the symbols UD and CD. The exact number and footage of the profile will help determine the drawing made at the design stage of the box.
- Drywall. Which one to choose: ordinary or moisture resistant? The latter must be used in damp areas such as bathrooms or toilets. In addition, condensate may form on pipes filled with liquid. Moisture-resistant drywall used in the construction of the box will guarantee that the structure will last a long time and will not be covered with fungus or mold. And for a ceiling box in an ordinary room, erected to accommodate hidden lighting, an ordinary plasterboard is quite suitable.

- fastener elements: dowel-nails, small self-tapping screws for metal (popularly called "seeds", "bugs" or "fleas") for fastening profiles, screws for fixing drywall.
The frame of the structure can also be assembled from a wooden beam. But in this case, all elements must be impregnated with an antiseptic solution, paying special attention to the joints and sawn off ends. This greatly complicates the work, so it is preferable to use a metal profile. To fasten the GKL to the frame of the timber, wood screws are used.
Marking the mounting points of the guide profiles
A drywall box can have three or two faces. Structures of the second type are placed in the corner, which not only facilitates installation, but also significantly saves the space “eaten up” by the box.
The layout of vertically oriented structures usually starts from the floor, and then transferred to the walls. Horizontal boxes - start from the walls, then mark the floor and ceiling.
The dimensions of the box being erected should be chosen in such a way as to provide a gap between the drywall and pipes of several centimeters.
Note! If the finishing will use materials that have fixed dimensions, such as tiles, then it is better to adjust the width of the box to fit them. This will help to avoid unnecessary operations for cutting and fitting elements to the desired size.

Installation of the box frame
Sequence of work:
- Using a tape measure and a square, a contour is drawn on the floor for installing guides.
- To transfer it to the ceiling, use a plumb line.
- Corresponding points on the floor and ceiling are connected by drawing lines on the walls. For convenience, you can pull a thread between them.
- Guide profiles are fastened with dowel-nails.
- How to make the corner part of the frame, forming a protruding rib? There are two options. You can assemble this element from two guides, placing them at a right angle. The second option is more economical: instead of the second profile, elements 100–120 mm long are used, which are screwed to the base surface at the locations of the horizontal jumpers.
- Jumpers are necessary to stiffen the structure; not so many of them will be required per box: two or three on each side every 120 cm.
- The corner element made in this way is inserted into the guides on the floor and ceiling and fixed with “bugs”.
- The same "bugs" fasten horizontal jumpers from the rack profile. The correctness of the installation is controlled by a level or a plumb line.

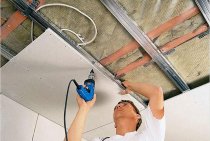
Sheathing the frame with drywall
After mounting the frame, you can proceed to fixing drywall. There is nothing complicated about this, but it is important to take into account some nuances:
- It is preferable that the box consists of whole strips of drywall, and not individual fragments.
- All joints of the cladding elements must be located on the surface of the profile.
Cutting drywall for the box is as follows: one side is marked exactly according to the dimensions of the frame, the second should be larger in order to close the end of the first. You can initially cut out strips with a margin, and cut off the excess after fasteners. But this leads to more material consumption.

- Drywall strips less than 50 mm wide are cut with a carpentry saw. Wider fragments can be separated with a paint knife: first, an incision is made on one side of the drywall screwed to the box, by pressing the strip breaks along this incision, and then a layer of cardboard is cut through on the other side.
- After fixing the skin, the surface is puttied.
When installing ducts, it must be remembered that it is necessary to maintain free access to closed communications for their repair and preventive maintenance. Therefore, in the box being erected, there must be doors with which you can safely get to the meters, stopcocks, inspection hatches. Otherwise, if necessary, you will have to disassemble the box. The size of the cut windows should provide ease of maintenance of communications. As a rule, such hatches are located on the front side of the box, and they can be masked with the help of external decoration.