Installation of a wooden floor with electric heating
Electric underfloor heating in the house can be equipped in two ways:
- install heating mats;
- run a heating cable on the floor.
In the first case, the work can be done independently, the installation of a warm floor is easier and faster. The floor rises no more than 3 mm. So, it is ideal for rooms with low ceilings. However, such a floor heating system is characterized by low power, therefore it is used only as an additional source of heat.
When laying the heating cable, the floors are raised by more than 30 mm. Laying them under a wooden floor is not recommended. It is advisable to get expert advice.
Both types of heating can be done under any floor covering.
For laying infrared mats, the following steps are taken:
- prepare a wooden base: eliminate floor irregularities, significant defects, primer;
- put a layer of thermal insulation material;
- evenly spread strips with heating elements;
- install a temperature sensor for a warm floor;
- fix the cable;
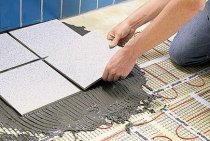
- on top of the mats, a leveling mortar is distributed in a thin layer;
- then lay the flooring or lay tiles;
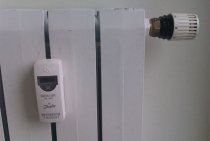
- be sure to install a thermostatic floor heating.
If it is planned to lay tiles on boards with warm electric heating, it is recommended to lay the leveler in 2 layers.
The heating cable is usually laid on a concrete screed made on a reinforcing mesh. It can be done over wooden floors. In this case, it should be borne in mind that the floors will become higher by about 30 mm or more.
- on tightly lying boards without clearly expressed defects, a thermal insulation sheet or a heat-reflecting substrate is placed;
- then throw a reinforcing mesh;
- a heating cable is attached to it with plastic stitches;
- a concrete solution is poured on top and distributed in an even layer;
- after it hardens, spread the waterproofing;
- then they put a layer under a certain floor covering: under the tile - glue, under the laminate - the substrate.
In addition, a temperature sensor in a corrugated tube and a thermostat should be installed.
There is another option for laying a warm electric floor on a wooden base: in a concrete screed created on top of the boards, on a mounting tape.
During laying and during subsequent operation, it is important to follow safety rules, since electricity can harm the health and property of people.
Act according to instructions.
Do not spontaneously change the length of the cables.
Observe the temperature regime in the room: it should not be lower than -5 degrees.
Before turning on the system, it is important to make sure that the screed is completely dry.
Underfloor heating cable should not be placed under heavy furniture.
Among the many advantages of electric floor heating, there are disadvantages of such a device. The main thing is the high energy consumption during operation. If there is a need to create underfloor heating in the house, it is worth calculating everything several times and determining the possible benefits
It is important to find out the total cost of the system and the cost of electricity
Advantages and disadvantages of wooden floors
Properly arranged wooden floors have the following advantages:
- Environmental friendliness
- the use of natural materials almost never harms the health of households. If it is necessary to change some elements of the floor, there will be no problems with their disposal; - Aesthetics
- very beautiful and noble; - Durability
- with proper care, such floors will last a long time even in such "difficult" rooms as, for example, a bathroom. Many pre-revolutionary houses still have floors installed more than a hundred years ago.
However, in all these barrels of honey there are quite a few fly in the ointment:
-
Device complexity
- unlike the concrete floor, which is not difficult to pour for the average builder, wooden floors, arranged according to science, are installed for a long time and are difficult; -
The need for care
- the tree is exposed to moisture, various microorganisms, fungi (this is most critical in the kitchen or bathroom). This forces builders to apply various antiseptic and other chemicals during laying. In addition, the boards must be periodically treated with such preparations and during their operation. They must be kept almost perfectly clean, which is not always possible, for example, in the country. In addition, they need regular coating with paint and varnish; -
High price
- the construction of such floors requires more money than concrete floors, in addition, regular thorough maintenance of them also requires financial costs; - Service
- in any, even the highest quality construction, any floor, after its installation, requires constant maintenance in order to avoid the appearance of cracks, chips and breakages in its elements. Such damage can lead to the destruction of the entire structure, and in case of damage to the floors of the ceilings, it can lead to damage to the walls. Damage to the floors in the bathroom can cause a violation of the waterproofing and water pipes.
Building a house in general and installing floors in particular is a long, laborious and responsible process. Doing it yourself is a thankless task. Even if the owner of the house has the necessary tools and materials to do everything himself, it is better not to perform feats on your own. There are many construction organizations whose professional employees have the necessary knowledge and skills in the construction of such houses, own the necessary tools and equipment for laying floors in the house and bathroom.
Today we will consider one of the most popular schemes for installing an insulated floor in a wooden house. The review will raise key questions about the preparation and installation of the substructure of the floor, the insulation pie and its protection, as well as the correct laying of natural board covering.
Floor installation without screed
Water heated floor without screed is used quite often today. The concrete base, of course, is reliable, but it will not be possible to install it in any room. It is in these cases that an alternative underfloor heating system is used. The installation of such structures is easier than the design of the screed, and in operation they are in no way inferior to it.

Underfloor heating system without screed
If the house is built of timber, the rooms have low ceilings, the implementation of a concrete screed can additionally “capture” an already small space. In addition, laying a concrete base is a laborious and dirty job. In this case, the ideal solution for you will be a warm water floor in a wooden house with your own hands.
A water floor without a concrete base is installed on a wooden or polystyrene coating. Pipes are laid in special recesses. For better distribution of warm air, special metal plates are mounted. The laid pipe system is covered from above with a waterproofing material, and a finishing coating is applied to them.
Piping system for wooden underfloor heating
floor structure

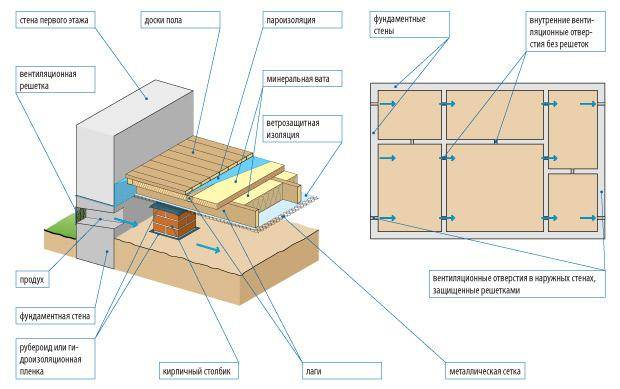
Before proceeding to a detailed description of the creation of the correct "pie" of the floor of the first floor, it is worth noting the constituent elements and technical rules.
- Priming. The overlap of the first floor separates the room from the underground space, the surface of which is soil. The soil becomes a source of moisture ingress into wood structures, which can adversely affect their technical properties. Therefore, this surface must be waterproofed. On the second floor, waterproofing is not necessary.
- Ventilation must be carried out in the underground space so that moisture penetrating from the ground is weathered and does not get into the floor ceiling.
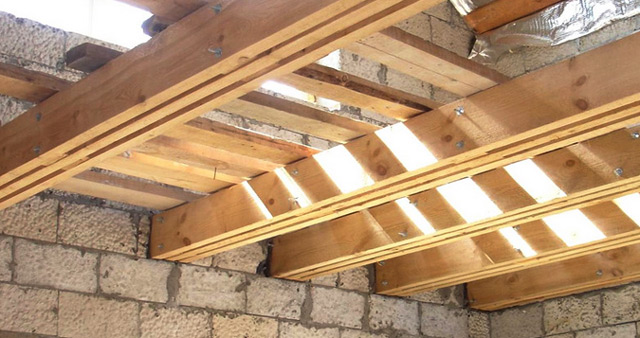
- Brick pillars on which wooden floor beams lie.
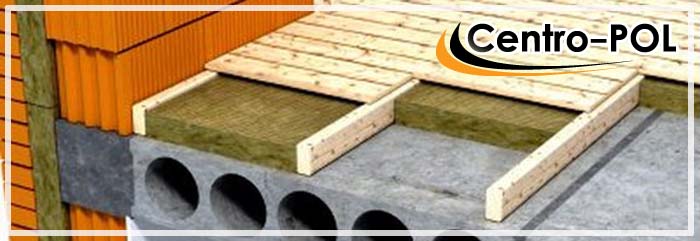
- Wooden beams. The beams serve as a supporting element for the floor joists. Depending on the step with which the beams are laid, the choice of the thickness of the boards for the supports depends. The design should easily transfer possible loads without deformation of the floor.
- Logs - transverse boards lying on the end sides. They serve as the basis for laying the finished floor in the form of floor boards or using plywood or other tile substrate.
- Insulation material is filled between the bars. In this case, it is necessary to take into account that there is a gap between the insulation and the finished floor for ventilation.
- Vapor barrier and waterproofing to protect the insulation material from moisture ingress.
- Finished floor with or without sheet and tile backing. When using boards, they are laid on the bars, and such finishing coatings as laminate, parquet, tiles are placed on a leveling layer of tiled material.
When using an insulated coating, it is necessary to take care of damping gaps for ventilation under the floor.
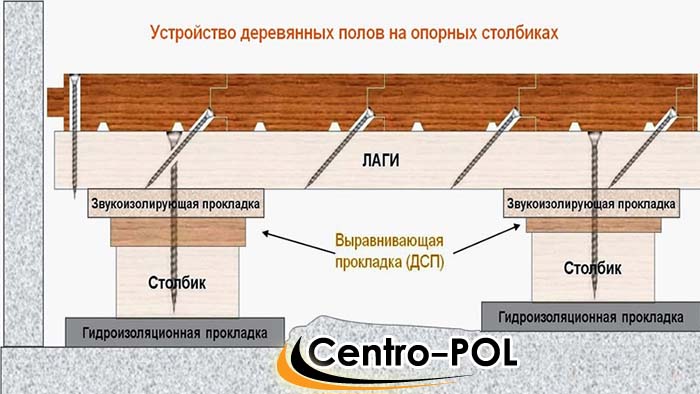
Floor support system requirements
High-quality insulation of a wooden floor requires that the configuration of its subsystem (log, supports, lintels) match the existing dimensions and form factor of the insulation. Expanded polystyrene and mineral wool are considered the most suitable for insulating a wooden floor, bulk granular fillers such as ecowool or perlite chips are less commonly used. The design of the floor bearing system should allow to securely fix the insulation, ensure its immobility and at the same time maintain its strength and functionality.

 1 - strip foundation; 2 - support pillars; 3 - waterproofing; 4 - floor logs; 5 - waterproofing lag
It is also necessary to make sure that the moisture contained in the stone elements of the structure - the foundation and supporting bollards - will not migrate into the wood. For this, linings of 2-3 layers of rolled waterproofing are used.
You should focus on the processing of wood before starting installation work. All lumber must be thoroughly impregnated with antiseptics and, if necessary, flame retardants, and then dried in a stack
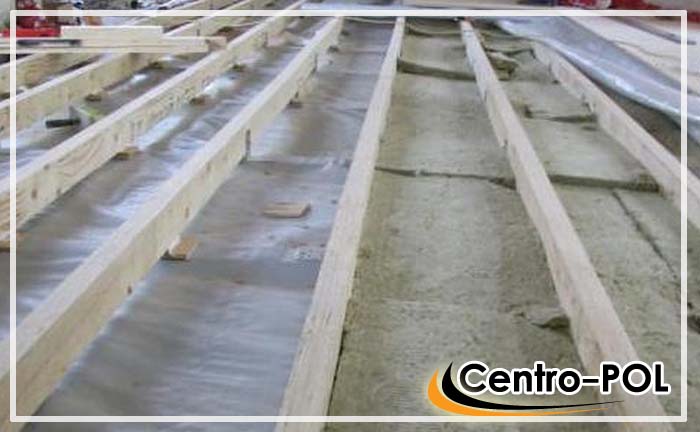
Insulation bookmark
The width of the cells for laying mineral wool mats should be 1-2% less than the size of the insulation. Due to the tight fit, excessive ventilation of the floor is eliminated and possible shrinkage of wool over time is compensated. When laying the mats, they must be carefully and evenly compressed across the plane, put into the cavity and then straightened inside. It is desirable that after laying the cotton wool forms a small hump protruding upward, which will be pressed against the boards. If foil wool is used, it is located with the reflective surface up.

In the case of expanded polystyrene, which is practically not compressible, minor gaps may form. They are eliminated by blowing with summer mounting foam at the end of filling all the cells. Too thick gaps in order to reduce foam consumption can be eliminated with thin cut-out PPS inserts.

To fill the insulation in the space between the lags, it is necessary to localize the cells by laying the bottom with a vapor-permeable membrane with a turn on wooden beams. In the simplest version, geotextiles or a vapor barrier can be used to protect roofs. To prevent the membrane from shifting when filling the insulation, it is recommended to shoot it with staples to the wooden elements of the floor system.

Floor frame
First, we will study the main constituent elements and the main rules:
- The underground space from the underlays to the floor board must be at least 1 cm (and not more than 25 cm for floors on the ground). This is necessary for good ventilation inside the frame.
-
lags
- these are transverse bars that serve as the basis for further cladding with boards. They can rest on beams, a concrete slab, posts, and even on the ground (when using pads).
- The width of the log when laying on a slab should be within 80-100 mm and 100-120 mm when laying on posts or beams. The thickness when laying on a slab should be 25-40 mm, and when laying on posts - 40-50 mm.
-
beams
- these are horizontally laid structural elements that perform load-bearing functions. They are supported at least at two points on load-bearing walls. -
columns
(linings) are used to level the base. For logs with a thickness of 40-50 mm, linings are installed every 80-110 cm. - The laying step of the lag depends on the thickness of the skin. For example, if you use the thinnest floorboard of 21 mm, then the laying step of the lag should not exceed 30 cm.
- It is best to use a thicker floorboard of 35 mm, and use a standard laying spacing of 60 cm, especially if you are going to insulate the base. So you do not have to cut the insulation in width.
Options for flooring in a wooden frame and the main structural elements
Masters advise to use the two most common methods
arrangement of boardwalk in a private house:
- on the ground using a log;
- along the floor beams.
The choice of option depends on the design of the object
and should be carried out at the initial stages of design construction
. In buildings with two levels and premises with a basement
The second method is almost always used along the floor beams
. His advantage
lies in complete isolation from the ground
Moreover, such a structure increases the rigidity of the entire structure. Flaw
such installation of floors on logs in a wooden frame
consists of increased noise
, but the use of special noise-absorbing pads will reduce the noise level.
Option with flooring on the ground
provides for the equipment of supports, on which logs are subsequently placed. Thus, communication with the walls is excluded and, accordingly, sound and vibration vibrations are minimal.
. The base for the supports can be masonry made of red brick or concrete.
Important!
The supports are formed in rows with spans equal to the distance between the lags, usually 0.5-1 meter. Under the base of the lag, it is imperative to lay a layer of roofing material
During work, regularly monitor the horizon lag level, their joints should be located only on the pillars of the supports.
Depending on the living conditions plank flooring is divided into two types
:
-
single
- for objects intended for seasonal residence; -
double
- for premises with a permanent mode of residence.
First option
floor installations in wooden log cabins
most often used in country houses
where people spend the summer season. Double construction
formed in capital buildings
and implies the use insulation, as well as layers of vapor and sound insulation
.
Features and nuances
To make a floor in the premises of a wooden house, you can use various laying technologies and choose different materials, including for insulation, sound and waterproofing.
In particular, as a heater, in addition to mineral and glass wool, expanded clay, filled into the recesses between the beams, sawdust or slag, can be used. Styrofoam sheets will also work. However, materials such as expanded clay, slag or sawdust are better suited for ground flooring, especially under bathrooms.
At the same time, when laying the floor of the floors of the second and more floors, it is better to use mineral wool for better sound insulation. It is also better suited for floors of the attic floor.
How is the protection of the heat insulator
Various insulation and ventilation schemes may require limited air circulation in the space under the floor.This is especially true for houses on a pile-grillage foundation, where the insulation is in contact with street air and must be protected from getting wet.
So that mineral wool does not lose its heat-saving properties when saturated with moisture, it is covered from above with a vapor barrier. The protective membrane is spread over the lag and insulation, then fixed to the wooden bars with small nails or staples. The joints must be carefully glued on both sides, it is better if they are located exactly on the edges of the floor carrier system.

In those rare cases when the dew point can move above the insulation with the formation of condensate on the vapor barrier, it is required to provide air under the flooring from the boards. It is necessary to stuff a counter-lattice from boards of the same width as the logs themselves over the frame logs covered with a vapor barrier. The thickness of the vent usually does not exceed 20-25 mm, while the counter-lattice itself does not affect the quality of fixing the flooring from the boards.
Laying technology for single timber decking
In rooms with a small area, the beams are mounted and attached directly to the wall. If, however, laying the log on the support posts is considered, then it is necessary to take into account the requirements that will ensure the reliability of the overall structure. Let's say the gap between the pillars is 0.8 m - the supporting beams must have a cross section of at least 100X100 mm. With an increase in the parameters between the supports up to 1 meter, beams of 120X120 mm will already be required. Logs are mounted across the room at intervals corresponding to the thickness of the boards. For example, a distance of 0.5 m will be sufficient to install a 28 mm cover. For quality floor installations in a wooden frame
tongue-and-groove lumber is used from coniferous or hardwood with a thickness of 28-40 mm
. Traditional location - perpendicular to the wall with windows
. The material is fixed with nails, their length is taken from - 2.5 times the thickness of the lumber. Possible two mounting methods
:
- usual;
- parquet.
The essence of the usual method
in that a nail is driven into the front of the board
. Second option
- it driving a nail at an angle of 45° into the corner of the comb
.
In order to ventilate the underground space at the corners of the floor, it is necessary to organize openings that are closed with decorative grilles. Its design should prevent the ingress of foreign objects and water during cleaning. It should be remembered that there are not enough vents in the flooring, and it is necessary to foresee windows for ventilation in the basement of the building.
The overlapping of the first floor must be carried out in compliance with the technologies for the "warm" floor. Fortunately, on wooden beams it is possible, without stealing the cherished heights of the ceilings of the room, to make the floor cake insulated.
Plank floors
The device of electric transformer substation in the construction of the floor on the logs
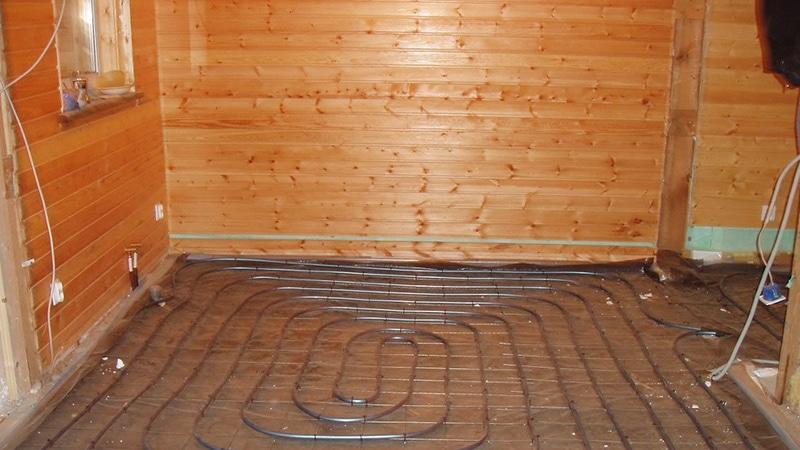
The floor in a wooden house is most often arranged in the form of a structure along wooden beams - logs. This leaves its mark on both the coating device and the nuances of using a warm floor. On wooden floors along the logs, it is possible to install an electric underfloor heating, it is arranged in the space between the logs, subject to safety precautions.
Requirements
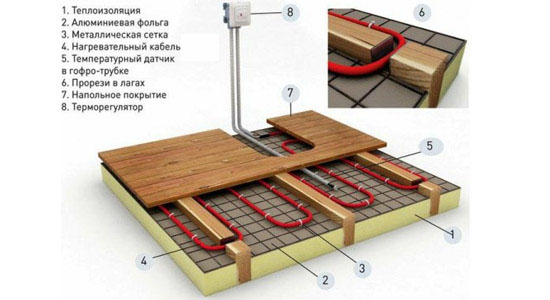
A warm electric floor in a design with lags is arranged from a heating cable or mat, and from an infrared film.
Important! When calculating, take the total power of the system not higher than 80 W / m². If a cable is used, then its power should not exceed 10 W / m (linear meter)
It is better in this design that the floor heating system will work, which is arranged in the air gap between the top coating and thermal insulation. The heating element itself should be no closer than 3-5 centimeters from the bottom edge of the wooden covering.
Cable underfloor heating in a design with lags.
The main requirements to be followed are:
- If a heating cable is used, it must be located at least 3 cm away from the log and any other wooden elements.
- The heating cable is mounted on a metal mesh with small cells, which is attached to the logs.
- Be sure to apply a layer of heat and sound insulation. The use of mineral wool 5-10 cm is recommended.
In addition, it is recommended to use underfloor heating systems equipped with two temperature sensors - in the floor structure and in the room. This allows you to more accurately control heating and prevent overheating.
Installation steps
When using a warm floor in the form of a heating cable, work should be carried out approximately in this order:
- On the subfloor between the logs, or on the bottom filing of chipboard or drywall, a layer of hydro and vapor barrier is arranged, which spreads continuously over the entire surface, capturing the logs.
- Next, a layer of thermal insulation made of mineral is arranged.
Mesh between lags.
- Directly for mounting the heating cable between the lags, there is a metal mesh with a small cell, for example, a chain-link, which is attached to the side surfaces of the lag. It is necessary to arrange the distance between the mesh and the bottom surface of the wooden covering so that the distance to the cable is not less than 3-5 cm
- A cable is located on the grid with the required pitch and is attached to it with plastic clamps.
Further, the structure is closed with wooden boards, on which, if necessary, a decorative coating is laid.
When using infrared film, the process is similar, differing only in some nuances.
It is also important to arrange hydro and vapor barrier, to which thermal insulation material is sent. Further, you can use a reflective film, which will allow the entire system to work more efficiently.
Between the infrared film itself and the thermal insulation, it is necessary to arrange an air gap 1–2 cm thick. To do this, slats are nailed to the side surface of the log in such a way that it is convenient to attach the edges of the heating film to them with building brackets.
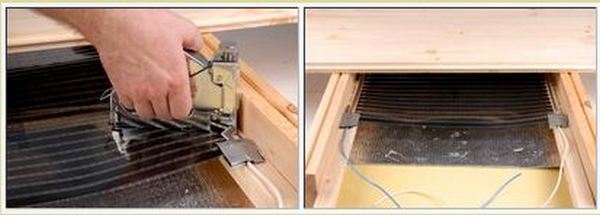
Fastening the film between the lags.
Further, a wooden coating is also mounted with the calculation of an air gap of 3-5 cm above the film.
The main elements of the floor
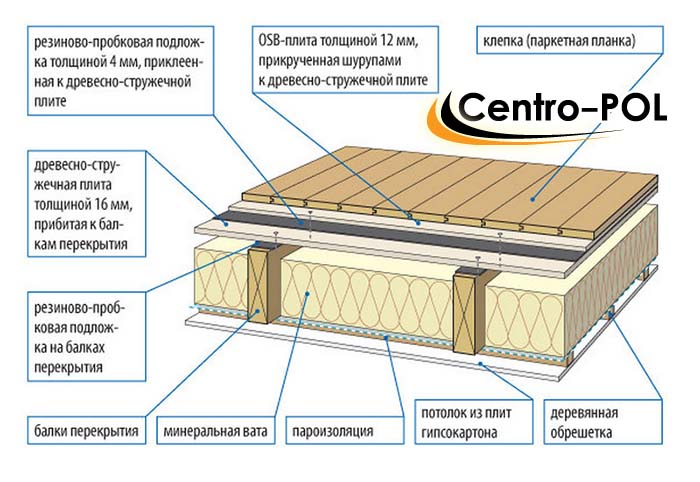
To meet all requirements, wooden floors must be a multi-layer structure. Such a device will ensure strength, durability and thermal insulation. The main elements of a floor pie in a house are:
- rough coating - the lowest layer;
- waterproofing - the second layer, providing dryness and warmth in the room;
- finishing coating - the top coating intended for laying the coating;
- floor covering - the visible part of the floor.
Overlappings in the house can be divided into how many types:
- basement
- performs the function of the floor in the lower room of the first floor; - interfloor
- located between rooms located on different floors, for example - the first and second; - mansard
- separating from each other the premises of the upper (usually second) floor and the attic or attic.
Subfloor device
The main elements are:
-
Metal or wooden beams
- are laid in such a way that their ends are on the foundation. If the distance between the support points exceeds three meters, then additional support posts must be installed. Otherwise, beam deflection is possible. Support pillars are usually laid out of brick. The recommended distance between the beams is 60 cm; - cranial bars
- fastened to the bottom of the beams; - Flooring
- Chipboards are usually used as subfloor flooring. They are placed on the cranial bars without additional fastening; - Layers of insulation
- consist of waterproofing and insulation. Mineral wool or fiberglass mats can be used as insulation. For waterproofing, you can use a plastic film.Often, especially when installing a floor pie in the bathroom and on the first floor, polyethylene foam is used. In floors between floors and in bathrooms, lighter fiberglass is usually used.
Arranging the floor of the first floor of the house, it is necessary to lay a metal reinforcing mesh and a layer of roofing material on the ground for better waterproofing.
Finished floor
As a finishing flooring, wooden boards are used, along the edges of which there are devices for connecting the boards to each other according to the “groove-thorn” principle. For better fastening, you can use metal screws or nails. The distance from the edges of the boards to the walls should be about two centimeters to compensate for the possible expansion of the boards. Boards are laid in a direction perpendicular to the window.
Many have heard of "floating floors". What is it? For better sound insulation, as well as to improve ventilation under the flooring, you can lay the boards along the logs without attaching them to the walls. This design is called a "floating floor". The floating floor structure also allows the deck wood to expand when subjected to high temperatures without the risk of warping the boards. Such a "floating" device is more often used on the ceilings of the upper floors, in attics and attics, especially if the roof of the house is made of rolled metal, profiled sheet and other metal materials.
Varieties of floors on logs
A log is a beam with a rectangular section, there are a lot of types of beam:
- the smallest component is presented in the form of a log with a cross section of 150 mm;
- a log hewn from 2 sides, the cross section of which is 150 mm;
- paired boards with a width of 100 mm and a thickness of 25 mm;
- a wooden beam with a section of a rectangular type or another type of section in accordance with the load on the part (the minimum permitted section of a beam according to GOST reaches 100 × 150 mm with a distance of 60 cm);
- channel, made of durable metal, I-beam;
- slats used for dry leveling and insulation;
- plastic components leading to the screed.
Without exception, all logs are mounted in order to lay the floor in a wooden house. They are installed on a mortgage crown, wooden parts, slabs, support, soil.
Floor of the first floor on the ground
If you do not have a warm basement, then the installation of the floor on the ground floor is done on the ground using stands from the posts.
- To make such a floor, you first need to remove the vegetable and soft layers of soil. This can be done locally at the installation site of the posts, or over the entire area inside the strip foundation.
- Then a dry layer of soil of at least 15-20 cm is filled up and carefully compacted.
- The resulting base must be moistened and rubble or gravel is pressed into it a few centimeters from above.
- Then the sand-gravel mixture is backfilled and, after compaction, red brick columns are laid on it to support the floor beams. They are laid in increments of 70-100 cm, several bricks high. Above and below the columns must be protected by a waterproofing layer of roofing material.
- Between the posts, it is desirable to lay a layer of waterproofing so that moisture from below does not affect the beams.
- Beams are laid in the center of the columns. Their height should be at least 2 cm higher than the height of the subfloor boards and insulation in order to leave an air gap.
- Subfloor boards are stacked on posts along the edges.
- Then comes the layer of vapor barrier.
- A heater is laid between the beams (mineral wool or extruded polystyrene foam, polystyrene foam).
- On top of the beams, a floorboard of the finished floor is attached.
Expert answers
Uncle from the Future...
That is, you want to say that you are going to glue the tiles on the chipboard ??? And in general, where did the chipboard come from on the floor. Something similar was already here. Do you want to be the second person in the world to have chipboard floors? Throw out chipboard to start, and then ask which floor is better.But in principle (if there is no chipboard already), then it doesn’t matter. For the water layer of the screed will be thicker. And so, as it is more convenient, do it. Both have pros and cons. (water and electric) True, there are infrared now, but they are somehow not right under the tile, they are laid under the laminate or carpet.
Aeon Stealth:
I have not heard that underfloor heating would be installed on chipboard, electric or water heated floors are usually filled with a screed with a special solution.
A_C:
Electric. Ties are a must.
Scarifier:
Chipboard emits harmful fumes and floor heating triples the effect
Old Plinth:
Good thermal insulation on the base, then DSP (note C, not D! ) 16 mm on logs more often and from the top mini electric floors in mats (they are placed in glue right under the tile .... and it will be fine ... and good glue is necessary, do not press like Knauf...
Ira Bakuleva:
warm floors under chipboard do not put ...
Roman Zelenov:
No need.. . not necessary, chipboard is a “warm material” Substrates for other uses…
*Irishka*:
Can. Substrate is placed under the laminate.
NataMK:
sure, and not only in terms of insulation, but also ...
Mikhail Pershutin:
Chipboard in the construction industry rests on logs that are pre-antiseptic (never directly on the floor), so the air gap between the mark of the floor leveling screed and the bottom of the chipboard sheet is in itself a good thermal insulation. If your apartment is located on the ground floor in a house with a technical unheated basement, then it is possible to insulate the inter-gender space with a layer of expanded clay or foam concrete, but not more than 150 mm.
Alex:
You can put the substrate at least under anything, but it does not function as a heater, but as a shock absorber and prevents the laminate from knocking on the base when walking on the laminate.
Michael:
Why.. .Don't… .Chipboard and so insulation….
Advantages and disadvantages of wooden structures
Wooden structures are used both in private wooden and stone houses of all types. This versatility is not inherent in concrete structures. In addition, wooden structures have other advantageous properties:
- the arrangement of wooden structures is much cheaper than concrete;
- for the arrangement of monolithic concrete floors, special equipment and complex engineering work are required. And in the case of timber beams, you can do without the help of professional builders. The minimum required skills are to work with a hammer and a saw.
- concrete floors are heavy. Their heavy weight puts a lot of pressure on the foundation, which cannot be said about the light weight of wooden structures.
- with a low density, they have sufficient bearing capacity to withstand heavy furniture.
- higher rates of sound insulation and thermal insulation compared to concrete structures;

There are also disadvantages that also need to be addressed:
- wood has a shorter lifespan than concrete. Therefore, to increase the service life, the beams are treated with antiseptic agents. Even so, under normal operating conditions, they can last more than 50 years.
- has the lowest refractory ability;
- floor construction on wooden beams is susceptible to moisture and rots under its influence.
But these shortcomings are indirectly related to the case, because with proper operation under normal conditions, the wooden floor structures of the first floor can last a good time.
Logs and counter-lattice
When installing a log, they are placed in increments corresponding to the format of the insulation used. To avoid the frequent installation of support poles, you can use a system of cross logs. In this case, the lower bars have a section with equal sides and perform the main load-bearing function. The top row has a frame device: the boards, placed on the edge, form longitudinal cells, convenient for laying insulation of a certain width and fastening the floorboards.

If the house is located on a slab foundation, then the floor carrier system has the simplest device. Logs are formed by one frame row, which is anchored to a concrete base. The plane of the monolithic base forms the bottom for the cells under the insulation, ensuring its reliable fixation.

When constructing a floor on the ground, there is no such reference plane. One of the options for arranging it is to fill it with light porous material, such as expanded perlite or expanded clay, to the lower level of the lags.

Otherwise, the logs that form the cells for the insulation are provided with longitudinal stops. A bar of approximately 25x25 mm is screwed with self-tapping screws at the bottom of each log, forming parallel ledges. A mesh of shingles or a thin edged board is laid on them, due to which the insulation is supported.
 1 - cranial bar; 2 - floor lag; 3 - grid; 4 - vapor barrier; 5 - insulation; 6 - floor board

It is important to know that since the stuffed bars “eat up” the space of the floor cells a little, the remaining height may not be enough to accommodate the insulation of such a thickness as provided for by the heat engineering calculation. In this case, bars of the same size are stuffed over the ribs of the frame system.
They can be located parallel or across the upper row of logs, in the latter case, an additional gap is provided for ventilation of the insulation.