Electrical connection
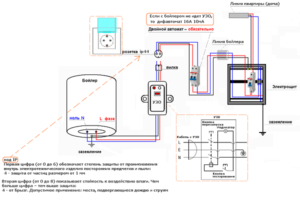 Electrical connection diagram of the water heater. (Press to enlarge) According to the instructions, before connecting the device to electricity, it is necessary to fill it with water.
Be sure to observe the position of the phase relative to the wiring diagram.
After connecting plumbing communications, the boiler must be filled with water, and only after that it is possible to connect the device to the electric current network. The rules for connecting a water heater are the same as for washing machines.
If the machine does not start, you must recheck all connections according to the connection diagram and, if necessary, correct connection errors. Otherwise, you may have to invite a specialist.
Well, finally, the unit started working, and hot water flowed from the tap in a thin stream. Termex has done everything for the comfort of your life. And of course, their skillful hands, where without them!
Watch a video in which an experienced user shows in detail how to install and connect a Termex water heater:
How to fix the device
Brick or block walls are considered ideal for mounting a water heater, but it is highly undesirable to mount it on a thin wall. However, mounting on other types of materials is also acceptable. The most common:
Consider the installation features for each type of wall. 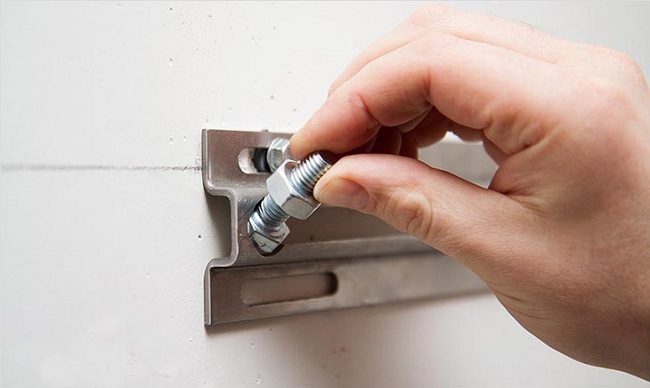
Drywall
Experts consider drywall to be a capricious material and question its resistance to stress. However, there are two effective ways by which you can install a boiler in a room sheathed with drywall sheets:
- installation on reinforcement, which is laid under the sheathing material of the walls;
- installation on holes made in the wall.
Tile
Sometimes during the repair the question arises: when is it better to mount the heating tank - before laying the tiles or after. It's good to have options. What if the tiles are already installed? Qualified specialists believe that in this case three conditions must be met:
- glue evenly applied to the tile;
- tiles must be laid without voids;
- the wall must be made of solid materials that do not allow the tile to sag or stagger.
If all the requirements are met, then any water heater can be mounted on top of the tile. 
Tree
Information about mounting the tank to a wooden surface is full of contradictions. According to some sources, mounting on a tree is highly undesirable, since the wall will not be able to withstand the enormous load, which will become even greater after filling the boiler with water.
According to other sources, the installation is acceptable. True, with a caveat
Before fixing the water heater, it is important to choose a non-combustible base for the unit in accordance with fire safety rules.
clapboard
This material in this case is considered capricious. Therefore, you can not do without special conditions for the installation process. You will need two vertical beams, which must be carefully processed and painted to match the color of the lining or tank. They are thoroughly fixed, and a water heater is already hung on them. By itself, the lining is not able to withstand the weight of the boiler. 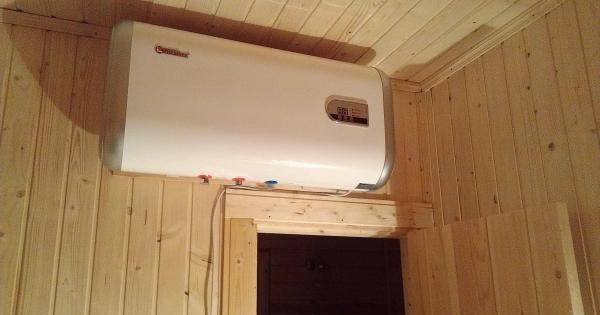
foam concrete
You will need special fasteners such as nylon spiral dowels. If the volume of the device exceeds 100 liters, it makes sense to use metal fasteners. Two mounting options are acceptable - using metal dowels or using special or chemical anchors for foam concrete. The option using a chemical (or adhesive) anchor is considered the most reliable and modern, as well as environmentally friendly.
plaster
There are two mounting options:
- Cutting holes in the slabs for the frame (metal shaped pipes) with subsequent fixation to solid surfaces such as ceilings, floors or walls.
- The use of two metal tires 40x4, bent at right angles. They will be used as anchors. One end of each tire goes to the anchor to concrete ceilings, and the other for additional fixation - to the dowels to the wall.
Choosing a water heater
Specialized stores offer a wide selection of units that heat water.
The combination of high quality and affordable cost includes water heaters of the Thermex brand.
They are available in storage and flow type.
Such a water heater can be installed anywhere in the house, apartment, cottage. Through it, you can simultaneously supply heated water to the kitchen faucet, bathroom, and shower.
In the event of any malfunction, the safety valve built into the system will operate.
Termex flow heaters are assembled from quality parts, so the service life is long and the quality of their work is high.
On them, as well as on storage units, there is a safety valve. With its help, the device is protected in case of damage.
Before giving preference to any type of boiler, it is worth analyzing the capacity of the tank, the conditions in which the equipment will be operated, and the appearance.
To connect the water heater, you can use the services of specialized companies.
It should be noted that only the main installation activities are included in the installation cost. All additional procedures will have to be paid additionally.
There is another option - installing a boiler with your own hands. For the installation to be successful, you must have experience in working with plumbing.
Following the sequence of work, the water heater will be installed correctly.
However, you can get the following benefits:
- money will be saved;
- you can acquire new knowledge, skills that will help solve problems in the event of a water heater breakdown;
- in the event of a breakdown of the unit, it will not be necessary to call the master to dismantle the water heater.
To install the boiler with your own hands, you need to have the necessary tools and additional elements. You will need a tape measure to measure the distance between the holes.
https://youtube.com/watch?v=geJtf9gCxoI
The tank is installed on anchor bolts, which require holes in the wall. To make them, you need a puncher with a drill of the desired diameter.
In addition, wrenches, pliers, screwdrivers, wire cutters will be needed.
To seal the joints of the joints, it is recommended to use tow, a special paste or fum-tape. You can use modern silicone sealants.
Do not forget the flexible connecting hoses and the required number of meters of plastic pipe if you need to change the plumbing in the house.
For a new wiring device, it is worth purchasing a three-core wire, the length of which must be no less than the distance between the boiler and the shield. In addition, you need an outlet and a machine on the shield.
How to install a boiler with your own hands
Electric boilers and water heaters are equally in demand, both in private houses and in ordinary apartments, easily coping with possible hot water outages or working on an ongoing basis. Electric boilers can be storage or flow. The latter are usually in less demand, as they are inferior to storage electric boilers in terms of volume and are more expensive.
To install the boiler, you can call specialists or do it on your own, observing all safety rules.
When installing the boiler yourself, you must follow strict rules: turn off the electricity completely and shut off the pipes with the water supply!
In this article we will tell you how to install the boiler correctly.

Elements that are necessary for mounting the boiler on the wall
Wiring diagram for a double-circuit boiler with a boiler / storage.
To attach the water heater to the wall, it is best to use a construction gun, a hammer drill or an electric drill will also work.
As fasteners for a water heater, you can use steel hooks with a diameter of more than 10 mm and dowels, which are fixed with a construction gun. This is due to the dimensions and overall weight of the structure. If a construction gun is not available, you need to drill holes for screws for fasteners using an electric drill or puncher.
If the wall on which the boiler is to be mounted is covered with a layer of plaster, you can use screws 8-10 mm long, while the plastic part of the fastener for the water heater should be less than 8 mm.
It is not recommended to use budget and flexible hoses to supply water to the boiler, because they fail quickly enough, and therefore they often have to be changed. It is recommended to spend more to purchase quality materials to fix the boiler to the wall, otherwise you will have to run around looking for a replacement. It is best to perform hard piping from pipes that are made of copper.
It is forbidden to connect the boiler to the water supply system and using metal pipes.
List of all elements necessary for work:
- water heater;
- steel hooks with a diameter of more than 10 mm;
- dowels;
- electric drill or puncher;
- quality hoses;
- screws 8-10 mm long;
- connection diagram;
- network cable;
- coarse water filter;
- nozzles;
- simple pencil;
- construction gun.
Do-it-yourself boiler installation technology
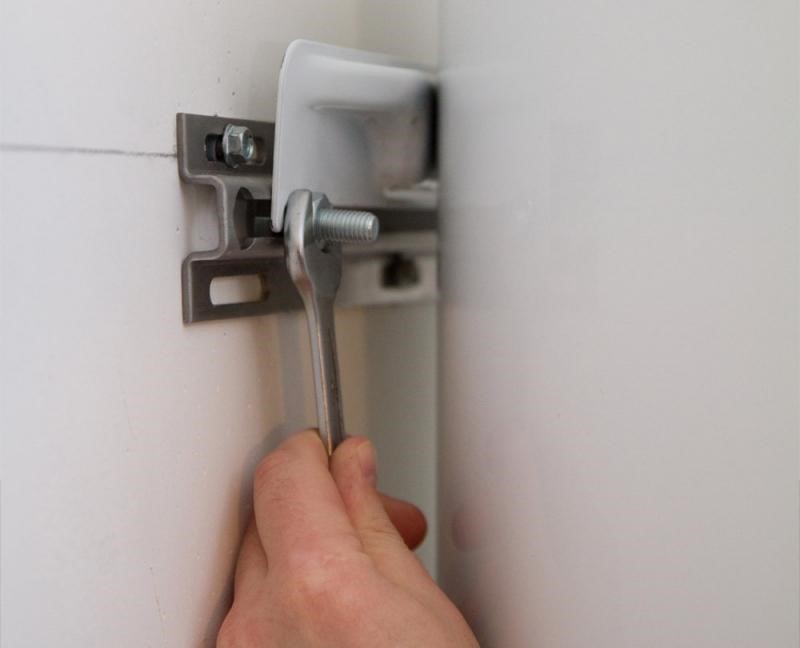
Figure 1. The fastener plate is attached using screwdrivers.
The installation process looks like this:
- A suitable place for installation is selected.
- Holes are made for dowels. In holes in epoxy or cement, you will need to insert wood plugs or plastic liners. If wooden plugs are used, then in them with a drill that has a diameter smaller than that of screws, it is necessary to drill holes 3/4 of their length. Then you should screw in the screws and leave them until the cement or resin is completely dry. In most cases, on the rear surface of the water heater there is a mounting plate with shaped holes that have the shape of a keyhole. They should include the heads of dowels or screws that are fixed in the wall. An example of a mounting plate can be seen in Fig. 1. To securely hang the structure, it is recommended to install another screw, which is screwed between the two screwed ones. The plate for fasteners will rest on it with the lower part. This method will help prevent deflection of the fastener plate, which is found on some types of water heaters. It is recommended to put a washer on top of the screw in order to more securely fix the edge of the mounting plate.
- The water heater is being installed.
- The possibilities of electrical wiring of the apartment, the material and thickness of the cable are determined. If there is any doubt about whether the cable will withstand the load, it is recommended to lay a new cable from the shield.
- Grounding is in progress.
Figure 2. Water heater connection diagram.
The connection diagram of the water heater is shown in Fig. 2.
The work of mounting the water heater on the wall is best done by two people: one person will hold the boiler, and the other will mark the fasteners with a simple pencil.
You should pay attention to the accuracy of the markup. If there is even a slight deviation, the screws or dowels that are fixed in the wall will not be able to fit the holes in the plate for fixing the water heater, as a result of which the unit will be installed unevenly
If all this is done correctly, then the water heater will be able to work properly for a long time.
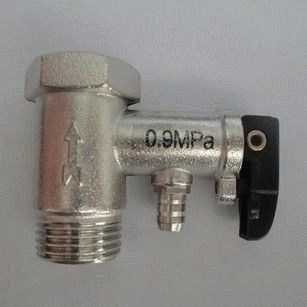
The equipment kit contains a check valve for protection, with the help of which an obstacle will be formed for the outflow of water from the water heater.
The safety valve is screwed onto the water inlet pipe for several turns.
Particular attention should be paid to this process, otherwise it is likely to damage the joints of the pipes with the boiler tank. When mounting it in a horizontal position, it should be remembered that the cold water connection must be located at the bottom, and the hot water connection must be located at the top.
Yak povsiti water heater dopomoga fakhvtsv
Scheme of connecting a wall-mounted water heater.
As there is no way to independently turn on the water heater, you can turn for help to fakhivtsiv. The bindings are the same:
- The specialist is obliged to fold and hand over to the zamovnik the koshtoris on the materials, like vikoristovuyutsya under the hour of work. Also responsible for warehouses are the plan of work and їх assessment.
- The meister is guilty of the Viconati dismantling the old outbuilding, as it is there.
- A specialist in fixing the boiler (fixing for a water heater can be found in plumbing stores).
- After the installation, the master is responsible for connecting the pipes for the supply and introduction of water.
- After the installation and connection of heating to the systems of supply of water and electricity, the master is guilty of converting the attachment to the practice, after which he demonstrates it to the deputy. As soon as the hour of the construction of the construction will be revealed, if there are any malfunctions, the fahivets is guilty of the cost of their work, with which it is not necessary to pay extra for the price.
- Goiter specialist to give advice to the client on yoga chirping, briefly tell about those, how to fix it with an installed outbuilding.
Malyunok 3. When the heater arrives to the wall, the water will look compactly in the interior of the booth.
Good materials and tools, which may be needed for fixing the heating of the water to the wall, next to know, that in most cases maistri vicorist their materials and tools. You have to pay extra for them.
I will buy materials for fixing the heating of the water to the wall on the right, I will not become obese, because other elements will be needed. For the presence of their vіdpovіdaє fahivets. Dosit widen є vpadki, if fakhіvtsі try to swindle their clients. It is possible to hack someone, so as to request a koshtoris in a written form.
The installation of the boiler is to blame buti raztashovaniya strictly vertically. In some cases, one cannot reach through the expansion of the plates for fixing - the tank of the water heater is lightly wounded. If this is the case, then it is necessary to put a lining on the bottom of the structure, as it was prepared from a slotted gum.
The hopefulness of the reinforcement can be distorted. For whom you need to hang on the frame, huddling behind the dowels, like washing from the walls, after which the trochs are torn apart in different sides. If the design is trimmed, it means that it is possible to install a water heater, so as the vaga has more vipadkiv more, the lower vaga of the people.
Attachments to the heating water wall can be added to Fig. 3.
You can make visnovok about those who, practically, whether a person can independently install a water heater on the wall in his home. May buti dorimana all the current rules, so that the water heater won't create daily folds or problems.
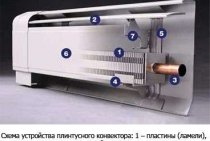
Types of water heaters
Before starting work, it is worth familiarizing yourself with the device of the water heater. There are several types of structures, the characteristic features of which are:
- electric - heating occurs by connecting to the mains;
- gas - work by connecting to a gas main, require a separate chimney;
- with indirect heating - they have a heat exchanger operating from their own heating system. Such devices can be both wall-mounted and floor-standing.
All models are equipped with storage tanks.And if an empty tank does not seem too heavy, then filled with water becomes an unbearable burden.
Therefore, it is so important that the wall on which the boiler is planned to be installed is strong and reliable. In addition to weight, overall dimensions, as well as structural features of the tank, are of great importance.
Is it possible to put the Termex water heater upside down
The Termex water heater must not be installed bypassing the instructions. It happens that you need a device with an upper eyeliner. The solution is to buy a new water heater.
In normal condition, when the Thermex is hanging correctly, the intake tube inside the tank enters in the upper quarter, and the inlet in the lower quarter. The heating element is located at the bottom, between the spirals there is a probe of the thermostat, which is responsible for turning off the device in case of overheating. The temperature of the water is determined, not the heating element. How the circuit works:
- Water comes from below, breaks against a divider (horizontal plate above the inlet), enters the spiral.
- The heating element heats the water until the thermostat indicates that it is time to complete the process. For this, the temperature of the medium is measured.
- The fence goes in the upper quarter, where the temperature, due to the laws of physics, is the highest, therefore, from below, under pressure, a new portion comes from the riser.
Let's turn the tank upside down:
- Cold water comes in from above, hits the divider.
- From below, a part of the jet that has passed the heating element accumulates. The device does not withstand thermal conditions.
- It is worth opening the tap, as the fence will go from below. Hot water will gradually reach this point, it is possible to burn yourself.
It's okay until the water is turned off in the riser, and usually without warning. In normal condition, when the water heater is hung correctly, the water in the tank will not drop below three quarters. It is worth turning the tank over, the heating element will be in the air (a pillow will come out of the riser). It turns out that the spirals heat up, but the probe hanging in the air cannot correctly determine the mode. Spirals overheat and burn out. Repair under warranty is excluded, get ready to tinker in the sediment and dirt of the tank to fix the problem.
How to hang a boiler on the wall yourself
Before fixing the water heater to the wall, you should choose a suitable place for its installation. In this regard, you need to know some of the nuances. The boiler should be located next to water and electricity communications. This need is due to the following: through the pipes of the water supply system, water enters the boiler itself and is heated.
Wiring diagram for an indirect heating boiler.
Electricity is needed for devices that operate exclusively with the help of electricity. This must be taken care of if the installation of water heating elements was not provided for in advance by the relevant project. In most cases, the installation of the boiler is carried out in a plumbing cabinet in order to hide the entire device and leave more free space.
Before hanging a water heater in the kitchen, you need to think in advance whether there is enough free space. You should be aware that special water heaters are produced for kitchen facilities, which are distinguished by their relatively small size.
Scheme of using a water heater.
In this case, moisture may enter the control unit, which may cause some inconvenience during use. You should be aware of another nuance: if the humidity level is high, some devices can quickly fail.
Before fixing the water heater, you need to check the strength of the wall on which you plan to fix the device. In order to mount the boiler to the wall, a base made of brick, concrete or durable blocks is ideal
Particular attention should be paid to this, because the device is heavy, and after filling with water, the structure will weigh even more. The wall on which it is planned to hang the water heater must withstand such a load.
It is impossible to mount the boiler on a wooden wall.
The elements that are needed for the installation of the boiler on the wall
Wiring bypass the boiler with a boiler / storage.
To fix the heater to the wall is better to use a gun construction, also suitable punch or electric drill.
As for fixing the water heater can be used steel hooks with a diameter greater than 10 mm and dowels which are fixed gun construction. This is due to the dimensions and total weight of the structure. If building a gun is not available, you need to drill with an electric drill or punch holes for screws for fastening.
If the wall on which you plan to mount the boiler is covered with a layer of plaster, you can use screws 8-10 mm long, with plastic part for fixing the water heater should be less than 8 mm.
For the liner to the boiler water is not recommended to use budgetary and hoses, because they quickly fail, and therefore often have to change from. It is recommended to spend more to buy quality materials for fixing the boiler to the wall, otherwise you'll have to run around in search of a replacement. It is best to perform a hard liner of pipes, which are made of copper.
It does not connect the boiler to the water supply system and with the help of a metal pipe.
List of all the necessary elements for operation:
- water heater;
- steel hooks diameter greater than 10 mm;
- plugs;
- electric drill or a hammer;
- quality hoses;
- 8-10 mm long screws;
- wiring diagram;
- network cable;
- coarse filter water purification;
- pipes;
- a pencil;
- construction pistol.
Installation of the boiler with his hands Technology
Figure 1. Plate for mounting fixed with screwdrivers.
The process of installation and as follows:
- Select a suitable location for the installation.
- Make holes for dowels. The holes in the epoxy resin or cement plugs will need to insert liners of wood or plastic. When using wooden tube, in which a drill that has a diameter smaller than the screw, it is necessary to drill holes in a length 3/4 of their length. Followed by screwing screws and leave them until the cement or resin is not completely dry. In most cases, the rear surface of the heater fixing plate is present with scalloped openings which have a keyhole shape. They should include the head dowels or screws, which are fixed to the wall. Sample plate for fixing can be seen in 1. To hang securely design, install another screw which is screwed between the two screwed. On him will rest the bottom of the plate for the fixture. This method helps to prevent deflection of the plate for fastening, which is found in certain types of water heaters. Top screw is recommended to put the puck in order to perform more reliably fixing the edge of the coupling plate.
- Produced water heater installation.
- Determined wiring possibilities apartments, the material and the thickness of the cable. If there is doubt as to whether the load cable stand, it is recommended to lay a new cable from the panel.
- running ground.
Figure 2. Wiring the heater.
Wiring heater depicted in Fig. 2.
Installation of the heater on the wall is best done together: one person will keep the boiler, and the other mark in pencil place fasteners.
Note the marking accuracy. If there is even a slight deviation, screws or dowels, which are fixed to the wall, can not come to the plate holes for mounting the cylinder, causing the device to be installed smoothly.
If all this is done correctly, then the water heater will work properly for a long time.
The complete equipment contains a non-return valve to protect, by means of which will form an obstacle to the outflow of water from the water heater.
The safety valve is screwed onto the water inlet pipe by a few turns. This process should be given special attention, otherwise it is likely to damage the joints of the pipes from the boiler tank. By mounting it in a horizontal position, it should be remembered that the inlet for cold water should be at the bottom, and outlet for hot water is located on.
Water heater installation
Termex instantaneous water heaters, due to their size, can be installed above the sink, which will significantly save space in the room. Water is heated in a metal flask.
Due to the use of powerful heaters, it is worth making a separate machine for the flow boiler.
Thus, the general wiring in the house, apartment will always be serviceable and not depend on the inclusion of the unit.
The water heater installation scheme can be temporary or stationary. In the first case, the cold water pipeline is connected to a tee, after which it is combined with a water heater.
Tees must be cut separately for cold and hot water. Shut-off valves are installed behind the tees.
The inlet pipe of the flow boiler must be connected to a water pipe with cold water.
The outlet pipe is connected to a tap through which already heated water is supplied.
The tightness of the system is checked without fail during a temporary, stationary connection.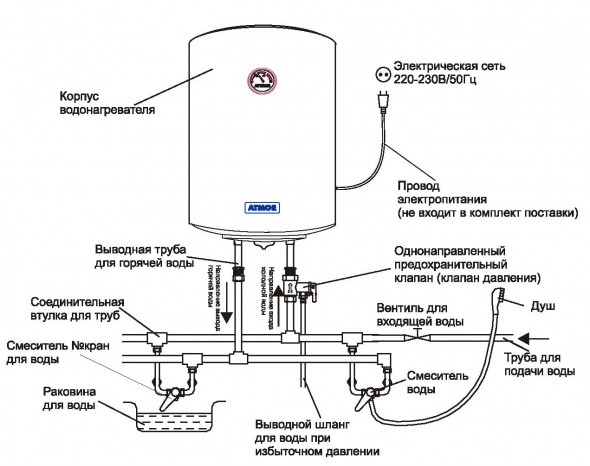
To do this, you need to simultaneously turn on the hot water tap in the shower, in the bathroom, in the kitchen. If there are no leaks, then you can turn on the electricity.
Termex storage water heaters do not impose such requirements on wiring as flowing water heaters.
Installation and connection requires the use of a scheme in which water can be supplied simultaneously to a faucet and shower.
Installing this type of boiler with your own hands is simple if you have the necessary tools. Marking is applied to the wall where the water heater will be located.
After attaching the tank to the wall, you will need to connect the water, install a safety valve.
When connecting the water supply, make sure that the valve is closed. After the installation of the entire system, the operation of the Termex water heater is checked.
When checking, all connections of the pipeline parts must be tight, and heated water must flow from the tap.
To see clearly what is the scheme for installing a Termex water heater with your own hands, you can watch the video in our article.
How to install an electric boiler yourself
We begin the process of installing a storage boiler by choosing a place for mounting it in a bathroom or bathroom. Our choice fell on the wall above the toilet in the bathroom, where it definitely won't bother anyone. It should be borne in mind that the wall must withstand the load of the boiler, so you should refrain from installing the boiler on non-reinforced plasterboard partitions. If the boiler has a volume of 50 liters, the wall must withstand a double load, that is, 100 kg. Our boiler, for example, is designed for 80 liters of water.
When attaching the boiler, we determine the lower point of the boiler location and mark it with a pencil on the wall. We measure the distance from the bottom point to the mounting plate on the boiler (it is firmly welded to the boiler body) and again mark the resulting distance on the wall. We drill two holes. The fastening bar has no holes, and the anchors with a hook at the end simply hook on its edge.
If the wall is made of brick, concrete or wood, then for work we use a puncher with a pobedit drill (for a wooden wall - we use a regular drill for wood) with a diameter slightly smaller than a plastic dowel.Then we insert the plastic dowel into the hole (if necessary, we drive it in), and screw in the metal anchor-hook until it stops turning. Usually a depth of 10-12 cm is sufficient. We hang the boiler by hooking the anchor hooks to the mounting plate on the boiler.

In principle, the boiler suspension process is completed. As you can see, there is nothing fundamentally complicated in it.
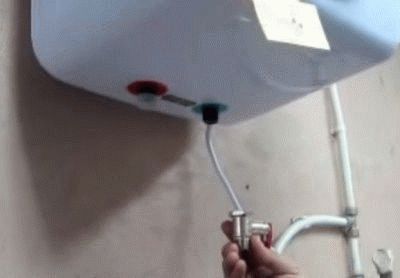
Then we connect the boiler to the water supply. For this we need flexible hoses.

You can also use metal-plastic or polypropylene pipes. But it will cost more, and installation will take more time.
There are two pipes on the bottom of the boiler. One with a blue identification plastic ring for cold water supply.

The second, output, for hot water, with a red ring, respectively.

A safety valve must be installed where cold water is supplied. It either comes with a boiler, or is purchased separately.
First, we fasten the safety valve, having previously wound a sealing tape or plumbing linen around the thread.
We fasten one end of the flexible hose to the safety valve from below.

Here, the sealing tape is not needed, since there is a special rubber gasket in the hose nut that performs its role.

Now, in the same way, we fasten one end of the other flexible hose to the tube from which hot water will come out. Likewise without sealing tape.

Let's connect the free ends of the flexible hoses. The end of the hose to which cold water enters is connected to the water pipe.

Please note that you must first put a tap or valve in this place in order to be able to shut off the water supply to the boiler when it is replaced or malfunctions. We connect the free end of the other hose to the pipe leading to the mixer
We connect the free end of the other hose to the pipe leading to the mixer.

I must say that before connecting the boiler, the tees on the water pipes were already removed. If you do not have sufficient experience with plumbing, it is better to entrust this work to professionals!

Everything related to the plumbing part is connected to each other at this stage.
Now we connect the electrical part. Water heaters of the Thermex type have a good feature: the cable for connection, together with a plug and a special safety relay, is included in the kit and is already connected to the boiler. Otherwise, all this will have to be purchased separately.


Due to the fact that everything is already connected, we did not have to open the cover of the boiler, where the contacts are located. It was enough to pre-install a socket with grounding near the boiler.

We turn on the cold water supply tap, check the tightness of the connections. If everything is normal (dry without leaks), you can plug the boiler into the outlet.

The indicator lamp on the boiler body should light up. We set the required water temperature using the temperature controller located on the bottom of the boiler.
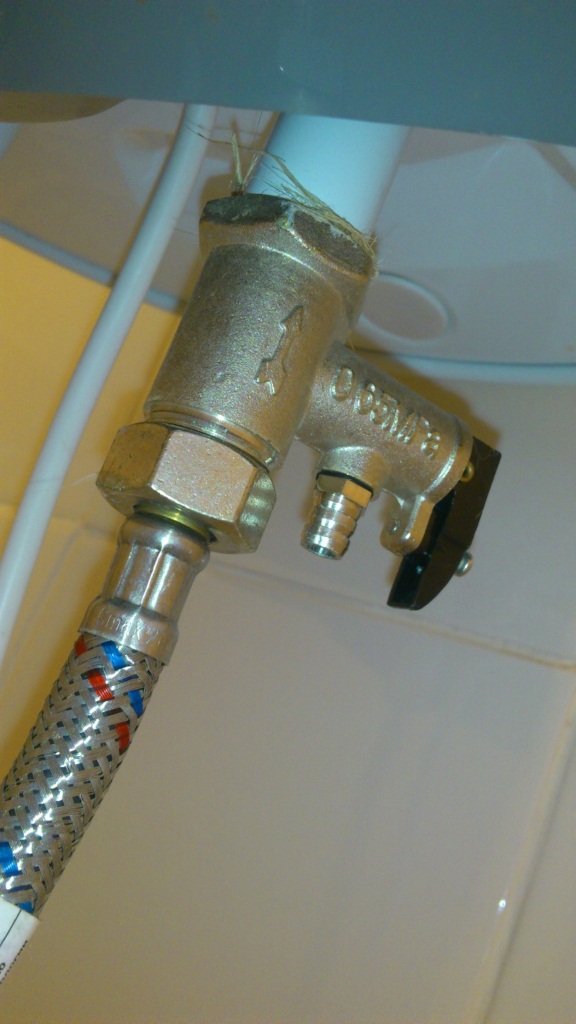
The presence of a check valve in Termex water heaters
In the store, the check valve is marked with a water flow arrow and is associated with a bypass valve (ribbed fitting in the photo). It is necessary:
- When water enters the tank from the riser (for the first time you will have to slightly open the mixer, give air current). The system works without it, just a pillow will accumulate on top, and when using the shower it will come off. We'll have to wait for time.
- As soon as the pressure inside the tank is equal to the riser, the check valve slams shut. The heating element starts heating the water. The thermal expansion coefficient of steel is less than that of water. The tank begins to buckle under pressure. The valve does not let the water back into the riser. Deformation causes damage to the tank leading to cracks in the protective enamel coating and corrosion (see above). The bypass valve bleeds excess fluid when pressurized.
The non-return valve prevents the heated water from leaving the riser.It is permissible to use the water heater with an empty faucet. When the tap is turned off, the upper part of the tank is drained, but 80 percent will remain inside. To use it, at the inlet to the water heater, a tee is placed on the inlet pipe, water is taken through the valve if necessary
It is important to make the correct wiring diagram. The tee is between the water heater and the bypass valve
Let us mention the rule of cutting a tee. Usually sediment accumulates in the tank. If you embed a check valve into the lower branch of the tee, when you turn off the water and try to empty the tank through the side branch, dirt will settle on the valve, which is unfavorable for the operation of the latter. The scheme looks advantageous when the water heater is powered from the side, and the emergency drain goes vertically down. In this case, we partially clean the tank without disassembling the tank and removing the heating element, which is very convenient. Take note.
Place a coarse filter near the riser - the non-return valve does not like dirt. The inner channel resembles the Latin V, set on its side. There is a mesh at the top, and according to the rules, the entrance wall has a negative slope (pointed down), dirt accumulates inside. Deviate from the rules, during a planned or emergency shutdown of water, rust will be washed into the riser. But no derogation is allowed. A worthy owner is able to clean the filter on his own. Signs: the tank is poorly filled, and the water drains well through the outlet. If cleaning did not help, the problem is in the non-return valve, the fittings should be removed and rinsed.
Before installing the Termex water heater, make sure that there is a convenient approach to the device. Quickly make sure: removing the heating element is not an easy task. If you do not want to re-install the Termex water heater yourself, worry about scheduled maintenance in advance. The instruction manual clearly states how many times a year to clean the product by completely emptying the tank.
The main points when installing Termex water heaters
Consider how the self-installation of the Termex water heater is carried out
Let's pay attention to the moments mentioned in passing. By the way, do not forget - the plumbing is completely dressed for at least three and a half turns
Otherwise, cut the thread. Self-installation of the Termex water heater is carried out according to the standard scheme. We emphasize only the hushed places.
It is impossible to operate the Termex water heater without a magnesium anode. In heating technology, the magnesium anode protects aluminum and steel against galvanic corrosion in circuits with copper elements. This is written in SNiPs. It is forbidden to operate iron and aluminum structures downstream of copper structures.
The same applies to water heaters. Often heating elements use copper. Copper conducts heat well, the efficiency of the device increases. There are steel heating elements. This is due to electrochemical corrosion: the difference in electrical potential between the steel tank and the heating element is zero. Therefore, destruction is blocked. We want to note that the process of electrochemical corrosion is not associated with 220 V from the outlet. Metals in nature have a natural potential. Copper is on the right side of the charge range, magnesium is on the left.
When a conductive medium is formed between two metals, charge transfer begins. As a result, one material becomes a donor, collapsing. Tanks of water heaters, not counting flow models, are made of steel. In some cases, the alloy is alloyed, gets the properties of stainless steel, in others it is covered with enamel. There is no third. If the protective layer is broken, the steel comes into contact with water. As a result, if copper lurks upstream, the process of electrochemical corrosion starts. All the more so because the small scratched area of steel accounts for the full impact force. Due to this, the process of electrochemical corrosion is fast.The tank starts to leak, damage is not subject to replacement under warranty or repair. Draw your own conclusions.
It is difficult to patch the tank - you will have to tear off the external thermal insulation glued (foam) to the walls from the outside. It is necessary to carry out and passivate the places of damage from the inside. The process is not simple and safe. Clearly imagine that the operation of a water heater without a magnesium anode is unacceptable.