Varieties of infrared films
From a constructive point of view, all IR films are similar and have a common principle of operation. However, for various types of premises and operating conditions, it is customary to use certain options for underfloor heating film. The differences between ICs are primarily due to the fact that different companies are engaged in their production.
Consider the types of IR film according to the maximum heating temperature and their compatibility with various floor coverings:
high-temperature infrared heat-insulated floors under a tile. The maximum heating temperature of such systems reaches 50°C. They are incompatible with floor coverings that are more susceptible to heat (linoleum, laminate);
In terms of their structure and principle of operation, all infrared films are similar to each other, the main difference is the maximum heating temperature
- low-temperature infrared heat-insulated floors under linoleum and laminate. Such systems can be heated up to 27°C;
- universal IR systems that are compatible with all types of floor coverings.
The second parameter by which IR films are classified is the type of heating element. To date, two main types of IR floors can be distinguished, depending on the heating element:
- carbon;
- bimetallic.
The specific power of the infrared floor is the last indicator, which is very important when choosing heating. Let's consider three main types of IR films, depending on this parameter:
with low power (130-160 W / m²) - are used in cases where it is necessary to organize heating of a room with a small area. Compatible with "light" floor coverings;
Infrared films from different manufacturers may differ in their appearance and technical parameters.
- with medium power (from 170 to 220 W / m²) - mounted in more spacious rooms. Great for the following flooring options: porcelain stoneware, tiles;
- with high power (above 220 W / m²) - are installed in industrial buildings. And also they are used for floor heating in saunas and various workshops.
If necessary, you can always contact specialists who will help you choose the right system for a particular case. It is also recommended that you read the relevant reviews on the relevant forums before purchasing. Film underfloor heating is an innovative solution for any room, allowing you to achieve maximum comfort.
Features of carbon and bimetallic IR films
Carbon films used for floor heating are more expensive. The heating elements in such a system are made of a special carbon material, which has a fibrous structure. In some cases, they are supplied with a protective layer of graphite. Spraying from this material contributes to an increase in the strength characteristics of the system, and also affects the duration of its service life.
The basis of the material is represented by a lavsan film. Film infrared floor made of carbon is mounted on horizontal and vertical surfaces.
Diagram of bimetallic infrared film for heating
Bimetallic IR film differs from carbon film in that it has heating elements consisting of two metal layers (aluminum and copper). As a basis for the material, a double polyurethane film is used, which has good elasticity.
The installation of a bimetallic system is complicated by the fact that a grounding conductor cannot be connected to the system. Also, the bimetal design is incompatible with ceramic flooring. It belongs to the low-temperature variety, so its recommended heating level does not exceed 27 ° C.
Infrared underfloor heating pros and cons
Heating with IR film has many advantages over other types of similar heating. Consider the main advantages of such a heating design:
- such a system cannot fail at the same time, as it is connected in parallel;
- the ability to install on any type of surface - both horizontal and vertical, as well as on elements that are located at an angle;
The film does not contain components hazardous to human health, does not produce unpleasant odors and toxic fumes.
design features of the infrared floor allow you to achieve uniform heating of the room
This is especially important if a laminate is used as a floor covering;
another plus of such a system is ease of installation;
the possibility of disassembly if necessary;
such a film is suitable for installation in rooms in which the humidity level exceeds the permissible parameters;
compatibility with different types of flooring;
installation of such a system is allowed not only indoors, but also in open conditions (for example, on a veranda);
high heat transfer coefficient, which reaches 97%;
The efficiency of the IR film floor is approximately 30% higher than that of other underfloor heating systems. The prices of film heat-insulated floors completely correspond to their efficiency.
However, this design also has some disadvantages, among which are especially distinguished:
the need to comply with clear rules when connecting;
Unlike other heating systems, infrared floors act directly on the surfaces of heated objects and do not dry the air in the room at all.
- high inertia, due to which heating and cooling occur very quickly;
- weak resistance to mechanical stress in comparison with a tubular structure using water as a coolant.
The film system is generally not suitable for installation as a main heating system. It is recommended to use an infrared design for organizing additional heating.
This is interesting: Designing a heating system for a private house - consider it thoroughly
Do I need waterproofing over the screed
When arranging the floor in “wet” areas or rooms, they sometimes ask themselves the question - can double waterproofing be done? Lay one under the screed, the other on top. If you do not know if there is waterproofing in the existing screed, it is quite even and you are not going to redo it, but you will be laying an expensive or non-separable coating, then such a way out seems logical.
 Laying waterproofing after screed is also sometimes necessary
The second option is if you are very tormented by the fear of flooding your neighbors from below. For your own peace of mind, you can lay a second layer on top of the screed. There is no need for this, but what can you do for your own peace of mind.
In the apartment
If the floor is tiled, one (high-quality) layer of waterproofing under the screed is enough. First, tile is a waterproofing material. Yes, cement-based grout joints are water-permeable. But polymer grout is waterproof. If you are so afraid of the flood, it is better to use a good grout. Here you will have double waterproofing.
When can waterproofing be installed on a screed? If you will lay laminate in the same kitchen or in the corridor. To calm your paranoia, spread the film over the screed, then the underlay under the laminate, and further along the technology. Such a thin additional layer will not affect anything.
 Cracks in the screed can be repaired and covered with waterproofing
When else do you need waterproofing on the screed? If the screed is old, there are cracks. In general, in a good way, with a large number of cracks, it is necessary to remove the old screed and pour a new one.But if there are few cracks, the pieces of the screed are on the same level, it is quite possible to try to restore the slab under the tile. To do this, embroider cracks, fill with a repair compound. Then, if you lay tiles, you can coat with coating or penetrating compounds. Under other types of coatings, such a more serious waterproofing is also desirable, but you can get by with a film.
In a private house
The same approach - with laying the second layer of waterproofing on a screed under a laminate or carpet can be justified in a private house. But here it is needed not in order to protect the “neighbors from below”, but in order to cut off the flow of water from the ground. But if there is such a problem, then this is only a temporary solution. Dampness will accumulate under the film and you will still need to redo everything.
 In a private house in concrete floors on the ground, it is necessary to protect against capillary moisture
What exactly needs to be done, you need to decide after examining the floor, the foundation and the surrounding area. But the first thing you can try is penetrating waterproofing. If the problem is that the bottom layer has torn and stopped working, this will work. If the problem is in the settlement of the foundation, cracks, then you need to look at the degree of damage and then make a decision. In general, small bloodshed in such cases is not enough.
Substrate preparation for underfloor heating
Floor preparation is carried out for two purposes: to level the surface and to insulate it from the underside (from the ground).
Leveling the bottom surface, thermal and waterproofing
Scheme of waterproofing underfloor heating.
In apartments, floor slabs have sufficient horizontal surface. Leveling is necessary in the private sector, when soil is located below the future floor. Primary leveling is carried out by pouring dry sand into the recesses. Next, the primary screed is poured. The material for the bottom screed is cement. The thickness of the lower primary screed is 5-6 cm. At the same time, the primary screed is considered to be of high quality, in which the existing irregularities do not exceed 3 cm
It is especially important to provide a flat surface for laying pipes, the free flow of heated water will depend on this.
It is possible to provide additional thermal insulation of the floor radiator from the ground with a cement + clay + sawdust screed (tyrsa).
Isolation of the heating layer from the ground or basement (in the house) or floor slab (in the apartment) is necessary for any design of underfloor heating. The most common material for such insulation is foam and foam. In this case, the density of the boards used must be 3.5 kg/cm3 or higher. The density of the insulation should ensure its sufficient rigidity; a layer of cement screed, pipes with water and heavy flooring (for example, tiles) will lie on top.
Waterproofing (e.g. polyethylene 250 µm) is necessary before laying foam boards. The structure of the foam contains open cells, it is vapor-permeable and hydrophobic, that is, it absorbs moisture into itself. To prevent the penetration of ground moisture, the insulation is placed on a layer of polyethylene (or other waterproof material).
Penoplex insulation is characterized by improved properties, its cells are closed, moisture does not impregnate the material, so laying waterproofing is not important. The thickness of the insulation should be above 5 cm (for the private sector) and 2-3 cm (for floor slabs in the apartment)
Reinforcing the screed and laying the damper tape

Scheme of reinforcement of the underfloor heating screed.
Reinforcing the underfloor screed is important if the structure is an overhanging layer (the floor is the ceiling of a garage or cellar). Reinforcement is necessary when laying a pipe structure, it is heavier than electrical wires and creates additional uneven pressure on the lower screed, which can cause it to crack
In cases where reliable reinforcement is required, metal reinforcement or mesh with a wire diameter of 4-6 mm, in increments of up to 150 mm, is used. A mesh with a smaller diameter (2-3 mm) is used to reinforce a warm floor with an electric cable. The metal mesh material will have an additional smoothing effect in the distribution of heat over the surface of the screed.
The damper tape is produced with a thickness of 5-8 mm and a width of 12-18 cm, when laying it, it must be taken into account that the edge of the tape should rise above the upper level of the floor by at least 2 cm.
This completes the preparation of the base for laying the warm floor. Further, the heater is unfolded (according to a pre-lined scheme), poured with a secondary screed of concrete or self-leveling floor, installation of an external decorative coating.
The material of the outer floor should be characterized by high thermal conductivity, it should transfer heat well into the heated space. The ideal flooring for underfloor heating is tile, suitable and can be used: stone, laminate, linoleum, carpet.
Features of IR films from Heat Plus
The Heat Plus brand is engaged in the production of underfloor heating (including infrared). The features of the models that are manufactured by this company is that they can have a different film shape, namely:
- striped;
- solid.
Features of the technology for the production of infrared floors from this company make it possible to avoid the presence of unheated areas. The manufacture of such film systems includes the uniform application of carbon material on a polyester base, which makes it possible to achieve a high level of heating communication efficiency.
Consider other advantages of Heat Plus infrared floors:
- ease of installation;
- wear resistance;
Heat Plus infrared film consists of safe and environmentally friendly materials and is a coating with a thickness of 0.338-2 mm, consisting of 5-9 technological layers
reliability.
The service life of similar products can reach 15 years under normal use. If desired, the organization of such a system takes no more than one day, which is very convenient.
Laying
So, polyethylene was chosen as a waterproofing agent. The film sold in rolls can be used in one piece in small rooms. In larger rooms, you will need to glue a canvas of 2 or 3 strips. Before laying the waterproofing, the walls to a width of 15 cm from the floor are treated with a universal primer.

Underfloor heating insulation scheme.
The film is placed with an allowance on the side surfaces of up to 15 cm. If it is impossible to lay the insulation in a single piece, then one on top of the other polyethylene strips are overlapped at least 10 cm wide. The joints can be sealed with adhesive tape or soldered with an iron, placing paper tape under it.
Cement-polymer waterproofing is even easier to install. A special tape (vinyl) is laid along the perimeter of the room with an overlap on the walls, and the coating is applied to it and the cleaned surface of the screed, as described above, with a spatula, roller or similar tools.
But the cast waterproofing of the warm floor, although it is the most reliable, can “steal” not 1 cm from the height of the room, so it is worth resorting to this method of moisture protection only in fairly high rooms. In addition, work should be carried out with intensive ventilation of the room, since hot mastics are used to fill the waterproofing. They are applied in several layers on a dried and primed surface. The final layer is leveled with a rule, trowel or spatula. Often, cast waterproofing of a warm floor needs to be reinforced with mesh or fiberglass.
Another “hot” way of moisture protection device is pasting waterproofing. Roofing material is the most famous material here, however, isoplast, hydroisol, and other bitumen-polymer or bitumen-roll materials are used for waterproofing.Sheets of roofing material are attached to the mastic previously applied to the surface of the screed. The edge of each next strip is overlapped with the edge of the previous one. Do not forget about the roofing felt on the walls and puttying the joints of the material.
https://kuhnyamoya.ru/youtu.be/vrX04vlzTso
Believe that this, although very simple, operation is almost the most important when installing a heating system, so do not neglect not only the choice of high-quality pipes or a reliable heat insulator for it, but also the moisture protection of a warm floor. Moreover, the correction of omissions will require the destruction of the entire structure.
Warm floor ZEBRA EVO-300
During the onset of the autumn-winter season, the most pressing issue is the choice of a heating system for your own home. Owners are turning not only to traditional types of heating (gas, stove, electric or central), but also to more modern systems. This type includes film underfloor heating. It can be used as the sole heat source or act as supplementary heating.
The LUCH group of companies sells film heaters ZEBRA EVO-300 WF, which are a new generation of heating systems developed on the basis of ceiling film solutions. The maximum power of the floor heater is 150 W/m2.
The design is a film with a thickness of 1 mm from a special composition. One box set includes 50 sections with a size of 500x600mm. The maximum tape length is 10 modules.
The amount of waste during installation is minimized, because. film can be cut to length. Here you can order a warm film floor in any volume, starting from one module.
Each section is an independent heater with a power of 45 W and can work separately.
Appearance ZEBRA EVO-300 WF
- Outputs (phase, zero),
- ground contact,
- branded label,
- Resistor (heating element),
- installation areas,
- Place of cut.
Basic indicators
- Rated operating voltage Un - 220 V, 50 Hz.
- Maximum specific power - 150 W / m²
- Rated load current In - 1.0 A / m².
- The maximum heating temperature is 40°C.
- Thickness - less than 1 mm.
- Weight - about 550 g / m².
- Heater protection class – IPx4.
Advantages of ZEBRA EVO-300 WF
- modularity: if one of the modules fails, the rest continue to work,
- directed warm flow, which is guaranteed to heat up the room and floor faster than other floor film systems,
- guaranteed service life - 25 years,
- environmentally friendly and safe for health components from which the modules are made,
- electricity consumption is 20 W / h, provided that the room is insulated in accordance with the SNIP standard Thermal protection of buildings 23-02-2003,
- simple installation, which can be done by hand,
- absence of electromagnetic radiation: conductive elements are placed in a "Faraday Cage",
- does not overheat.
Our company carries out installation of film systems of heating under any floor covering.
under the laminate. The installation technology is similar to the method of laying ceiling heating systems. During installation, a 3-mm layer of Izolon is used, which creates a body protective screen. Isolon is mounted with the shiny side up. All joints and fastenings of heating elements are connected with mounting tape. If the floor base has a wooden base, then the heating modules can be fixed using a mounting stapler.
Under the draft floor on the logs. The system under this floor can be installed in two ways:
Under the screed. A heat-insulating layer with a minimum thickness of 15 mm is laid on the base. Then a heat-reflecting layer is mounted using adhesive tape. This sequencing guarantees the insulation of heat-emitting surfaces, resulting in improved energy efficiency, improved system focus and reduced energy consumption.
The modules must be covered with a polyethylene film with a layer of at least 0.1 mm. All joints are again glued with tape. The film starts up slightly above the level of the screed. Then a metal mesh is laid, which will act as a frame. Only now you can fill the screed to the desired level.
To correctly observe the correct load on the electrical wiring, it is necessary to calculate the power of the film heating floor. Provided that the system power is higher than 2.2 kW (10A), it cannot be connected directly. To connect this power, a modular contactor is used. The system can withstand a current of 16A, but the power quality may not meet the approved standard. As a result of drops in the electrical network, the current strength changes, the surges of which can damage the thermostat.
Where to buy a warm floor in Sevastopol?
The company "LUCH" presents advanced economical solutions for heating various objects. Our consultants will help you calculate the power of the warm floor and the number of sections. We present the most favorable prices for the implemented underfloor heating systems in Sevastopol and the region. To clarify all the details, leave your application or call.
Laying the finish coat
Laying carpet, parquet or laminate on infrared film is carried out according to the standard scheme, but the laying of ceramic tiles has some features. The laminated surface of the film may interfere with the adhesion of the tile adhesive to the subfloor. To improve it, it is recommended to lay a mounting grid on the floor with a cell of up to 20 mm and fix it in those places where there is no IPO.
After completion of the tiling work, the adhesive solution must dry completely. This happens after 28-30 days. Turning on the heating system before this period is not recommended.
With the growing popularity of this material, there are more and more companies producing infrared heat-insulated floor. You should buy this material only from a trusted supplier who is not only able to support the issued warranty, but is also ready to provide full information about the intricacies of installation inherent in his particular products.
The device and principle of operation of the IR film
The infrared film is made from a durable polymer. During the production process, carbon-graphite strips are applied to the flexible web. The semiconductor sections are connected by copper and silver bars.
The final coating of the material is a laminating film (PET), which protects the components from moisture, breakdowns and fire. Dense polymer does not delay radiation
Functions of the main layers of IR film:
- Carbon paste or carbon fiber cloth is a heating element that converts electricity into heat.
- Foil strips (copper busbars with silver) form a heating circuit and evenly distribute thermal energy over the surface of the film. This element is controlled by a temperature sensor - when heated to the desired temperature, the supply of electricity stops.
- The laminating coating is a protective electrically insulating and heat-resistant layer (the melting point of the material is 210°C).
The carbon nanostructure is distinguished by unique parameters. The atoms of the substance, formed into a hexagonal grid, give the material the ability to emit radiation in the IR spectrum.
Working principle of infrared floor film:
- Electrical current is supplied to the system.
- The current passing through the heating elements (foil strips) is converted into thermal energy.
- Nano-carbon components are heated and generate IR waves, the range of which is 5-20 microns.
- The rays fall on interior items, walls and furniture. From the heated elements, the air in the room warms up.
In addition to the film, the infrared floor heating system includes: a thermostat, a temperature sensor, contact clamps and insulating materials.
The thermostat controls the degree of heating through sensors built into the floor. More complex heating systems are able to change the temperature regime according to a user-defined algorithm
The following article, which we recommend reading, will acquaint you with the varieties of carbon underfloor heating used in the arrangement of residential premises, and the features of their installation.
Stage 3 installation of infrared floor heating
Step-by-step instructions for beginners with no experience in construction:
1. Preparation (learning security measures)
If the work is performed by a non-professional, you need to familiarize yourself with the installation technique and safety measures:
minimize walking on the laid film. Protection of the film from mechanical damage, which is possible when moving along it, is achieved through the use of soft covering material (thickness from 5 mm);
do not allow installation of heavy objects on the film;
prevent the instrument from falling onto the film.
Safety rules for installing IR floor heating:
it is forbidden to connect a heating film rolled into a roll to the power source;
film installation is carried out with no power supply;
connection to the power supply is carried out strictly according to SNiP and PUE;
film installation rules are observed (length, indents, absence of overlaps, etc.);
only suitable insulation is used;
installation of the film under furniture and other heavy objects is excluded;
installation of a film under low-standing objects is excluded. These are all items having an air gap between the bottom surface and the floor of less than 400 mm;
contact of the film with communications, fittings and other obstacles is not allowed;
isolation of all contacts (clamps) and cutting line of conductive copper bars is provided;
the film floor is not installed in rooms where there is a high risk of frequent water ingress;
mandatory installation of an RCD (residual current device);
break, cut, bend the heating cable;
mount the film at temperatures below -5 °C.
2. Preparation of the thermostat installation site
Includes chasing the wall (for wires and temperature sensor) to the floor and drilling a hole for the appliance. The thermostat is powered from the nearest outlet.
Advice. It is advisable to lay the wires in the corrugation, this technique will simplify maintenance and repair if necessary.
3. Foundation preparation
Infrared film is laid only on a flat and clean surface. Horizontal deviation of the surface exceeding 3 mm is also unacceptable. Masters recommend treating the surface with a primer.
Note. Dismantling of the old floor (draft) is not required if its surface is satisfactory.
6. Laying infrared floor heating
drawing markings for laying on the floor;
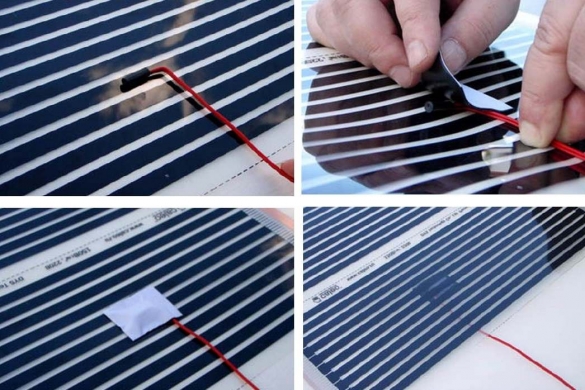
preparation of a strip of film of the desired length
Please note that the film can only be cut along the cut line; the film is located towards the wall that is intended for the installation of the thermostat
The strip is oriented with a copper heater down;
the film is located towards the wall that is intended for the installation of the thermostat. The strip is oriented with a copper heater down;
the recommended distance from the wall of 100 mm is maintained;
the recommended indent (gap) between the edges of the infrared film sheets of 50-100 mm is maintained (film overlap is not allowed);
strips near the walls are glued to the insulation with adhesive tape (squares, but not a continuous strip). This will avoid shifting the canvas.
7. Installation of clips
Metal clamps must be attached to the ends of the copper bus. When installing, it is necessary that one side of the clamp is inserted between the copper bar and the film. And the second was located above the copper surface. Crimping is carried out evenly, without distortions.
8. Connecting the wires of the infrared floor
The wires are installed on the clamp, followed by insulation and tight crimping. The ends of the copper bus are also insulated at the point of cutting. The requirement of parallel connection of wires is observed (right with right, left with left). In order not to get confused, it is convenient to use a wire of different colors. Then the wires will be laid under the plinth.
Advice.So that the clip with the wire does not protrude above the film, it can be placed in a heater. Previously, a square is cut out in the insulation for the clamp.
9. Installing the temperature sensor for the thermostat
The temperature sensor is recommended to be installed in the center of the second section under the film. To prevent the sensor from being damaged during movement, you need to cut a hole in the insulation under it.
 Installation of a temperature sensor for underfloor heating film
Wiring diagram for a film underfloor heating thermostatConnecting a thermostat for an infrared underfloor heating
Conclusions and useful video on the topic
Video #1 The principle of operation, technical and operational characteristics of the IR film in the underfloor heating system:
Video #2 Types of infrared film and recommendations for choosing the material:
Video #3 Rules and procedure for arranging a warm floor with thermal film:
The principle of operation of the infrared film is based on the natural processes of heat generation. The material has a lot of advantages and it was appreciated by consumers - the scope of IR film is multifaceted.
The coating is most in demand when installing a warm floor. Observing all technological requirements, it will be possible to independently mount an effective heating system.
Please write in the block below the text of the article. Tell us how you chose and installed a film heating floor. Ask questions, share useful technological nuances, post photos on the topic.