If you are doing repairs in an apartment using drywall, you may have a question: how else can you use this versatile and easy-to-use material? With its help, it is easy to embody a variety of design ideas and bring a touch of originality to the interior. From GKL sheets and even from their scraps you can make interesting cabinets, shelves, a coffee table, niches, window and door slopes, ducts for pipes. Plasterboard columns can become an exclusive decoration of your bedroom, and a dressing room made of this material can complement it functionally.

How to make a dressing room in the bedroom
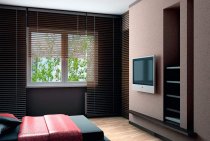
Plasterboard wardrobe, which can be placed in the bedroom, will help not only create a harmonious design, but also save space and time, as all wardrobe items will be located in easily accessible places. And if it is done by hand, money will also be saved.

Because wardrobe - this is more than just a closet, it will take at least 3 square meters. meters. It follows from this that it is necessary to decide on a project if the bedroom is medium or large in size, and the bed does not occupy a large area. If you use sheets of drywall measuring 150 by 60 cm, you can make a dressing room with your own hands, using a minimum of outside help.
First of all, you need to decide what shape the dressing room will have and where it will be placed. When choosing a corner wardrobe project, you will need a minimum of material.
The finished drawing with dimensions can be found on the Internet. But if you want to buy ready-made shelves, a pipe for hangers, doors, you will have to adjust the drawing to fit their dimensions.

You can also think about making a plasterboard suspended ceiling with your own hands inside the dressing room. If you want natural light in this isolated part of the bedroom, make sure that there are openings in the walls.
Necessary materials and tools
The flexibility of the GKL allows you to give them different shapes with your own hands, after which they are securely fixed on a solid frame assembled from profiles. Drywall constructions are based on a kind of skeleton of interconnected guides and rack profiles. In addition to them, you will need:
- single-level connectors ("crabs");
- direct suspensions (for fixing the rack profile at the required distance from the surface);
- special self-tapping screws ("bugs");
- self-tapping screws for mounting sheets.

Dowels may also be needed (if you will be installing the profile on concrete bases). Required tools:
- screwdriver;
- metal scissors for cutting profiles;
- plumb;
- roulette;
- pencil;
- level.

Sequence of work
During installation, you must follow a certain sequence of actions:
- Marking the places of attachment of profiles to surfaces. You can start it from the ceiling, where the guide profile will be installed. Then, using a plumb line, you need to transfer the markings to the floor, where the lower guide profile will be located.
- Installation of guide profiles to the floor and ceiling. If the surface is concrete - use dowels (6 by 48 mm).
- Installation of rack profiles. They should be located at a distance of 60 cm from each other. Rack profiles during installation are attached to the walls and to the ceiling by means of direct suspensions. In the place where the doorway will be located, you need to fix a horizontal profile, the length of which will be 10 cm more than the width of the opening.
- Reinforcement with wooden beams for profiles that carry a large load. For example, these are profiles bordering the dressing room door and those that are adjacent to the wall.
- The "skeleton" of profiles is completed by transverse elements. These short horizontals are installed every 60 cm.

To equip the lighting in the dressing room before sheathing the plasterboard structure, you need to take care of the supply of electricity.
- Cutting sheets GKL desired configuration. At the same time, follow the wise saying: "Measure seven times, cut one" to avoid unnecessary spending.
- Installation of prepared sheets to a metal frame using self-tapping screws.
- Puttying corners, holes with screws and junctions of sheets.
- Surface priming.
- Finishing. From the inside, the dressing room can be wallpapered or painted, from the outside - use a material that will be in harmony with the decor of the room.

The best option for wardrobe doors is a sliding design.
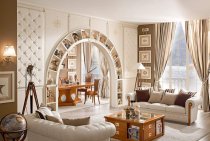
Columns made of drywall
From plasterboard, you can make columns of various configurations and sizes with your own hands, which will not only become the highlight of the bedroom interior, but will also be able to perform many useful functions:
- divide the room into zones;
- mask risers, pipes;
- serve as a stand for the necessary items and a source of additional lighting.

Columns of various configurations and sizes can be made by hand. They can be either rectangular, with niches, or round, semicircular or multifaceted.

The principle of work when creating drywall structures of this kind will be the same as for the dressing room, starting with marking and ending with plasterboard sheathing and puttying. However, you need to take into account a few nuances:
- If a rectangular column is installed in the middle of the room, 4 vertical posts will be required, if near the wall - 2.
- Align the corners of the columns using a special perforated corner.
- You can decorate plasterboard structures with decorative plaster, paint, wallpaper, decorative stone, and mosaics.
- To give the column a complete look, plinths are installed along its perimeter from above and below.

- To create a round or semicircular column, you will have to bend drywall dry or wet.
- Guide profiles for a round column can be bent by making cuts every 7-10 cm. Vertical profiles are installed frequently, according to the radius of the guides.

- The width of the drywall part for a round column should be equal to the circumference, the length - the height of the structure.
- If the column hides pipes inside, it is advisable to take care of sound insulation. For this, you can use mineral wool.