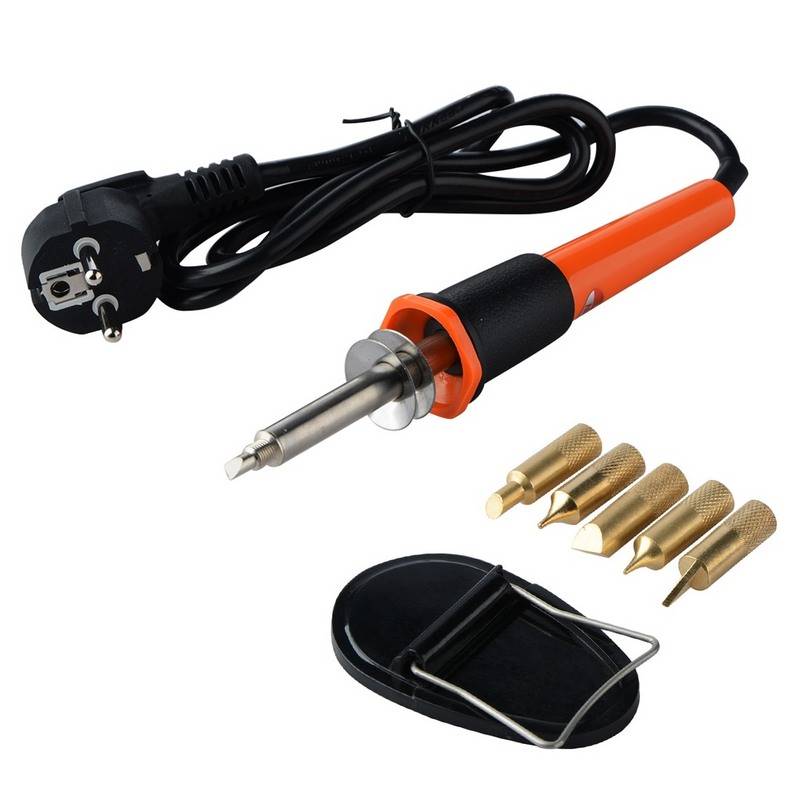
What additional tools will be needed when working with a soldering iron
When working with the tool in question, you will need to have not only consumables, but also auxiliary tools.
A special stand is needed in order not to hold a heated soldering iron in your hand. The stand can be purchased, but its design is so primitive that it can be made independently. To do this, you need a piece of wooden board, on which steel wire supports are placed, curved in the form of horns
File or rasp - needed in order to sharpen the sting. With the course of the operation of the tool, the sting undergoes deformation, therefore it needs to be leveled. In addition to the fact that the file cleans and aligns the tip, it can also be used to prepare the tool for working with materials of various thicknesses.
It is very difficult to work with a contaminated tip, so if you are just learning, then pay attention to the issue of preparing the tool for soldering
Pliers or tweezers - these tools play an important role when working with a soldering iron. Indeed, when a core of a wire or a part is heated, heat is transferred over the entire surface
It will be difficult to hold the wire without insulation by hand, as you can get burned. For this, pliers are used if thick wires are soldered, or tweezers (with the obligatory presence of a plastic base) when working with small semiconductor elements or thin wires
Sponge - used to clean the tip of the soldering iron during the soldering process from various substances - soot, foreign particles and other things. Sponges made of different materials are used to clean the sting - viscose, cellulose, metal. How to use sponges for cleaning soldering irons is described in detail in the material below.
After joining the parts by soldering, you may need alcohol if fluxes, electrical tape or heat shrink tubing were used to isolate the area and protect it from external factors.
Induction soldering iron device
Any induction (pulse) soldering iron consists of a step-down transformer, a short circuit button and a tip made of copper wire, 1-3 mm thick. In some designs, a power source and other elements are added to them.
This is how the diagram of the simplest induction soldering iron looks like:
It should be noted that in this circuit the transformer has two secondary windings: one feeds the lamp to illuminate the soldering point, and the other feeds the tip. https://www.youtube.com/embed/z-a__qL-Fq4
A pulse and induction soldering iron are not the same thing. Pulsed are called induction soldering irons, which incorporate a high-frequency voltage converter. The example device with a step-down transformer is not a pulse device.
What is a soldering iron and how the device works
An electric soldering iron is a type of electric tool by means of which two parts are joined together by means of soft substances. Such a soft substance is solder, which melts and becomes liquid due to exposure to high temperatures. When the exposure to high temperatures stops, the solder solidifies (which happens almost instantly), thereby providing a reliable connection. The device in question is the main weapon of electronics engineers, through which not only the connection of wires and semiconductor elements is carried out, but also their separation.
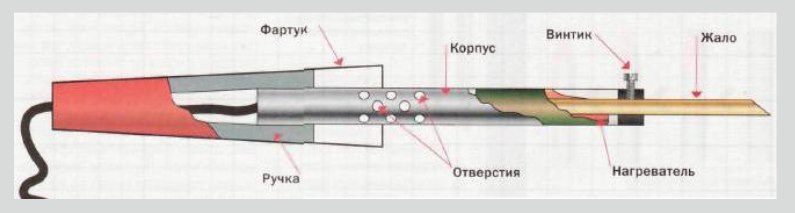
The device externally has a simple design, but inside it consists of various parts, the purpose of which should be understood.It is not at all necessary to know the device of a soldering iron in order to learn how to use it correctly, but this information will help in case of failure. The device consists of a number of the following elements, which have their own characteristics:
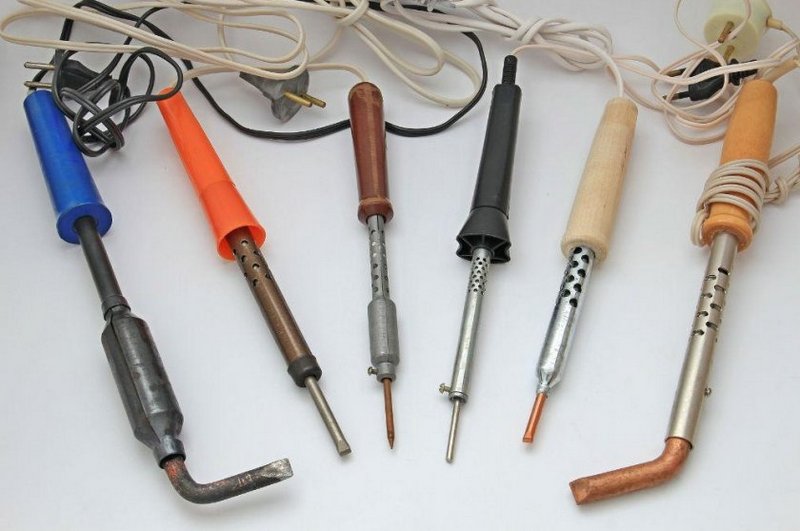
- It is based on a metal rod made of red copper. It is this rod that heats up and melts the solder when connecting the parts. Red copper is used as the basis of the rod, since it is this material that has a high degree of thermal conductivity (it transfers heat well). The end of the rod has a wedge shape, which is necessary for working with small semiconductor elements. The end of the rod is called a sting, like on screwdrivers
- The heating element is a steel tube, inside of which a red copper rod is inserted. The tube is wrapped in mica or fiberglass composition, on top of which a nichrome wire is wound. When current passes through the wire, it heats up and transfers heat to the metal tube. As a result, the rod heats up, and goes into working condition. On top of the nichrome wire is a protective layer of mica. It protects the spiral from contact with the metal body of the soldering iron, thereby increasing the safety of the electrical appliance. Its second protective function is to retain heat and not transfer it to the steel case of the device.
- Handle - made of heat-resistant plastic or wood, and allows the master to comfortably work with the tool
- Wires and plug for connecting to a socket. The wires are connected to the leads of the nichrome wire. For a secure connection, aluminum clips are used, which are soldered to ensure reliable contact. Clamps at the junction are used on powerful soldering irons, and on low-power devices, the union is carried out without additional fixation, but with the obligatory application of solder. Aluminum plates for connecting copper wire with nichrome thread are used to increase the reliability of the connection, as well as to remove heat. The more powerful the soldering iron, the stronger the copper wires heat up, so the aluminum clamps carry out heat dissipation. This information will be useful if, when repairing a powerful soldering iron, the decision is made to remove the aluminum plates. The thickness of the core of the copper cable is selected depending on the power of the device
- The steel body is the part of the tool that contains the heating element. There may be (depending on the model) a threaded screw on the body, through which the rod is fixed. The housing design may have holes closer to the handle, the purpose of which is to remove heat
How the soldering iron is arranged inside is shown in the photo below.
It is useful to understand the device of the soldering iron to everyone who plans to carry out its repair in the event of a breakdown.
Flaws
Despite the convincing advantages of soldering irons from Kandan, there are some disadvantages:
- The cost of soldering irons is quite high and those who rarely use such tools often have to look for something cheaper.
- The brand has fakes. Under the guise of Turkish soldering irons, other, very similar devices may be produced, but they will not have anything to do with the original company. This product will be lower in quality.
Features of Candan soldering irons
Many models of soldering irons are standardly equipped with additional tools for work. It all depends on the specific variety, since the equipment may vary, but you can often find a stand, scissors, tape measure, levels and a set of nozzles. In most cases, soldering irons are equipped with a two-position switch that increases or decreases the power of the tool by connecting additional heating elements.
Burning indicators can also be attributed to the features of the brand.If the heating coil is on, the red lights will light up. The Candan CM 06 soldering iron model has a thermostat control that helps regulate the temperature from 50 to 320 degrees Celsius. Other models may have different adjustment values. The adjustment step is about 10 degrees. For convenience of work, handles of the tool are rubberized.
The original tools are branded with the company logo, which is located on the box and the soldering iron itself. On the Chinese copies, the production date is printed on a sticker, while on the original, it is stamped on the side plate. The fastening of the plate in the original is made with rivets, while in the fake everything is bolted there.
Models
The range of tools has several quite popular models, among which it is worth noting the following:
Soldering iron for pipes Candan CM-01. There are two levels of power control. The maximum power is 1500 watts. Comes with stand and pipe cutter. Temperature control from 50 to 350 degrees Celsius. The kit comes with 4 nozzles.
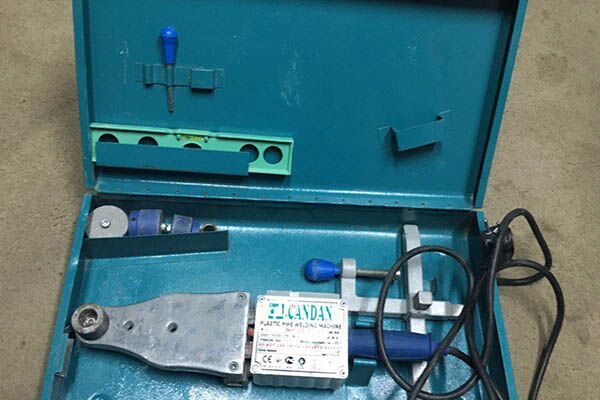 Soldering iron for pipes Candan CM-01
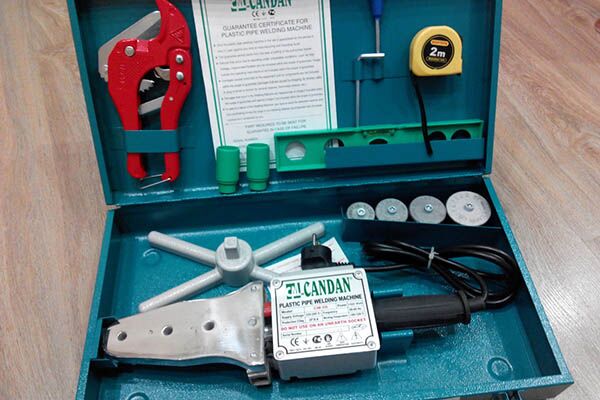
Soldering iron for pipes Candan CM-3.
 Soldering iron for pipes Candan CM-3
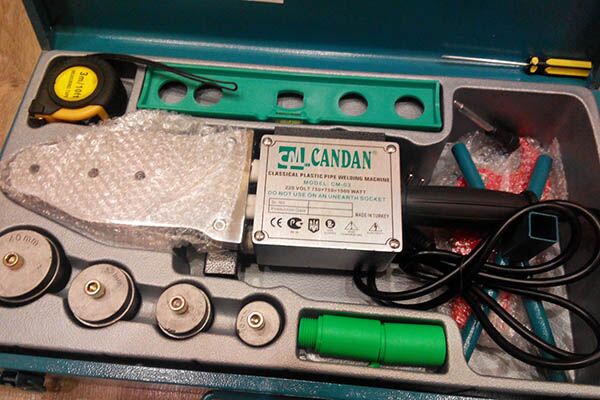
Soldering iron for pipes Candan CM-06 1500 W. The heater has a Teflon coating. The weight of the soldering iron with packaging is 5 kg. The maximum pipe size is 63mm and the minimum is 16mm. The ability to adjust the temperature from 50 to 350 degrees Celsius.
 Candan CM-06 pipe soldering iron
How to use a Candan soldering iron
The appearance of a soldering iron for polypropylene is noticeably different from the usual tool familiar to everyone. This applies not only to models of this brand, but to the whole type as a whole. The principle of operation will also be somewhat different, so you need to know the instructions for using the soldering iron for Candan polypropylene pipes.
The principle of operation of this device is very similar to that used in home irons. Before turning on directly, here you need to prepare the soldering iron for work. A special stand is screwed to the tool and a nozzle is installed, which becomes the main part for soldering pipes. If you have to work with different pipe diameters, then you need to install two nozzles with suitable sizes in the soldering iron.
After the preparatory procedures, it is already possible to start connecting to the network. To warm up, you need to set a suitable temperature, and then turn on both heating elements. Warming up can last from 10 to 30 minutes. The indicator should inform about warming up. After that, you can already proceed to direct soldering.
Next, you need to prepare the pieces of pipe and fitting to be soldered. With a soldering iron, you need to heat the fitting and a piece of pipe at the same time. When the parts reach the desired condition and their ends melt, the parts must be quickly connected together. Everything must be done the first time, otherwise the remelted polypropylene will lose its properties.
Conclusion
It is not for nothing that the Candan brand occupies a high place in the market for soldering irons for polypropylene. This is a sought-after area, which is mostly interested in professionals. It is for such specialists that this tool is created. For business needs, it has a very affordable cost, although for private use it may seem expensive. The quality and reliability of the products pays off in full.
The principle of operation of an electric soldering iron
When you turn on the soldering iron in the electrical network, the current passes through the nichrome coil and heats it. The heat released in this process is transferred to the copper rod. The rod can be heated to a temperature of 300 - 350 C. The heated copper rod ("sting" of the soldering iron) melts the solder and heats the parts to be soldered.
Electric soldering irons differ in power and type of heating element. For soldering and tinning large parts, metal sheets and wires with a large cross section, soldering irons with a thick “sting” and a power of at least 80-100 W are required.Electric soldering irons with a heating element power of 40 to 80 W are used in radio electronics and are well suited for minor repairs of electrical equipment. Low-power soldering irons (20 - 40 W) with a thin "sting" are used for soldering very small parts that are sensitive to static voltage (for example, electronic components).
clicker for adsense
Today, the most common electric soldering irons with a spiral heater - EPSN. The heater (heating element) consists of a ceramic or mica tube, on which a nichrome spiral is wound. These soldering irons are the most reliable and durable in operation. They are great for those cases where you do not have to solder so often.
Electric soldering irons with a ceramic heater are also now produced. As the practice of their application shows, they are very capricious. The heating element consists of a thin narrow ceramic plate, inside of which there is a spiral of very thin nichrome wire. When a liquid gets on such a soldering iron (or rather, on a heating element), if it falls unsuccessfully or is severely deformed, the thin wire of the spiral breaks and the soldering iron can no longer even be repaired.
If you do soldering often enough, then simple electric soldering irons are indispensable. You will simply need to acquire either a set of soldering irons of various capacities and with interchangeable “stingers”, or buy an electric soldering station. The soldering station is equipped with a “sting” heating temperature controller, automatic maintenance of the set temperature, a convenient stand for a soldering iron, a bath for a cleaning sponge, antistatic protection and some other additional features.
When soldering and working with an electric soldering iron, you must remember the rules for the operation of soldering equipment and safety precautions. With proper use and care, any soldering equipment will last a long time, and the work performed will be of high quality.
You can discuss your questions on this topic on our Forum.
Varieties of soldering irons for different reasons
In addition to the fact that soldering irons for wires and boards are classified into types according to power and voltage, there are other criteria for their separation. Knowing what types of soldering irons are, and on what grounds they are divided, is necessary in order to choose the right device depending on the tasks assigned to it.
According to the design features, soldering irons are of the following types:
- Rods are the most common soldering tools. Their device and principle of operation is described in the material above. This type is best suited for soldering around the house - when you need to repair household appliances or connect two electrical wires, eliminating the decrease in resistance at the junction
- Pistol - they are so called because of the similarity in appearance with firearms. The working part of the tool is located directly at an angle of 90 degrees from the handle, which increases the convenience of carrying out the relevant work. Such soldering irons are used during repair work.
- Soldering stations - they are also called stationary soldering irons. The devices got this name because they are equipped with control units, through which voltage, power, current, temperature are regulated.
Rod appliances are also called household appliances, as they have found their application among home craftsmen. However, they are used not only by home masters, but also by professionals. When carrying out more complex adhesive manipulations, soldering stations are used, which are divided into three main types:
- Infrared - the soldering process is implemented using infrared radiation.The wavelength of infrared radiation is from 2 to 10 microns, and the heating zone ranges from 10 to 60 mm
- Hot Air - melting of solder is carried out by exposing it to a stream of hot air (similar to the operation of a hair dryer). The temperature of the heated air coming out of the tool nozzle ranges from 100 to 500 degrees. Focusing of a stream of air is carried out by means of a nozzle. The creation of the flow is realized through the use of a compressor or turbine. Turbine models have a built-in electric motor inside the device, which is connected to the impeller. The rotation of the motor drives the impeller, which ultimately contributes to the creation of air flow. Compressor models of soldering irons create air pressure through diaphragm compressors located in the structure of the station
- Digital - these are modern professional soldering irons, the principle of operation of which is identical with rod devices. Their distinctive feature is that the specialist, depending on the soldering of the relevant parts, sets the appropriate voltage, current and power parameters.
Another important feature by which soldering irons are classified is the principle of their heating.
How to use a soldering sponge
To clean the tip of the soldering iron, special sponges are used, as mentioned above. Often beginners have a question why these elements are needed and how to use them correctly. There are several important rules that you need to know in order to properly use sponges to clean the sting of the device.
- Ceramic tips of soldering irons must not be cleaned with metal sponges, as this will damage the top layer of the surface.
- It is not at all necessary to buy a special sponge, since an ordinary piece of fabric can play its role. However, this method is suitable for cases where you need to quickly solder something. If you plan to do soldering for a long time, then for such cases it is better to purchase a special sponge
- Viscose sponges should be soaked in water before use. However, you do not need to make the sponge very wet, as it is enough that it is damp. The sting is wiped on the sponge in the process of work. For dry cleaning of the tip, viscose sponges are not suitable
- Copper shavings - designed for dry cleaning of the tip, but the disadvantage of such a sponge is that it is quite expensive, and sometimes even more expensive than the soldering iron itself (depending on the model)
- Metal sponge - it is not designed specifically for working with a soldering iron, but this does not prevent it from being used to clean the tip of this tool. The advantage of such a sponge is that it costs 10 times lower than copper shavings, but it copes with the task of dry cleaning the sting just as well.
Now that the technology of soldering with a soldering iron is known, you can begin to train. You can start finishing soldering only after there is enough practice.
Summing up, it should be noted that the electric soldering iron can be replaced with a conventional lighter. If it is necessary to solder the wires without a soldering iron, then this is done very simply - the cores are heated with an open fire (lighter), after which solder must be placed at their junction, and the exposure to open fire should continue. When the solder melts, it will cause the conductors to join.
The work of the tool must be treated with all responsibility, and the most important thing to remember is that the soldering iron is an electrical appliance that cannot be disassembled if it is connected to the network. It is also forbidden to leave the tool connected to the socket for a long time, as a fire may occur. And one more important point - do not check the heating temperature of the sting with your hand, because in this way you can get a very severe burn.
Related publications
The principle of operation of a pistol-type puncher with a photo description
How a screwdriver works and tool design - what you need to know when using
Learning how to use a glue gun with rods
We repair the grinder with our own hands quickly and easily
How to solder copper wires all the secrets of the process
For novice electricians and electronics engineers, it will be useful to learn how the process of soldering wires is carried out. Before using a new soldering iron, it is necessary to perform the tip tinning procedure. To do this, the sting is heated to operating temperature, and dipped into the rosin with the entire surface. Next, you need to melt the solder over the entire surface of the tip, thereby protecting it from corrosive attack and accelerated wear. Next, we proceed to the direct procedure for soldering the wires.
The whole technology can be divided into three main stages:
- Preparing the wire for soldering. To do this, part of the core must be freed from insulation. The core should be cleaned of contaminants, and if this is not possible mechanically, resort to the use of rosin or flux. Before treating the surface of the core with rosin or flux, it can be sanded with sandpaper or a file.
- Tinning - the soldering iron must be heated to the appropriate temperature. If rosin is used, then you need to bring the stripped part of the wire to it and warm the core. In this case, the core is immersed in molten rosin, thereby the process of cleaning it takes place. After that, you need to take the solder, and warm it up with a soldering iron. The melted solder is applied to the core, thereby the tinning process is carried out. As a result, we get a copper wire, on the surface of the core of which there is a thin layer of solder. Such a process is carried out in order to carry out a reliable and high-quality connection of copper wires. A similar procedure is carried out with the second end of the wire.
- Connection - now you need to connect the cores together in the way they will remain after soldering. After that, solder is applied to the connected wires, and melted with a soldering iron. As a result, the molten solder spreads and hardens, ensuring the connection of the parts.
If the connected wires are subsequently planned to be insulated with a heat shrink tube, then it must be put on the cable first. This completes the process of soldering wires with a soldering iron with rosin and tin. There is nothing difficult in this, if all actions are performed according to the instructions.
The soldering process will be slightly different if the wires to be soldered are pre-twisted. In this case, each core of the wire does not need to be tinned, and after twisting them, treat with rosin or flux, and melt the solder over the entire outer surface.
It is interesting! If flux is used instead of rosin, then the soldering technology will be slightly different. The difference lies in the fact that part of the core is dipped into the flux, after which it is heated with a soldering iron with the addition of solder. Further steps are the same as described in the instructions above.
And now the most important thing when learning how to work with a soldering iron is practice.. It is almost impossible to learn how to solder wires or microcircuits the first time, since this will initially require training. It is in the training that the success of mastering the technology of soldering wires and semiconductor elements is laid.
Types of soldering irons for soldering wires by power
The types of devices under consideration are classified according to such a parameter as power. In terms of power, they are produced in the following ratings - 12, 20, 40, 60, 100W and more
This parameter is important to consider when choosing a tool. What power is better to buy a soldering iron, few people know, so very often beginners purchase a device that does not cope with the tasks
The greater the power, the higher the capabilities of the tool, but when work is carried out with semiconductor elements soldered to the board, then high-power devices are not needed here.To ensure the connection of parts by soldering, it is necessary to preheat them. The heating temperature of the parts must be higher than the melting temperature of the solder to ensure a quality connection. If the power of the device is insufficient to warm up the parts to be soldered, then it will be extremely difficult to implement the procedure.
From this comes the following:
- Tools with a power of 12 and 20 W are used exclusively for working with semiconductor elements - capacitors, resistors, diodes, transistors, etc. It will be very difficult to solder the connection of two large-section electrical wires with such devices.
- Devices with power from 40 to 100 W are the most popular, as they are suitable for working with semiconductor elements and copper wires.
- Powerful soldering irons from 100 W and above are designed for soldering heat exchangers of gas water heaters and other large parts
The size of the rod depends on the power of the tool, and it has a direct impact on the ability to work with small or large parts. The higher the power of the device, the faster the tip warms up, which means that the tool can be used for soldering after a short period of time after plugging into the outlet.
It is interesting! The greater the power of the device, the faster the tip heats up, but most radio components do not allow temperatures to exceed 70 degrees. From this it turns out that when using high-power soldering irons, it is not allowed to influence semiconductor elements for more than 3 seconds.
Features of soldering a copper cable with aluminum
As you know, the conductors of wires and cables are made of copper and aluminum. Copper conductors are the most effective, but there are often cases when two wires with different core materials need to be connected to each other. It should be noted right away a very important point that it is impossible to solder copper with aluminum. This is due to their physical properties:
- Copper when heated (when current passes) expands less, which is associated with high conductivity
- Aluminum expands when heated more
With the constant expansion and contraction of the cable cores, microcracks are formed at the junction by means of solder. Over time, they increase, and in this area the resistance increases, and the magnitude of the current increases. The higher the current, the higher the load, which eventually leads to a break in communication. That is why it is impossible to solder aluminum with copper, since such a connection will be considered unreliable.
If it is necessary to connect two conductors of different materials, the following methods should be used:
- Connect them with a twist. The connection point must be carefully insulated. However, this method is also not considered reliable, because resistance will increase at the junction.
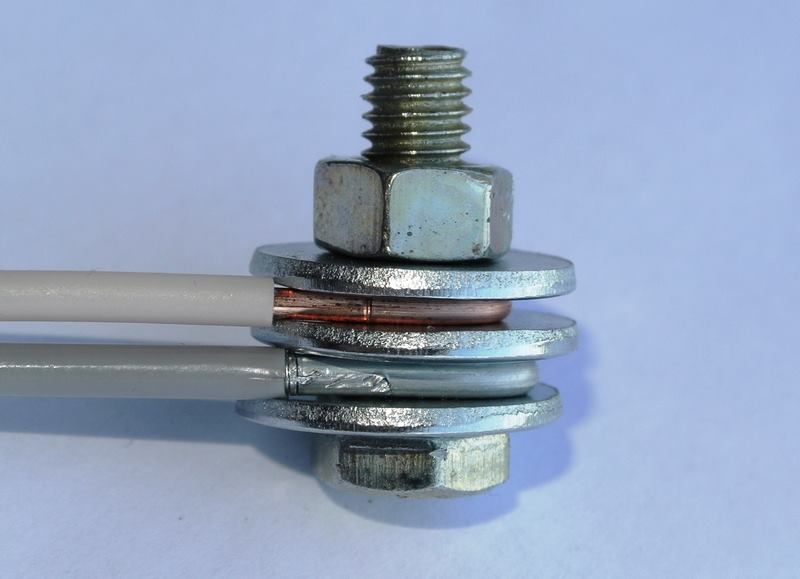
- Use bolt connection. To do this, you can use a bolt with a nut and three washers. Wind the wire strands between the washers on the bolt shaft, and squeeze them with the nut. However, this method is considered obsolete, and today terminal blocks are used instead of bolts.
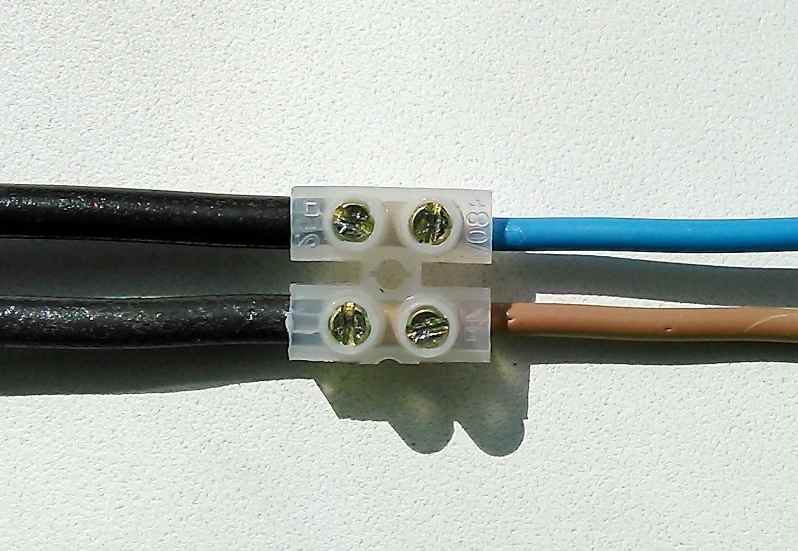
You can always find a way out of any situation, but the most important thing is to do it right.
Types of soldering irons by the magnitude of the supply voltage
The tools in question are produced in different types, and the first criterion by which the devices differ from each other is their supply voltage. According to this parameter, soldering irons are classified according to the following supply voltages - 12, 24, 36, 42, 220 and 380V. Why are devices produced in different voltages? A perfectly valid question that can be answered as follows:
- To ensure human safety.If work is carried out with a tool in a damp room, then it is allowed to use only such devices that operate from voltages up to 36V, but no more. In this case, the body of the device must be grounded, which will prevent electric shock to a person.
- Scope of the device. The device is used for soldering not only at home, but also in production, where it is used to connect various large parts. For such purposes, high-power tools operating from a 220V network are used. When performing soldering work on cars and trucks, as well as motorcycles, devices operating from a constant voltage of 6, 12 and 24V are used.
- Power - the more powerful the device is needed, the higher the supply voltage parameter should be. For example, a low-power 12W soldering iron does not make sense at all to produce 220V voltage. Indeed, for this you will need to make a large number of turns of a very thin nichrome thread. The result is a large tool with very little power. The situation is similar with high-power devices, which are difficult to make if their supply voltage is designed for 12 or 24V.
It is interesting! The use of nichrome wire as a heating element makes it possible to manufacture soldering irons that operate not only on AC, but also on DC voltage. The difference lies in the thickness of the wire, as well as the number of turns.
How to solder microcircuits with a soldering iron
Separately, it is necessary to consider the process of soldering microcircuits, which today are found in modern TVs, computers, phones and other equipment.
Before soldering microcircuits, you need to understand that it is important here not only to solder or unsolder the element, but also to understand their purpose.
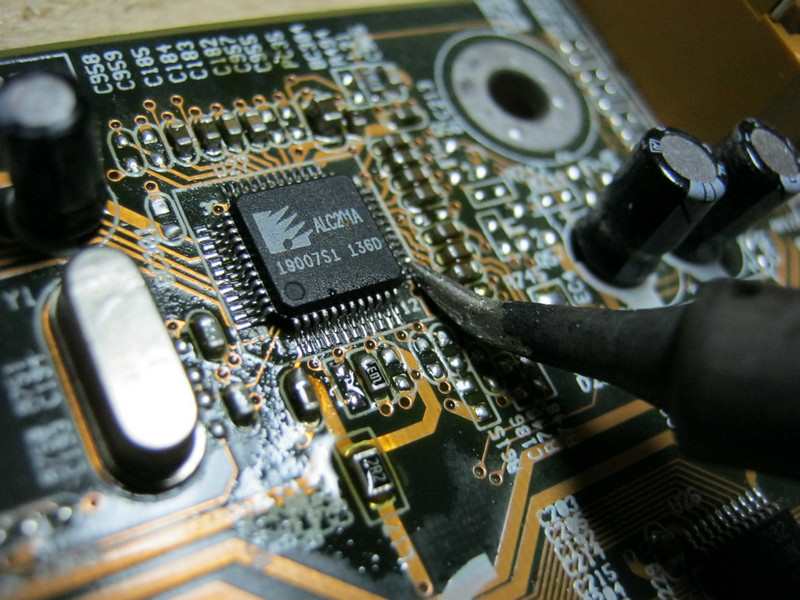
If conventional soldering rods are used for soldering wires and printed circuit boards with semiconductor elements, then when working with microcircuits, hot air devices or, as they are also called, hair dryers should be used. Their main advantage is that the soldering or desoldering of parts is carried out very quickly. To work with microcircuits, you will also need to prepare materials and tools. LTI flux is used as an antioxidant agent, and tweezers are used as an auxiliary tool.
The process of soldering chips with a hot air dryer is as follows:
- The soldered element can be a microprocessor, controller or microelements - resistors, diodes or capacitors. Before soldering or desoldering them, it is necessary to flux the legs of the parts and places on the printed circuit board
- If it is necessary to solder a microelement, which is filled with special substances from above, then before soldering, they must be removed. For this, acetone or special solvents are used.
- After the part is cleaned, you can start soldering it. To do this, bring a soldering iron, which must be preheated. Positions it at a distance of 2-3 cm from the part
- With the help of tweezers we pry the part, applying a little effort. As soon as the legs of the part melt, it will detach from the board
- In a similar way, the part is attached to the board
Solder is used, if necessary, when parts are soldered onto a new board. Solder should be applied first, and then proceed to the soldering of microelements. A detailed process of working with microcircuits with a soldering iron is presented in the video below.