What are junction boxes for?
There are many factors that speak in favor of the existence of junction boxes:

- the power system can be repaired in a matter of hours. All connections are available, you can easily find the area where the wires are burned out. If the cable was laid in special channels (corrugated tube, for example), then in an hour you can replace the failed cable;
- connections can be inspected at any time. As a rule, wiring problems occur at the junctions. If the socket or switch does not work, but there is voltage in the network, check, first of all, the quality of the connection in the junction box;
- the highest level of fire safety is created. It is believed that dangerous places are connections. With the use of the box, they will be in one place.
- minimum time and financial costs when repairing wiring. No need to look for wires in the walls that are out of order.
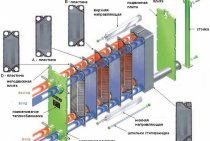
Terminal blocks
The list of tools and consumables for an electrician includes terminal blocks. Terminal blocks - copper or brass plated with a layer of nickel, designed for wires of a certain section and covered with a layer of insulating plastic. The wires are secured with 2 small screws.
When connecting copper and aluminum terminal blocks, the fixing screws must be correctly tightened. If you overtighten them, you can damage the aluminum conductors, which will not be very good for the further operation of the wiring. Therefore, it is necessary to find a middle ground: tighten not too tight, but achieve high-quality contact.
How to assemble the frame of a PVC profile balcony block
Do-it-yourself installation of a balcony block poses many tasks for a novice master
It is necessary to take measurements taking into account a quarter of the window, order and bring the manufactured structure to the site, properly prepare the opening and, which is very important, correctly assemble the block itself into a single whole. Competent assembly of the frame of the PVC profile balcony block is to ensure that the connection between the door and the window is strong, airtight and, as a result, does not freeze during the cold season
In this article you will find some useful recommendations on how to properly assemble a balcony block.
As you understand, the future junction of two structural elements requires careful sealing. Fix the door frame to the floor with the hinges down and apply mounting foam along the edge of the frame at the top.
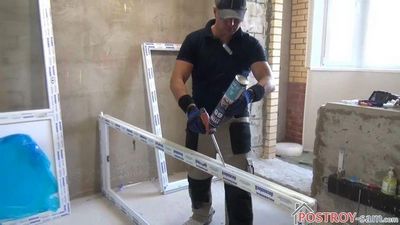
The foam layer must go through the primary polymerization process. These 15 minutes should be spent preparing the window. Using a screwdriver and a 5 mm drill, drill the window profile in three places from the side opposite to the hinges so that the holes come out in the center of the fastening part of the frame. It is better to drill from the outside: firstly, it is easier and more convenient, and secondly, it will help to avoid damage to the sealing rubber by the rotating element of the screwdriver.
While you are working on the window, the adhesive you applied will already acquire a suitable consistency: the foam will no longer be viscous and sticky.
Please note: Compliance with the norm of primary polymerization helps to avoid unpleasant consequences, since accidentally squeezed areas of freshly applied foam lose their ability to expand, which deprives this area of adjoining tightness. The dried crust will protect the substance from careless touches.
At the moment of joining the parts, it will burst, releasing the adhesive, which guarantees manufacturability and reliability of the joint.

Now install the connecting profiles on one of the structures, having previously removed the protective film from the frames.Additionally, apply a little mounting foam for better bonding and connect the door and window frames. Be sure to align all the pieces horizontally before finally fastening them together. For the final stage of assembly, we need a screwdriver, a PH 2 bit and self-tapping screws with a drill.
Important: do not screw in the screws too much so as not to deform the profile, while their length should be enough to pass through the first part and fix in the reinforcement of the second. As you can see, assembling the frame of the balcony block is not so technologically complicated as to not take it on with your own hands, without involving strangers who consider themselves professionals.
As you can see, assembling the frame of the balcony block is not so technologically complicated as to not take it on with your own hands, without involving strangers who consider themselves professionals.
Power supply devices and linear structures of automation, remote control and communication of railway transport
- Introduction
- Overhead line classification
- Typical profiles of supports for overhead lines, ALL STsB and overhead communication lines
- Materials and fittings for overhead lines
- Wooden poles, reinforced concrete attachments and reinforced concrete poles
- The main types of supports for overhead lines of signaling and communication
- Equipment for high-voltage automation and telemechanics lines
- Overhead line equipment
- Arrangement of elongated spans, crossings and transitions
- Grounding in automation, telemechanics and communication devices
- Types and designs of grounding devices
- Construction of overhead lines
- Maintenance and repair of overhead lines
- Mechanization of work in the construction and repair of overhead lines
- Safety precautions when working on overhead lines
- Purpose and classification of cable lines
- Cable design
- Cables for automation and remote control devices
- Railway communication cables
- Equipment, fittings and materials of cable lines
- Construction of cable lines
- Installation of power electrical cables
- Installation of power and control cables. Certification of cable lines
- Mechanization of cable works
- Maintenance and repair of cable lines
- Safety precautions when working on cable lines
- Impact of electric railways and transmission lines on overhead and cable lines
- Means of protecting automation, telemechanics and communication devices from dangerous and interfering influences of railways and power lines
- Surge protection of semiconductor devices
- Impact of lightning on automation, telemechanics and communication devices. Protection devices
- Protection of automation, telemechanics and communication devices from atmospheric surges
- Corrosion protection for cables
- DC generators
- Armature reaction and current switching
- Types of generators and their characteristics
- General information about DC motors
- DC motors and their characteristics
- Single-phase and three-phase transformers
- Autotransformers and Saturation Chokes
- Railway automation and telemechanics transformers
- Travel choke-transformers
- Asynchronous motors
- Synchronous generators
- Primary chemical current sources
- Lead batteries
- Electrolyte and chemical processes in lead batteries
- Electrical characteristics of lead batteries
- Rechargeable batteries
- Operating rules and troubleshooting methods for lead batteries
- Alkaline nickel-iron and nickel-cadmium batteries. Battery rooms
- Electrical valves and rectifiers
- Classification of AC rectification circuits and their parameters
- The influence of the nature of the load on the operation of rectifier circuits
- Rectifiers used in automation and telemechanics devices
- Electromagnetic and semiconductor converters
- Features of the power supply of devices
- Power supply for automatic locking devices
- Power systems
- Power supply for crossing signaling and semi-automatic blocking devices
- Maintenance of power supply devices on hauls and stations
- Feeding points for automation and telemechanics devices
- Calculations of power devices of the signal point of auto-blocking
- Power supply of automation and telemechanics devices of large stations
- Unified switchboard installation for power supply of centralization devices at large stations with a batteryless power system
- Power supply of electrical interlocking devices of small stations
- Power supply devices for electrical centralization of intermediate stations
- Power supply installations of batteryless and battery power supply systems of EC intermediate stations
- Calculations of power supply devices for electrical interlocking
- Automated diesel generator sets and standby power plants
Is it possible to twist copper wire with aluminum
Let's start with the fact that is it possible to connect aluminum wires to copper, and will such a connection not lead to a fire? The answer is yes, you can. But let's first get acquainted with these materials.
If you ask yourself which wiring is better, copper or aluminum, then the choice is of course copper. This comes from the technical characteristics of copper, the cross section of the aluminum wire under the same conditions has to be taken more. There are also disadvantages, copper is more expensive. It is easier to distinguish copper wire from aluminum by color, copper has a reddish tint, aluminum is gray, white.
Looking at the electrical performance of metals, there is no question of what conducts current better. Here are some details:
- Resistivity: copper - 0.017 Ohm mm² / m, aluminum - 0.028 Ohm mm² / m.
- Heat capacity: copper - 0.385 J / gK, aluminum - 0.9 J / gK.
- The elasticity of the material: copper - 0.8%, aluminum - 0.6%.
So why can't you twist copper and aluminum wires, because twisting, especially with a small cross section, is the cheapest option in terms of both money and time? The thing is that, when these materials are connected, they create a galvanic couple.
Galvanic couple - 2 metals of various kinds, the combination of which will lead to increased corrosion. Copper and aluminum are such a galvanic pair. The electrochemical potentials of the two metals are too different, so rapid corrosion will increase the resistance at the junction and its heating will follow. For more details on the compatibility of metals, see GOST 9.005-72. Below is a table with some data on metals:
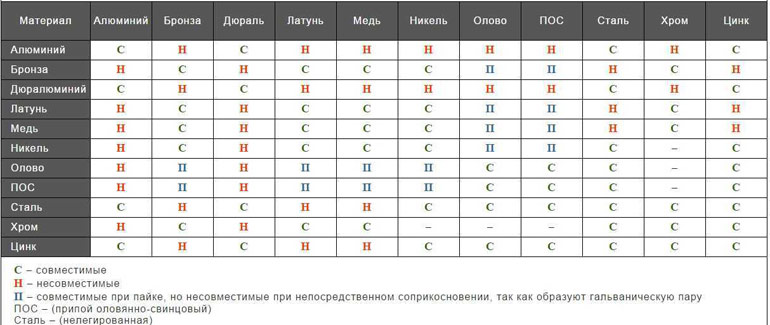
Galvanic compatibility of meltals
There are many ways to achieve high-quality contact between two conductors (soldering, using a simple terminal block, more expensive WAGO terminals, or an ordinary bolt with a nut).
Wire connection
The connection of aluminum and copper wires to each other requires technological solutions, simple twisting is not enough here.
Methods for connecting conductors with different electrochemical potentials:
- By soldering. But not simple soldering.
- Using simple terminal blocks or expensive WAGO. It’s not worth saving here, and if the question is how to properly connect copper and aluminum wires, then it’s better to take WAGO. The advantages of this manufacturer will be described below.
- Using a bolted connection, which has a lot of advantages: cheapness, simplicity and the ability to work with large wires.
- Crimping with sleeves. Requires a specialized tool.
WAGO clamps for joining aluminum and copper are very popular, as they are very convenient to use:
- Push the pressure plates to the side with a click.
- Insert wires into holes.
- Put the plates in their places, clamp.
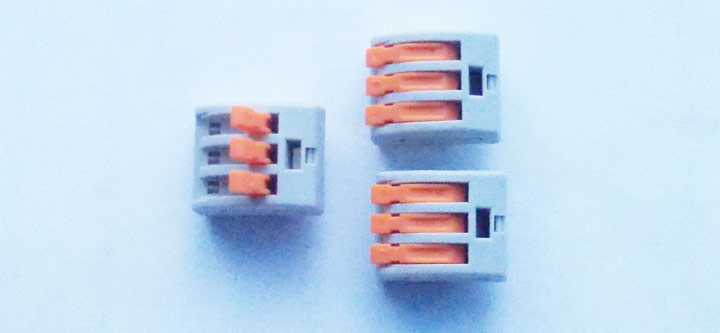
WAGO terminals for connecting copper wire to aluminum are an excellent solution
But now WAGO is casting doubt on its reputation. According to numerous reviews, the spring contact weakens, which leads to burning of the terminal block and its quick replacement.
Advise how to dock 2 windows
popped in for a minute
Posts: 3 Location (City): Kharkiv
| « Last edit: April 08, 2010 01:46:28 PM by el-otdel » |
|
Various twist options
Unprofessional connection. This is a twisting of a stranded wire with a single-core. This type of connection is not provided for by the rules, and if such a connection of wires is discovered by the selection committee, then the facility will simply not be accepted for operation.
However, twisting is still used, and here you need to know how the correct twisting of stranded wires is performed. It is often used in emergency cases when it is not possible to professionally make a connection, and the service life of such a connection will be short. And yet, twisting can temporarily be used only for open wiring, so that you can always inspect the junction.
 Bad wire connection
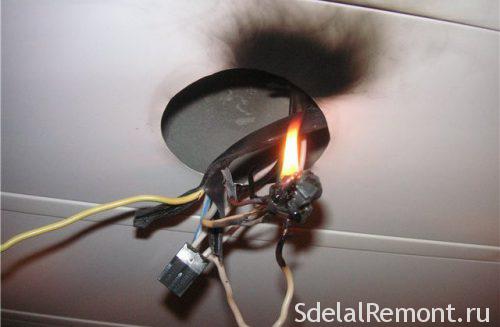
Why is it impossible to connect the wires with a twist? The fact is that when twisting, an unreliable contact is created. When the load currents pass through the twist, the place of the twist heats up, and this increases the contact resistance at the junction. This, in turn, contributes to even more heating. Thus, at the junction, the temperature rises to dangerous values, which can cause a fire. In addition, a broken contact leads to the appearance of a spark at the place of twisting, which can also cause a fire. Therefore, in order to achieve good contact, it is recommended to connect wires with a cross section of up to 4 mm 2 by twisting. Details about the color marking of wires.
There are several types of twists. When twisting, it is necessary to achieve good electrical contact, as well as the creation of mechanical tensile strength. Before proceeding with the connection of wires, they should be prepared. Wire preparation is carried out in the following sequence:
- from the wire, the insulation is removed at the junction. The insulation is removed in such a way as not to damage the wire core. If a notch appears on the core of the wire, then in this place it may break;
- the exposed area of the wire is degreased. To do this, it is wiped with a cloth dipped in acetone;
- to create a good contact, the fat-free section of the wire is cleaned with sandpaper to a metallic sheen;
- after connection, the insulation of the wire must be restored. For this, insulating tape or heat shrink tubing can be used.
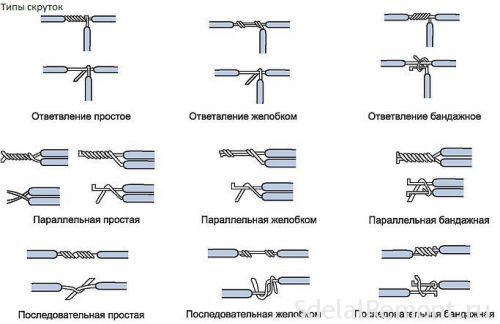
In practice, several types of twists are used:
- simple parallel twist. This is the simplest and most common type of connection. With a good parallel twist at the junction, a good quality of contact can be achieved, but the mechanical forces to break will be minimal. Such twisting can be weakened in the event of vibration. To properly perform such a twist, it is necessary that each wire wrap around each other. In this case, there must be at least three turns; Twisting the usual two wires
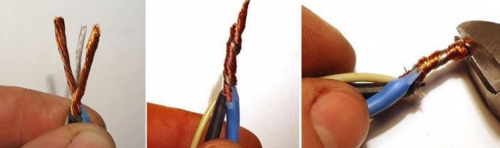 Stranded twisting of three wires
winding method. This method is used if it is necessary to branch the wire from the main line.To do this, the insulation of the wire is removed at the branch section, and the branch wire is connected to the bare place by winding;
 Connecting the wire to the main
- bandage twist. This type of twist is often used when connecting two or more solid wires. With bandage twisting, an additional conductor is used from the same material as the wire cores. First, a simple parallel twist is performed, and then a bandage from an additional conductor is applied to this place. The bandage increases the mechanical tensile strength at the junction;
- connection of stranded and solid wires. This type is the most common and simple, first a simple winding is performed, and then clamped;
 Connection of stranded and solid copper wire
other various connection options.
About junction box
In an apartment or house, wires are routed from an electrical panel to different rooms. Usually there are several connection points: a switch, sockets, and so on. In order for all the wires to be collected in one place, junction boxes were created. They start wiring from sockets, switches and are connected in a hollow housing.
In order not to have to look for where the wires are hidden in the walls during the repair, the electrical wiring is laid on the basis of special rules prescribed in the PUE (Electrical Installation Rules).
The main recommendation is that all connections are made in the junction box.
Distribution boxes are classified according to the type of attachment. So, there are boxes for outdoor installation and indoor installation. For the second option, it is necessary to prepare a hole in the wall into which the box will be inserted. As a result, the lid of the box is flush with the wall. Often the cover during repair is hidden with wallpaper, plastic. In extreme cases, an outer box is used, which is mounted directly on the wall.
There are round or rectangular junction boxes. In any case, there will be at least 4 exits. Each outlet has a fitting or thread to which a corrugated tube is attached. This is done to quickly replace the wire. The old wire is pulled out, the new wiring is laid. It is not recommended to lay the cable in a strobe on the wall. If the electrical wiring burns out, you will have to gouge the wall, break the finish in order to carry out repairs.
Lubricant
To improve the quality of contact, you can use a special lubricant or paste. Usually it is quartz-vaseline paste. Usually it is used to improve the connection of aluminum wires.
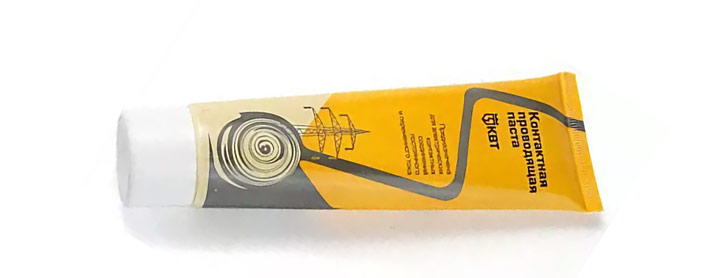
But such a paste can be used for all types of connections (threaded, using terminal blocks, crimping), especially if the connection takes place outdoors. Then the contact is affected by additional factors that significantly reduce the durability of the connection. Although the use of grease without insulation is questionable.
Based on the foregoing, choose the method that suits you, depending on the connection point (street, house) and material capabilities.
In a field such as electricity, all work must be carried out strictly, accurately and without a single mistake. Some wish to understand such work on their own, not trusting third parties to carry out a responsible mission. Today we will talk about how to properly connect the wires in the junction box. The work must be done with high quality, because not only the performance of electrical appliances in the house depends on it, but also the fire safety of the room.
Sunday, December 28, 2008
Types of windows. Part eight. Multi-frame or composite structures.
So now we will briefly go over multi-frame structures. What it is?
A multi-frame construction is a construction that consists of two or more window or door frames that are interconnected using a special profile into one structure. This is done mainly in order to bring together windows of different heights. In 90 percent of cases, this is a connection between a door and a window.
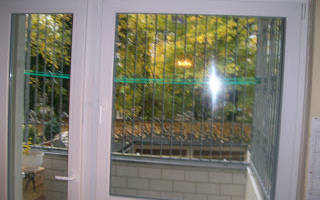
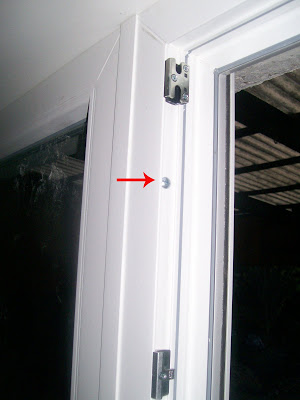
As an example, look at the following photo.
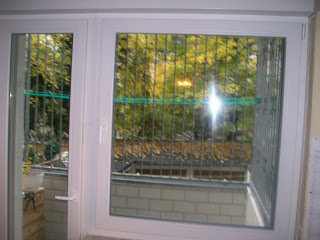 Here you see a classic connection, a window and a balcony door are connected.
In the second photo you can see it in a closer view.
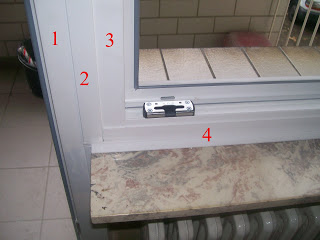
Under the number 1 is the door frame, 2 the connector itself (kopplung) and its visible, outer part, 3 is naturally the window frame. (4 is the corner that closes the space between the old window sill and the new window. Has nothing to do with this post. About this I'll talk later.)
So, each plastic window has special cutouts in the profile on the side, which help to connect to the window either expanding profiles, or connector, or compensating profiles. Profiles are snapped into these cutouts.
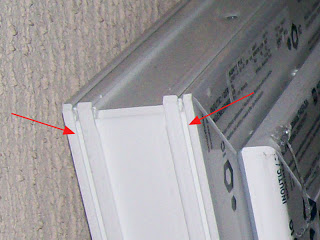
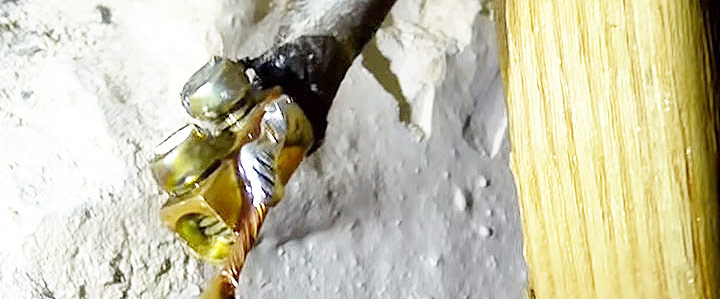
And here is the connector itself.
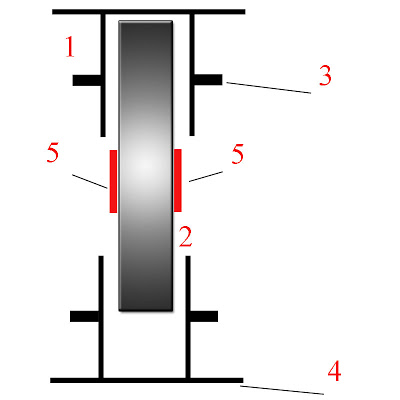 The connector consists of three parts. Number 1 indicates a plastic profile (there are 2 of them in the connector) which actually provides the connection itself. In this case, the protrusions indicated under the number 3 must go into the corresponding grooves on the frames to be connected when connected. Number 4 is the outer part of this profile.
In order for the connection to be stable and ensure the stability of the structure to be joined, a reinforcing metal profile (number 2 in the figure) is required, which is inserted between the plastic profiles. But in order to provide thermal insulation, a heat-insulating tape is glued on the connector, naturally, on both sides, as shown in the figure under the number 5.
How to connect two windows to each other? First of all, at least two people are needed in order for the installation of this structure to pass without problems. Believe my experience, one person will spend 3-4 times more time than two. And this is not to mention the danger of some problems during assembly.
In order to connect two windows, we assemble the connector and fasten it to a frame of a lower height, making sure that the connector fits snugly and without distortion into the grooves on the frame, if necessary, you can knock on the metal, in no case on the plastic profile . After making sure that the connector is installed correctly, we drill a hole in the metal profile and screw the fixing screw into the frame. One will suffice as its function is temporary. It is needed only so that the connector remains in place during the assembly of the entire structure.
Now you can install the frame with the connector in the window opening. Then the second frame is installed and pulled together with clamps from the first. If the plastic profiles do not fit into the grooves of the second frame, then you can tap lightly on the frame with a hammer
Just be careful, in cold weather the plastic becomes more brittle and can be damaged. In any case, I recommend, if possible, either a hammer with a plastic tip or a wooden one.
At the next stage, after making sure that the connector is installed correctly (In order to check whether the connector is installed correctly, it is enough to measure the distance from the connector to the edge of the frame. Top, bottom and in the middle. The distance should be the same everywhere.) you can proceed to fixing the connection . To do this, using a long drill, we drill the frame, the connector and the second frame to the depth of the screw (we use screws 5 mm thick and 100 mm long) as shown in the photo. The diameter of the drill is preferably a little larger than the screw. For example 5.5 or 6 mm. If necessary, apply a little industrial grease to the screw when twisting the connection.
If you are connecting a window to solid glazing and drilling from the side of the window, then do not forget to sink the screw under the frame surface otherwise you will have problems installing the glass. That's probably all. A couple more tips when measuring, consider the thickness of the connector plus a couple of centimeters of free space, depending on the thickness of the connector, so that you can connect the windows freely and without problems. And secondly, if you connect the windows in a horizontal plane, and not in a vertical one, as I described to you, you don't need a temporary screw.
Next, we will talk about roller shutters, their types and installation methods. Including electric motors.
Twisting wires
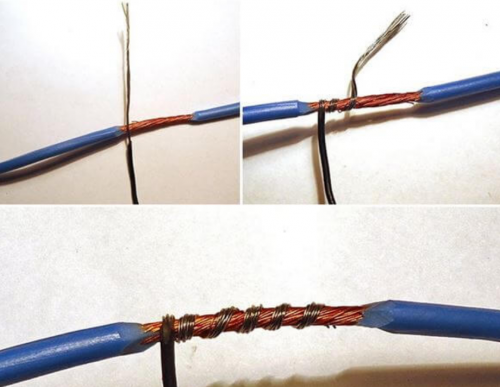
Stranding aluminum and copper wire was mentioned earlier as a very unreliable method of connection, but sometimes this is the only way to quickly restore power supply.
A couple of tips before twisting:
- Before twisting the copper wire should be well tinned.
- The amount of twist must be at least 5 turns.
- After work, the joint must be protected with several layers of insulating tape or heat shrink tubing.
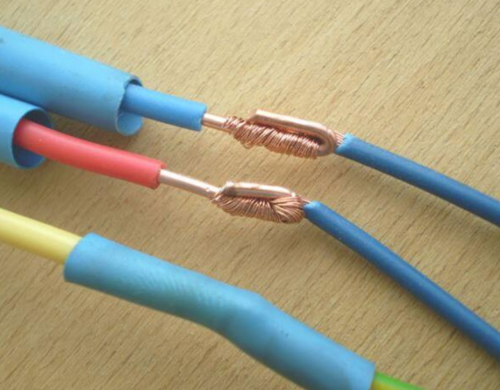
Soldering copper to the terminal block
You can solder copper and aluminum together. If everything is clear with copper, then a special flux is needed to solder aluminum. Some electricians simply solder the copper wire to the terminal block.
Flux for aluminum
What are plastic window connectors
You need to know what system you have a plastic window, since each manufacturer has different types of connections and can be very different from each other. Even windows from the same manufacturer can have different types of connections. So, for example, window profiles produced under the GOODWIN brand have at least two of the most common window systems, such as group 583 and group 705
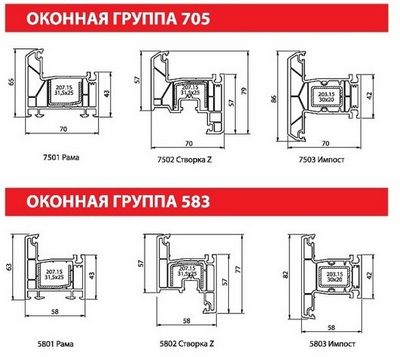
In each group, the profiles differ from each other, although they have the same names. They differ in article numbers, which consist of four digits. Below are the profiles themselves and their components, including fasteners.