The thickness of the outer wall of the house
In terms of the bearing part, the thickness of the outer wall of an individual house of 25 cm will cope with its task completely, but solid brick, in addition to its excellent qualities, has its drawbacks. One of the disadvantages is good thermal conductivity. In short, if you build a house with insufficient thickness of external brick and without additional insulation, then at negative temperatures in winter the walls in the house will begin to get wet.
What to do in this case?
Increasing the thickness of the wall of an individual building
If you try to increase the thickness of the wall, it will turn out that it should be 0.64 m., i.e. 2.5 bricks based on the maximum temperature in winter -30 ° C. Given that the proportion of brickwork is very large, such a wall requires a massive foundation for a house that can withstand such a load, and these are huge costs, and brick itself is not the cheapest building material.
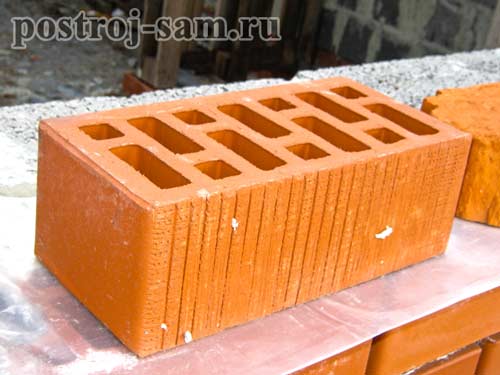
Using hollow brick for a brick wall
In masonry, you can use the so-called hollow brick, which will reduce the thickness of the wall of an individual structure due to voids, with the help of which its thermal conductivity will decrease.
The use of insulation inside the wall of an individual house
The use of additional material for insulation inside a brick wall is ideal in this case, which is very popular and has a lot of advantages. Today, the construction of the walls of a brick house without insulation is not advisable, and is practically not used in modern construction.

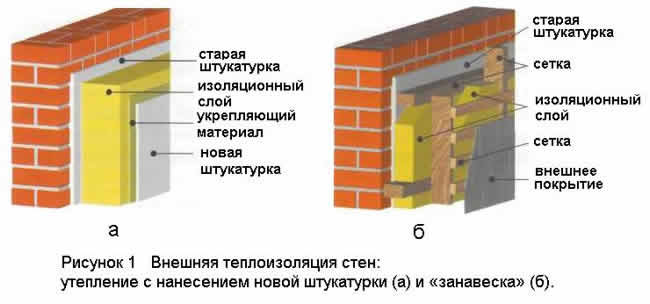
The pie of such a wall looks like this:
- the outer part of the wall with a thickness of 0.5 bricks, i.e. 12 cm. - insulation, the thickness and type of which is selected taking into account climatic conditions. - the inner part of the wall, to ensure the bearing capacity, from bricks 25 cm thick or blocks.
The choice of this method of erecting brick walls of an individual house will solve several problems at once:
- reduction of foundation costs - reduction of brick costs - increase in the area of \u200b\u200bthe house, by reducing the thickness of the wall
And in general, living in an individual brick house is a pleasure. Such a house will never lose its popularity, because, with a properly laid foundation, such a house will stand for “eternity”.
Stage one Rough finishing
So, we built a house, erected walls, floors, floors and roofs, installed windows and doors, and carried out engineering systems. Now it's time to give the premises a habitable look. And you need to start with a rough finish. In the case of brick walls, there can be two options - plastering and drywall installation. The latter occurs by installing the frame, followed by the installation of the GKL. At the same time, it is convenient to hide wiring and pipes in the walls, but the disadvantage is a decrease in the usable area of \u200b\u200bthe premises. As for the first finishing option, it is carried out along the lighthouses, which allows you to maintain the perfect evenness of the walls.
Finishing ceilings depends on what the ceiling is made of. If it is reinforced concrete, then we proceed in the same way as with the walls - using plaster. If the ceiling is wooden, then you can sheathe it with drywall or use suspended or stretch ceiling variations.
Work from the inside of a house under construction also involves finishing the floor. The ideal solution would be a screed using self-leveling compounds or cement-sand mixtures poured over beacons.
Detailed description of the brick wall plastering process
After the house has shrunk, we begin to finish the wall with plaster. First of all, the wall must be cleaned of dust and other contaminants.In this case, the solution in the seams on the walls should be scraped to a depth of 1 centimeter. After that, you can wet the walls with water for better adhesion to the plaster, or cover them with a solution of water and cement in order to give the surface unevenness, which again facilitates the application of the plaster.
After that, we need to install beacons, which we will mount to the height of the future plaster layer. At the same time, the beacons themselves are attached at the seams between the bricks. The first beacon is installed 30 centimeters from the corner, and the subsequent ones - 120-150 centimeters from each other. After first applying a layer of primer, and then plaster, wait for the latter to set, then apply the second - a covering layer of material to a thickness of about a couple of millimeters. After that, the beacons can be removed, and the irregularities remaining in their place can be plastered.
Masonry mortar
If the external masonry of the wall is carried out “for jointing”, then the quality, composition and proper application of the mortar determine how aesthetically the brick wall will look. The thickness of the seams should be the same everywhere, and they must be filled completely, voids are not allowed. The solution must be prepared before the start of work and applied within two hours. For plasticity, clay, lime or marble pulp is added to it.
For horizontal joints, a thickness of 10 to 15 mm is used, for vertical - from 8 to 10 mm.
When building a brick building, you need to know that any deviation from the project can subsequently lead to unpredictable consequences. The stability and strength of brick load-bearing walls can be easily reduced if:
- reduce their thickness;
- increase their height;
- increase the area or number of openings;
- reduce the width of the walls between the openings;
- arrange additional niches or channels in the walls;
- use heavier floors.
A brick wall, the thickness of which is less than the design, must be additionally reinforced.
All changes in the project must be made by specialists, this cannot be done independently.
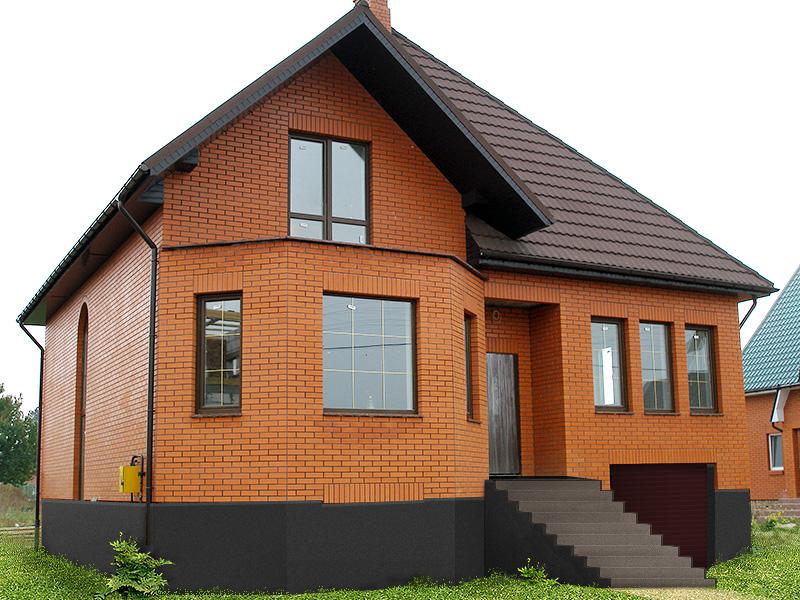
 Buildings made of brick have obvious advantages that put them a step above houses made of any other materials. Made according to original designs, they have their own style and charm. It is also a good option for investing and transferring real estate to descendants by inheritance.
Internal load-bearing walls
Buildings with a length or width of more than five and a half meters are divided along the long side by internal load-bearing walls. On them, the end support of the ceilings or coatings of the structure is made.
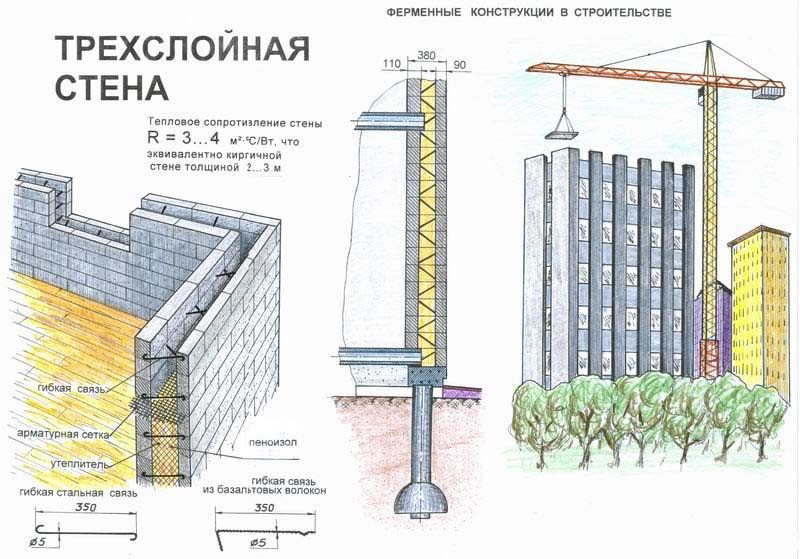
The thickness of the walls of the brick interior is made less than the exterior, because insulation is not required here, but not less than 250 mm (masonry "in brick"). These load-bearing walls, both external and internal, are interconnected and form, along with the foundation and the roof, a single structure - the skeleton of the building. All loads acting on the structure are evenly distributed over its area. The joints of the outer and inner walls are reinforced with meshes or separate reinforcement through 5 rows of masonry. The piers are arranged at least 510 mm wide and they are also reinforced. If it is necessary to put the pillars as load-bearing supports, then the cross section of the structures should be at least 380x380 mm (laying "one and a half bricks"). They are also reinforced with wire 3–6 mm in 5 rows along the height of the masonry.
Internal insulation of brick walls
When insulating a brick wall from the inside, the main problem is how not to make a mistake with the selection of heat-insulating material. First, it must have high thermal insulation properties. Secondly, when insulating from the inside, the usable space of the room is “eaten up” - therefore, it is necessary to buy a heater for brick walls with a minimum thickness.
The wall itself, insulated from the inside, does not get warmer, and freezes even more. The dew point moves inward.Do not use loose fibrous seals because they absorb moisture and lose their properties.
To cut off moisture, it is recommended to install high-density basalt slabs. Such products are much more expensive than "light" plates. Specific recommendations: ROCKWOOL (ROCKWOOL) Panelrock, IZOVOL (IZOVOL) 90, TECHNONICOL Technovent standard, etc.
It is even better to use materials based on extruded polystyrene foam with zero water absorption - Styrofoam IB 250 A, URSA XPS. Thermal insulation material PENOPLEX (PENOPLEX) is also ahead of mineral wool in terms of water absorption and at the same time is very thin.
Insulation of a brick house from the inside
Insulation of the house can significantly reduce heat loss, which, in turn, will reduce the cost of heating a dwelling. Brick houses are durable and durable, but in terms of heat retention, brick is still much inferior, for example, to wood, and without additional insulation it is not always possible to maintain the required temperature in the house with minimal loss of money.
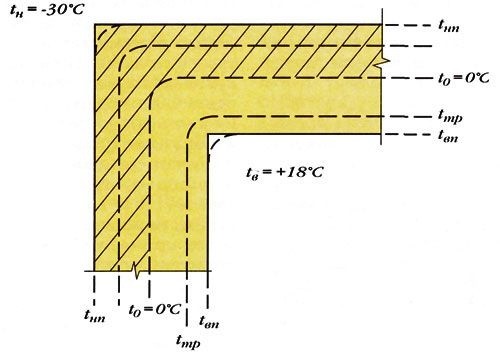
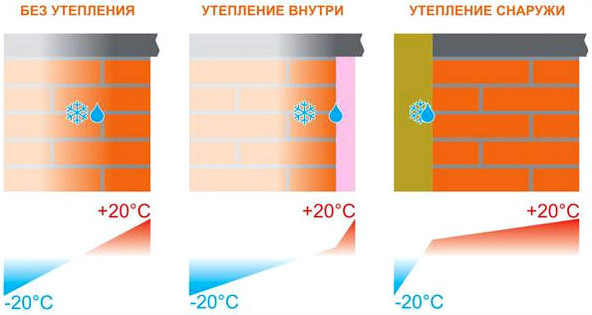
Decay of temperature in the thickness of the building.
For the most part, external insulation, even if it is carried out correctly, is not able to completely save the house from heat loss, since a lot of energy is spent on heating cold stone walls. In addition, many owners of brick houses do not always think about the formation of a thermal insulation layer before the exterior finish, and it is too laborious and costly to completely redo the house cladding.
Wall insulation from the inside.
Warming a brick house from the outside is considered a more acceptable option, since in this case there will be no loss of usable living space. However, this option is not always feasible, for example, external insulation may be prohibited if the building is of architectural value, and the appearance of the facade cannot be changed. In the case when it is not possible to properly conduct external insulation, there is only one thing left - to insulate the brick house from the inside. Warming the house from the inside has both its advantages and obvious disadvantages.
The clear advantages of insulating a house from the inside include lower costs, since fewer materials will be used for insulation. In addition, internal insulation is the only way to keep warm in an apartment of a multi-storey brick building, since in this case, external decoration must be carried out comprehensively. However, when performing work on insulation inside the house, the question immediately arises about the safety of insulation materials, because some heaters can release harmful substances into the air that affect health.
Options for wall insulation, taking into account the dew point.
A striking example of such materials is, for example, extruded polystyrene foam, which is not recommended for indoor use, since this material emits the harmful substance styrene at positive temperatures, so it is better not to use it for insulation from the inside. In order to properly make high-quality insulation in the house so that it is also safe, you need to use only proven and safe materials.
Description of the construction process
The construction of any building begins with laying the foundation, which is responsible for its stability and strength. The process of pouring it has many subtleties, one of which is waterproofing. To carry out such a task, it is necessary to cover the top layer of the foundation with an insulating material that ensures the preservation of the qualities of the foundation. Such products can be various materials, ranging from special bituminous impregnations to ordinary roofing material.
In the process of their installation, the main reference points of the building are created, on which a full-fledged roof can be laid. First, 2 corner bricks are laid on an isolated foundation.
In the future, it is from them that the wall will be formed.As a rule, its construction is carried out from left to right. To mount the first row, you must first tighten the thread to control the evenness of the plane. Each subsequent brick, starting from the corner, is planted on cement mortar and compacted well. This should be done carefully, as excessive pressure on the material can cause the plane to skew. The joints between two bricks are also filled with mortar.
The second row is also laid from the corner of the building in such a way that the joint between the bricks of the first layer is half blocked. Every few rows, it is necessary to reinforce the brickwork, which consists in laying a metal mesh between the bricks. Its installation is carried out inside the cement mortar, which is covered by the next row of material. This method of dressing will improve the load-bearing characteristics of the wall and give it a colorful appearance.
Let's talk outdoors
In this part of the article, we will briefly list all the options for exterior decoration of a brick building, but you can read more detailed information about many of them with step-by-step instructions in other articles on our website. At the same time, it should be noted that strong brick walls allow for almost any exterior finish, as they can withstand a lot of weight. But in this case, it is necessary to take into account the strength of the foundation. But before you start the final finishing work that will determine the look of your home, let's talk about insulation.
The choice of insulation
Wall insulation in a brick house can be carried out both from the inside and outside. The second option is much more preferable. So, with external insulation, the walls do not freeze through, which means that condensation, mold or fungus does not appear on them. In addition, in the case of external insulation, the walls get the opportunity to "breathe", which significantly improves the conditions of stay in the room.
The choice of insulation is very wide, since this class of products today is represented by a large number of options. It can be rolled materials, such as mineral wool, or tile insulation, such as polystyrene foam or polystyrene foam. Now we will consider the process itself in stages:
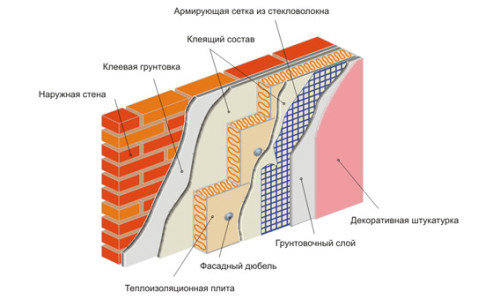
- Installation of insulation begins with cleaning the walls from dirt and dust, as well as giving the walls a perfectly flat surface. The level will help in the latter;
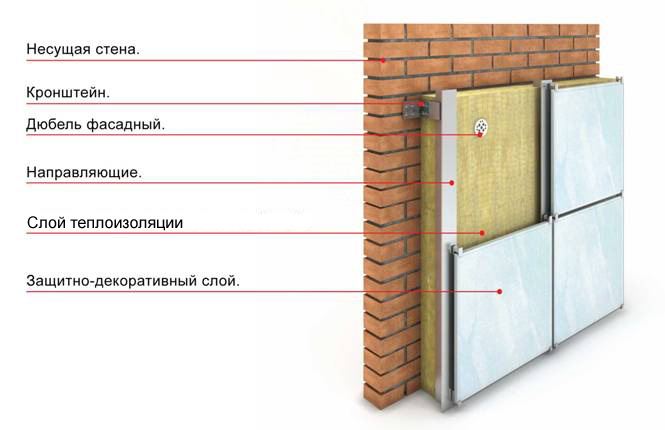
- The starting profile is installed at a distance of about 30 centimeters from the wall. In general, the level at which the starting profile is set should be specified in the project documentation. The design is most firmly attached to the wall with dowels;
- Installation on the insulation profile in a checkerboard pattern. We put the first layer on the glue and press it as firmly as possible. We supply the corners of the material with plastic teeth, but in the area of \u200b\u200bwindows and doors we try to use solid sheets in order to avoid an excessive number of seams. The latter are filled with sealants. Further, the material is fastened with dowels;
- At the final stage, reinforcement and final finishing of the facade of the building is carried out, which serves both a decorative function and protects the insulation from external influences. First of all, from precipitation.
Types of exterior decoration of the house
- Siding. Can be wood, metal, plastic, can imitate wood. In this case, the installation is carried out on a pre-created frame with previously carried out insulation. The process itself is very simple and relatively fast. The house gets a stylish and modern look;
- Plaster. The variety of this method is very high. You can use the option with a "fur coat", or you can decorate the house with various types of plaster for outdoor work. The material is perfectly tinted, which makes it possible to give the house any appearance. In addition, plaster for outdoor work is not afraid of moisture, sunlight and temperature changes;
- Thermal panels.A new technological way to finish the house, which allows you to simultaneously give the building a varied appearance, as well as to do insulation work. They are composite materials. It consists of a layer of insulation (polystyrene foam, polyurethane foam) in the middle and decorative layers on the sides. The latter can imitate various surfaces and give the plates strength, as well as the ability to withstand the most severe external influences.
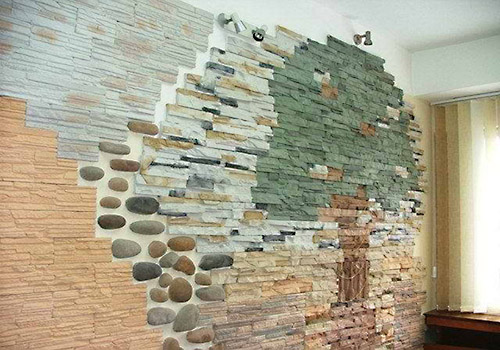
- Facing brick. The brick texture is quite beautiful, so why hide it? But the problem is that the building brick is not as beautiful as its facade counterpart. It is theoretically possible to build from the latter, but it is more expensive and such a brick is still not intended for the foundation of walls. But they can finish ready-made brick walls. At the same time, the material is heavy, so this must be taken into account when creating the facade;
- A rock. Along with facing bricks, stone is another way to give a home a solid appearance. It has the same drawback - a lot of weight, which increases the load on the walls and foundation. Fitted with pre-reinforcement.
https://youtube.com/watch?v=Y8lHhyFwPD0
Steam permeability
In any residential area, the walls must lead the accumulated steam towards the street. High humidity appears:
As a result of breathing, washing, washing dishes, showering and bathing by residents.
If the windows are closed (and this is a common thing during the heating season), all the moisture remains in the rooms and settles on the walls. Even a good ventilation system is not able to fully cope with such a problem. As a result of temperature differences. When heated, room air can hold more moisture than when it cools.
In contact with colder walls, the air releases water in the form of condensate. This process is clearly visible on the windows "weeping" in the cold. In winter, excessive dampness also manifests itself in the corners of the dwelling in the form of mold or wetting of the walls.
Hence the general rule arises: the better the wall passes steam, the faster the humidity level in the house normalizes. "Breathing" building materials filter the condensate through the pores (capillaries) and bring it out.
If the wall is impervious to moisture, water vapor, when it encounters an insurmountable barrier, begins to accumulate in the thickness of the structure, which leads to the gradual destruction of the building.
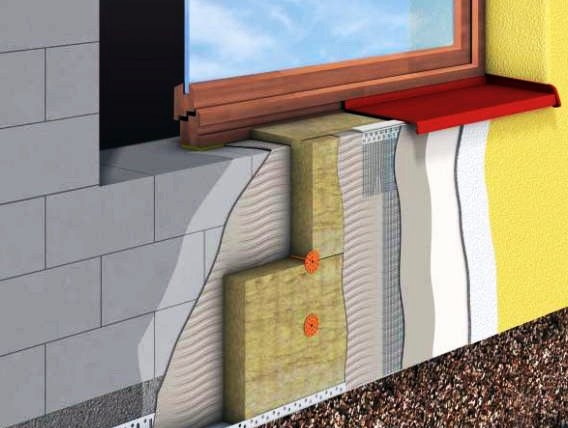
Materials for insulation from the outside
Protecting the walls with heat-insulating material from the outside from cold and humid air, contributes to their drying with excessive accumulation of moisture. Insulation materials include:
- Mineral wool - hard and semi-hard slabs made from silica and basalt. It is processed with special means to give waterproof and vapor-tight properties. It has a density of 80 to 150 kg/m3 and a thermal conductivity of 0.030 W/m. The material is divided into the following types:
- simple;
- lamellar - due to the perpendicular arrangement of the fibers, they are excellent for warming uneven surfaces and brick walls.
- Expanded polystyrene is a durable and easy-to-work material with low water absorption. It has a density of 15 to 50 kg/m3. It is relatively cheap. Duration of service on average from 25 to 35 years. After the expiration of the period, the material begins to partially crumble, due to which the thermal resistance of the wall decreases. The thickness of the plates is from 1 to 50 cm. Suitable only for external insulation. But it has a number of disadvantages:
- ignites easily;
- does not let steam through;
- not suitable for insulation of internal walls;
- attracts mice.
- Polyurethane foam is a compound of polyisocyanate and polyol that forms foam when heated. Thermal conductivity from 0.019 to 0.035 W/m3. It passes air well and has a semi-elastic structure, which contributes to excellent sound insulation. Resistant to acids and chemicals. Waterproof and low-combustible material has a service life of 20-30 years.However, there are also negative points:
- high price;
- does not come into contact with mineral acids and organic solvents;
- is a steam passer;
- when installing, you need the help of specialists;
- loses its properties at the end of its service life.
Characteristics of the internal insulation
According to statistics, 40% of heat loss in a building occurs precisely through the walls.
So you need to start thermal insulation with them. How to properly insulate a brick wall from the inside? The purchased insulation must have certain properties:
Low thermal conductivity. The acquired finish, in addition to preserving warm air in cold weather, should also not let heat through in the heat.
Only under such conditions will it be possible to achieve comfortable living at any time of the year. Low vapor permeability. The insulation must have less vapor permeability than the material that was used to build the building. Fire resistance. Ignition resistance is the main parameter for compliance with fire safety. Environmental friendliness.
The coating during operation should not emit any harmful substances that have a detrimental effect on human health. Protection from moisture. The coating must have low absorbency so that moisture does not accumulate in it. Light thickness. The amount of space that its installation will take depends on the thickness of the finish.
Why is it not recommended to insulate walls from the inside?
Many people refer to the insulation of their apartments “in a slipshod manner” and do not take into account real needs and problems. It is very tempting to quickly and at minimal cost insulate the wall from the inside and not “steam”. But, unfortunately, this method has many shortcomings that are forgotten or simply do not want to hear.
 1.
1.
It is important to understand that after insulation, the temperature distribution in the wall changes. Under normal conditions, warm air warms the wall from the inside
But the insulation does not allow heat to pass through and does not allow the wall to warm up.
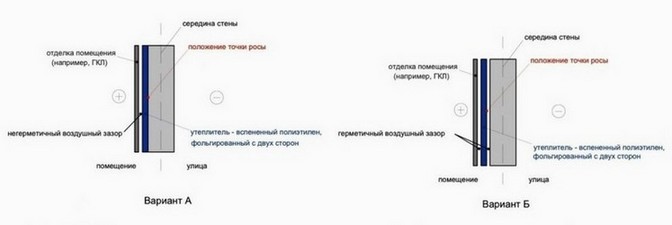
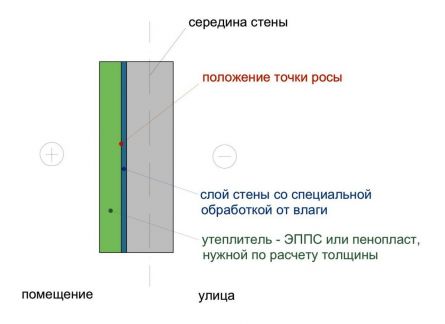
Consider the position of the dew point in the absence of wall insulation, insulation from the inside and outside:
As a result (let me remind you, we are considering insulation from the inside):
- the dew point shifts to the inner surface of the wall, which promises the formation of condensate behind the insulation, dampness in the room, fungus, musty smell and all that follow; due to freezing of the wall and sudden temperature fluctuations, the service life of the walls is reduced; only by heating radiators, but also due to the heat accumulated by the walls. Having insulated the walls from the inside, when the window is opened, it can get colder by 6-8 degrees, and in order for the temperature to normalize, it takes from several hours to one or two days.
2.
Many people think that it is much cheaper to insulate from the inside, because there is no need to call climbers. And they don’t even consider the option of insulating the walls of the apartment from the outside. It is a myth.
Not only not cheaper, but sometimes even more expensive. We don't know why. Just check.
3. Decreasing the usable area of the apartment: For example, for an ordinary “kopeck piece”, the loss of space can reach from 0.5 (non-corner) to 1 sq.
m. (corner). The cost of 1 sq.
m. of housing in Nizhny Novgorod - about 55,000 rubles. A decent amount, isn't it?
4. In addition to all this, if you decide to insulate the walls from the inside, you will have to completely destroy the interior, which is very unpleasant, especially if you have just recently made expensive repairs.
The only advantage of wall insulation from the inside is that such work can be done independently and at any time of the year.
How to lay brickwork correctly, basic techniques
An important condition for a quality wall is the correct composition of the solution. For 1 part of M400 cement, 3 parts of sand (fraction 2 mm) are required, or 4 parts if M500 cement is taken. As a measure, a 10-liter bucket is usually used (12 kg of sand or 14 kg of cement are placed in it).Water is added 0.5 - 0.7 liters per 1 kg of cement - the solution should not be too liquid. During the laying process, the following rules are observed:
the plinth is laid out of red ceramic brick (it is more resistant to moisture) to the level of average snow cover;
line 2 levels of waterproofing from roofing material - at a height of 0.2 m and 0.5 m from the blind area;
the first row is laid along a stretched twine, so that the bricks do not touch it, the subsequent layers are checked with a level - this is especially important for the facing row;
every 5 rows there is a layer of reinforcement;
if the wall is to be plastered, the seams are not completely clogged with mortar - this technique is called "laying a wasteland";
the facing row is filled with a mortar mixture flush with the wall - “under cut”, sometimes a decorative (convex or concave) seam is made;
so that the corners are even, the construction begins with them, using the order - a corner with risks for bricks.
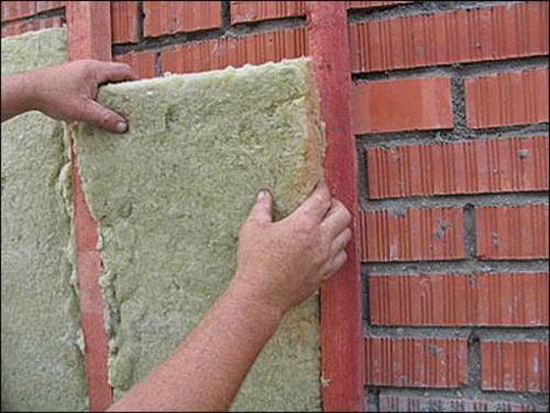
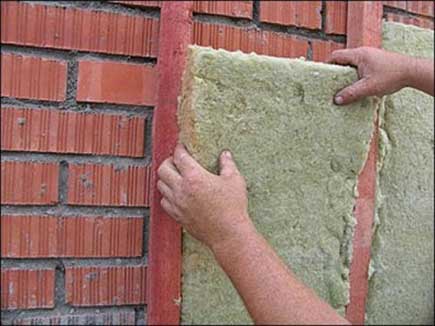
The use of mineral wool
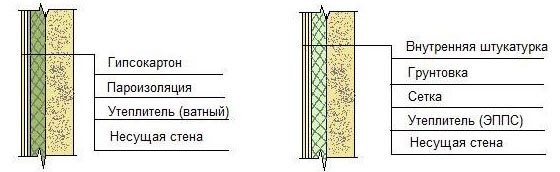
Scheme of wall insulation with mineral wool, protected on both sides by a vapor barrier.
Another budget and widespread type of insulation.
The disadvantages of mineral wool include its high vapor permeability and carcinogenicity. Therefore, when insulating a house, it is necessary, firstly, to use a vapor barrier film, and secondly, when working with mineral wool, wear long-sleeved clothes, work with gloves and a respirator. To safely insulate the house from the inside, the mineral wool must be sewn up - with drywall, plywood, clapboard, etc.
Required materials: mineral wool in sheets or rolls, vapor barrier film (optional - glassine, cellophane, penofol), metal drywall profile (guide and rack), drywall screws, Delta type vapor barrier adhesive, aluminum or acrylic adhesive tape.
Necessary equipment: knife, metal shears, perforator, level (ideally laser).
For the installation of mineral wool, you will definitely need a crate.
It can be made from a metal profile or wooden bars. Installation: we glue a vapor barrier film on the wall, glue the joints with adhesive tape; using a level, we set a metal frame from the profile along the walls, it should be slightly less than the thickness of the mineral wool from the wall surface. The frame must be made as rigid as possible, the distance between the longitudinal profiles should be slightly less than the width of the mineral wool sheet or roll; them; we fix a layer of vapor barrier or penofol on top, glue the joints; we mount drywall, then the exterior finish. In addition to the walls, it makes sense to insulate the floor and ceiling. or mineral wool is tightly clogged. After that, we recommend laying the floor with a vapor barrier film so that moisture from the house does not get into the “pie” of insulation and timber.
Then floor boards and thick plywood are laid, which can be painted, or linoleum or laminate can be laid on top. The ceiling can be insulated by analogy with walls. Having completed all these works, you will get a room that retains heat well. Today, you can choose any heat-insulating technology. Scheme for insulating a brick wall from the inside with mineral wool or expanded polystyrene.
Features of insulation from the inside
The main problem with internal wall insulation is the fact that the wall itself does not get warmer and even starts to freeze more. This causes the dew point, that is, the place where moisture from the warm room air begins to condense, is transferred even closer to the inner edge of the wall or to its surface. At the same time, condensate will inevitably lead to dampness and destruction of the wall itself and the finishing layer, deterioration of the thermal insulation properties of the insulation material and, as a result, heat losses will again be high and plus even more humidity. Most of the damage from dampness will be near brick walls.
The work of insulation inside and outside in practice: a visual diagram
To avoid this, it is necessary to choose heaters with minimal vapor permeability, moisture absorption and the absence of any seams or joints during installation, through which condensate could escape into the room, and air into the space between the wall and the insulator. Materials such as mineral wool, liquid ceramics, cork, drywall, warm plaster, etc. do not fit these criteria at all. The last two options can only be used as the final stage of insulation.
The use of expanded polystyrene (penoplex) is also very doubtful, since it is difficult to achieve reliable docking with the wall without the use of solutions, and the joints between the sheets will play an important role in the deterioration of tightness.
Insulation with foam
Styrofoam insulation is one of the easiest and most economical ways.
Internal insulation of brick walls with polystyrene foam is one of the most inexpensive and simple methods, so it is often used. It is perfect not only for walls, but also for other surfaces. The disadvantage of polystyrene is its combustibility, but subject to safety rules, this should not be a problem.
The installation of foam plastic is well done with glue, but for this you will need to first clean the walls of the old finish: wallpaper, plaster, tiles and other things. This will ensure a good adhesion of the adhesive.
Slight unevenness of the walls is acceptable, as during processing they will be filled with an adhesive solution. After cleaning, the surface is treated with a primer and it is expected to dry. Priming will strengthen the base and prevent the formation of mold or fungus.
After that, the installation of polystyrene foam to the surface is carried out.
Using a notched trowel, the adhesive is applied to the finish and the wall, then the slab is pressed against the surface. The flooring is made end-to-end, each row must be offset relative to the previous one. This is achieved by laying the slabs in one row horizontally and in the other vertically, if the dimensions of the walls allow for such cladding.
For better fastening of the material, it is additionally fixed with dowels with a wide cap. A vapor barrier finish is laid on the foam plastic and the finishing wall cladding is carried out.