Features of installing a thermostat
- The thermostat must not be placed in the zone of ascending warm air flows that occur above a working radiator;
- The connection diagram of the thermostat provides that it must be raised above the floor level by at least 800 mm;
- It must be protected from direct sunlight;
- The remote sensor, if any, must be firmly fixed on the wall;
- Do not block access to the thermostat with furniture or heat flow curtains that form in the room.
After the end of the heating season, the thermostat should be switched to the maximum flow mode (open), in order to avoid deposits on the valve seat.
Kinds
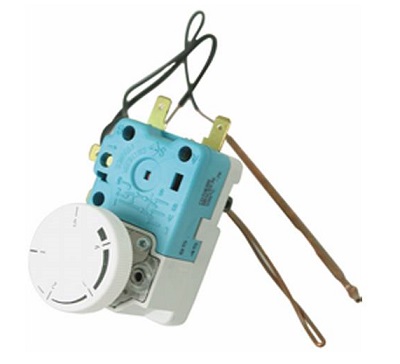
Modern boilers, as a rule, are already equipped with thermostats, among which there are rod, electronic, bimetallic and capillary models.
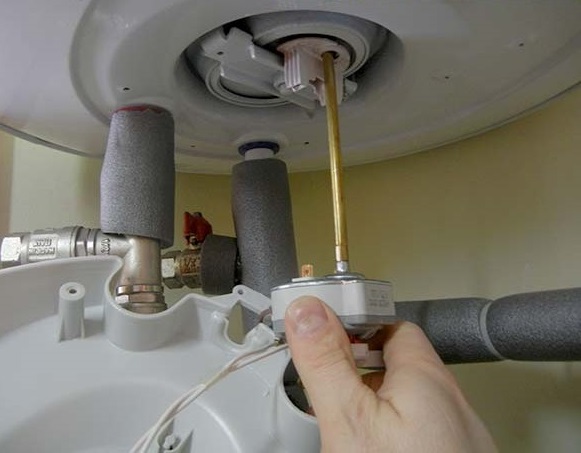
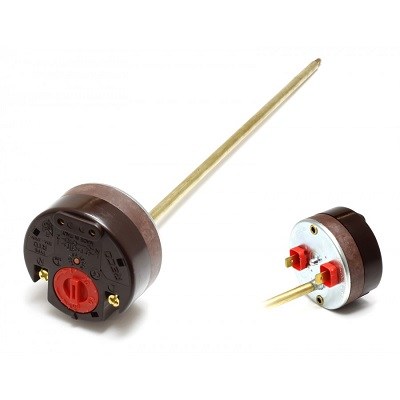
The rod thermostat is the most common type of household thermostat and is presented in the form of a small tube that expands linearly with increasing temperature and presses against the switch relay. The reverse process with the inclusion of heating elements occurs when the water in the tank cools and its temperature drops below the specified values.
Among the advantages of models of this type, one can note the low cost of devices, the disadvantages include some inaccuracy in the work associated with the close location of the device to the cold water supply system, which is why the operation of the thermostat is often not quite correct. Due to constant cooling, the device does not have time to respond to the heating of the liquid in a timely manner and does not turn off the heating element. Therefore, the temperature of water from boilers equipped with rod thermostats often exceeds the set values.
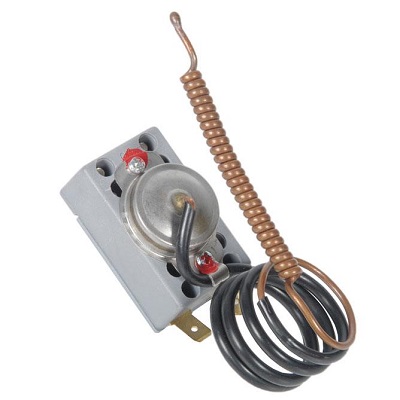
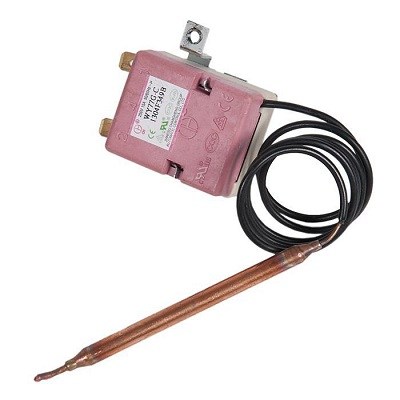
The capillary thermostat is the most modern type of thermostat and is a tube with a capsule containing a contrast liquid inside. When the temperature rises, the water exerts pressure on the membrane, which, in turn, opens the contacts of the heating element. This type of thermostat is characterized by high accuracy and long service life. The tube containing the cylinder is made of anti-corrosion alloys, and therefore the unit is not subject to rust and oxidation. The temperature error of capillary thermostats does not exceed 3 degrees.
The electronic thermostat is equipped with a protective relay that stops the operation of the heater when the tank is empty. The cost of such models is somewhat higher than the price of simpler analogues. Thermoregulators of this type are installed on boilers of well-known world brands, and are distinguished by high accuracy, reliability and ease of use. Particularly technological models have the function of programming temperature and on-time.
Bimetallic. If in rod and capillary models the indicator of temperature change is a liquid in a sealed tube, then in thermostats of this type the role of liquid is played by metal plates. When the temperature regime changes, the plates change their location and open or close the electrical circuit.
Capillary
Electronic
Bimetallic
By purpose, thermostats are divided into adjustable, protective and adjustable-protective. The first maintain the temperature of the heated liquid in a certain range and operate in automatic mode. Reaching the upper limit of the set value, the relay opens the contacts and the water heating stops. Upon reaching the lower limit of the set temperature, the relay closes the circuit, and the operation of the ceramic or steel heating element resumes.
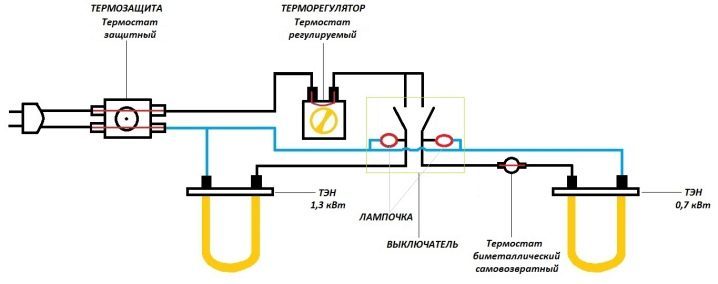
Protective thermostats are designed to forcibly turn off the heating element upon reaching the specified heating parameters. The heater can only be turned on after such a shutdown manually.Typically, such thermostats are installed as a second additional device designed to turn off the heating element in the event of a failure of the main thermostat. The temperature in the protective devices is set at around 95 degrees, which prevents the water from boiling and a possible explosion of the boiler. The third type - adjustable-protective - is a device that combines the properties of the first and second types, and is considered the most versatile device.
According to the mounting method, thermostats for water heaters can be divided into mortise and overhead models. The former are used for mechanical control, the latter for electronic control.
Ways to validate an element
You can independently check the operation of the thermostat directly on the car. In the vast majority of cases, such a diagnosis gives a reliable result. You need to start the check with the engine completely cooled down: start it and periodically feel the lower part of the radiator and the pipe extending from it from below back to the engine.
The serviceability of the thermostat is determined by the following features:
- at the initial stage of warming up, the radiator and the pipes suitable for it are completely cold;
- at an antifreeze temperature of 40-60 ° C, the upper supply hose begins to warm up, the lower one remains cold;
- when the antifreeze is heated to 90–95 ° C, the entire area of \u200b\u200bthe heat exchanger and the lower pipe become hot, which indicates the opening of the damper and the movement of fluid along a large circuit.
Diagnostics is recommended to be carried out until the sensor is triggered and the fan automatically turns on.
Deviations from the norm are interpreted as follows:
- If the inlet and outlet pipe immediately warms up along with the radiator, the thermostat is stuck in the open position. Antifreeze initially goes in a big circle, hence the heating.
- When the temperature reaches 90 °C, the bottom of the heat exchanger and the outgoing hose remain cold - the thermoelement damper is tightly closed, the part has become unusable.
- When the top of the radiator is hot and the bottom is slightly warm, the thermostat is stuck half-closed.
Unlike the first two points, the last conclusion requires mandatory confirmation. It is quite difficult to make a clear diagnosis when the coolant is divided into two streams moving along different circuits. Uneven heating of the heat exchanger fins, turning on the fan and temperature jumps are indirect signs. Similarly, symptoms of an air lock in the cooling system appear.
To clearly check the performance of the thermostat, it will have to be dismantled from the car. Disassembly and diagnostics are performed in the following order:
- Let the engine cool and drain the antifreeze - first from the cylinder block, then from the radiator. It is more convenient to empty the system into a wide container with low sides.
- Loosen the clamps securing the pipes to the thermostat. Disable them and pull out the element.
- Inspect the part for a slightly open damper. If a malfunction is detected, further verification is pointless - you need to buy and install a new spare part.
- Heat a pot of water on the stovetop. When its temperature approaches boiling, lower the thermostat into the container and observe the damper. It should open without delay.
- Remove item from pot. When cooling, the thermocouple must immediately close the passage.

If during the inspection it turned out that the damper does not work or is jammed, the part must be replaced, since it cannot be repaired. Given the large number of fakes in the auto parts market, a new thermostat can be pre-tested in a store. Close the outlet with your finger and try to blow air through the inlet. A hermetically sealed damper will not allow this to be done.
Retest your new part at home by dunking it in a pot of boiling water. If the heat-sensitive mechanism does not work, take the defective part back to the store or exchange it for another one.
Procedure for replacing the thermostat
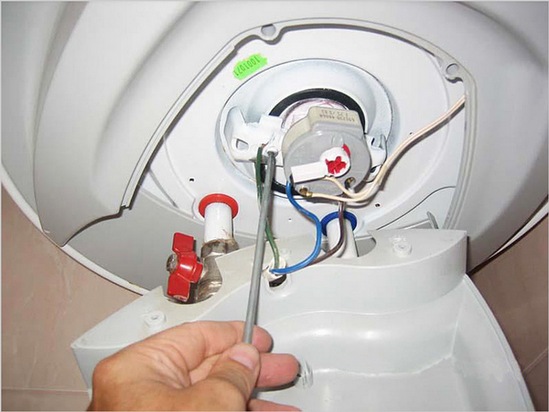
First you need to remove the regulator knob with an awl or a thin screwdriver
Then carefully remove the decorative overlay, because it can be fragile. After that, the fastening nuts and hex screws are unscrewed
In the process, the door must be held, and after all the screws are unscrewed, the top panel rises and the door is removed. After removing the top cover, you need to get the thermostat from the dashboard.
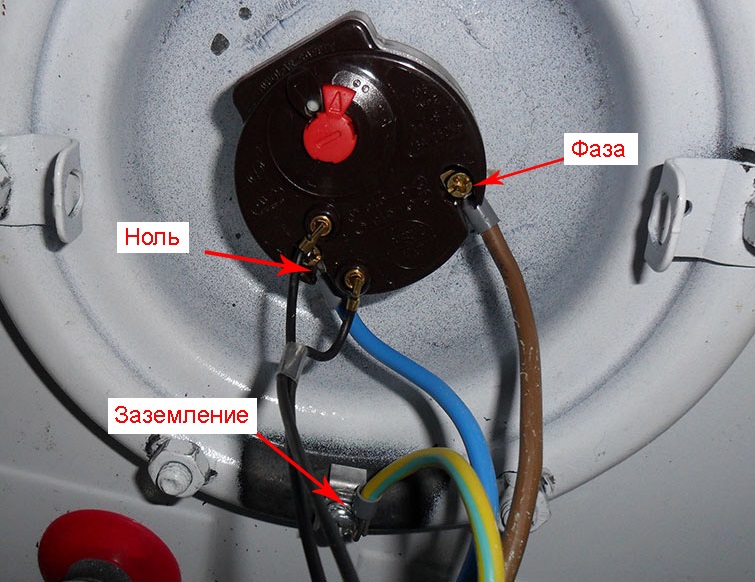
Before that, contact connectors are removed from it. The whole procedure for replacing an internal part is quite complicated and sometimes only professionals can do it. Therefore, it is still worth relying on instructions from the Internet and trying to do it yourself.
Replacement and repair of the refrigerator thermostat
The master will not only install a new thermostat with high quality, but will also adjust it and be able to check its functionality using special equipment.
You should always remember that the thermostat is such a thin electrical appliance that experts strongly do not recommend disassembling and trying to repair it yourself. Practice shows that unskilled intervention in the operation of a household appliance never leads to anything good.
Same day repair is a reality! Quality repairs at an affordable price
for every client!
- Discount when ordering from the site 10% (30% for pensioners)
- Free visit of the master and diagnostics*
- Warranty up to 3 years
Fill out the feedback form and get prompt advice from a specialist!
MAKE A REQUEST FOR REFRIGERATOR REPAIR
* departure and diagnostics are free if you repair the refrigerator in our company. If you refuse to repair, then the cost of diagnostics will be 500 rubles.
Useful articles:
- Refrigerator drain cleaning
- Fixing a Leak in a Foamy Part of a Refrigerator
- Refrigerator door adjustment
- Refrigerator door rehinging
comments powered by HyperComments
Installation
Sometimes there are situations in which the heating element of the water heater is functioning properly, and the thermostat has already failed for some reason - it does not turn off or does not work correctly. In this case, the purchase of a new water heater can be postponed and limited to self-replacement of the thermostat. To do this, take the technical passport of the boiler and, based on its operational properties and technical characteristics, select the appropriate model.
For a more accurate choice, you should rewrite all the data from the marking of the old device, and based on the data sheet and these data, you can purchase a new thermostat.
Installing a thermostat with your own hands requires certain skills and knowledge in the field of electrical work. It is very important to comply with safety regulations, without knowing which work cannot be started. The thermostat should be replaced only with a model similar in its technical characteristics; the use of a home-made device for installation in a factory-made boiler is not allowed.
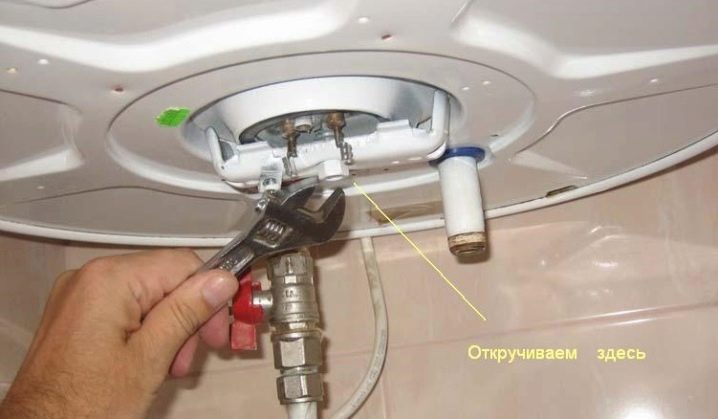
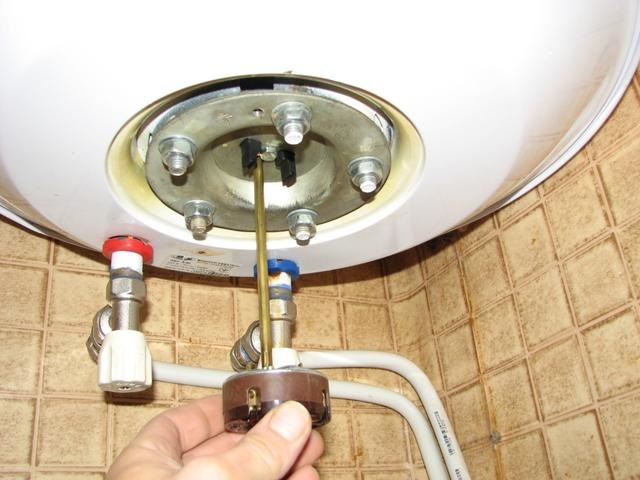
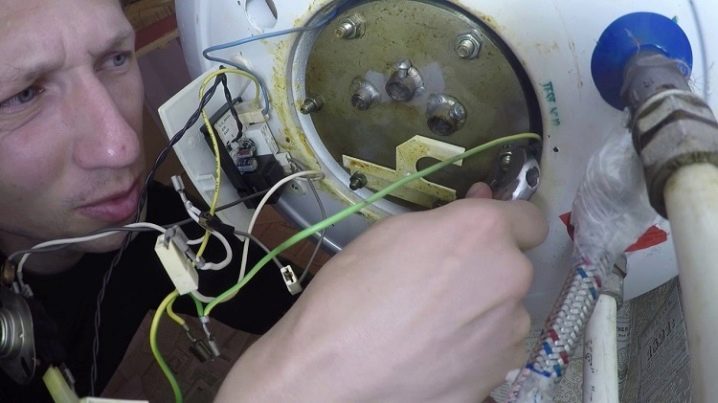
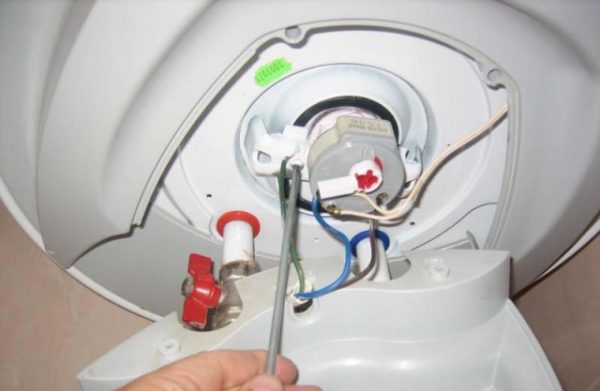
At the first stage, the water heater should be de-energized and the water supply to it from the water supply system should be stopped. Then it is necessary to drain the existing liquid and remove the bottom panel of the device, thereby opening access to the heating element. After opening the cover, you need to remove the clamping ring and remove the old thermostat together with the control unit.
Next, you should install and connect a new thermostat, put the clamping ring in place and fix the bottom panel. After the installation is completed, you need to fill the water heater tank with water, turn on the heating element and check the operation of the new device by setting it to the minimum temperature value.
If the thermostat turned off the heating element after the water reached the desired temperature, then the installation was done correctly, and the thermostat is operating in operating mode.At the last stage, the thermostat should be adjusted by setting the necessary operating parameters for it.
In order to notice failures in the operation of the device in time and take measures to eliminate them, you should know the main causes of breakdowns and their symptoms. The most common thermostat problems include:
- wear of the copper capillary tube;
- poor interaction between the three-pin thermostat and the heating element;
- failure in adjustment and the formation of scale on the heating element;
- failure due to power surges.
Signs of a failed thermostat:
- the water in the boiler does not heat up;
- the display shows incorrect temperature values \u200b\u200bthat differ from the actual indicators of water heating;
- the thermostat does not turn off the heating element at a given temperature, resulting in uncontrolled heating of the water, which can be stopped only by disconnecting the boiler from the network;
- the indicator light on mechanical models is off.
How to set the thermostat correctly
For the correct setting of the thermostat, it is necessary to minimize heat leakage from the room by closing windows and doors. A room thermometer is placed where the temperature should be constant. Then the valve is fully opened by turning the thermostat head to the left until it stops. In this position, the radiator provides the maximum level of heat transfer, so the air in the room will begin to heat up.
After the thermometer readings increase by 5-6°C compared to the initial value, the valve is closed. Why turn the head to the right as far as it will go. At the same time, the air temperature in the room will gradually decrease. When the temperature reaches the desired value, proceed to the slow opening of the valve.
As soon as the sound of water in the thermostat is heard and a sharp heating of the valve body is felt, the rotation of the head is stopped, remembering its position. This completes the thermostat setting.
It is better to entrust the choice and installation of temperature controllers to specialists who will connect the equipment in accordance with the manufacturer's recommendations. A properly installed thermostat will ensure a comfortable temperature level in the room and help save heat, which will positively affect the family budget.
How to choose
Usually a faulty thermostat can be replaced with a similar one in form and principle of operation. However, if it is possible to buy and install another thermostat and there is an urgent need for this, then why not. The main thing is to be able to choose the right device and install it correctly. Although even here the Internet or a consultant at the point of sale can help the consumer.
It would seem that the heating element or volume should be important in the boiler, but, as it turned out, the thermostat and its role cannot be neglected. By setting the desired temperature and protecting the boiler from overheating, the thermostat is extremely important in the operation of the heater.
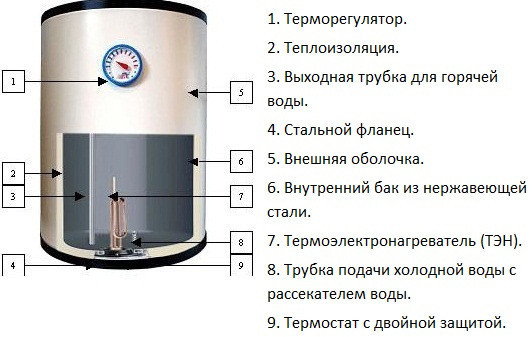
The thermostat for the water heater is an important element of the boiler device. The main task of the device is to maintain the specified temperature regime of the heated liquid, and for some models it must also be maintained during an emergency shutdown of the appliance in case of malfunctions. Recommendations regarding the selection and installation of such a device will be discussed in this article.
Peculiarities
The thermostat is responsible for the safety of the water heater and turns off the heating element when the temperature has reached the set value. If the thermostat is missing or defective for any reason, then an explosion may occur as the temperature rises, and hence the pressure inside the sealed housing. Therefore, the safety of others depends on the correct installation and operation of the thermostat.
Modern models are equipped with an emergency shutdown function of the heating element at a low level or complete absence of water in the tank, which is very convenient in case of interruptions in water supply, poor pressure and frequent shutdowns.
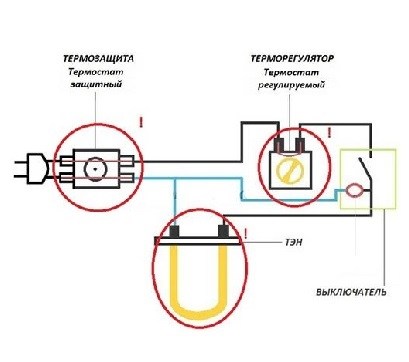
The principle of operation of the thermostat is quite simple. It consists in opening the contacts of the heating element when the temperature reaches a predetermined level and in their connection when the temperature of the liquid drops below the predetermined value. Almost all models of thermostats are equipped with an indicator light showing the state of the device: a burning light indicates the operation of the heating element, and an extinguished one indicates that the water has been heated to the set temperature and the boiler can be used.
More modern and high-tech devices in the event of a malfunction of the electric heating element will instantly disconnect it from the network and prevent electric shock while taking a shower with an ungrounded boiler. Also, some models of thermostats are able to perform their functions even if the electronics fail.
About the principle of operation of the thermostat
The part is a temperature-sensitive element that opens the damper when heated to a certain temperature (from 87 to 93 °C). The actuator is triggered by the expansion of the working fluid - a special fluid that reacts to changes in ambient temperature (in this case, antifreeze).
A thermostat with a hermetically sealed damper is usually placed in its own housing and is a separate part. But there are also frameless products installed inside the provided channel in the engine. The algorithm of work for all models is the same:
- After starting a cold engine, the coolant flows in a small circle - through the water jacket of the power unit and the small stove heat exchanger. The passage to the main radiator is blocked by a damper, due to which the engine warms up faster.
- When the set temperature threshold is reached, the damper begins to open, allowing part of the antifreeze to cool in the main radiator.
- When the motor warms up to operating temperature (over 90 ° C), the passage opens completely and all antifreeze moves along the large circulation circuit.
The primary signs of a thermostat malfunction come down to two symptoms: constant “boiling” or the inability to warm up the power unit, especially in winter.
Signs and consequences of a malfunction
What consequences should be prepared for if it was not possible to check the operation of the thermostat in time?
- Poor operation of the car interior heater. If the valve is stuck open, the coolant is constantly circulating through the large circuit. The cooling of the radiator by the flow of incoming air and the general increase in the surface area that gives off heat leads to a constant underheating of the engine. Because of this, not only does the stove heat poorly, but power also drops, fuel consumption increases.
- Motor overheating. A short-term excess of operating temperature can only lead to overheating of the piston rings, due to which their elasticity is lost. Subsequently, this will lead to loss of compression and increased oil consumption. Long-term operation in overheating mode is fraught with breakdown of the cylinder head gasket, thermal deformation of the cylinder head, loss of elasticity of the valve stem seals, scuffing of the cylinder-piston group. As you understand, it is much easier to check the thermostat with your own hands than to pay for an overhaul of the engine. If the cap of the expansion tank is faulty or cannot cope with the increased pressure in the cooling system, the tank may crack, the integrity of the radiator in previously damaged areas will be violated.
Adjustment features
The heating of the radiator occurs due to the circulation of the liquid heated by the heating boiler.The heat carrier gives a significant part of the thermal energy to the heating device, which provides heating of the air in the room.
The less hot liquid passes through the battery per unit time, the weaker it will heat up. The principle of quantitative adjustment is the basis for the functioning of the thermostat. Before the invention of the thermostatic valve, a plumbing valve was used for this purpose.
The principle of operation of a modern thermostatic valve is the same as that of a valve - a special device in the housing limits or completely blocks the flow of the coolant. The main difference lies in the principles of control - in the case of using a plumbing valve, the temperature of the batteries has to be adjusted by turning the knob, while the thermostat for a heating radiator works without human intervention, it is enough to install and configure it correctly.
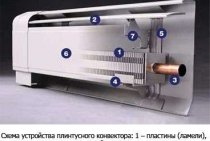
Thermostat design
The thermostat is a valve equipped with a thermal head that controls its operation.
The valves differ in the design of the body, depending on the characteristics of the installation site, the valve is used:
- standard straight;
- angular horizontal;
- angular vertical;
- angular, in which the head and nozzles are located along three perpendicular axes (left and right versions).
The corrosion resistant alloy body has a valve seat that can be fully closed by the poppet valve when it is fully lowered. When the height of the plate is changed, the amount of fluid passing through the valve per unit time changes.
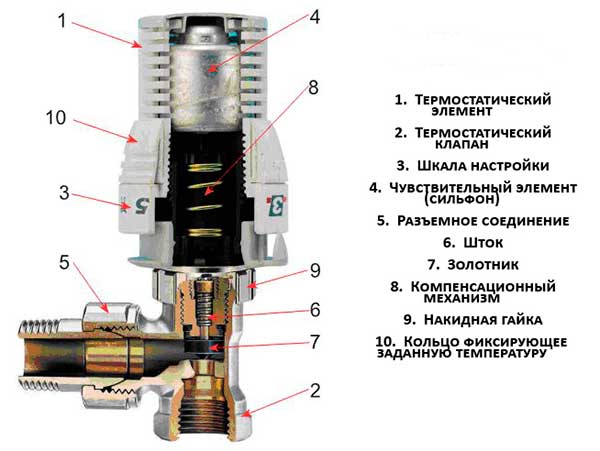 Temperature controller device
The poppet is mounted on a stem, which is actuated by a pusher pin, its upper part protrudes from the valve body. As standard, the pin is covered with a cap. It is removed and the selected valve control mechanism is installed.
Choice of control mechanism
The thermostat for heating batteries must be equipped with a suitable control mechanism:
- locking handle;
- bellows type thermal head;
- servo head;
- electronic thermal head.
Locking handle
It turns the thermostat into a regular valve. The handle is usually used when it is necessary to reliably close the valve for repair work or to replace the heating device. It can be considered as a removable auxiliary attribute.
Thermo head with bellows
Looking at the disassembled thermostat, you can see a bellows - an elastic container filled with a liquid or gas with high thermal sensitivity. If the temperature of the air around the thermal head rises, the bellows expands and pushes against the pusher pin, causing the poppet to move down. When the bellows is cooled, the process is reversed. The thermostat of this type installed on the radiator is non-volatile, it is enough to set it once, and the battery heating level will be maintained automatically with a fairly high accuracy.
Servo Head
The valve stem moves up or down a miniature electric motor, which receives the appropriate signals from the electronic control unit. Such a system allows for very precise control of the heating of the coolant. The installation requires cabling for motor power and control signals. The device is suitable for use as part of the "smart home" complex.
Electronic thermal head
The heater, equipped with an electronic thermal head, changes the heating level of the room depending on the set program. For example, work during the day in an economical mode and heat the air to the desired values by the arrival of the owners of the house from work. Such a thermal head with an electronic display works autonomously, batteries provide power.
Installing a thermostat on a heating radiator
Consider how to mount and configure a bellows thermal head - this is the most popular option due to its affordable cost.
Most thermal valves have a thread for the M30x15 nut in the upper part - it is with its help that an automatic mechanical thermal head is installed. Its fixed part is attached to the valve body, and the upper part rotates freely around its axis. Holes are provided in the plastic head to allow air to enter the bellows, causing it to contract or expand.
 Installed thermostat
The installation of the thermal valve is carried out at the stage of connecting the heating radiator to the pipeline. It is placed on the supply pipe, fixed with an “American” adapter - such a connection is easy to disassemble if necessary. The direction of the coolant flow is indicated on the body of the device - this must be taken into account. Before installation, study the product passport - if the thermal valve does not have the function of completely blocking the flow, a ball valve must be installed on the supply pipe before it.
The valve is connected to the battery with a free pipe. Then the protective cap is removed from the thermal valve and the bellows thermal head is installed by tightening the corresponding nut with a spanner wrench. If the model provides for snap-in installation, the head must be turned to the “max” position, attached and pressed until it clicks.
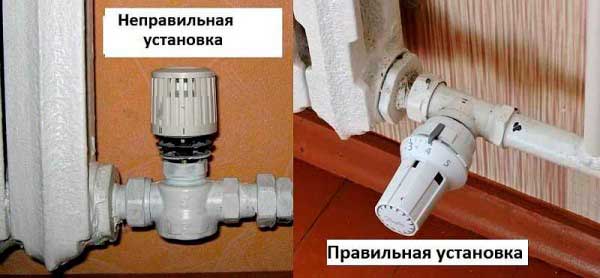 Correct position of the thermal head
After installation, adjustment is carried out. The position of the stem, pusher pin and bellows relative to the body of the thermal valve can be changed by rotating the moving part of the head. It has a temperature scale and a mark for reference, which makes it possible to set the required temperature to the nearest degree. A suitable battery mode is determined by practice.
There are different versions of the thermal head. If the radiator is blocked by thick curtains, furniture or structures, when installing the regulator, you can use a thermal head with an external sensor-probe. The sensor, connected to the bellows by a capillary tube, is placed up to 2 meters from the battery.
The thermostat for the heating battery can also be equipped with a remote control panel, which can be mounted in any convenient place. This model is equipped with two bellows (on the valve and in the control panel) connected by a capillary tube.
Installation of a thermostat is not difficult to do on your own when it comes to an autonomous heating system. In a house with central heating, this is possible in a situation where a ball valve is installed on the supply pipe after the bypass. Otherwise, it is required to call specialists and agree on a temporary shutdown of the coolant supply through the riser.
God saves the safe, let's trust the experts
Have you read our instructions and realized that you won’t dare to “open” the refrigerator? You are quite understandable. Unqualified intervention can lead to the fact that not only the replacement of the thermal relay, but also the repair of the entire device will be required. And this is completely different money.
Therefore, if in doubt, it is better to call professional masters. An experienced specialist will quickly replace the part, and your refrigerator will quietly “purr” like a satisfied cat. If you live in Kiev, then you can order repairs - the ALM-repair company specializes in repairing refrigerators of different brands. Let your refrigerator give you only positive emotions again!
ALM-Remont - service for the repair of household appliancesAddress: Kiev, Revutskogo st.
Typical malfunctions of Ariston heaters
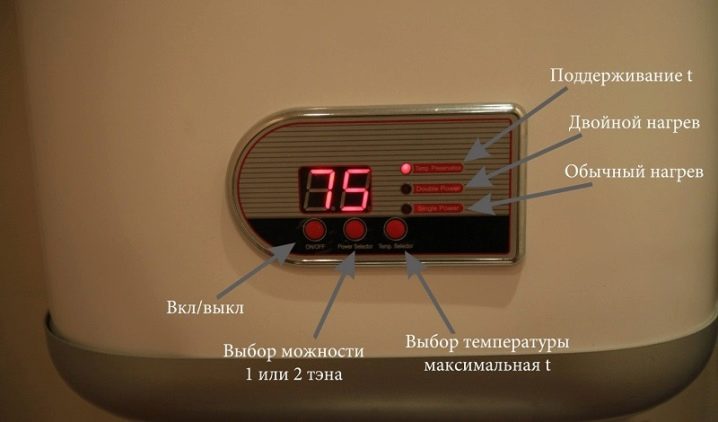
Why is the technology not working? The answer to the question will help to find diagnostics or the boiler itself. Modern models are equipped with control boards that regulate the operation of all nodes in the system. When a breakdown occurs, a fault code is displayed on the display. If there is no display, then the indicators indicate an error (flashing).
Deciphering the symbols will help solve problems with the operation of the heater.
Error codes for Ariston boilers: table
| Fault code | What does | How to repair |
| E01 | There are problems with the control board. | To exclude a system error, turn the column on and off for 10 minutes. If the error reappears, inspect the board. Maybe it has condensation on it. |
| E10 | Temperature sensor problem. | Check the integrity of the wiring, the tightness of the contacts. Test the sensor with a multimeter. In the event of a breakdown, a replacement is made. |
| E11 | Message about exceeding the normal temperature (more than 105 degrees). Causes: |
- Scale, salt deposits on the heating element.
- TENA failure.
- Thermal sensor malfunction.
Do-it-yourself repair:
- Get the heating element, clean it from scale and deposits. Check for correct operation with a tester. Perform replacement.
- Install a new temperature sensor.
E12
Sensors indicate that the water temperature is 12 degrees higher than it should be.
See code E11.
E13
Sensor differential error. Between the temperature sensors, the difference in readings is more than 50 ° C.
Diagnostics and installation of new sensors.
E14
Error E14 reports: water heats up very slowly.
Make sure the voltage is correct. Clean the heating element from scale.
E15
The system reports that there is no water in the tank.
Check the presence of water in the water supply, the condition of the safety valve. Replace defective part.
Since the boiler is simultaneously connected to electricity and water communications, problems can also concern the network or the safety valve and hoses.
Let's analyze the main breakdowns of the Ariston heater:
- The tank leaked.
- The device does not turn on.
- No water heating.
Symptoms of a malfunction can be:
- Prolonged heating.
- Noise during work.
- Water with an unpleasant odor and cloudy color.
- Quick turn on and off of the boiler.
What to do and how to fix problems, read below.
Checking the water heater thermostat thermostat
The water heater thermostat is a device that regulates the heating of the boiler and controls the temperature of the water. In simpler terms, the thermostat is needed in order to heat running water to a certain temperature, and then automatically turns off and also automatically turns on when the water has cooled to a certain temperature and needs to be heated again.
You can check the thermostat as follows:
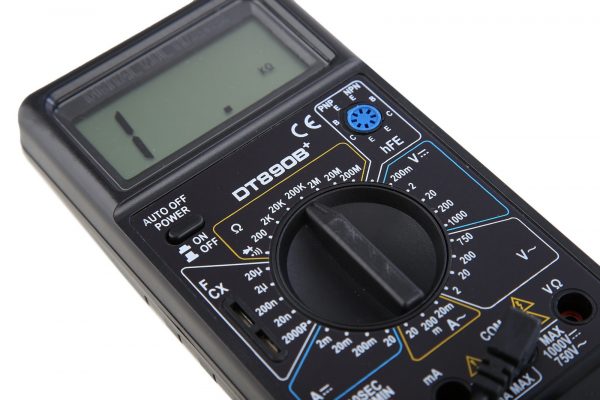
First you need to remove the thermostat and find out if it is working. It must be switched to resistance measurement mode.
- Then you need to set the maximum temperature and measure the resistance at the output and input contacts of the thermostat. The thermostat is broken and defective if the system does not respond in any way.
- If the thermostat is working and the system has responded, then the regulator flag must be set to the smallest value and the tester contacts must be connected to the boiler contacts.
- At the end, you need to heat the tubular element of the thermostat with a lighter. If the system turns out to be working, then the resistance indicator will increase greatly.
To check the thermostat, you will need a multimeter, which was used in the first case, it is very functional.
How to install a thermostat on a battery
To install a thermostat for heating radiators, first turn off the supply riser. Then the water is drained from the heating system and proceed with the installation work, which is performed in the following order:
cut off horizontal pipe connections at a certain distance from the radiator;
disconnect the cut pipeline, as well as the tap, if it was installed earlier, from the radiator;
carry out the disconnection of the shanks together with the nuts from the shut-off valve and the thermostatic valve; they are wrapped in battery plugs;
then piping is assembled and installed at the selected location;
then the installed piping is connected to horizontally located supply pipes coming from the riser.
Heating systems are divided into two types: one-pipe and two-pipe.In a single-pipe heating system, when connecting a thermostat, it is necessary to change the radiator connection scheme by installing a jumper connecting the direct and return connections of the device.
This jumper pipe, otherwise called a bypass, allows the coolant to run when the heating battery is blocked by a thermostatic device. When implementing such a connection scheme, it is convenient to dismantle the device by first closing the valves shown in the figure under numbers 3 and 4.
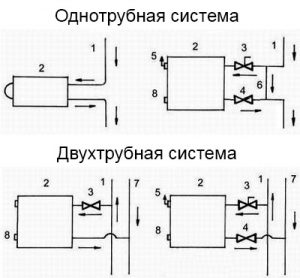
Legend for schemes:
- supply riser of the heating system;
- Radiator;
- thermostat (automatic or manual);
- bottom valve;
- manual or automatic air vent; P
- small bridge;
- reverse riser;
- plug.
In a two-pipe heating system, the regulation of the flow of coolant into the radiator can be carried out using the temperature controller of the radiator of the heating batteries installed on the upper supply.