How to remove the grille Lada Granta
You'll need:
- Wrenches on "8" and "10";
- Screwdriver;
one). Open the hood;
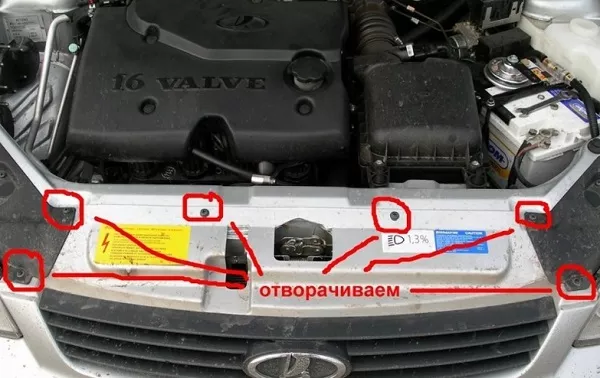
2). Unscrew 6 bolts from the top of the grille;

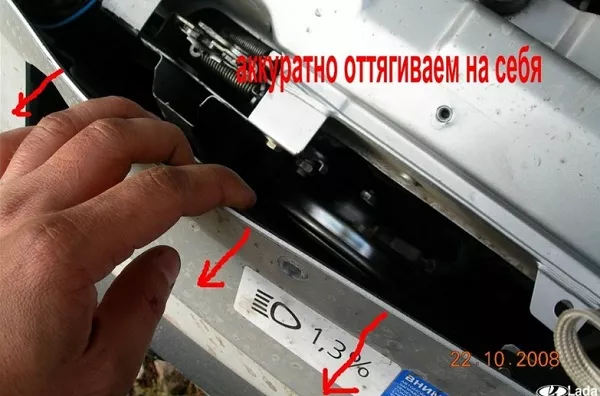
3). We bend the grille and, putting our hand into the formed slot, unscrew by touch from the inside of the grille 4 bolts on top and 5 nuts on the bottom.
4). Using a screwdriver in the area of \u200b\u200bthe headlights, snap off 2 latches.
How to remove the Renault Sandero grille?
one). We unscrew a few screws that attach the lower part of the bumper to the body (we do this with the help of Torxes, since it is impossible to do this with a conventional screwdriver).
2). We press each latch down, and we press the plastic itself inward.
3). We do the same with the rest of the latches on the bottom.
4). After the lower part is released, slightly press it inward. We do the same operation with the upper part.
5). Next, we mix the plastic to the right, slightly pulling up the upper edge of the bumper, after which we pull the part towards ourselves (we dismantled the left side).
6). Then you should slightly bend it in a plane and move it to the left.
7). Thus, it is possible to remove the grille without removing the bumper.
How to remove the radiator grill on the Priore?
You will need:
- pliers;
- Screwdrivers (long and short);
Upper grille
one). We turn out 6 screws of the top fastening of a bumper.
2). We bend over the upper part of the bumper along with the grille.
3). We remove the fixing washers (on the Priora SE, unscrew the screws) of the upper bumper grille, sticking a hand with a short screwdriver through the resulting hole;
4). Remove the upper bumper grille by pulling it towards you.
I would also like to note that it will be quite difficult for owners of large hands to stick their hand in, or even worse, they can break the upper part of the bumper.
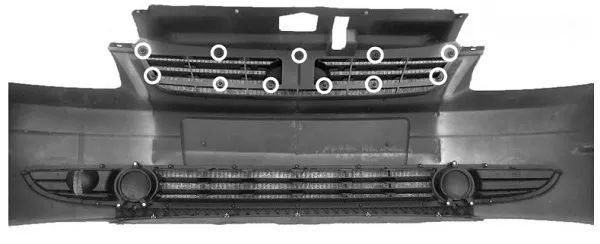
Upper and lower bumper grille mounting scheme:
Lower grille
It is no longer possible to access the fasteners of the lower bumper grille (in which the PTFs are installed) from above. Not enough space on the bottom of the car. In this case, we remove the bumper assembly with this grille, after which we unscrew the screws and disconnect
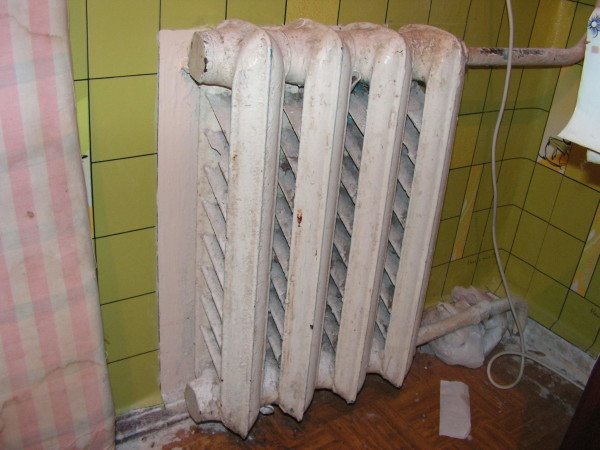
How to make a cheap heating radiator in the household. indoors
Radiators are an important part of the heating system. They are expensive. To save on repairs, arranging the premises, you can do them yourself. Most often, this is done when heating various utility rooms. At the same time, it is possible to make radiators of any shape, fit them into a free space.
Start by preparing the tools. You will need, depending on the material, a soldering iron, a welding machine, a gas burner. Marking and measurements are done with squares, a ruler, a tape measure. You can not do without a grinder with a grinding disc, a chisel, a hammer, files. For final finishing, brushes, sprayers, primer, solvent, paint are used.
Then they decide with the shape, size, number of radiator registers. In this case, special reference books are used that take into account the heat loss of the room. If the device is made for heating a greenhouse, then it can be, for example, a battery of long pipes, of which there are several located near the outer walls.
The next step is cutting pipe sections of the desired size. The operation is responsible - the permissible error is up to half the wall thickness. This condition allows you to get even joints.
Docking registers requires the presence of holes and precise fit. The work is done faster, better, using a needle template, a step drill of the appropriate diameter. The assembly of massive radiators is carried out on the wall. At the same time, they provide an opportunity for welding hard-to-reach places.
The exposure of the radiator parts is carried out using clamps, magnets. Then they "grab" them. After that, all joints are welded.Ferrous metal is welded using propane, acetylene torches.
Arc welding can be used, but only small gaps can be tightened with it. Stainless steel is welded with special, tungsten electrodes, using argon and an inert gas environment.
With a shallow, its alloys work by soldering.
In the absence of a heating system in the room, a heating element powered by electricity is placed in the radiator. At the same time, the design of the radiator becomes more complicated: the heating element is placed lower, it should not touch the pipe walls. An expansion tank is added, placing it above the highest point of the radiator.
When are batteries removed?
More often than others, it is necessary to dismantle a cast-iron heating radiator, which has already served its time. But sometimes you have to decide how to remove a bimetallic radiator. Modern heating appliances are the easiest to dismantle.
Work on dismantling the heating radiator may be necessary under the following circumstances:
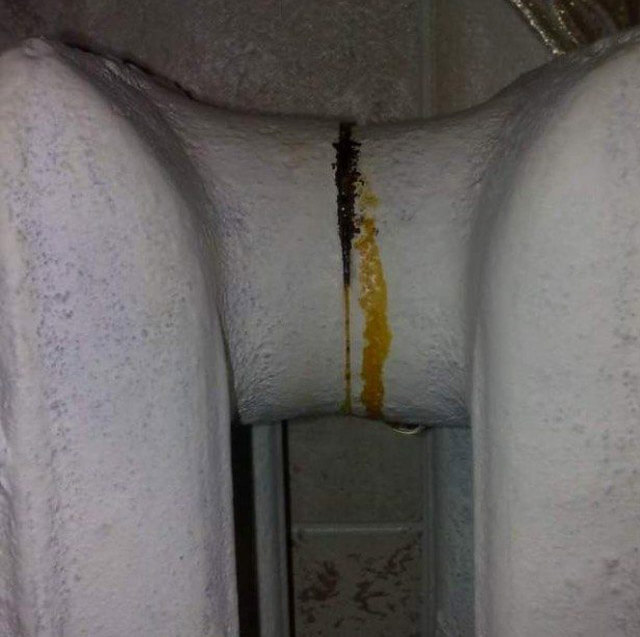
When cast iron batteries leak between sections. At the same time, the distance from the eyeliner is small, there are many sections. It can be impossible to reach the nipples that are located on the side of the blind plugs with a conventional radiator key. Therefore, you have to remove the device from the side of the eyeliner. To make the dismantling urgent, you need to know in advance how to properly remove the heating battery.
If leaks form in the places of the drive on the supply to the battery
To change the drive (it doesn’t matter if it’s threaded or welded), the device must be dismantled.
Sometimes it becomes necessary to replace the radiator with another device with more favorable power characteristics or a more modern design.
Radiators also need to be removed for maintenance work to remove scale inside. Sometimes this is done by annealing. After this procedure, the intersection gaskets must be replaced.
When repairing an apartment for gluing or painting the wall behind the radiator, it must be removed. It is not recommended to glue wallpaper near radiators during the heating season, they will not stick, so you need to take care of this in advance.
There are other cases: for example, it was decided to convert a one-pipe system to a two-pipe system. Radiators must be dismantled carefully in order to be reused.
Aluminum appliances require special care.
How to remove the grille on the Kia Rio
We will need:
- key on "10";
- crosshead screwdriver;
one). We open the hood.
2). We unscrew the four bolts that are located on top in the engine compartment (they are in a conspicuous place and there should not be any difficulties here).
3). We unscrew 10 screws, with the help of which the radiator grille is fixed from the inside.

4). Gently pull the radiator grill towards us, pressing the fasteners in the lower part (see photo). In cases where it is still not possible to snap off from the inside, then you can try to “bend” them from the outside with a thin long object, putting it between the bumper and the grille.
Video
Tools
Each type of work necessarily requires the presence of certain tools, thanks to which it is easy to perform certain actions. Of course, in order to remove the heating radiator, it is necessary to have in your asset not only special tools, but also components that will allow the further installation of new radiators. A full-fledged purchase of all the necessary parts allows you to carry out the planned work without loss of time and in the most economical way. It goes without saying that the subsequent purchase of materials in case of shortage requires additional time and freezes the work begun. (See also: Which is better to choose a heating radiator)
Be sure to get the following materials:
- torque wrenches;
bypass;
Bulgarian:
adjustable wrench;
gas key;
Roulette;
Drill;
Pencil;
soldering iron;
Level;
Lever pipe wrench.
In addition, the presence of a Mayevsky crane, without which no plumbing work can do, will not interfere. Be sure to have plugs that are suitable in size to the junctions of batteries and radiators, as well as to install additional taps. In a compartment with plugs, it is recommended to stock up immediately with gaskets.
If, in addition to dismantling, it is planned to replace batteries and pipes, then it is necessary to stock up on new sections of pipes, and it will not hurt to buy bimetallic heating batteries Rifar, or some other analogues. In the same case, you will need the presence of "American" taps or simpler options. A polypropylene tap is very useful, with its help it will be easy to achieve heating performance with the radiator removed. The PPR limit switch will be necessary for carrying out work in the neighbors' space. In case of unsuccessful communication with them, you will also need a lerk.
Precautionary measures
So that the procedure for removing the battery with your own hands does not end in trouble for the car owner, he should follow a number of rules:
- Terminals can oxidize over time. And in order to remove them, some owners often hit them with a heavy object at hand. But by no means should this be done. This can lead to their permanent failure, or they fall apart into smaller parts and with a high degree of probability cause a complete failure of the battery.
- Once removed, the battery must be handled with care. Do not throw or kick her. Otherwise, it may cause electrolyte leakage or cause damage to the active mass.
- Do not place the battery on its side or upside down. Such a ban is due to the risk of leakage of electrochemical fluid and even a short circuit.
- Do not drain the electrolyte from the jars. It contains sulfuric acid and distilled water, which, if in contact with skin or clothing, can cause burns. Such a procedure should be carried out only in specially prepared places.
- Do not add acid or electrolyte. This can only be done during special restoration work. In all other cases, the density level may increase greatly, and this is fraught with sulfation of the plates. Only purified water can be added.
- Never store a fully discharged battery in the cold. If it freezes, then this can provoke shedding of the active mass, which most often happens in half the cases.
The operation of the car is associated not only with pleasant moments for the car owner. But often other procedures are necessary. One of them is the removal of the battery. Although in some cases this operation is simply necessary, it is not worth resorting to it in the absence of an urgent need. After all, the battery can affect the operation of other important systems, and not always for the better. Therefore, before removing the battery from the car, you need to make sure that there are serious reasons for this.
 In general, such a procedure is not difficult. Even a novice car owner can cope with this task. But in any case, it does not hurt to prepare for it, to study the theoretical aspects of its correct implementation, to find out how to properly disconnect the battery terminals. After all, knowing certain secrets, including the sequence of removing the terminals from the battery, will help not only complete this procedure as quickly as possible, but also avoid serious problems associated with the operation of other important vehicle systems.
This is especially true when the battery is planned to be removed from luxury cars. Therefore, if a person does not have experience in dismantling a battery from such a vehicle, then it is better not to take risks, but to entrust this work to experienced specialists of the official service.This will not only save a lot of time and effort, but also avoid unpleasant moments caused by the incorrect implementation of this necessary procedure.
Repair
After identifying the cause of the malfunction, you can begin to eliminate the breakdown. Elimination may consist in repairing the failed equipment or in replacing it with a new one. It is necessary to act on the basis of the nature and degree of damage.
- If there is a lack of cooling water, it is necessary to find the place of the leak and remove it. Then add coolant to the norm and remove the air plug. You can remove the air lock by pushing through the rubber pipes on the running engine.
-
A non-working thermostat must be replaced with a new one, draining with all this coolant. This type of repair is not difficult and, with a new thermostat, will not require a huge amount of time. It is only necessary to drain the coolant, unscrew the thermostat cover and replace it with a new one. Next, fill in the coolant and bleed the system, as described in paragraph No. 1.
- A clogged cabin filter contributes to the fogging of the windows (when the stove is on) and is accompanied by a nasty smell when the fan is turned on. To change you need:
- dismantle the glove compartment;
- open the lid and remove the old element;
-
removing the accumulated debris, install a new element.
- For the best effect, it is necessary to clean the stove radiator both from the inside and outside. The honeycomb in its outer part is clogged with dust, and they cannot pass enough air through themselves. The inside is clogged with debris from the engine cooling system. In addition to cleaning the radiator, it is necessary to clean the entire system, otherwise the effect of such cleaning will not last long. For cleaning, you can use chemicals, or by forced circulation of water, wash out the accumulated debris until complete cleaning.
- The cause of a faulty stove motor may be a blown fuse or lack of power. If power comes on, it means that the electric motor itself is faulty. It can be tested to be repaired, and if the repair fails, it can be replaced with a new one.
- The operation of the vehicle with a non-working pump is prohibited. If the water pump fails, you need to postpone the planned trip until the breakdown is repaired. If heat is not removed from very hot parts, they can be deformed, which will lead to failure of the entire internal combustion engine or increase the repair cost by 10 times. The pump has a pulley and an impeller. The pulley, by means of a belt drive, turns the impeller, and that, in turn, sets the coolant in motion. The impeller of the pump under the influence of a brutal environment may collapse and will not create sufficient pressure for the movement of the coolant, which will lead to the fact that the heater will not heat the air enough.
These diagnostic methods will help to understand why the stove does not heat up. And the repair methods described by us will help to remove this problem, after which the car interior will be filled with a pleasant warm atmosphere.
Can you see everyone
Why are we talking about different ways to dismantle radiators?
How do they connect differently?
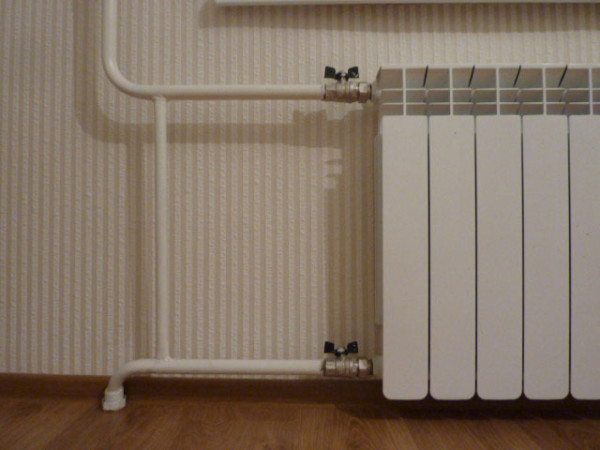
- fittings used. Traditionally, for the installation of Soviet-style cast-iron radiators, a bunch of squeegee (a pipe with a long thread) and lock nuts were used, now batteries are more often connected by Americans - quick-disconnect fittings with union nuts;
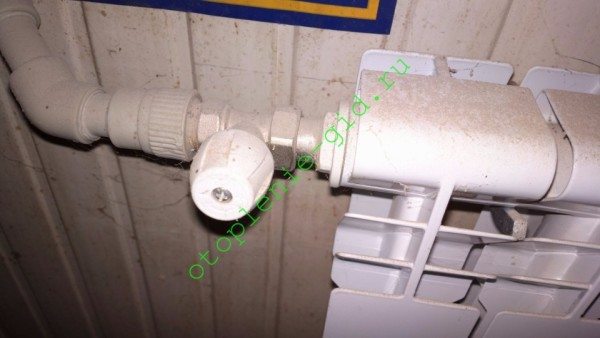
In the photo - the connection of an aluminum sectional radiator by an American.
Connection on the slopes.
The location of the connections relative to the radiator. Connection can be one-way or two-way
This is important when mounting on sleds: one of the radiator plugs will have a left-hand thread
A special case
- In many houses built in the 80-90s, convectors are used as heating devices. The convector is a coil made of a steel pipe of the same diameter as the riser, with fins that increase heat transfer. A typical connection between a convector and a steel pipe is a butt weld.
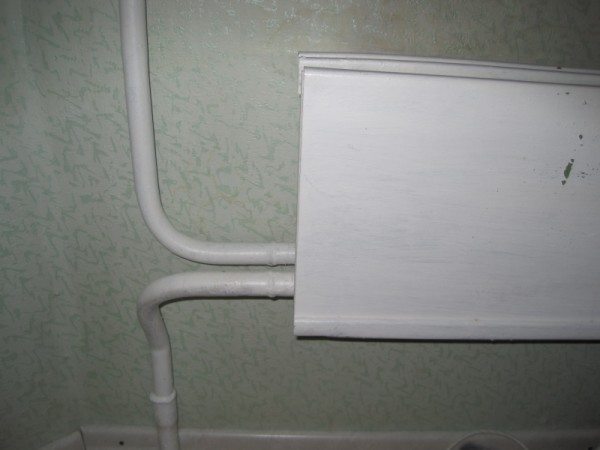
The heater is connected to the riser by welded seams.
Do I need to remove the battery from the laptop
The most powerful argument in favor of removing the battery from the gadget is that by constantly recharging, the life of the device is minimized. This danger can be refuted by the argument that the battery is recharged when the charge level mark reaches 90–95%. A similar situation does not threaten a laptop that is constantly working from the network.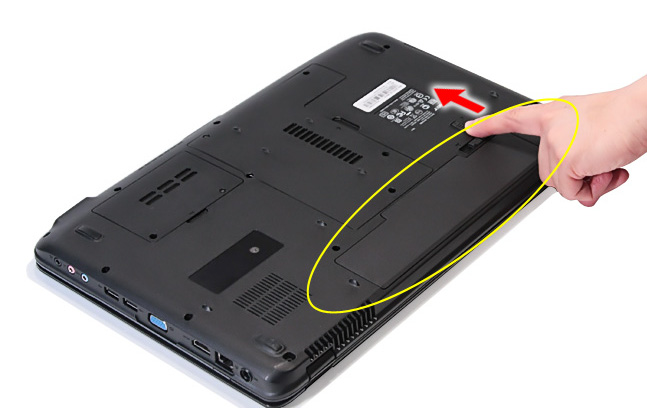
If you are still a supporter of the conservative theory of the need to remove the battery, remember that it acts as a backup power.
For example, you work for a long time, forgetting to periodically save your work, or do not use the "Autosave" function, and then there is a jump in the network and the device turns off.
Of course, in the absence of a battery that acts as a source of additional power, all data will be lost. Another thing is when you did not remove the battery - it will provide autonomous operation of the laptop for a while.
How to remove the battery from an asus laptop and other models? Simple enough. See our detailed instructions.
How to remove the battery from an asus laptop: a guide to action
- You will need to disconnect the device from the network. To do this, close all working programs, click "Start" and "Shut down". After the laptop screen is completely off, and the lights on the front panel stop blinking, you can remove the plug from the outlet.
- Close the lid and turn the laptop upside down.
At the bottom, on the back of the keyboard, you will see either a screw fastening or ordinary latches, which are typical for modern models. The battery area will resemble an oblong rectangle.
We take a screwdriver and carry out the unscrewing of the screws. We slightly pry the bar with the battery. We take it out.
We screw the bar in the reverse order, but only by releasing it from the battery.
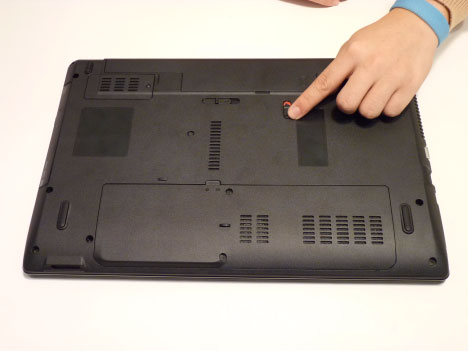
In modern models, everything is much simpler. We press the latches (you need to understand in which direction to press or scroll). After such simple manipulations, you will see that the places where the battery joint is introduced are weakened.
You just need to carefully remove the battery.
How to remove the battery from an asus laptop: remove a non-removable device
There are some models that do not have a removable battery, such as the Asus K750J. To take it out, you have to tinker a bit.
Stages of work:
- We unscrew the screws on the back case.
- We insert a plastic card into the gap between the keyboard and the back. The laptop lid must be open. When you hear a click, you will understand that the first latch is open.
- Walk around the perimeter of the laptop.
- Lift the keyboard cover up. The motherboard will open in front of you, and the battery will be placed at the top (at the point where the front part is attached to the case).
- Unscrew the two screws and disconnect the cable.
- Now you can safely remove the device.
Battery storage and care
If you removed a working battery, you should:
- store it in a place protected from sunlight (+16-34°С);
- control the battery charge, which should be at least 50% (recharge regularly once a month);
- make sure that the battery contacts do not touch any metal objects in order to avoid a short circuit;
- calibrate the battery at least once every 3 months (for this, the device is completely discharged, and then fully recharged by 100%).
When using a laptop with a battery, try not to overheat the device. Use special modes in which the processor will operate at a low frequency, and also keep an eye on the coolers that provide the exit of heated air and cooling. Radiators need to be cleaned frequently to remove dust and other debris.
Battery failure is one of the most common laptop problems.It happens to be easy to fix it by digging into the settings or buying a new one ...
Experts strongly recommend that you remove the battery when using a laptop from the mains. The advice has quite logical justifications - with constant recharging ...
How to remove the battery from an Acer laptop

How to remove the battery from an Acer laptop?
- Remove the battery from the laptop quot; Acerquot; in this case, it will not be difficult - you just need to press the so-called hidden lock in that place and the battery will unfasten itself - you just have to disconnect it. Be careful not to drop the battery when pressing the lock.
- Remove the battery from the laptop quot; Acerquot; can be done as follows*First you need to open the battery compartment. To do this, we translate from the closed position to the open position. Your second action is to open the battery itself. We do this with a binder. It must not only be moved, but also held.
- When disassembling an Acer laptop, the first step is to remove the battery. To remove it, there is a special battery compartment latch on the rear panel. And then you need to move it from the closed position to the open position. Next, you need to move the battery latch to the open position and, while holding it, slide and remove the battery. This is usually how the battery is removed in an Acer laptop.
Removing the battery from an Acer laptop is easy: just turn your device over and find the red button on the back cover. You need to pry it with your fingernail so that the cover goes in the opposite direction to the arrow - then the battery will fall out when the laptop is turned over to its usual position.
I also have a laptop of this company and when I use it at home, I take out the battery and turn it on via the network. Before you take it out, turn off the laptop and check that you have dry hands. Next, take something thin and press where the lock is drawn. Then hook the battery with your finger. That's all.
- We remove the battery from the Acer laptop like this: first we find the image of the battery on the back cover of the laptop, then we see a recess with a red plastic mask inside - here we hook it up and pull it towards us - so the battery will fall out - consider half the weight of the laptop.
- The battery can be removed from almost any Acer laptop equally easily. It is necessary to find a button with a red plastic insert on the back cover and pry it with a handle. Then the cover along with the battery will easily separate from the laptop, but do not forget to turn it off in advance.
- Here I take my little Acer Aspire One. I turn it upside down. On the left, near the leg, I see one switch, a closed lock is drawn on one side, and an open one on the other. I switch to the open lock. On the right is the same switch marked with a battery. If you take it to the side, it is not fixed there. Therefore, I take it and keep it in this position. And that's how you hold it, you can remove the battery.
Which occupies almost the entire back wall of the laptop. Just hooking on the notches and pulling it back (in relation to the beech). Now I take a large Acer Aspire E1-531. I also flip. It has a hole in the middle, in which you can see a red plastic with a notch on one side.
This case is marked with a battery. I put my finger in there, hook it on the notch and slide it in the opposite direction. Holding it like this, I hook the battery and lift the inner edge up. If it doesn’t work out with a fingernail, you can do it, for example, with an ordinary pen.
In order to remove the battery from your laptop, you first need to gently rotate it and press the switch and slide it back. Now you can carefully pull the battery out.
Be careful not to remove the battery with wet hands.
Diagnostics
In Nissan Qashqai, as in other cars with liquid cooling of the engine, the stove uses the heat of the engine for heating. Therefore, the meaning of diagnostics is to understand at what segment of the heating system (which is associated with the cooling of the motor) the work becomes incorrect.
- Check the cooling water level.When the tank is full below the low mark, there is a high possibility of an air lock in the heater radiator, due to which part of the radiator will be constantly cool, and the air passing through it will not warm up enough.
-
Make sure the thermostat is working correctly. This can be done either with a pyrometer or by touch. The degree of heating of the surface (cold motor) before the thermostat should be significantly higher than after it. These values should equalize after 80°C. If the temperature characteristics are the same throughout the entire operation of the motor, it means that the thermostat is not working properly and must be replaced.
- Check the capacity of the cabin filter. Due to the fact that “outboard” air is used to heat the cabin, which contains a huge amount of impurities (dust, dirt, etc.), it needs to be cleaned. For cleaning, a filter element is used, which is able to pass only air through itself, and all impurities remain on the ribbed structure. Like the engine air filter, it needs to be replaced when the capacity deteriorates.
- Make sure that the cooling water and air pass through the heater core well. From the outside, the radiator can become clogged with dust and prevent the free passage of flow through the honeycombs. A cork of rust can form in the inside, which will block the free passage of water through the radiator, which will adversely affect the heat loss of the interior heating system. To check for clogging, it is necessary to check the temperature of the nozzles at the inlet to the stove and at the outlet of it by touch. They should be approximately the same. If the inlet is warm and the outlet is cold, then the plug is inside the radiator. In this case, you need to create a cleaning or a change, since for good interior heating, you need unhindered circulation of water through all the elements.
- A broken heater fan can be the cause of nasty heating, as the interior is heated by forcing a cool stream through a hot radiator. The fan is responsible for "pumping" the air. It may not work at all, or it may not work properly. If there are no signs of "life" in the electric motor, you need to check the fuse. If it burns out, you need to remove a short circuit (it can be in the wiring or in the electric motor). Also, the impeller may be faulty. It is made of plastic, which is itself a very fragile material, and over time can break from rotation. When the impeller is destroyed, air circulation is aggravated, and heating becomes insufficient.
- A poorly functioning or jammed pump noticeably aggravates the circulation of water through the system, which, in turn, leads to unsatisfactory heating. This breakdown threatens the failure of the entire motor, since heat is not removed from very hot parts, which causes them to overheat. This type of breakdown can be diagnosed only in the early stages. For diagnosis you need:
Why remove the battery from a laptop
When buying a new thing, be it a car, shoes or a laptop, we are wondering about its preservation in its original form for a long time. Sometimes the measures taken to do this are more like insanity than common sense.
In this article, I will try to figure out whether it is necessary to remove the battery from the laptop when using it in stationary mode, how this will affect its safety and comfort of work.
We study the problem of a damaged battery on a laptop
In the vastness of the World Wide Web, you can find the opinions of a fairly large mass of users, saying that after more than a year of laptop operation from the network, the battery starts to hold a charge for several minutes at most.
Well, it’s hard to argue with this, the fact remains, such cases are observed, and I myself was a witness to them. After a year of work, my home laptop really lost its endurance, the charge began to last for about 15 minutes at most.
But if you look closely, there are also opinions that the battery capabilities have not changed at all even after two years of running the laptop on the mains.
My work laptop after a year of operation from the network did not suffer at all in mobility, it can still last 3 hours in mobile mode just like a new one.
The fact that on a working laptop the battery did not lose its capabilities at all just discouraged me, because before that I was completely convinced that running a laptop from the mains = death of the battery. What is the reason for such different results?
In order to find out the reason for such different battery behavior, I decided to find differences in the operation and technical characteristics of my laptops. So the differences are:
- 1. Laptops from different manufacturers (I won’t say which ones, so as not to cast a shadow).
- 2. On a working laptop, I only ran office applications and programs that did not require large power consumption, so it almost never overheated. With a home laptop, the opposite is true, it is used as a game console, which is why it constantly overheats.
Based on the results of the comparison, several conclusions can be drawn, which, as you understand, may not be entirely correct.
Conclusion one. Perhaps the manufacturer of one of the laptops used some super-duper methods to minimize the harmful effects of mains power.
Second conclusion. The decisive factor that killed the battery was the high temperature of the laptop. It's no secret that heat is detrimental to a battery.
Learn more about battery care: Proper Laptop Battery Care
We answer ourselves the question - do I need to remove the battery from the laptop?
Let's take a look at the PROS and CONS of removing the battery from a laptop in sequence:
PER. By removing the battery from the laptop, and having fulfilled all the conditions for its proper storage, you, of course, will extend its life. And when you really need mobility, you will be fully equipped.
According to some unverified reports, the battery life is three years, after which it will need to be replaced. Therefore, you should remember that saving the battery for too long, you risk being left with nothing at all.
AGAINST. A laptop without a battery is defenseless against power surges and power surges. This can be fraught with laptop failure, loss of unsaved data, problems with the operating system.
Shutdown of the coolant supply
Let's move on to practice.
Before removing the radiator, you need to turn off the heating and drain the water. How to do it?
I will analyze the shutdown of heating in an apartment building. For autonomous heating systems, it is difficult to give any general recommendations because of their individuality.
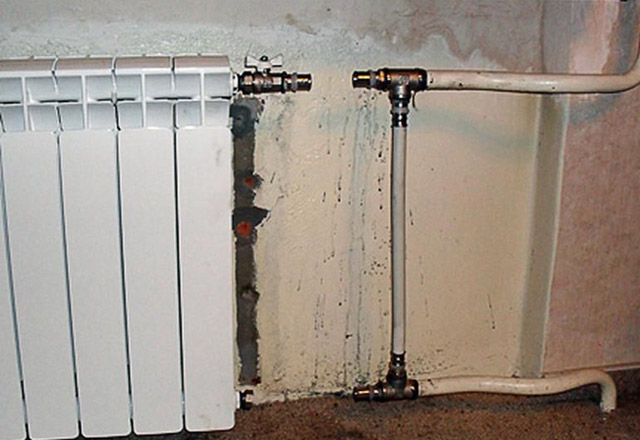
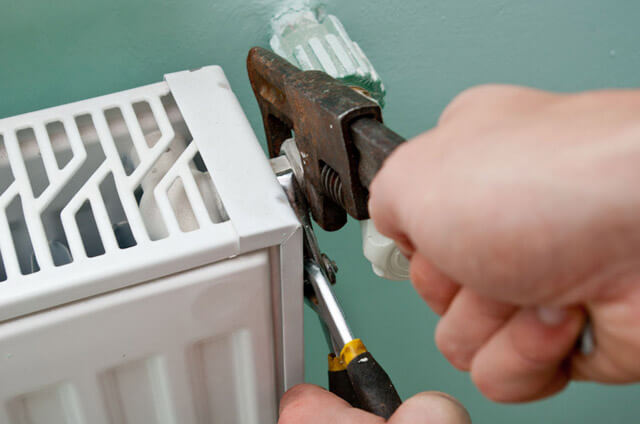
The simplest scenario is to turn off the water with valves, ball valves or throttles installed on the inlets. It is enough to close the shut-off valves on both connections - and you can disassemble the connections on the radiator plugs, after substituting a basin or other container for draining water under them.
A jumper must be installed between the connections with shut-off valves. Without it, a closed throttle or valve will stop circulation in the entire riser. Very soon, neighbors will come to you and begin to question your high moral qualities aloud.
Correct connection: shut-off ball valves on the inlets and a jumper between them.
If the eyeliners are devoid of valves, you will have to look for and dump the riser. Here it is worth making a small lyrical digression.
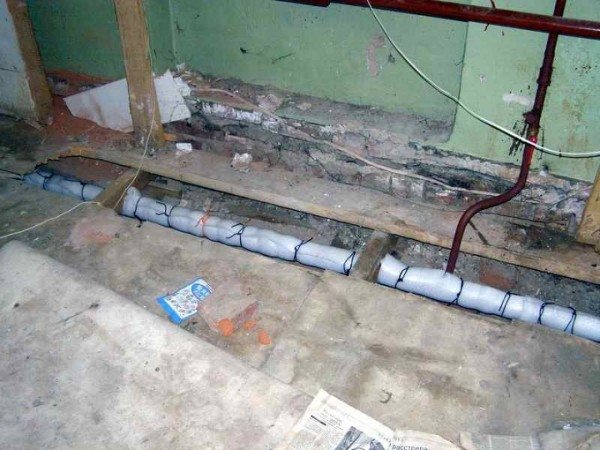
In multi-apartment buildings with standing wiring, two filling arrangements are used:
Top bottling implies a feed placed in the attic. Risers connect it to a backfill located in the basement or underground. Each riser functions independently of the others and is turned off at two points - below and above;
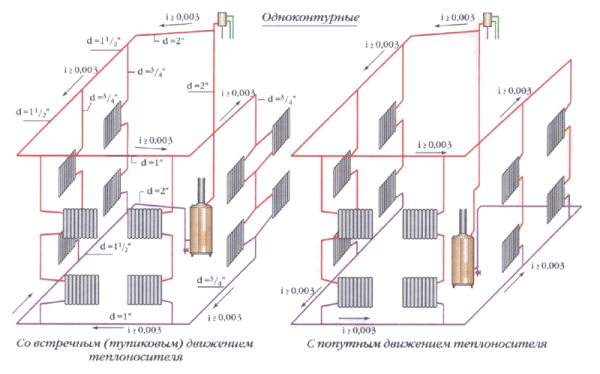
Pair of heating circuits with top filling.
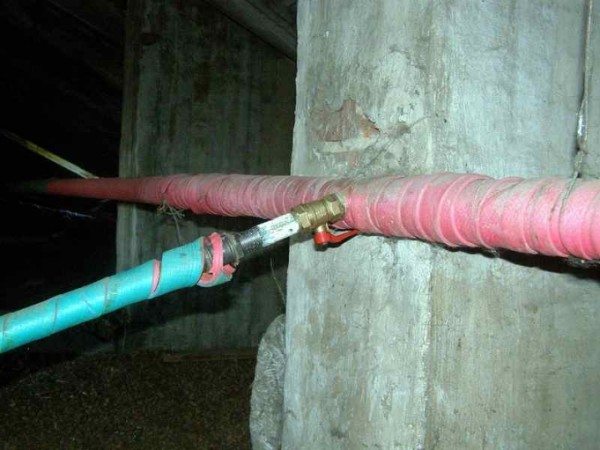
In a house with bottom bottling, the supply and return wiring is made in the technical basement. The risers are alternately connected to both bottlings and are connected in pairs by jumpers on the top floor of the house. Accordingly, two risers will have to be turned off - supply and return.
To determine the type of wiring, look into the basement. If two horizontal pipes in thermal insulation are laid along the perimeter of the house, you have a lower filling, one is an upper one.
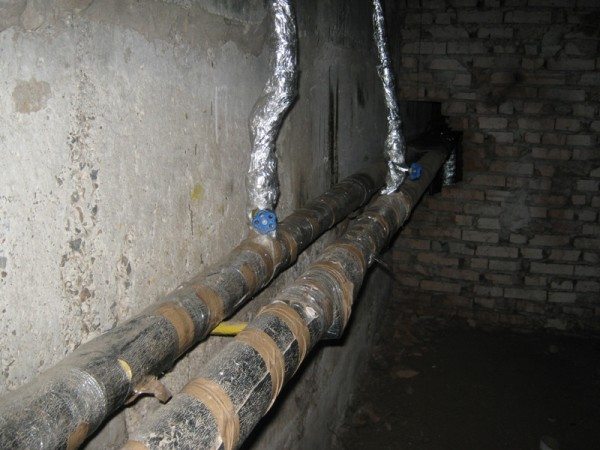
Lower bottling: along the perimeter of the house, both the return and the supply are laid.
First, find your stand. In the basement, it is easiest to navigate along the flights of stairs between the entrance and the landing of the first floor, in the attic - through the windows of the apartments. Further actions depend on the type of bottling.
Top filling
In the case of top filling, the shutdown procedure will be as follows:
- Turn off the valve in the attic. Do not unscrew the plug;
The removal of the riser from the bottling of the supply in the attic looks something like this.
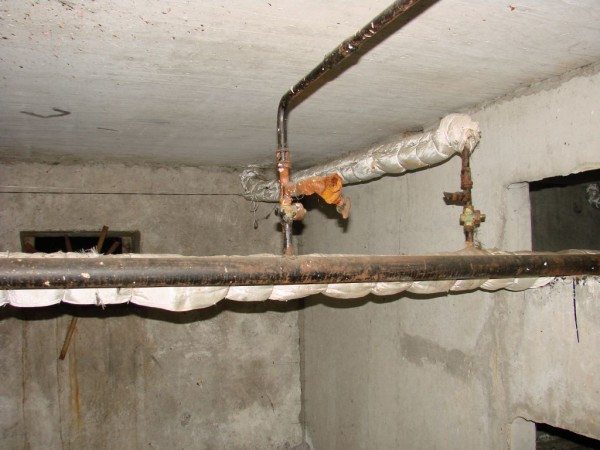
- Shut off the valve in the basement;
Riser and bottling return in the basement.
- Unscrew the plug one or two turns and wait for the pressure of the water jet hitting the thread to drop. So you make sure that the shut-off valves are in full working order;
- Unscrew the plug completely. The water hanging in the riser will pour out after you open the piping to the radiator.
bottom filling
Here is an instruction for turning off the heating riser in a house with a bottom bottling with your own hands:
- Block your riser and two adjacent to it;
- Unscrew the plug one or two turns;
If instead of a plug on the riser there is a vent, the task will be greatly simplified.
- Slowly open the valves on adjacent risers. So you will identify the riser associated with yours;
- Fully open the valve you do not need. Block your riser;
- Unscrew the plugs on your and associated risers.
Non-standard situations
An unpleasant situation can happen when, when dismantling cast-iron batteries, the bottom of the cork breaks off and the thread remains inside.
Proceed as follows:
- the collector is warmed up;
- put a chisel to the part in the direction of its twisting and try to turn it with a hammer;
- as soon as the edge of the thread sticks out, it is turned out with pliers.
Often you have to remove old rusty batteries in which the threaded connection is corroded or even perforated.
In this situation, you need to do the following:
- "arm" with a coupling made of brass or cast iron of the desired diameter;
- cut off the thread from the eyeliner, but leave the first five turns;
- drive the thread with a die;
- wind the thread with sanitary flax soaked in paint (on an organic solvent), which dries quickly;
- screw the prepared coupling;
- now the wound thread is screwed into the coupling, and the problem is solved.