Ways to hide pipes in the bathroom
 The next way is to put blinds in the toilet to hide the pipe. It will cost less. There is no need to make a frame and access to the valves is always free. Blinds can be vertical and horizontal. We choose by color and size, fasten to the ceiling or to the wall and you're done.
The most budget option is to hang an ordinary plastic curtain, and put roller shutters on the road. The process is not difficult. On the walls, on both sides, vertical markings are applied, along which guide strips are installed. The bobbin itself is screwed to the ceiling. The shutter is lowered from above to the desired length. If you need repairs, just lift it up and you're good to go. So we figured out how to close the sewer riser in the toilet.
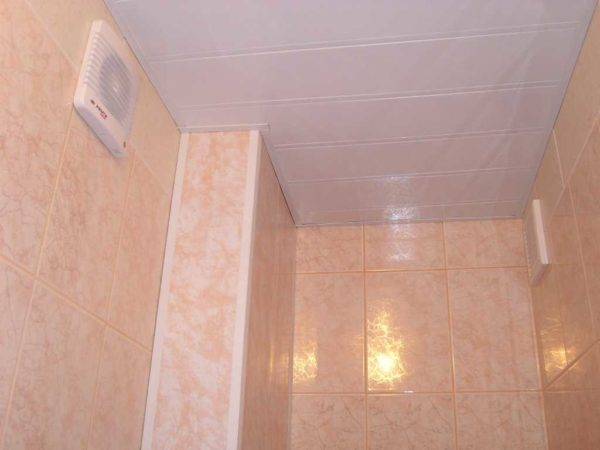
With modern construction, the bathroom looks better, as there are usually fewer communications. However, there is still work to be done here. If the sewer pipe is not very noticeable, then the plumbing and empty space under the bathroom spoils the whole view. The most environmentally friendly and practical way to paste over the walls with ceramic tiles.
It is durable, does not absorb moisture, is easy to clean and does not emit harmful substances during temperature changes. But this process is long and laborious. After all, you need to level the walls and floor, calculate the amount of material needed, provide plumbing hatches and, where necessary, cut tiles, which requires a special tool. That's why they call the professionals.
You can make a small bedside table under the sink, hang blinds, or buy a ready-made cabinet in the store. For pipes to the mixer, a profile box is placed, moisture-resistant drywall is screwed to it, on which tiles or plastic panels are glued. To hide the space under the bathroom, special shields with doors are sold. True, they have unreliable fastenings and they make it difficult to approach the opposite wall.
The best option is to make the frame yourself. To do this, we use a profile or bars. We mark the lines on the floor and walls along the height of the bath. Do not forget to provide a place for the door to provide access to the sewer. We make a crate. We fasten drywall on it or put plastic panels.
The frame should be raised above the floor by 5 or 10 cm, for a convenient approach to the bathroom itself. The main fasteners are installed on the side walls. For doors, you need to attach hinges or guides, if they are sliding.
You can buy horizontal blinds in the bathroom. One guide is attached to the floor, and under the second it is better to put a bar for the entire length. It is screwed to opposite walls to a height under the edge of the bath itself. Blinds can be placed on both sides so that they converge in the middle. This will provide good access to the sewer and the space itself, where it is convenient to store all sorts of little things.
https://youtube.com/watch?v=rp_cxKsiZ6k
Expert advice
 Making one large closet or several small ones, a corner or cabinet, hanging blinds or roller shutters, depends on the location and configuration of the pipes in the bathroom or toilet. And also an important factor is the availability of free space in the room.
Usually, there is not enough space and you need to properly use every meter. For example, if you get two cabinets, one above the other, then the niche between them can be adapted for a shelf for household items.
Particular attention should be paid to the decor. It is necessary that the external coating be the same or in harmony with the color of the walls
Otherwise, it will turn out that the pipes are hidden, but instead there is now a cabinet that does not fit into the interior. Ideally, everything should look like one whole.
How to make a drywall box
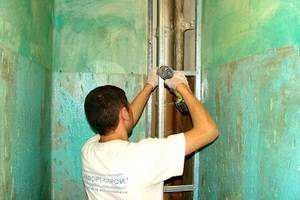
You can close the pipes in the toilet by making a drywall box.This is perhaps the most popular solution. This is because the technology is very plastic, you can hide pipes of any configuration. Another nice bonus is multiple finishing options: lay tiles on glue, level the surface with putty, then paint or paste wallpaper.
The pipe box in the toilet can be vertical or horizontal - this does not change the essence
Peculiarities
If you have chosen to close the pipes in the toilet, there are several points that you need to consider. The first - to all key nodes - counters, filters, etc. you need to have access. It is desirable that access to stopcocks be quick. There are several options:
- make one panel folding or turning (hinged);
- part of the panel can be removable, fastening with a pair of self-tapping screws and / or magnets;
- put a hatch (plastic or invisible hatch for tiling.
You can, of course, make the structure non-separable, but if necessary, you will have to break everything, then restore it, and problems happen even with new pipes.
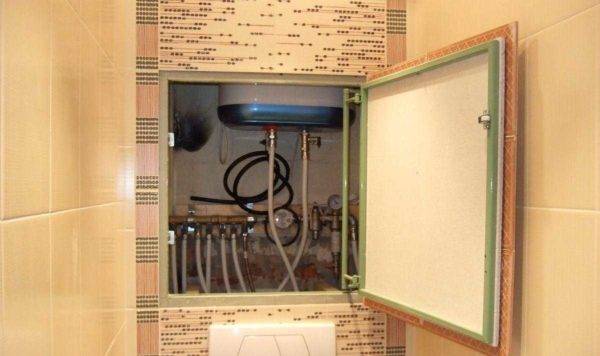
Special hatch for tiles
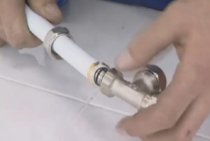
The second - the tile, if you finish it, it is better to glue it on a special glue, and not put it on a mixture of cement and sand. A thinner layer of glue is required; its mass is less. Under such conditions, it will be easier to remove / lift the cover.
Work order
First, decide what your box will look like. It is advisable to plan everything so that it not only closes the pipes, but, if possible, also carries a functional load. For example, if the pipes run down along the wall to the right or left, which happens if a hygienic shower is installed in the toilet. the box can be made a little higher, and various necessary little things can be placed on its upper part.
How to close the pipes in the toilet: make a drywall box
If you close the risers that run in one of the corners behind the toilet (the layout of standard Khrushchev toilets), it makes sense to close not only that corner, but to sew up the entire wall, making a locker out of it. Shelves can be open or closed (with or without doors), but in small apartments this is very convenient.
If the pipes are on the back wall, and the toilet is narrow and long, it makes sense to sew up the back wall completely
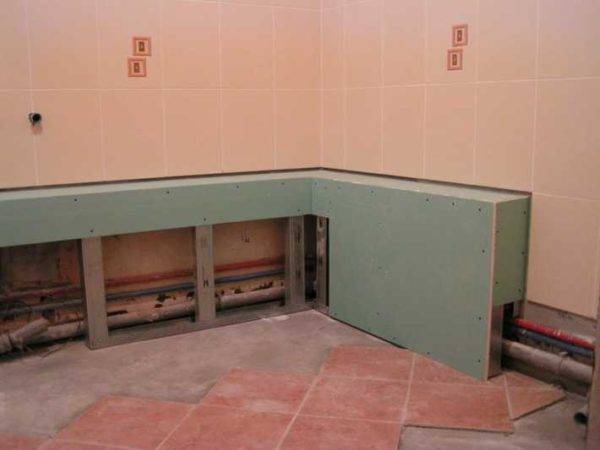
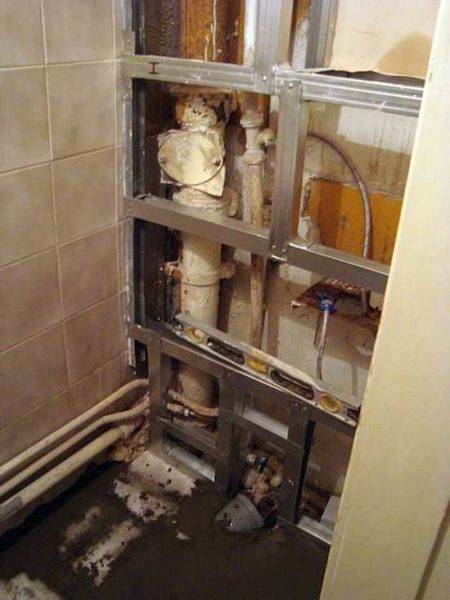
Having decided on how your box will look like, markings are applied to the walls and floor. Then take galvanized drywall profiles. Down and on the sides there is a bearing profile - PN (UW) - without curved sidewalls. Since the structures are small, a profile of 50 * 40 mm is sufficient. A rack-mount profile goes to the jumpers - PS (CW) - its width is also 50 mm, and the depth, if desired, can be small.
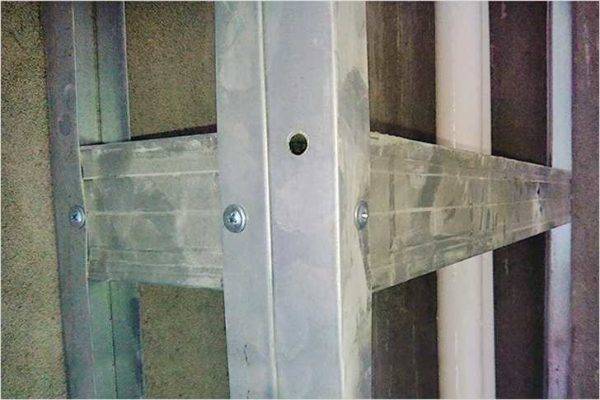
Jumpers are cut to size (with scissors for metal) and fastened with self-tapping screws. With a small distance - up to 50 cm - one from each end is enough, with a larger beam, put two. The installation step of the racks is about 60 cm, the jumpers are approximately the same step. In the place where the door is attached (if provided), a reinforced double profile is placed.
The assembled frame is sheathed with drywall, cut to size. They are fixed with small self-tapping screws with a screw at the end (TEX 3.5 * 9.5 mm). Fasteners are installed around the perimeter and in places where jumpers / racks go, the step is 20 cm. When twisting, you need to make sure that the hat is a little buried in the drywall, but does not break through the cardboard.
After sheathing, finishing work comes, and they depend on the chosen finish. For painting and wallpapering, the box is completely puttied; for laying tiles, only the screw heads are covered with putty.
What else can you make a box for pipes in the toilet
Not everyone likes to work with drywall and profiles for them. In this case, the frame can be assembled from dry wooden bars. If desired, they can (and in principle should) be treated with antibacterial compounds - so as not to rot.
Instead of drywall, you can use OSB, moisture-resistant plywood or flat asbestos-cement sheets.All these materials can hardly be called 100% environmentally friendly, but many people are more accustomed to working with them. All of them are moisture resistant, easy to process, so a good option. By the way, tiles fit perfectly on asbestos, better than on all other materials, including drywall.
Make the back wall in the toilet out of plastic
You can hide pipes in the toilet behind plastic panels. This way to close the pipes in the toilet is the cheapest, but also the most short-lived. The plastic is easily pressed through, so you have to be careful.
Now a little about aesthetics. If the wall decoration in the toilet is planned from the same plastic, then there are no problems at all - everything is in the same style. If the wall decoration is different, there are two ways out - find plastic panels that are similar in color or play on contrasts by adding a couple more details of the same color.
Very well chosen colors - exactly under the tile
It is easy to sheathe the pipes in the toilet with plastic panels. First, the frame is assembled, but already wooden. It is attached to the walls and floor with dowels. Since the design is small, it will hold on to nails perfectly, large loads are still not expected - plastic can only withstand very little weight.
Starting profiles for plastic panels are attached to the wooden frame, and segments of panels of the required length are inserted into them. They have a thorn/groove type connection and are installed without gaps. The plastic is attached to the frame with staples and a construction stapler. To provide free access to pipes for repair or maintenance, doors are made of plastic in the box / wall. In this case, you can install factory-made plastic hatches - they are light and fit perfectly into the style of rooms finished with plastic panels. Those who don’t like this option can make the doors themselves by making the frame also from wooden planks and sheathing them separately with plastic. There is another option - to leave a few strips loose and, if necessary, remove them.
Finishing the box and the ceiling with one plastic is a good idea
When buying, choose wall plastic panels (there are also ceiling panels) - they have thicker walls, it is more difficult to push through. If you plan to use the upper surface of the box, it is better to lay a sheet of plywood (moisture resistant) under the plastic.
Installation of roller shutters
Markings are made on the guide rails. 10-15 cm recede from each edge of the tire, on the rest of the segment the marks are distributed evenly, in increments of 45-50 cm. Holes with a diameter of 11.8 mm are drilled in the inner wall of the tire to attach the box to the opening. On the edge of the front flanging of the box and its cover, joint holes with a diameter of 4.2 mm are drilled, two on each side. In the future, they will be used to fix the box cover with rivets. Further, a hole with a diameter of 8 mm is distinguished and drilled in the upper flanging of the box panel for fixing it in the opening.
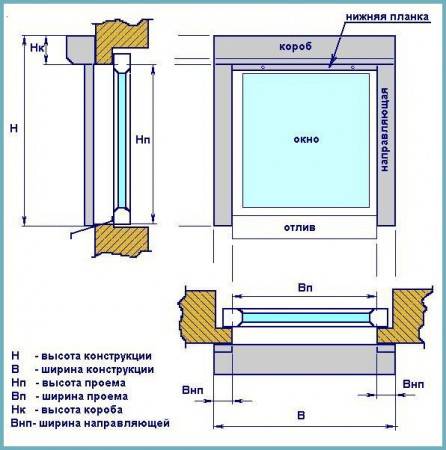
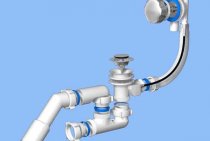
Scheme of installation of roller shutters for a sanitary cabinet
Assemble the roller shutter frame (box and guides) and install it in the opening strictly according to the level. The iron sheet is led over the drive shaft from the side of the rear wall of the box into the guide rails. At the edge of the canvas, traction springs are fixed and fixed to the shaft. Fix the box cover. Close the holes with plugs. Check system operation.
Advice! Roller shutters to the toilet are usually plain, and this does not affect their aesthetic qualities in the best way. You can make them more attractive and match the finish with the help of airbrushing.
How to choose a plumbing hatch access to communications
A plumbing or inspection hatch installed in the walls allows you to maintain access to the main elements of communications. There are several options on the construction market:
- Finished hatches. Usually, plastic, can also be made of metal or stainless steel. Do not need additional finishing.
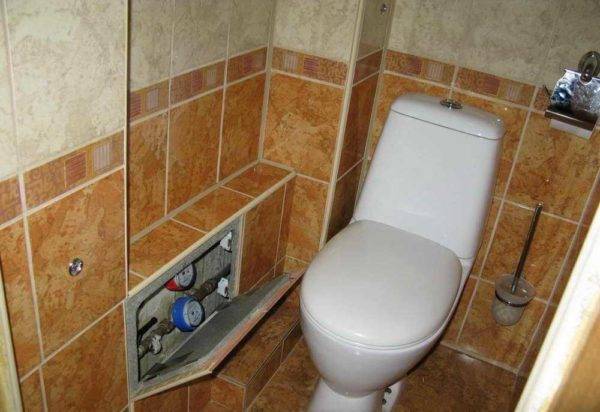
- Inspection hatches are installed if the question is how to hide all the pipes in the toilet or in the bathroom under the tiles. They belong to the category of invisible hatches. The sanitary door is decorated with the same finishing materials that are used for the walls, making it almost invisible. The frame of such hatches is steel, and the doors are made of gypsum fiber. They are used for openings of different sizes, so that the piping in the toilet becomes as accessible as possible.
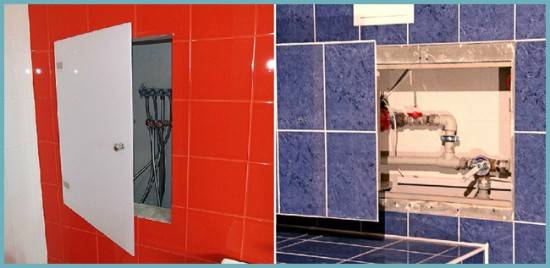
Inspection hatches: plastic (left) and decorated with tiles (right)
Paintable sanitary hatches are an aluminum frame and a drywall door that can be painted in any chosen color. The design does not imply finishing with other materials.
How to remove an erection
We will understand what methods of struggle exist and how to deal with an erection in a particular case.
First of all, it is worth noting that the following can help to remove a spontaneous erection:
- psychological techniques;
- medical preparations;
- physical exercise.
Psychological techniques are means of psychological influence that allow you to control the strength of your own feelings and experienced sensations.
Medications used in such cases are drugs that reduce the sensitivity of the glans penis. For this purpose, a man can be recommended specialized gels and creams that have a cooling effect.
Physical exercise allows you to control the process of excitation. Consider how to remove an erection with exercise.
Exercise No1. To perform this exercise, a man should take a supine position, bend his legs and stretch his arms along the body. Then he must raise the pelvis and bend the body so that there is a load in the area of the shoulder blades. After that, the body should return to its original position. Repeat the exercise until the blood from the pelvic area is distributed throughout the body.
Exercise No2. To perform this exercise, a person should take a supine position, bend their legs and put their hands on their knees. Then he should begin to spread and bring his legs together, preventing this with his hands.
The choice of material for finishing the box
Usually, the same material is used for lining the boxes as for the walls. And the most popular, of course, is ceramic tiles. And not only for aesthetic reasons, it is easy to clean, resistant to disinfectants and durable.

Finishing the box with plastic (left) and tiles (right)
In addition to ceramics, plastic panels are laid. They are cheaper and less reliable, but if pipe repairs are required, such a box is easier to dismantle. Sometimes the construction of a box made of drywall is only painted, but the option is not practical and durable. In addition, dirt accumulates in the pores of the paint, and this contributes to the development of bacteria. Facing stone, brick or mosaic are more often used only fragmentarily, to highlight certain areas. Thus, for example, it is possible to allocate a plumbing hatch for ceramic tiles.
practical furniture
Numerous pipes in the toilet can be hidden under furniture. This option is practical, functional and relatively low cost. Furniture disguise allows you to save the necessary access to communications. If necessary, carry out repairs, replace the filter or read the meter. If we talk about how to hide water pipes and heating, then it is worth considering that condensation can form on them.

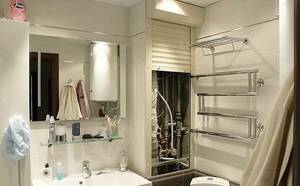
Special bathroom furniture can also hide pipes
This will negatively affect the condition and service life of wood-containing materials, therefore, communications are additionally covered with insulating material.Furniture design can be developed independently or contact specialists who are engaged in manufacturing and installation. In some cases, the above pipe decoration methods can be combined.
Preparation for work
Consider, using the example of an ordinary apartment in a block house, how to close plumbing pipes. First of all, let's select the tools:
- level;
- screwdriver;
- roulette;
- pencil;
- drill;
- hammer, hacksaw.
What will we close? Nowadays, there are many materials to hide pipes or a sewer riser in a toilet. The following are suitable for this:
- Drywall.
- Plastic panels.
- Blinds for the bathroom.
- Roller shutters.
- Waterproof plywood.
And you will also need dowel-nails, self-tapping screws.
Procedure
 The most popular way to disguise pipes in a toilet is to build a box or cabinet and hide them inside. If the communications are old, then it is better to replace everything. Otherwise, in case of leakage, you will have to disassemble the entire wall.
Be sure to leave access to valves or meters. The frame is made of a metal profile or wooden bars. Even if the pipes go on one side of the toilet, it is advisable to sew up completely.
We measure 10 cm from the communications, set it vertically and drill holes for the dowel in increments of 50 cm. A supporting profile is attached to the walls. Top and bottom guide rails. For the rigidity of the frame, jumpers are screwed. Usually self-tapping screws are used for this.
A significant drawback of such fastening is that the screw heads protrude above the surface. When put on such a frame, for example, drywall, then the material is skewed. To prevent this from happening, you need to fasten the strips together with a special tool called a cutter.
If the structure is assembled from bars, then the tree is first treated with moisture-resistant impregnation. Then drywall is screwed onto the frame. The advantages of this material is that it is easily processed, and subsequently any decorative coating can be applied. For example, paint, stick wallpaper or ceramic tiles.
Don't forget about pipe access. It should be not only convenient, but also fast, in case of an unforeseen situation. For this, sanitary hatches are installed.
In such a cabinet it is easy to put shelves or hang furniture doors. They can be made from moisture-resistant plywood or picked up ready-made in the store. To do this, a pair of bars is screwed to the profile, to which the loops are then screwed. Or, instead of doors, pick up and hang blinds. Toiletries can be stored in the closet.
If the outer coating is made of plastic, then first guides are attached to the profile, and then pieces of panels cut to size are inserted into them. The disadvantage is that this design has low strength. The advantage is that with such panels you can not only close the pipes in the toilet, but also the walls and even the ceiling.
A few words about erection
Before moving on to the issue of erection control, you should understand what exactly it is. And you should start with the fact that the strength of an erection depends on the volume of blood flowing to the penis. The blood entering the organ fills the cavernous and cavernous bodies, which leads to an increase in its size. The outflow of blood is blocked by a natural mechanism that allows you to perform a full-fledged sexual intercourse. Moreover, depending on the reasons that caused them, erections are divided into:
- psychological;
- reflex;
- night.
Psychological ones are largely related to the activity of the brain and occur under the influence of emotions and impressions, and therefore, control over them requires the ability to cope with one's desires and feelings.
Reflex occur after touching the genitals. Control over such erections can be achieved by properly managing your own muscles.
Night are the norm and do not require any control.
The most common causes of an erection in a public place are:
- overstrain both mentally and physically;
- stress;
- fatigue;
- increased fatigue;
- dissatisfaction with a sexual partner.