Disassembly of cast iron radiators
Dismantling cast-iron radiators sometimes becomes a very time-consuming process, but necessary.
Scheme of disassembling cast-iron heating radiators: a - capturing the threads of sections by nipples by 2-3 threads; b - turning the nipples and joining the sections; c - connection of the third section; g - grouping of two radiators; 1 - section; 2 - nipple; 3 - gasket; 4 - short radiator key; 5 - crowbar; 6 - a long radiator key.
A new or old radiator is placed on a level place. At least on one side, you need to remove the usual futors or deaf ones - plugs. On different sections of radiators, they can be left-handed or right-handed. Usually, cast iron fittings have a right-hand thread, and plugs have a left-hand thread. If there are no disassembly skills, and there is a free section, it is better to find out what kind of thread this is and in which direction the key should be rotated before applying force. If the thread is left-handed, when disassembling cast-iron batteries, turn the key clockwise.
As with unscrewing any nuts, you first need to “break” the futors from their place, i.e. turn them a quarter of a turn on both sides of the battery. Then the futors are unscrewed so that a gap of several millimeters is formed between the sections. If you release the futorki more, the whole structure will begin to bend under its own weight and due to the applied efforts. In this case, the thread may jam. To prevent this from happening, an assistant must stand on the disassembled battery, which will prevent bending with its weight.
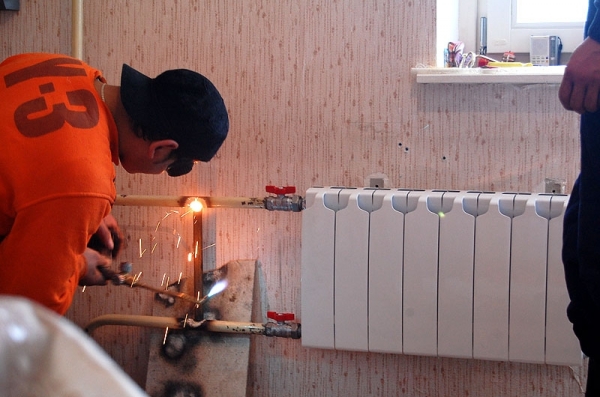
Usually, dismantling of old heating radiators is difficult because the fittings and sections are “boiled”. In order to disassemble such a battery, you will have to use an autogen or a blowtorch. The junction is heated in a circular motion. As soon as it is warm enough, the futorki are twisted out. If it was not possible to unscrew the first time, the steps are repeated.
If there is not enough strength to disassemble the battery, you need to increase the length of the key. An ordinary pipe is used, which serves as a lever.
Similarly, built-in nipples for airing cast-iron radiators are unscrewed.
If it was not possible to disassemble the cast-iron battery using the considered methods, it remains to cut it with a grinder or autogenous or smash it in a supine position with a sledgehammer. You need to carefully break or cut one section. After this operation, the adhesion between the sections may loosen, the battery can be disassembled, the remaining sections can be saved.
The use of a “liquid key” or WD liquid does not give an effect, since in old cast-iron batteries the futors were sealed with linen and paint, and liquids would not get on the threads.
Do-it-yourself installation of heating radiators in the apartment
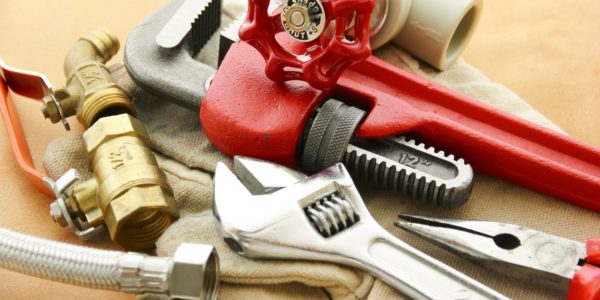
First, you should familiarize yourself with the list of necessary tools. You need to stock up on a drill with a drill bit. The list of tools includes torque wrenches, a screwdriver, pliers, a tape measure, a level, a pencil with a ruler. In general, the characteristic composition of a toolbox.
Installation steps:
To begin with, the heating system is turned off and the liquid is drained. In private buildings, a pump is used for these purposes, and in apartments, you will need to contact the housing and communal services. Then the old structures are disconnected.
Next, carry out the markings for the brackets. For proper and even installation, you will have to use the building level. Horizontal installation will eliminate the gas content of the system and allow you to completely drain the water.
Then mount the brackets
It is important to test the devices for strength by pressing them down with your own weight. For cast iron and aluminum radiators, only 2 fasteners are used
Plastic will require more elements. The walls must be clean, smooth, plastered.
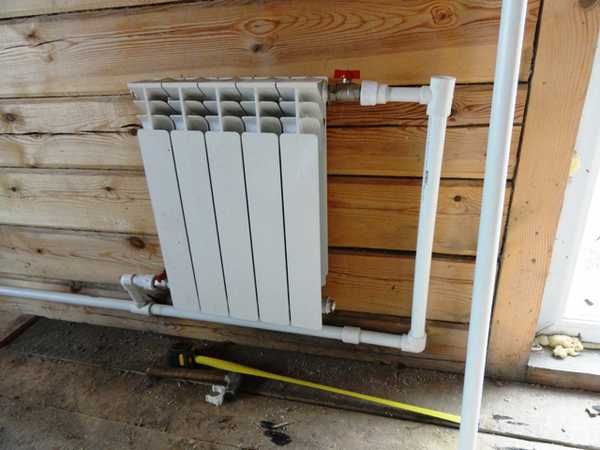
Then the stop valve is installed. All connections are securely sealed. Then pipes are connected. To connect the structure to the pipeline, you will need to make a thread on the spurs. Now metal-plastic pipes are used for heating.
 Do-it-yourself installation of batteries in the apartment
Use a torque wrench to prevent leaks. This is a mandatory element when installing aluminum pipes, where the installation of an air valve is necessarily implied. In this case, the force on the tool should not exceed 12 kg.
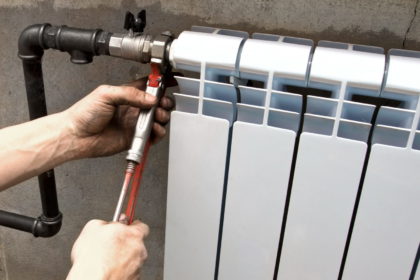
To seal the joints, tow or any other sealant is used. Pressing will be required after installation. This work should be entrusted to a professional. He has a special tool and the necessary skills. If a leak is detected, the nipple will need to be adjusted.
Installation of aluminum heating radiators
Assembling and adjusting the heating system is a responsible matter, it is best handled by professionals. But if you wish, you can install aluminum radiators with your own hands.
First you need to assemble the device:
- Screw in the included plugs and plugs.
- Assemble temperature controllers and attach shut-off valves at the inlet and outlet of the device.
- Check the nipples and fix the air valves.
The scheme of assembly-disassembly of the device is attached to the kit. It is better if the assembly is carried out by a specialist, then there will be a guarantee that all the taps are installed correctly. It is not allowed to clean aluminum with abrasives when installing adapters or building sections - a coolant leak may begin.
Attention! It is necessary to fasten the air valves so that at the end of the process their outlet heads look up. Having marked the installation location of the battery under the window in accordance with the indicated indents, brackets are attached to the wall
To do this, you need to drill holes with a puncher and insert plastic dowels, and screw the brackets into them. Screwing the fasteners, from time to time it is necessary to hang a radiator on them in order to maintain a distance of 5 cm from the wall
Having marked the place of installation of the battery under the window in accordance with the indicated indents, brackets are attached to the wall. To do this, you need to drill holes with a puncher and insert plastic dowels, and screw the brackets into them. When screwing the fasteners, from time to time it is necessary to hang a radiator on them in order to maintain a distance of 5 cm from the wall.
Battery connection diagrams
The device can be connected in several ways:
Diagonal. Experts consider it the most energy efficient. The supply pipe is connected to the upper pipe, and the outlet pipe to the lower pipe, but on the opposite side of the radiator. With such a scheme, the battery gives off the maximum of thermal energy received from hot water into space. The disadvantage of the method is that the pipes running on top do not fit well into the design of the room.
Side. The pipe supplying the coolant is connected to the side fitting (right or left), the return pipe is connected to the parallel lower one. If the pipes are laid in the reverse order, the heat transfer of the device will drop by 50%. Such a scheme for connecting aluminum heating radiators does not work effectively if the sections are of a non-standard size, or their number exceeds 15.
In terms of design, bottom-mounted aluminum radiators win. With such a wiring, the pipes are not visible, they are hidden in the floor or in the wall. Batteries are connected to the system through pipes located at the bottom of the devices. Bottom-connected radiators are usually mounted on floor brackets. The battery is attached to the wall on one hook, only to maintain balance.
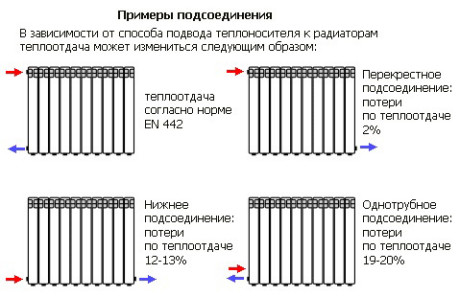
Connection diagrams for aluminum heating radiators
Important! Aluminum batteries have standard pipe parameters, so you don’t need to buy any additional adapters from the radiator to pipes.The device also comes with a Mayevsky crane, designed to bleed air
Connection and commissioning
Before installing aluminum appliances, the autonomous system is washed with water. Alkaline solutions should not be used.
Important! Aluminum is easy to wrinkle and scratch with tools, so it is better to mount the battery in the factory plastic packaging. After connection, the polyethylene can be removed
In an effort to connect aluminum heating radiators at a low cost, some homeowners use deaf, non-separable pipe and radiator mates. But heating a home in the northern hemisphere is not something to save on. It would be wiser to install “Americans” - quick-connect threaded assemblies, when the pipes are joined and disconnected using one union nut.
The procedure for connecting radiators to the heating system:
- Make sure that there is no water in the system or it is blocked at the installation points.
- Hang the radiator and connect it to the pipeline with the help of spurs.
- Seal all threaded connections using plumbing linen. Enough 4-5 turns in the direction of the thread.
- Pressurize the system.
Aluminum battery connected to the heating system
You can install an aluminum heating radiator yourself, but it would be wiser to entrust the matter to specialists who have all the necessary permits to perform such work. The slightest inaccuracy in installation can lead to leaks and inefficient functioning of the heating system.
Ways to install heating radiators
Everyone can mount radiators, because the system is quite simple
But at the same time, it is important to comply with building rules and regulations. According to them, there are several ways of installation
Battery Installation Methods:
Lateral connection is much more common. The input and output of the pipe is mounted on one side of the radiator. True, the connection to the fittings is different, so the inlet is fastened to the top, and the outlet to the bottom.
This option provides a certain interval between fittings. Otherwise, the battery will not fully warm up. If the radiator itself has many sections, then you will have to use an extension cord.
 The process of installing a heating radiator
Sometimes both fittings are placed on the bottom. In this case, the bottom connection is mounted. But this option reduces heat transfer.
The diagonal option is considered the best. The inlet pipe is connected to the fitting from above, and the outlet pipe is connected from below. There, heat loss is minimized as much as possible.
The connection is divided into serial and parallel. The first option involves the output of one pipe as an inlet for another. This is a closed system requiring the installation of a bypass. This is a special tube connecting the inlet and outlet pipes. Parallel connection means a different outlet for each pipe.
How to place batteries
First of all, the recommendations relate to the installation site. Most often, heaters are placed where heat loss is most significant. And first of all, these are windows. Even with modern energy-saving double-glazed windows, it is in these places that the most heat is lost. What can we say about the old wooden frames.

It is important to correctly place the radiator and not make a mistake in choosing its size: not only power is important
If there is no radiator under the window, then cold air descends along the wall and spreads across the floor. The situation is changed by installing a battery: warm air, rising up, prevents cold air from “draining” onto the floor. It must be remembered that in order for such protection to be effective, the radiator must occupy at least 70% of the width of the window. This norm is spelled out in SNiP. Therefore, when choosing radiators, keep in mind that a small radiator under the window will not provide the proper level of comfort. In this case, there will be zones on the sides where cold air will go down, there will be cold zones on the floor.At the same time, the window can often “sweat”, on the walls in the place where warm and cold air will collide, condensation will fall out, and dampness will appear.
For this reason, do not seek to find a model with the highest heat dissipation. This is justified only for regions with a very harsh climate. But in the north, even of the most powerful sections, there are large radiators. For the middle zone of Russia, an average heat transfer is required, for the south, low radiators are generally needed (with a small center distance). This is the only way you can fulfill the key rule for installing batteries: block most of the window opening.
The battery installed near the doors will work effectively
In a cold climate, it makes sense to arrange a thermal curtain near the front door. This is the second problem area, but it is more typical for private houses. This problem may occur in the apartments of the first floors. Here the rules are simple: you need to put the radiator as close to the door as possible. Choose a place depending on the layout, also taking into account the possibility of piping.
Preparation for disassembly
At this stage, you need to prepare all the necessary tools and dismantle the battery from the attachment point. For work, depending on the type and condition of the radiator, you may need the following tools:
- radiator (nipple) key;
- adjustable wrench or a set of wrenches with different head sizes;
- autogen or grinder;
- building hair dryer;
- hammer, sledgehammer;
- chisel.
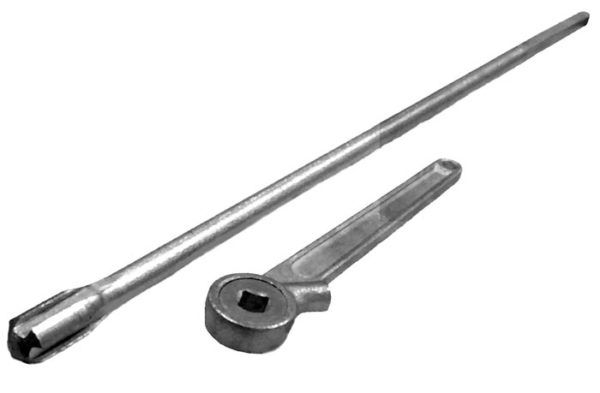
Tools for disassembling radiators
A nipple wrench is an iron rod with a spade-shaped head at one end and a hole or bent "ear" at the other. The tool purchased in the store has serifs, the distance between which is equal to the width of the sections of the heating radiator. They will help you find the location of the desired nipple nut.
After preparing the tools, it is necessary to equip a place for disassembling the radiator. A floor or a sturdy table will do. It must be taken into account that dirty water will flow from the battery, and do not forget to lay a waterproof cloth under it.
General rules for installing radiators
The battery is attached to the wall with special brackets. It can be installed in an open way, which is the most optimal, recessed into a niche or covered with decorative trim elements. When deciding how to properly install an aluminum heating radiator, it must be taken into account that when the heat source is closed, a loss of up to 30% of power is possible. Having made such a choice, it is better to lengthen the heating devices due to additional sections.
Either connection method will use three of the four radiator holes. Close the unused channel with a plug.
The two connection points to the system will act as input and output. On the third, always upper, you need to connect the Mayevsky tap, through which air is removed after the system is filled with coolant.
According to the design standards that establish how to correctly determine the connection point for an aluminum heating radiator, it is necessary to maintain the following dimensions:
- There must be a free space of at least 10 cm between the upper part of the battery and the window sill. If the distance is made smaller, the rising warm air will heat the window sill, and not heat the room.
- The gap between the floor and the heater should not exceed 12 cm. With an increase in this interval, the heating of the lower part of the room deteriorates.
- You need to step back from the wall at a distance exceeding 2 cm. At a shorter distance, a free upward flow of warm air masses behind the sections is impossible, as a result, thermal energy will go into the wall.
Often people, without thinking about where and how to properly connect a heating radiator in an apartment or other room, reduce the efficiency of this device. In this case, the losses will make up a considerable part of the precious heat.
- Installation under an element protruding from the wall by 3 - 5 cm - about 4%.
- Placement in an open niche - up to 7%.
- Partially closing with a grate - up to 15%.
- Installing the grate on the entire area of the heated parts - up to 30%.
For lateral and diagonal connection, it is better to arrange the input through the upper channel. When the coolant is supplied from below, the heating efficiency decreases by up to 15%.
The upper plane of the battery must be in a horizontal position.
Trying to comply with the conditions of how to most correctly and conveniently connect heating radiators, do not forget to use a supply valve that has a digital or point scale on the adjustment handle. The presence of this option will allow you to easily set the amount of incoming liquid.
When assembling the connections of the pipelines supplying and discharging the coolant with outlets to the radiator and at the connection points of the heating kits, taps should be used to disconnect the battery from the system if it is necessary to repair or replace it. Such a mechanism is called "American".
The laying of pipes connecting the radiator with the system is carried out after the installation of the sections.
When choosing how to properly connect heating radiators, we will consider each combination of the type of system and the method of connecting heaters.
Rules for the location of the battery and wiring diagrams
In addition to the characteristics of the radiator itself and the literacy of its connection, one of the most important factors affecting the efficiency of the heating system is choosing the right place to locate the product. True, in most cases it is predetermined in advance - the new battery, most likely, will stand in place of the old cast iron one, which has been since the building was built. But still, here are a few recommendations for the proper placement of the radiator.
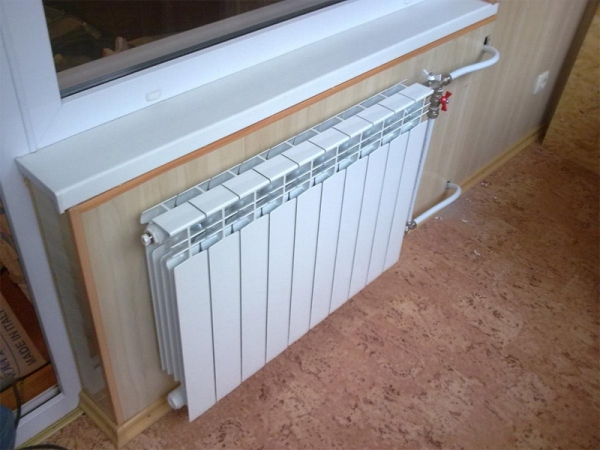
How to install a radiator with your own hands
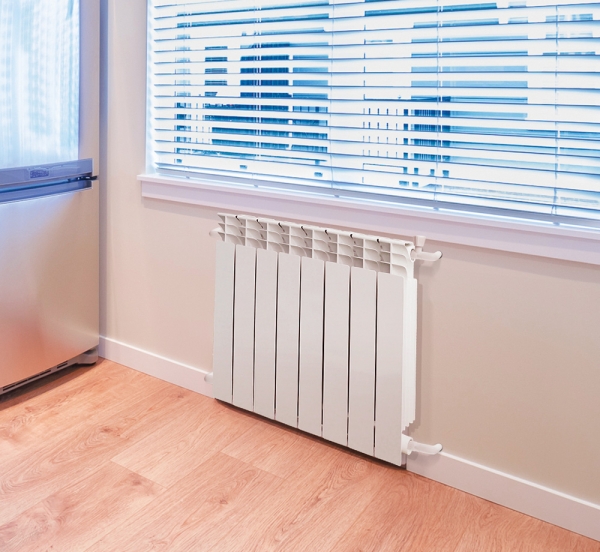
Firstly, it is desirable to place the battery under the window. The fact is that it is a “bridge” through which cold from the street enters an apartment or cottage. The presence of a radiator under the window forms a kind of "thermal curtain" that interferes with the process described above. In this case, the battery should be placed strictly in the middle of the window, and, preferably, occupy up to 70-80% of its width.
Secondly, from the floor to the radiator should be at least 80-120 mm. If there is less, then it will be inconvenient to clean under the battery, a huge amount of dust and debris will accumulate there. And if the radiator is located higher, a certain amount of cold air will collect under it, which requires warming up and, as a result, worsens the operation of the heating system. In addition, a too small distance to the window sill negatively affects the battery efficiency.
Thirdly, a distance of 2.5-3 cm is allowed between the back of the radiator and the wall. If it is less, the processes of convection and the movement of warm air flows are disturbed, and, as a result, the battery works less efficiently and wastes part of the heat in vain.
All of the above principles for placing a heating battery are presented in the diagram above.
Table. Standard schemes for connecting heating batteries.
Electric convector heating: how to choose a good unit Electric convectors are often used as main or additional heating devices, especially in.
Liquid fuel boilers - an overview of models and choosing the best For a comfortable stay in a private house in a temperate or northern climate, it is necessary to equip.
How to choose a convector heater At any time of the year, additional space heating may be required, and a convector heater.
Double-circuit wall-mounted gas boiler The specifics of the construction of country houses implies independent heating and hot water supply - laying.
Scheme and rules for installing heating
Each connection option can be used in one-pipe and two-pipe designs. The first option involves the installation of radiators in one system, where the liquid flows from top to bottom.In a private house, such a system is unprofitable, since the lower radiators do not warm up well.
The two-pipe scheme has more advantages. Hot liquid enters one riser and exits the other. Such wiring is often found in homes, as it is able to heat all rooms.
 The process of installing heating radiators consists of several stages
Rules for self-installation of batteries:
- The radiator must be placed horizontally, without distortions;
- There should be a distance of 5-10 cm between the upper part and the window sill;
- From the floor to the battery, an interval of 8-12 cm is provided;
- From the radiator equipment to the wall, a gap of 2-5 cm is provided;
- The valve should be tightened with a maximum force of 12 kg; work is best done with a torque wrench.
The installation process consists of several steps. First you need to dismantle the old radiator. Then they determine the place, fix the brackets and hang the batteries. Next, stop valves are installed and pipes are connected. In theory, everything is simple, but practice has many nuances.
Disassembly of aluminum and bimetal radiator
Before disassembling the heating battery, prepare the necessary tools.
A nipple wrench is used as the main tool (can be rented at a specialized store for little money). It is a rod about 700 mm long. On one side, a key head with a size of 24x40 mm is welded to it, and on the other, a through hole is made. You can insert a metal bar into it. With it, it will be easier to scroll the nut.

This is the main tool that is used when assembling / disassembling heating radiators.
Several notches are applied on the surface of the key. The distance between them corresponds to the width of the radiator section. By inserting the key inside the battery, and counting the number of notches, you can easily find the nipple of the desired section.
Before disassembling the heating battery, it is necessary to orient with the direction of rotation of the key. The radiator is laid on a flat horizontal surface with the front side up. The right side will be a right hand thread and the left side will be a left hand thread. In order not to get confused, you can do it easier: take the nut and bait alternately on the right and left, and then we conclude in which direction to turn the key
This is important because the threads are easy to break and then you need to buy two new sections. Imported manufacturers on the plugs and bushings on the front side of the section make the following designation for the thread: D-right, S-left
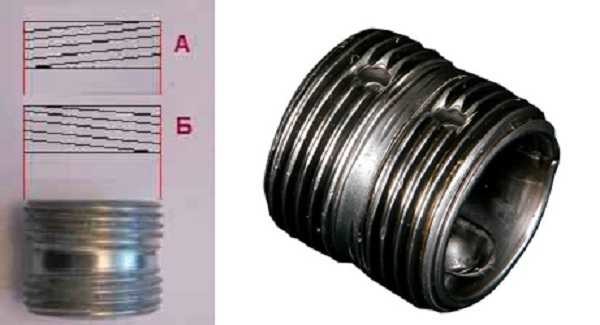
The thread on the nipple nut can be right or left, therefore, before disassembling the radiator, we determine in which direction to turn
Let's say you need to unscrew one section on the right. To do this, insert the key with a “blade” into the upper hole to the desired place, fix it in the groove of the nipple nut and, turning the key counterclockwise with force, “tear” it off. This is where a bar inserted into the ring on the key may be needed: a decent effort is required.
We make two full turns and rearrange the key to the bottom of the radiator. We repeat the operation by rotating the key in the same direction. We unscrew the nipple by 2 turns here. Again we take out the key and repeat the procedure for the upper part. So alternately unscrew the section completely. This is done so that there are no distortions.
Choosing a place to install heating batteries in a private house
To hang the device with your own hands, it is worth remembering that the inlet pipes to the batteries are mounted with a slight slope towards the coolant. With distortions and strictly vertical placement, air can accumulate in the batteries.
Small deviations of a couple of centimeters are allowed. Visually, everything should be smooth. But this is not a prerequisite for installing a radiator.
 To increase the heat transfer of the device, some manipulations can be carried out before installation.
Recommendations for determining the location:
- The slope of the supply pipes should be 0.005-0.01. This means that each linear meter of the pipeline is inclined by half a centimeter.
- From the floor to the radiator, an interval of 6-10 cm is observed, from the window sill - 5-10 cm, from the wall - 2-5 cm.
- The horizontal and vertical direction must be observed.
To increase the heat transfer of the device, some manipulations can be carried out before installation. This is how a shield made of heat-reflecting material is installed. Or cover with a product with similar properties.
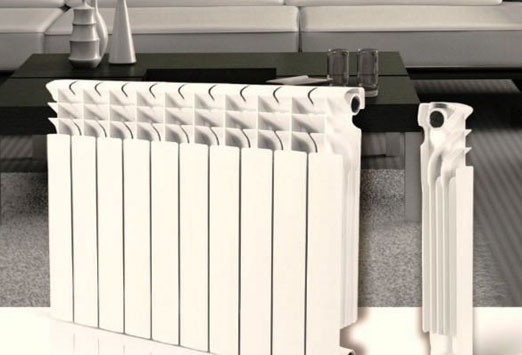
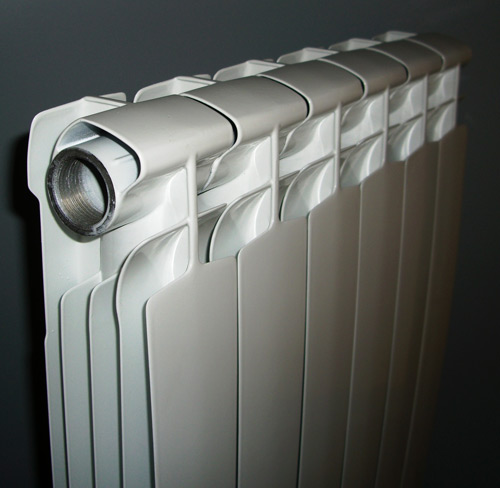
Variety of heating radiators
The most traditional are cast-iron models of heating radiators, which are familiar to everyone. Today, these units are used extremely rarely due to their large weight and the impossibility of installation in heating systems that operate automatically. However, these devices also have their own advantages, which distinguish them favorably from batteries made of other materials.
First of all, the design of the cast iron heating radiator allows it to withstand severe pressure drops.
In addition, such batteries are resistant to the appearance of corrosive deposits on them and endure the effects of harmful impurities in the coolant, which is also important.
The device of a panel-type heating radiator is somewhat different. First of all, these devices are much lighter than cast-iron batteries. In addition, their walls are less thick, which reduces their inertia. The principle of operation of a steel heating radiator equipped according to a panel type is based on greater heat transfer compared to other models. In addition, the appearance of these devices is much more modern. Many consumers appreciate aluminum heating batteries. These heatsinks are also very light in weight, their heat dissipation is quite acceptable, and the design can be very different.
Sometimes you can find such heating devices, where aluminum is not the only material that makes up the product. In inexpensive devices, silicon acts as an addition, which prevents the structure from breaking in the event of serious pressure and temperature drops.
And those devices that are more expensive may contain zinc and titanium, since it is these substances that are designed to provide the structure with increased resistance to various types of mechanical damage and protection against corrosion.
Parsing into segments
To properly disassemble an aluminum radiator, you will need a special tool - a nipple wrench, which is made specifically for this job. As a rule, it is not in stores, since it is a product of the mind and labor of plumbing workers. You can get it in two ways.
The first is to try your luck at the local market (if there is one), which sells various used tools and other useful household items. It is likely that there you will find what you are looking for, and at an affordable cost. The second option is to contact any plumbing workshop and ask them for a nipple wrench for rent.
When your search is successfully completed, you can proceed directly to dismantling the equipment. There is a specific order for this procedure.
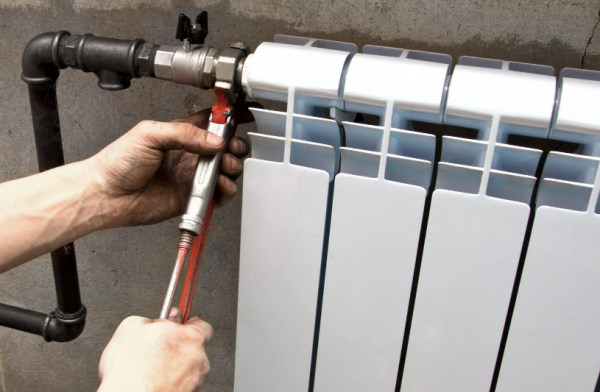
- The first thing to do is to shut off the water in the riser to which the radiator is connected and drain the coolant from the system. If you are the owner of a private house, you can do it yourself. If you are dealing with a centralized heating system, then such issues can only be resolved through the organization that manages the building. To do this, you need to write a statement and then wait for the arrival of a specialist. By the way, in the case of living in an apartment building, you can carry out such work only during the period when the heating season is already over.Otherwise, you simply will not be able to get permission, because stopping the central heating system will bring cold not only to yours, but also to the neighboring apartments.
- After you have dealt with turning off the water in the system, place containers under the junctions of the radiator and the line to collect the remaining coolant that will flow out during the separation of the equipment.
- Unscrew the fittings connecting the battery to the line. At the same time, check their condition. If you notice any flaws - cracks or “smoothed” threads - then it is better to replace these elements with new ones. Just keep in mind that not all metals are combined with aluminum radiators. For example, fittings made of brass or copper should absolutely not be used, as this may cause an electrochemical reaction, which will lead to the onset of corrosive processes.
- After detaching, remove the radiator from the brackets holding it.
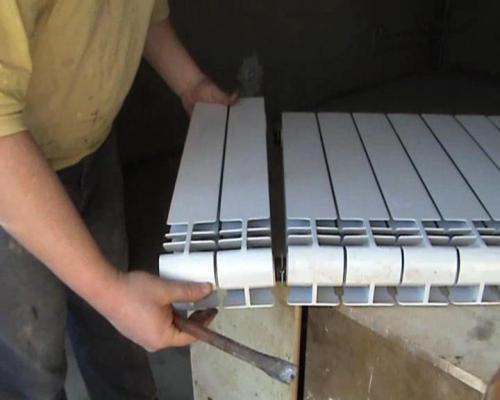
- Now it's time to use the very tool that you worked hard to extract in your time. The nipple key must be inserted into the battery exactly to the place that you are going to dismantle. Then it is necessary to get the end of the tool into the hole intended for this on the connecting element. After you have succeeded, turn the nut in the desired direction by half a turn. In general, for this stage it is advisable to invite an assistant who will fix the radiator in one place while you fiddle with the connections. So, turned the nut half a turn, go to the one located on the opposite side, and repeat the same operation there. Thus, by gradually unscrewing each element in turn, you can completely separate one section from another. Be careful and patient - each nut needs to be turned just a little, about 5-7 mm. Otherwise, the section may be severely skewed, resulting in damage to the radiator elements, and it will be necessary to replace them.
- After unscrewing the necessary nuts, remove the segment, and then check all the gaskets that come with it. The quality and condition of rubber seals plays an important role. Deformed gaskets can cause leakage. Therefore, in case of the slightest doubt about their suitability, it is better to replace these elements with new ones. Moreover, it is advisable to purchase gaskets made of paronite, since this material has proven itself best. If this is not possible, then try to find at least silicone seals. It is not recommended to install rubber ones, as they quickly fail.
Types of systems
- One-pipe system - one pipeline is mounted, through which the heat source is supplied and the exhaust fluid is drained. It is better to use in cases where a small number of batteries are installed. This is usually done when arranging the heating of apartments, where the riser passes in all rooms. With such a scheme, each next radiator will be colder than the previous one, but the number of pipes laid through the room decreases.
- The two-pipe system is the best device method, it makes it possible to maintain a uniform temperature of the heating fluid throughout the circuit. When mounting such systems, the supply line is usually located under the level of the window sill, and the return line is above the baseboard.
How best to connect heating radiators in one case or another, we will consider below, after we analyze each connection method separately.
- Lateral - with this method, the supply and reverse flow are supplied from one side. Works well with heating structures with up to 15 sections;
- Diagonal - best used on long heating elements. Communications are connected to the upper hole on one side and the diagonally opposite outlet.
- The lower one is the least efficient option, it requires high pressure in the coolant along the entire length of the heating structures. To maintain heat transfer, heaters with an increased number of sections are used. To ensure the normal temperature of private houses, it is used only if there is a pump of sufficient power in the heating system.
Radiator selection
You should start by choosing a radiator, and the main criterion for choosing will be the working pressure for which the radiator is designed. For a private house with its own heating system, a radiator with a working pressure of 6-7 atmospheres will be enough, but if you need to connect a radiator to the central heating system of an apartment building, it must withstand a pressure of at least 10 atmospheres.
Currently, the consumer is offered two options for aluminum radiators - standard or European and reinforced. The latter can operate under pressure up to 12 atmospheres. When connecting to a central heating system, it is necessary to choose among reinforced radiators.
The number of sections plays a big role
Next, you need to decide on the required number of sections. To do this, we determine the amount of heat. Necessary for heating the room and divide by the heat transfer of one section of the selected radiator.
The amount of heat required for a standard room can be taken equal to 1 kW per 10 m 2 of the room area. For non-standard premises and more accurate calculations, we will use the finished table:
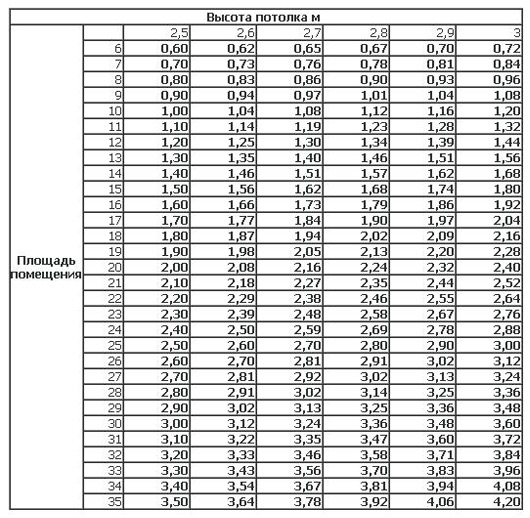
Radiator power table
It should be remembered that a battery connection diagram of more than 12 sections must be double-sided, diagonal or saddle. With a one-sided battery connection scheme from a large number of sections, a "pocket" of cold water will form on the side of the radiator opposite to the pipes. "Extra" sections simply will not work, we get harmful ballast.
Using forced injection, the battery can be extended up to 24 sections even with one-sided supply, but in this case the radiator must be reinforced.
It should be remembered that it is necessary to supply the coolant to reinforced radiators under high pressure only through metal pipes. Metal-plastic can not withstand such pressure, and the consequences will be the saddest.
It should also be taken into account that the heat transfer of the radiator indicated in the documentation is relevant only for one-sided or diagonal supply of coolant to the radiator. When using the bottom feed, feel free to subtract 10-15 percent.
If the heating system is installed in a private house, then it is possible to choose the general scheme for organizing heating - one- or two-pipe.
Conclusion
Dismantling the heating battery is quite doable on our own. The greatest difficulty can be the unwinding of old cast-iron models, in which the joints, as a rule, become attached over many years of service. Then you have to use a blowtorch and make more physical effort. With new aluminum and bimetallic radiators, there are no such problems, and they are easily dismantled.
Separation of a bimetallic battery into sections
The video in this article will introduce you to additional materials that are directly related to the topic presented. Be careful and attentive, and you will succeed.