A set of measures to prepare the greenhouse for winter
The greenhouse allows you to get fresh vegetables and herbs to the table, from early spring to the first months of winter. But during the warm season, it gets dirty, harmful bacteria, insects, and dirt accumulate on the walls, behind the rungs. On the beds - the remains of plants, in the soil - pathogens, pest beetles, harmful elements, in the air - infections. Such negative factors can damage the structure itself and the future crop, in order to avoid sad consequences, it is necessary to carry out a set of measures to prepare the greenhouse for winter:
- clean up, take out the trash
- wash;
- dry;
- disinfect;
- digging, tillage;
- insulate;
- reinforce the structure.
Preparing the greenhouse for winter, first of all, it is necessary to remove all unnecessary
Thermal insulation of the greenhouse
- How to keep warm in a greenhouse
- The location of the greenhouse in space
- Other ways to insulate a greenhouse
The thickness of the outer plastic sheets of the greenhouse should be 1.5 cm The thickness of the outer plastic sheets of the greenhouse should be 1.5 cm
How to keep warm in a greenhouse
The most suitable material with high thermal insulation performance is polycarbonate sheet. This translucent plastic ensures minimal heat loss. A more advantageous material in terms of heat retention is a three-layer coating, which includes two polycarbonate layers and an air gap.
The thickness of the outer plastic sheets should be 1.5 cm. For the inner layer, a thickness of 4 mm is sufficient. To minimize heat loss, special rubber seals should be used.
Equally important is the insulation of the foundation and the lower part of the greenhouse. The minimum depth of laying the foundation should not be less than the depth of soil freezing. Optimal indicators of thermal preservation are typical for foundations made of adobe blocks, aged in a cement solution and covered with a layer of polymer mastic
Roofing material must be laid on top of the foundation blocks, and on the inside, insulation should be carried out with foam plastic and a layer of sand with a thickness of 40 cm.
Polycarbonate sheet is the most suitable material with high thermal insulation performance Polycarbonate sheet is the most suitable material with high thermal insulation performance
The location of the greenhouse in space
The correct location of the greenhouse structure helps to save energy and reduce heat loss. When building a greenhouse, you should choose a site where sunlight will be maximum:
- greenhouse structures in the northern regions with a ridge should be directed from east to west;
- for Central Russia, the meridian orientation is represented by the location of the structure from north to south.
It is important to minimize the shading of the greenhouse, as well as, if possible, protect the building from strong winds.
Equally important is the insulation of the foundation and the lower part of the greenhouse. Equally important is the insulation of the foundation and the lower part of the greenhouse
Other ways to insulate a greenhouse
The gardener always has the opportunity to use other options to make the greenhouse warmer:
- the use of high ridges. The standard height of such a ridge should be 40 cm. In addition, the lower soil layer will require warming;
- the use of a heating cable that should be laid along the greenhouse beds with a depth of 10 cm. A special type of such cable works from a standard electrical network and combines efficiency with low costs;
- installation of a water heating system. This method is costly and labor intensive.However, water heating is very efficient and reliable.
There are other ways to increase the temperature inside the greenhouse. The choice of the optimal option involves taking into account the terms of use of the greenhouse structure, as well as the cost of materials and the cost of maintaining the system used. published by econet.ru
If you have any questions on this topic, ask them to specialists and readers of our project here.
Second layer of insulation
Effective insulation of greenhouses is carried out by installing a second film layer. Polyethylene film is the most affordable and cheapest material. Today, modern markets offer stabilized film with high wear resistance, elasticity and frost resistance.
It has excellent transmittance of ultraviolet rays and oxygen; has a light-scattering effect, which is important for greenhouse crops; dust resistant. Manufacturers of film products guarantee the service life of the film coating up to 7 years (Richel - PE film)! Such a service life was not observed in any known film of past years.
The quality of new generation materials cannot but please the owners of greenhouses.
Ethylene vinyl acetate copolymer film is ideal for insulating a greenhouse building - a particularly durable material with a light transmittance of 92%.
Various ways of sealing glazing: a - with the use of sealing mastic; b - unblemished glazing; c - with the use of a sealant; d - glass fastening to a tee bar; e - fastening glass on putty to a wooden bar; e - glass connection with a clamp; 1 - glass; 2 - bars; 3 - clamps; 4 - sealing mastic, putty or sealant; 5 - clamp KL-3; 6 - pins
Characteristics of the copolymer film:
- resistance to wind loads and punctures;
- long service life;
- excellent light transmission;
- strength;
- frost resistance;
- elasticity;
- antistatic properties (dust repellency);
- hydrophilic surface (rolling of condensate);
- energy saving up to 40%.
Inside the greenhouse, a simple frame made of wire, metal or plastic pipes (what is at hand) is installed. The frame structure should have 5 cm indents from the main walls of the greenhouse. The air cushion that occurs between the walls of the main and additional frame reduces heat loss by up to 50%. Significant energy savings are guaranteed only if tightness is observed at the joints and fastening of the film - special clip-on locks (Richel) and sealants (polyurethane, silicone) have been developed for this.
Energy saving screens
Horizontal screening systems for greenhouses at night are another way to keep warm. A heat shield made of aluminum fiber fabric (ALUMINET) prevents cooling of greenhouse structures. Under the influence of reflective components (aluminum has a high heat-reflecting ability), the infrared heat of the earth, accumulated during the day, returns back to the greenhouse. When using screens with aluminum elements, heating costs are reduced - 50% energy savings are provided. The greenhouse can be left covered with a heat-reflecting screen for 16 hours, since daylight hours in winter are only 8 hours.
There are other screens with a lower percentage of energy savings. For example, diffuse or shading (type LS 10) curtains save 40% of energy, and film - 30%. Polyethylene screens are permanently installed.
Horizontal screening is installed in separate sections under the roof of the greenhouse. All sections of the screen are set in synchronous motion by a special screening mechanism - for this, a cable drive or rack and pinion is used. There is also a vertical curtain, but it is still less common.
Automated screening systems are advisable in industrial-scale greenhouse facilities, and for small greenhouses, you can design a screen yourself that will work on the principle of roller blinds. The heat-insulating material is attached to a horizontal shaft (aluminum pipe) with a drum mechanism and wound into a roll. Fasteners are installed at the other end of the canvas. The shaft with the roll is fixed under the ceiling of the wall opposite from the entrance. As needed, the canvas is unwound under the surface of the greenhouse with an approximate step of 1 m. All components of such an energy-saving roller blind can be found on free sale in any hardware store.
Cold bridges and thermal curtains
Perhaps the very first thing to do for insulation is to treat all cold bridges (slots, joints, attachment points) with heat-insulating compounds. In the autumn-winter period, the greenhouse experiences enormous atmospheric loads, therefore it is better to use a two-component polysulfide composition as a sealant. Such hermetic means always remain elastic, they are not afraid of any hurricanes and showers. This unique product was developed specifically for the nautical sector, where protection from water and wind is of paramount importance.
Sealing gaskets should be installed around the perimeter of the door and window opening - these measures will require meager costs, but will significantly reduce heating costs. To seal the opening elements, sponge gaskets with already applied adhesive are used. Gasket elements are installed by applying and pressing them with the adhesive side in the required places of sealing.
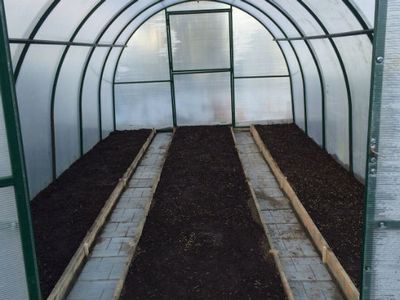
Soil preparation
Equipping the greenhouse for the winter season, first of all, you should carefully prepare the soil. The strip foundation will provide maximum thermal insulation.
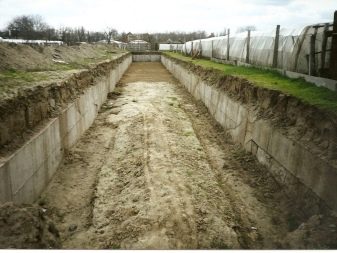
Soil preparation can be divided into stages.
- First, the layout of the future foundation is made. After marking, a cast-off is installed, which is usually made from boards. This scrap will help define the inner and outer boundaries of the base.
- The next step involves excavating the soil to the desired depth. Sand is poured into the bottom of the dug trench, which will protect the supporting structure. If possible, you should take care of waterproofing the underside.
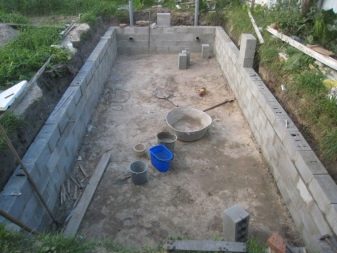
- Formwork is installed on the prepared trench. The most important requirement is its strength.
- Having decided on the formwork, you can proceed to reinforcement. After installing the reinforcing mesh, the structure will become even stronger.
- The last step is pouring concrete. Before this, it is recommended to lubricate the formwork walls with a water-based composition, so after the mixture hardens, it will be easier to separate the elements from it.
How to insulate a polycarbonate greenhouse from the inside in two layers with a film
Air is the best heat insulator. Therefore, we need to fix the second layer with bubble wrap along the internal arches of the greenhouse. We choose the most dense and cheap material. Insulation of a polycarbonate greenhouse in two layers with bubble wrap gives the effect of a thermos and reliably retains expensive heat.
Tip 3: Buy big bubble wrap as shown in the photo in 100m2 rolls.
Before installing the second layer, take a transparent sealant and seal the overlap of the outer layer of polycarbonate.
On the arches inside the greenhouse, it is necessary to fix the film with a wire as shown in the photo. We choose the step by eye. The main thing is that the material fits snugly against the arches. Let's not forget the overlap.
Video: Insulation option with a second layer of film
No tambour anywhere
Properly insulating a polycarbonate greenhouse will not work without a vestibule at the entrance. In this place there will be a watering container, an electrical panel, an automatic watering system and a small table for gardening tools.
From a bar 50mm x 50mm we make an opening for the door (box) and fasten it to metal structures.The door is knocked down from the same beam and hinged on the box. For rigidity, we mount a jumper in the middle of the door.
It will not be superfluous to buy and glue sealing gum for doors.
The lintel of the vestibule and the door are sheathed with 4mm polycarbonate along the second arch. We fasten, like the second layer in the greenhouse, with screws.
With the help of a transparent sealant, we pass all the external joints.
A cheaper option for insulation - ordinary film
Infrared heaters
Insulating and heating a greenhouse are two different tasks. If we are done with the first step, then it's time to hang up the heaters. The most modern and economical greenhouse heating is infrared heaters. On a structure of 6 meters, we fix three panels in the center. The power of the heaters is from 0.5 kWh to 1 kWh.
Unpacking Installing fasteners Selecting the ionage angle Unscrewing the cover bolts 3 bolts Opening the cover We hang the IR heater We look at the connection diagram Install the thermostat Result 2
It is better to hang 4 panels of less power than 3 of 1 kW each.
The principle of operation is very simple. The panel does not heat the air, but the soil in the greenhouse. The principle of solar heat. For example, for cucumbers, such heating of a polycarbonate greenhouse, and even competently insulated one, is simply heaven. Plants grow quickly and give a full harvest even in winter.
The price of infrared heaters for greenhouses ranges from 1800 rubles. up to 3000 rub.
The Leroy Merlin store sells Ballou panels: - 0.6 kW - 2300 rubles - 1.0 kW - 2500 rubles - 1.5 kW - 3000 rubles.
The thermostat will significantly save money on heating a polycarbonate greenhouse. The price is approximately 700 rubles.
Installing a thermostat in a greenhouse
From the first time it is difficult to understand the connection diagram of the BALU thermostat. A little later, I will definitely post a photo from our greenhouse.
Tip 4. Hang the device 1 meter from the beds in the coolest place, not far from the electrical panel.
Another useful energy-saving device is a timer for turning infrared panels on and off. It is especially useful in the spring, when the natural daytime temperature in the greenhouse is sufficient, and at night the heating is turned on.
If possible, install an electric meter to understand the final cost of the crop in winter.
How much electricity is spent on heating a 20m polycarbonate greenhouse?
Answer: For 4 days of the experiment, when the heater and the gun were turned on to maintain the temperature at 17-20 degrees - 700 rubles.
Prices for cucumbers and tomatoes in the winter of 2016 exceeded 250 rubles. Yes, and it would be worth paying for. Artificial, not tasty, plastic vegetables will become a thing of the past if you make a small piece of summer with your own hands.
We hope that insulating a polycarbonate greenhouse will not be difficult and will allow you to grow high-quality vegetables with your own hands all year round.
What did you start with.
What did you get.
Video: do-it-yourself greenhouse heating:
Polycarbonate in winter. Two greenhouses at the back of the house.
School repair
Tagsdacha ir panels heating tomatoes Buildings Do-it-yourself greenhouse Insulation
Infrared heaters
Today, infrared heaters with high efficiency are very popular.
Such systems primarily heat the soil, which is very important in the cold season. It is not the air that is heated, but the earth (important!), walls, racks, the plants themselves and everything that is in the greenhouse
In addition, electricity consumption becomes two times less than with electric heating. Cost-effective heating systems with ceramic infrared emitters have high power. Such heaters are recommended to be installed along the perimeter of the greenhouse structure in order to minimize heat loss.
Heaters are recommended to be installed along the perimeter of the greenhouse structure.
For small greenhouses, infrared lamps with a standard base are used, which greatly simplifies the installation and operation of this type of heating. Installation of lamps can easily be done by a person who does not have an education in the electric power industry.
Advantages of infrared heaters:
- uniform heating of the entire greenhouse,
- the air does not dry out, and the humidity indicator remains at a constant level,
- suppression of the growth of bacteria and pathogenic viruses,
- slow spread of heat from bottom to top,
- beneficial effect on the growth of greenhouse plants,
- quiet operation of the heater.
The hanging height of the infrared heaters is easily adjustable and depends on the desired soil temperature. For example, for newly planted seedlings, the heaters should be lowered lower to the ground; as the plants grow, the lamps also rise.
Using the example of a 3x6 meter greenhouse, you can calculate the intensity of the infrared system and the required number of heating elements. For such a greenhouse, two infrared heaters 1.7 m long will be required, since the heating zone of each lamp is 2.5x3 meters. The power of such a heating system will be approximately 1350 watts.