A few words about the application technology
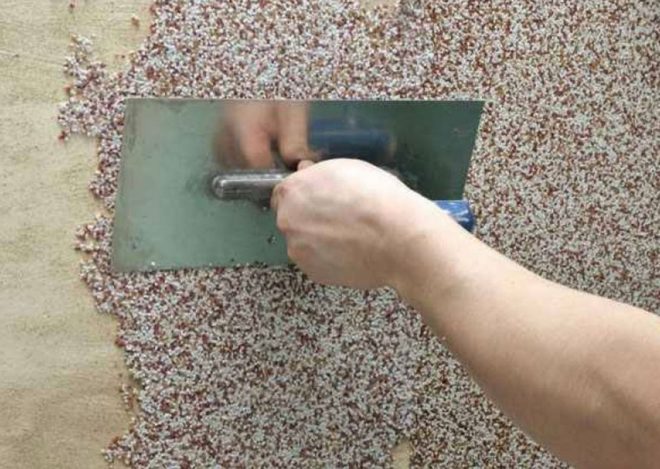
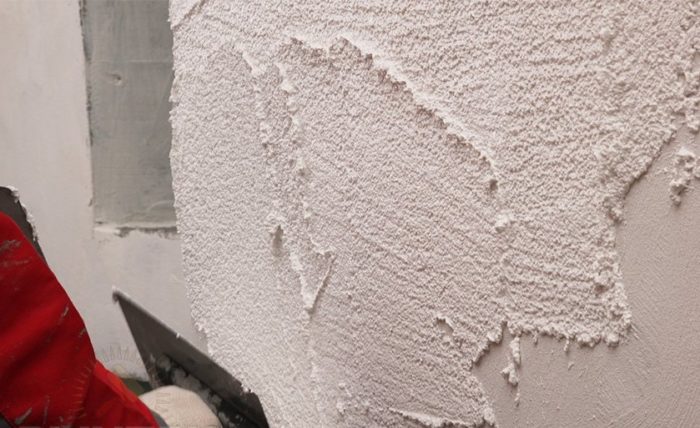
The technology of applying the mixture with a trowel is considered a common method of facing. The solution applied to the wall surface is evenly distributed over the entire surface. The mixture is rubbed with a trowel in a circular motion. Depending on how you work with the tool, you will get a drawing of a certain shape. Do not put pressure on the trowel. The thickness of the masonry is determined by the fraction of pebbles.
The technology of applying the mixture with a trowel is considered a common method of facing. The solution applied to the wall surface is evenly distributed over the entire surface. The mixture is rubbed with a trowel in a circular motion. Depending on how you work with the tool, you will get a drawing of a certain shape. Do not put pressure on the trowel. The thickness of the masonry is determined by the fraction of pebbles.
If you want to use the ironing method, then after about 20 minutes of drying of the first layer, apply the plaster a second time. In 10 minutes. It can be leveled, and polished after 20 minutes.
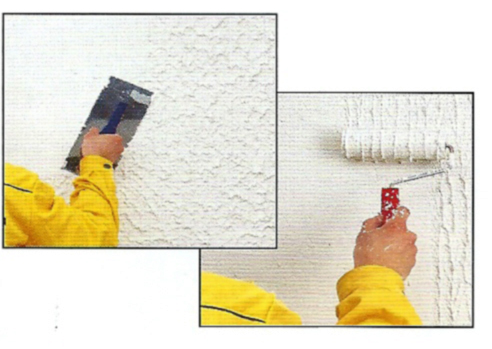
If you have a roller, you can use it to get an unusual pattern by rolling the working mixture evenly over the wall after treating the surface with a trowel.
The technology of applying ceresit pebble plaster using a spatula is a long and laborious process. Here, the speed of applying the finished plaster solution over the entire surface of the wall is important until the mixture has hardened. The mortar for plaster is prepared in such a way as to select the entire workpiece before solidification.
Heavy and light wet facade
Today there are two types of insulated wet facade: • heavy, • wet.
"Heavy" wet facade
A wet facade of this type does not involve gluing insulation to the wall. Dowels are inserted into the wall, insulation is attached to them with the help of special hooks. It is reinforced with a special mesh with pressure plates. This mesh is then plastered, and covered with a finishing layer on top.
This technology allows the structure to absorb thermal and seismic deformations. Some builders call this design "floating insulation."
For a heavy wet facade, a thick layer of plaster up to 40 mm is used. This is necessary in order to cover the metal mesh. At the same time, the wall must withstand heavy loads. A heavy wet facade costs more than a light one. This option is suitable for wall insulation in regions with a harsh climate.
"Light" wet facade
Such a system of wet facade insulation is most often used. Its cost is quite low. At the same time, there is a minimum load on the walls. Any surface can be used for the light wet facade technology. The wall must be level. If the masonry is made by hand, then, before applying the insulation, you need to plaster the wall.
The insulation is attached to the wall with dowels and glue with cement in the composition. As a heater, slabs of solid mineral wool are suitable. Such material is non-flammable and passes air well. This is especially true for masonry.
Light technology involves laying finishing layers on top of the insulation. The thickness of the finishing plaster should be no more than 8 mm, ideally 4 mm.
What is the difference between insulating materials
Styrofoam, which can be installed on the facade of a building, is sold at a cost of approximately 2000 rubles per m, and mineral wool costs approximately 2-2.5 times more. This feature is one of the most weighty arguments when choosing materials for insulation. Polyfoam has several distinctive features that can be attributed to the advantages. This material can be cut in any way and sanded very easily, which creates even corners, as well as a perfectly smooth surface.Styrofoam is easy to process and with its help it is very easy to install various cornices, ledges on the building, giving the structure an original appearance.
- Wet facade with mineral wool
- Wet facade using foam
If this material is so good, why is mineral wool used then? A high rate of elasticity allows you to overlay internal and external bends on surfaces. Mineral wool will always be in close contact with the wall. A high sound insulation rate allows you to install a wet facade with such a heater on a building located close to a noisy highway. Mineral wool passes more steam through itself than polystyrene.
When a wet facade is being designed, the size of the insulation layer is chosen so that moisture does not accumulate in the walls and the house remains warm. All efforts will be in vain if water vapor penetrates from the inside of the building into the wall. Wet structures will always freeze heavily and such a finish will not last long in the future. To make the correct calculation of the material when designing a wet facade, you need to contact specialists, and it is first recommended to obtain the necessary data yourself using one of the online calculators.
Wet facades Ceresit which of the two options is right for you
There are two varieties of the Ceresit wet facade, the installation technology of which differs very slightly - the difference is only in the choice of insulation. Right now we will tell you about each of them!
Attention! Whatever material you decide to create a wet facade from, the cost of which will please even the most economical developer, remember the obligatory preparation of the base - Ceresit CT 17 primer is perfect for this purpose. Ceresit WM mineral wool facade insulation system
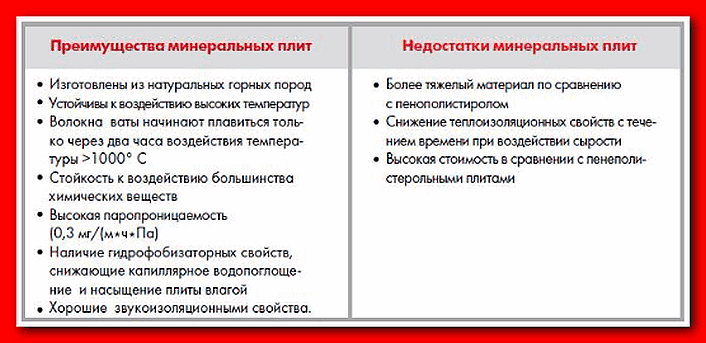
Mineral wool boards are distinguished by high rates of vapor permeability, are not afraid of most chemicals and belong to the category of non-combustible materials - these are their main advantages. Basalt wool fibers begin to melt only at temperatures above + 1000 °C! Such a heater is created on the basis of natural rocks and does not contain inclusions hazardous to health, and also provides good sound insulation of external walls. A wet facade made of mineral wool can be created on any base
Ceresit WM mineral wool facade insulation system. Mineral wool boards are distinguished by high rates of vapor permeability, are not afraid of most chemicals and belong to the category of non-combustible materials - these are their main advantages. Basalt wool fibers begin to melt only at temperatures above + 1000 °C! Such a heater is created on the basis of natural rocks and does not contain inclusions hazardous to health, and also provides good sound insulation of external walls. A wet facade made of mineral wool can be created on any base.
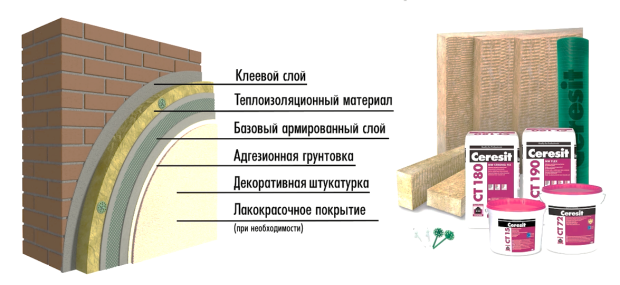
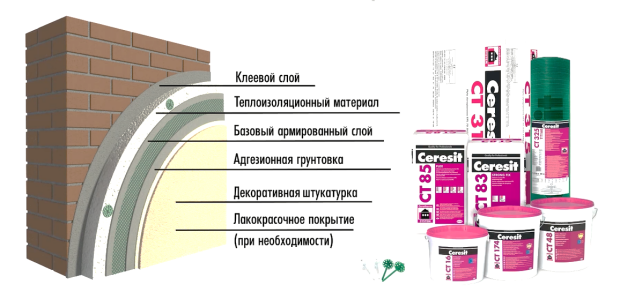
The layers of the wet facade created on the basis of mineral wool are arranged as follows:
- a layer of glue for Ceresit CT 180 mineral wool or a mixture for fixing and reinforcing Ceresit Thermo Universal insulation;
- basalt wool Rockwool Facade Butts or Baswool Facade;
- high-quality dowels with a metal nail for fastening the heat-insulating layer;
- base plaster layer of plaster and repair putty Ceresit CT 29;
- fiberglass mesh reinforcing from a trusted manufacturer;
- primer for decorative plaster Ceresit CT 16;
- top coat of Ceresit Dekor Plus decorative plaster, Ceresit CT 73 silicate bark beetle plaster, Ceresit CT 64 acrylic bark beetle plaster or Ceresit CT 174 silicate-silicone pebble plaster.
Among the shortcomings of the wet facade technology for mineral wool, one can note the rather large weight of the insulation and its high cost.The material is afraid of moisture, so you need to take care of a reliable moisture-proof layer.
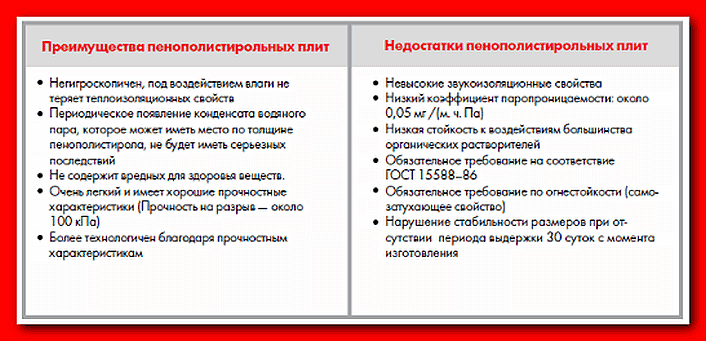
Ceresit VWS facade insulation system based on expanded polystyrene (polystyrene). Such a wet facade technology, the price per m2 of which is available to any developer in our company, is created on the basis of polystyrene foam or expanded polystyrene - materials that have their own advantages. Compared to mineral wool, expanded polystyrene boards are at least 5 times lighter. Wet foam facade technology is in great demand due to the fact that this insulation is not afraid of moisture, which means that there is no need to spend money on waterproofing. Thermal insulation for a wet facade on expanded polystyrene does not contain harmful substances and boasts excellent strength characteristics.
The steps to create a wet styrofoam or expanded polystyrene facade include:
- a layer of glue for Ceresit CT 83 expanded polystyrene boards or a mixture for fixing and reinforcing Ceresit Thermo Universal insulation;
- expanded polystyrene plates Penoplex Facade or polystyrene PSB-S-35;
- a special notch made of basalt wool;
- certified dowels with a plastic nail for fixing insulation;
- base plaster layer of plaster and repair putty Ceresit CT 29;
- high-quality fiberglass reinforcing;
- primer for decorative plaster Ceresit CT 16;
- top coat of Ceresit Dekor Plus decorative plaster, Ceresit CT 75 silicone bark beetle plaster, Ceresit CT 72 silicate pebble plaster or Ceresit CT 175 silicate-silicone bark beetle plaster.
Among the shortcomings of the wet facade technology for expanded polystyrene, one can name almost zero vapor permeability and poor sound insulation. When installing the material, it is necessary to minimize the risk of contact with organic solvents, which provoke its destruction.
Mounting technology
It is important to follow the installation technology in the exact sequence. The start of work is always preceded by the necessary surface preparation.
It consists in assessing and arranging the foundation, preparing wooden or metal scaffolding.
The stage of preparation for the installation of a “wet” facade
Examine the base.
It must be freed from dirt. Check the substrate for load-bearing and adhesive properties.
If the finish is partially damaged, it is removed and replaced with whole sections. If there are irregularities on the facade, the surface is leveled with a plaster composition.
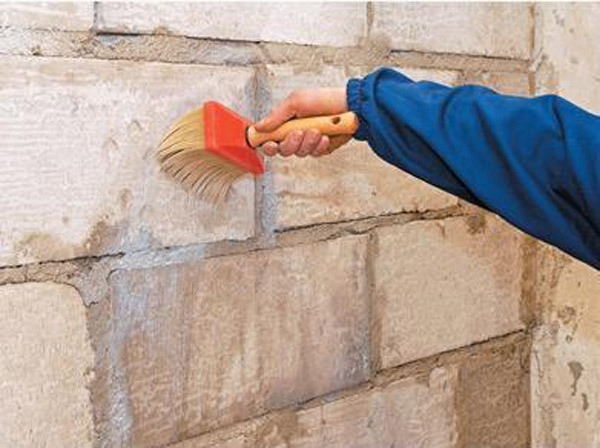
If the facade is finished with a material with a high degree of absorption, it must be carefully primed.
Also remove old plaster, if it is present on the surface of window and door slopes.
Base profile device
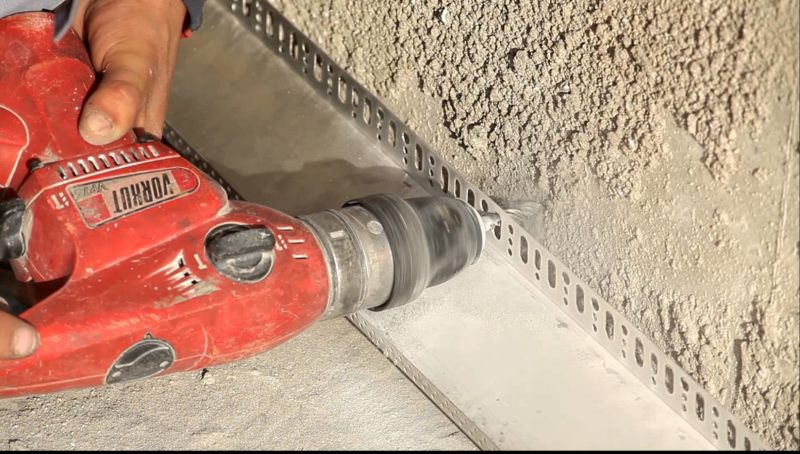 Now you need to install the profile bar. This design allows you to distribute the load from the heat-insulating plates, which are planned to be laid in the future. Also, the profile is necessary to protect the bottom row of plates from high humidity.
The profile is fixed taking into account the following rules:
-
The profile must be installed 40 cm from the ground surface.
Between the horizontal bars leave gaps of about 3 mm. It is necessary in case of thermal expansion. -
The profile is fixed with dowels and self-tapping screws
, the number of which per 1 sq. m is determined depending on the mass of heat-insulating plates. Usually the step is from 10 to 20 cm. -
At corner joints
at home, a special angular profile is used.
Installation of a heat-insulating layer
To organize a “wet” facade, a heater is traditionally used, represented by mineral wool or expanded polystyrene slabs.
What is needed for the correct installation of plates?
From the edge you need to retreat 3 cm
. Then glue is applied around its entire perimeter with a wide strip.
In the middle, the adhesive mixture should be applied pointwise
. As a result, the glue should cover about 40% of the entire surface area
Note! If you decide to use lamella mats for facade insulation, their surface must be completely covered with glue.
The plates are laid in a run-up as in the case of brickwork.
Plates with insulation are pressed tightly to the surface of the wall and to adjacent plates. Excess glue is removed immediately during operation.
The heater is installed in rows. Start from the bottom of the plinth profile, gradually moving upwards.
-
If the walls of your house are made of solid material, the recess should be 5 cm.
If the walls are porous, the recess is 9 cm. Keep in mind that per square. m should account for 6 - 14 dowels. But the exact amount is determined by the mass and thickness of the insulation plate, its location and the diameter of the fastener. -
First, nests are made, after which dowels are installed.
If top fastening is used, the clamping sleeves are placed flush with the surface of the insulation layer.
Installation of a reinforcing layer
You can resort to its device three days after installing a layer of thermal insulation
. First you need to process the corner bevels on the doorways and windows, the outer corners of the house and the joints on the vertical slopes. And only after that it is possible to process flat sections of the wall.
Reinforcement is carried out according to this scheme:
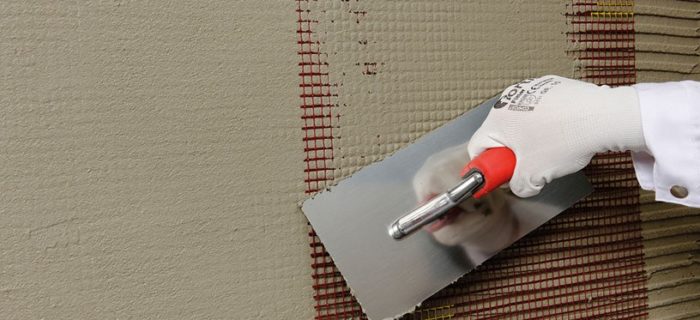
- Glue is applied directly to the surface of the insulation. A reinforcing mesh consisting of fiberglass is slightly recessed into it.
- A covering layer is applied to it.
As a result, the reinforcement thickness should be no more than 6 mm.
A grid is placed at a distance of 2 mm from the surface.
Finishing stage
 After a week, the reinforcement layer will dry completely.
. A plaster layer is applied over it. Use only plaster suitable for outdoor use. The plaster composition must have an increased degree of vapor conductivity, resistance to precipitation and mechanical damage.
Surface quality
plaster is largely determined by the conditions in which it is applied to the surface. The optimum temperature range is from +5 to +30 degrees
It is important that during this period there is no strong wind and precipitation.
There must be a shadow. If it does not exist, it will have to be created artificially.
Installation of the Ceresit wet facade system
Installation of a wet facade ceresite is carried out in several stages, which include:
- preparatory work;
- installation of a heater;
- fixing the reinforcing mesh;
- applying a plaster layer;
- surface painting.
High-quality performance of work at each stage is important for all subsequent ones and affects the final result.
Ceresit plaster insulation system - device sequence
Wall surface preparation
Work on the installation of the facade system begins with an inspection of the surface of the walls on which the materials to be mounted will be fixed. At the same time, the outer surface is thoroughly cleaned of any dirt and carefully inspected. Defects in the form of cracks, irregularities, potholes are detected and, if necessary, eliminated.
In some cases, to improve the bearing capacity of the walls, they are covered with a rough layer of plaster. After that, the entire bearing surface is primed.
Preparing the wall for the installation of the facade requires special attention - the surface must be flat
To reliably ensure the stability of the system, a U-shaped metal profile is fixed in the lower part of the wall, which plays the role of a support bar. This element is installed around the entire perimeter of the building, as well as above windows and doors. It protects the lower edge of the structure from moisture and allows you to properly distribute the weight of the entire multi-layer structure.
The support profile is installed at a height of 30-40 cm from ground level or installed on a protruding plinth. A gap of 3-4 mm is left between the individual strips to compensate for possible thermal expansions.For fastening, plastic dowels and self-tapping screws are used, which are clogged every 15–20 cm.
Insulation installation
Installation of insulation - the process is not complicated, but responsible
After completing the preparatory work, proceed to the installation of insulation. First, mineral wool boards or polystyrene are glued onto the prepared surface using Ceresit CM-15 or CM-11 wet facade adhesive. The glue is applied with a notched trowel in the form of a wide strip around the entire perimeter of the slab and a dotted area in the center. This allows you to ensure reliable fastening of the material with economical consumption of the adhesive composition. For proper execution, it is enough to cover with glue 40% of the surface of each plate.
Installation of plates is carried out from the bottom up, starting from the bottom row, which is immediately installed around the entire perimeter. The installation of each row starts from the corner. Wherein:
- vertical joints between plates in adjacent rows should not coincide;
- adjacent plates are tightly pressed against each other to minimize the thickness of the seams;
- excess adhesive protruding from the seams is immediately removed.
Scheme of fixing the insulation with a dish-shaped dowel
Three days later, after the glue has completely dried, fixing plastic dowels are installed, the design of which provides for a wide dish-shaped cap, a plastic nail and a bursting hammered nail.
The length of the dowels used depends on the thickness of the insulation and the material of the walls. The immersion of a nail into a wall made of porous materials should be at least 9 cm, and for solid ones at least 5 cm. 6-10 pieces are hammered into each slab.
Installation of the reinforcing layer
Reinforcement begins no earlier than a day after the installation of insulation. As a material for the reinforcing layer, a facade building mesh made of fiberglass with a special alkali-resistant coating is used. Adjacent strips of the grid should overlap each other by 5–8 cm. If it is necessary to strengthen individual sections, the grid is applied in two layers. At the corners, in doorways, windows and lintels, a special corner with an edge mesh is installed.
The reinforcing material is covered with a layer of adhesive composition 2–3 mm thick, and the total thickness of the layer can be up to 5 mm.
The final stage of the installation of the “wet” Ceresit facade is the finishing. It involves the application of a plaster layer on the surface and its subsequent painting. You can start this work only after the complete drying of the reinforcing layer, which lasts 3-5 days.
The material for the plaster layer must have a high vapor permeability, good resistance to adverse weather conditions and high mechanical strength. For this, special dry facade mixtures Ceresit are used. Plastering can be carried out in dry weather at an outdoor temperature of +5°C to +30°C, while direct sunlight is not allowed on a fresh plaster layer.
The surface is painted with a roller or through a spray gun with acrylic, silicate or silicone Ceresit paints.
Preparatory work before starting the arrangement of the system and strengthening the insulation
The arrangement of Ceresit facades involves the removal of the old cladding with its dubious stability and poor adhesion to the walls.
The wet facade system may require leveling before further work, during which you can use Ceresit ST 29 facade putty.
This composition must be applied to the surfaces that are pre-treated, for this, the facade primer of the Ceresit ST 17 brand must be used.
Then, in the area of \u200b\u200bthe border that connects the basement and the facade, around the entire perimeter of the building, it is necessary to strengthen the basement profile, which will determine the starting point for the installation of insulation boards.
After that, a heat insulator is to be strengthened on the surface of the facades, they can be slabs of expanded polystyrene or mineral wool.
They will be perfectly fixed on the walls by adhesive mixtures of the ST 85 or ST 190 brands, produced by the manufacturer Ceresit. You can also use polyurethane adhesive brand CT 84, which is sold in cylinders.
The peculiarity of the technology at this stage is that an adhesive mixture should be applied to the surface of the polystyrene foam insulation plate, while it is necessary to form a strip, the width of which should be 6 cm, while its height should be 2 cm.
The composition must be applied along the perimeter of the base, departing from the edges of 2 cm. The application of the mixture in the central part of the slab should be carried out according to the type of lighthouses, the diameter of each of which should be equal to 10 cm, and the height - 2 cm.
The maximum number of such beacons should be 8 pcs.
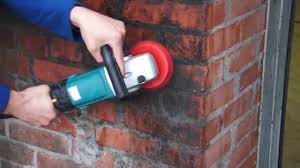
If the process of warming is supposed to be carried out using mineral wool boards, then the adhesive mixture should be applied in a continuous layer. Once the adhesive has been applied and distributed, the board can be applied to the wall and pressed down. The Ceresit system at the stage of strengthening the insulation should be equipped from the basement profile, the material should be laid in order, moving up.
Do not forget that during the installation of the insulation, its position should be controlled using a level. Now it’s worth waiting until the glue hardens, only after that, in order not to change the position of the plates occupied by them during the fastening process, you can grind the base using a semi-terre equipped with coarse sandpaper.
Then the insulation can be further strengthened, as described above.
Installation of the reinforcing layer
At the next stage of arranging Ceresit facades, a waterproofing mixture should be applied to the surface of the insulation; when using a polystyrene foam heat insulator, a mixture of ST 85 from Ceresit is used;
The reinforcing mesh should be laid on a freshly applied mortar and sunk into it with a trowel. The arrangement of a wet facade requires laying a grid with an overlap, which can vary from 5 to 10 cm.
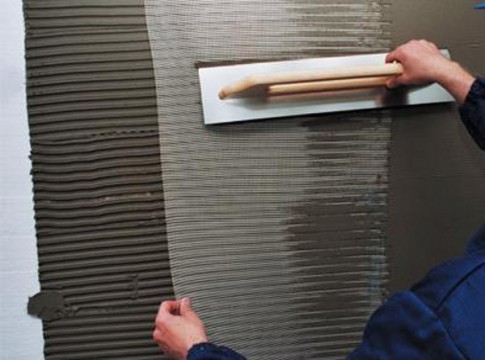
In the process of this, the mesh does not need to be strongly stretched and deepened to the very heat insulator. Then the façade system must be equipped with a layer of mortar, the thickness of which must be equal to 2 mm.
The mixture should be applied so that the mesh is hidden underneath. And then the surface should be leveled using a metal grater.
Arrangement of a decorative layer
The process of facade insulation according to the Ceresit system involves the application of a finishing decorative layer at the last stage.
To ensure better adhesion of the reinforcing and decorative layers, priming should be performed. In the role of a primer solution, you can use facade paint brand ST 16, the color of which is close to the color of the facade plaster. It should be applied as evenly as possible, using a brush for this, one layer will suffice.
When equipping a plaster facade using a silicone or silicate mixture, in tandem, a primer of the ST 15 silicon or ST 15 brand should be used.
A thin-layer plaster mixture should be applied to the surface as evenly as possible, the thickness of the layer should be equal to the thickness of the grain, while using a semi-ter, the tool should be held at a slight angle, after which the surface will have to be further smoothed.
After the facade plaster stops sticking to the tool, it can be given the desired texture using a plastic grater, which must be carried out in a horizontal position.
Flaws
Insulation of facades ceresite has some disadvantages and limitations in use. So, PPP has the following limitations:
- susceptible to the action of organic solvents;
- does not protect the premises from extraneous sounds;
- has a low coefficient of vapor permeability;
- has limitations in use: applicable only for walls made of monolithic reinforced concrete and three-layer panels;
- it is unacceptable to use in buildings with increased requirements for fire safety, for example, in hospitals.
Mineral wool boards have fewer disadvantages:
- the material has a large weight (22-40 kg / m2);
- the high cost of the material;
- low impact resistance.
This method of thermal insulation has a universal application and is suitable for all types of walls.
Ceresit building thermal insulation technology has shown good performance and thermal insulation qualities, which makes it possible to recommend this method. The ability to choose the finish and color to your liking removes restrictions on the personal preferences of the owner of the house or apartment.
Mounting technology "wet" facade
becomes more and more popular, because there are a small number of cold bridges.
But this is not the last factor in the chosen technology. Thanks to this technology, you literally take out dew points outside the living space. As a result, the inner parts of the walls will not suffer from condensation. In our article, we will consider the step-by-step instructions for this finish.
The choice of insulation
One of two options can be used as a wet insulation for facades:
- foam plastic (plate thickness 5-10 cm);
- high-density mineral wool (it is best to use basalt wool).
When choosing a material, you can be guided by four main criteria:
- Price. In this regard, the foam wins, as it is a cheaper material.
- Vapor permeability. This property is inherent in mineral wool, which allows the walls of the house to "breathe". Styrofoam does not have this quality.
- The complexity of the work. Styrofoam is the easiest to work with due to the higher rigidity of the material.
- Fire hazard. Foam boards are flammable, so they need to be treated with fire retardants. Basalt wool does not burn and is able to withstand temperatures up to 1000 degrees.