Walls and ceilings finished with figured plasterboard make an indelible impression even on the most demanding connoisseurs of luxurious interiors. Arcs and broken lines, clouds and constellations, bizarre patterns and plants, fantastic flower petals, silhouettes of unseen animals and other plasterboard patterns on the ceiling and walls, softly lit with hidden lighting, create an atmosphere of comfort and relaxation.

Drywall figures on the ceiling can be very different, but the most common solutions are:
- geometric shapes (circles, ellipses, ovals, squares, rectangles);
- waves;
- plant elements - flowers, leaves;
- clouds;
- butterflies.

The figures on the walls can be even more diverse, smoothly moving into arches, niches, combined with designer shelves.

Which drywall to choose for curly walls and ceilings
Flat and voluminous figures are best made from arched or flexible drywall, the thickness of which is 6.5 cm. Its main distinguishing feature is high flexibility, which makes it possible to easily create convex and concave surfaces.
In the process of working with arched drywall, there is no need to wet and treat the surface with a spiked roller to increase elasticity. The cost of flexible GKL is higher than conventional material, but it pays off due to the strength and long service life of the created structures.
It is allowed to use ordinary ceiling or wall drywall with a thickness of 8 to 12.5 mm, but in this case you need to be prepared for the fact that it is much more difficult to give it the desired shape.

How to bend drywall?
Methods for bending drywall sheets (regular, inflexible):
- With the help of water and a needle roller (awl). The side of the sheet, which will have a concave shape, is wetted with water and rolled with a spiked roller. After the GKL is slightly saturated with water, it is carefully bent, laid on a template and fixed in the desired position until completely dry.
- By creating incisions. A very strong bend can be obtained by the “dry” method, for this it is necessary to apply cuts on the sheet surface at a distance of 1–5 mm from each other and up to 6 mm deep, which should be located across the bend. The distance depends on the radius of curvature: the smaller it is, the more often there should be cuts. After shaping the GKL, it is necessary to form and fix the incisions filled with putty.

Tools for creating figures from drywall
To work, you will need the following set of materials and tools:
- construction knife;
- metal scissors;
- drywall cutter with replaceable blades;
- level;
- roulette;
- perforator;
- drill;
- screwdriver;
- self-tapping screws;
- dowels;
- nails and screws;
- Bulgarian;
- circular saw;
- metal profiles;
- suspensions;
- roller;
- rule;
- choline;
- awl;
- cutter;
- construction markers;
- squares;
- stencils of different shapes.

Preparatory stage
Before proceeding with the realization of your plan, it is necessary to prepare the premises:
- Remove furniture and all functional and decorative interior items.
- Remove plaster and wallpaper.
- Prime cracks.
- Thoroughly clean the surfaces of the walls and ceiling from dust.
Drywall sheets should be kept in a horizontal position for several days to acclimatize to the temperature and humidity in the apartment.
How to make figures on the ceiling
First you need to measure the ceilings and walls with a tape measure, think over the design of each figure and pattern in the interior of the room, draw a sketch using rulers, patterns, compasses. Transfer a proportionally enlarged drawing to cardboard, make a stencil by cutting the image along the contour.

Frame installation
At this stage you need:
- Mark the canvas with a chokeline or building markers.
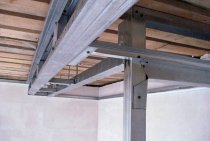
- Install frame made of UD and CD profiles, suspensions and firmly fix the first level of ceiling plasterboard.
- On the stencil, draw the contours of the figures on the first level of drywall, attach guide profiles to them.
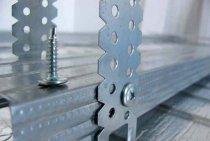
For curved structures, it is necessary to make cuts on the profile: straight, if it needs to be bent outward, triangular - if inward. You can use a special arched profile with holes.
- Attach the ceiling profile (CD) to the guide profile (UD). The CD profile, the length of which exceeds 0.5 m, must be fixed on hangers so that the drywall does not deform under the weight of the curly elements.

Working with GKL
To create a drywall figure, you need to do the following:
- On the wrong side of the drywall sheet, intended for the figured level, draw the outlines of the future figure or pattern.
- Cut a sheet with a pattern into several parts with a grinder, a drywall cutter or a construction knife.
Important! You can cut out figures only on pre-moistened (but not soaked from water!) Material. To do this, wipe the inner surface with a damp sponge, treat with a spiked roller, and after a couple of minutes, apply a lot of holes on the same side along the contour of the figure with a perforator or awl. Bend the sheet towards the holes until it separates into pieces. Do the same with the rest of the details.
- Attach parts of the drawing on drywall alternately with self-tapping screws to the profiles installed at the first level.
Thus, you can make an oval, arc or circle of drywall on the ceiling. For complex figures, more detailed detailing, the use of squares, drills, power saws will be required. Simultaneously with the figured level, open and hidden lighting is mounted, for which it is necessary to drill nests, make secret niches, and draw conclusions for wiring.

How to make patterns on the walls
Plasterboard patterns on the walls are an important element of interior design and should be a single ensemble with the figures on the ceiling. From figured material, you can make whole or partial wall cladding, masking irregularities, build interior partitions of different heights and unusual design, arched doorways.

The principle of working with wall figures is no different from ceiling structures, but it is much easier to carry out, since there is no need to hang from the ceiling with a curved spine and arms raised.
In a professional environment, there are many options for installing curly structures. Those who want to learn how to make a figured plasterboard ceiling can choose one of the affordable and relatively simple installation methods. To install complex multi-tiered compositions with intricate figures, it is better to use the services of professionals.