German tiled stoves
Germany is a country of talented artisans, so it is not surprising that the most interesting old stoves were made by German craftsmen.
 Tiled oven at Heidelberg Castle
The 16th century is the heyday of the European Renaissance. The world of the "dark" Middle Ages was broken. People perked up, gained prosperity and new self-confidence. This is a period of euphoria of the human spirit, which gave a lot for the development of European civilization in all areas of human activity.
Hans Kraut was the most prominent and most famous ceramist of the Renaissance in Germany.
 Rock faience kiln at the Stockelsdorf factory in Lübeck
Johann Bartholomew Kraut (1532-1596), more often called Hans Kraut, was a potter from southern Germany, also known outside of it. Creator of numerous ceramic products at the Austrian court. His best-known surviving work is a 1577 tiled relief stove in the Victoria and Albert Museum.
 Tiled oven at Heidelberg Castle
Hans Kraut is rightfully considered one of the most important ceramists in South Germany, for he was one of the first to bring Italian majolica across the Alps. He created a lot of new for Germany products in the style of the Italian Renaissance, using the drawings of Holbein and Raphael, although his main interest was in sculpture.
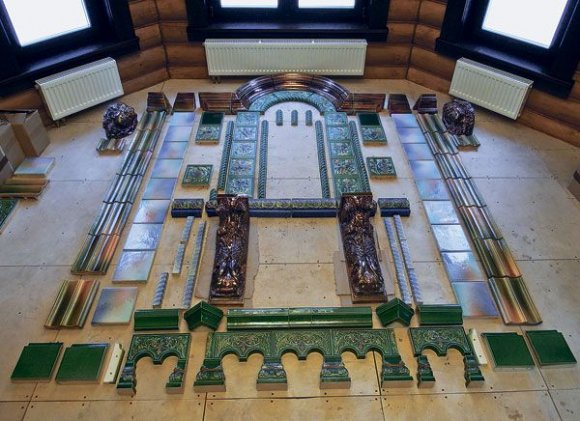
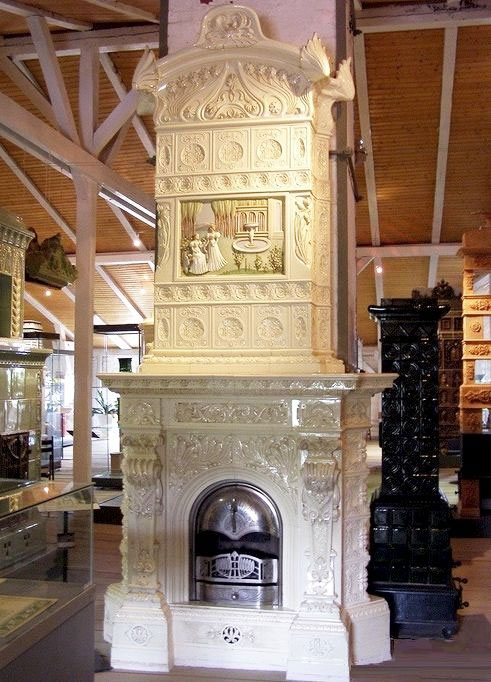
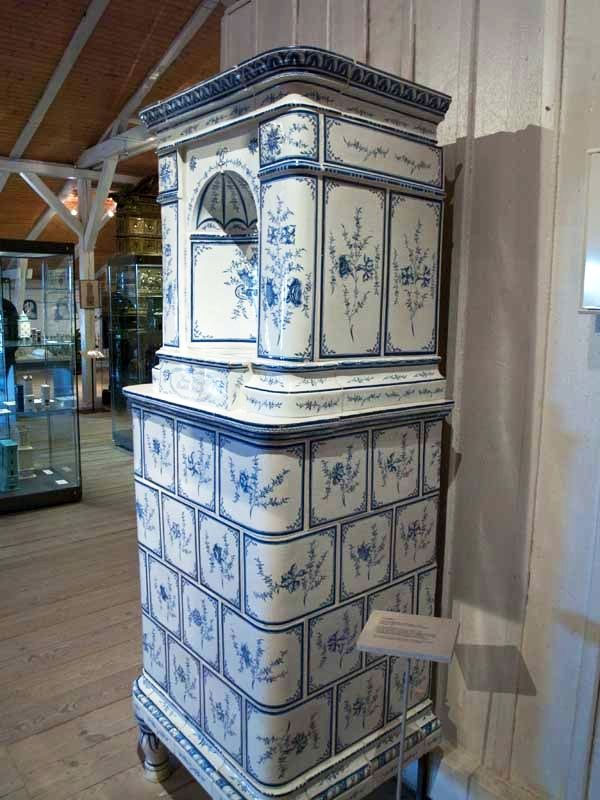
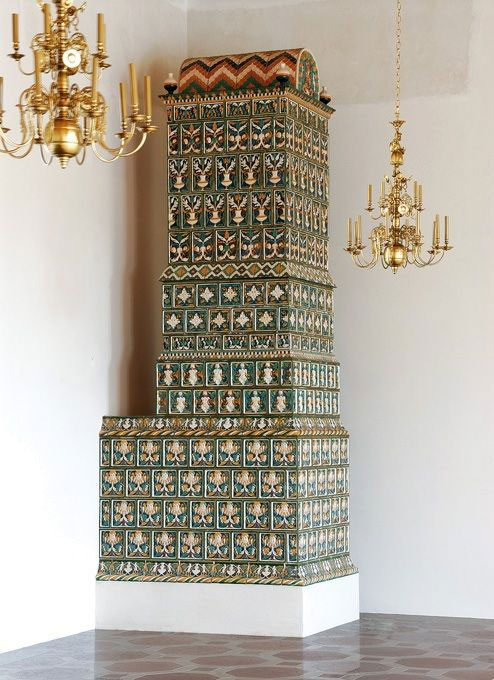
 Tiled stoves at the Museum of Kilns and Ceramics in Felten
Kraut made a significant contribution to the decorative arts of Germany, using sculpture and bas-relief in his ceramics. His skill was so great that at the court of Archduke Ferdinand II he was accused of witchcraft, and as a result he was even buried outside the Christian cemetery. Two of his sons became followers of their distinguished father, and the name Kraut was known among potters until the 18th century.
 Furnace and Ceramics Museum in Felten
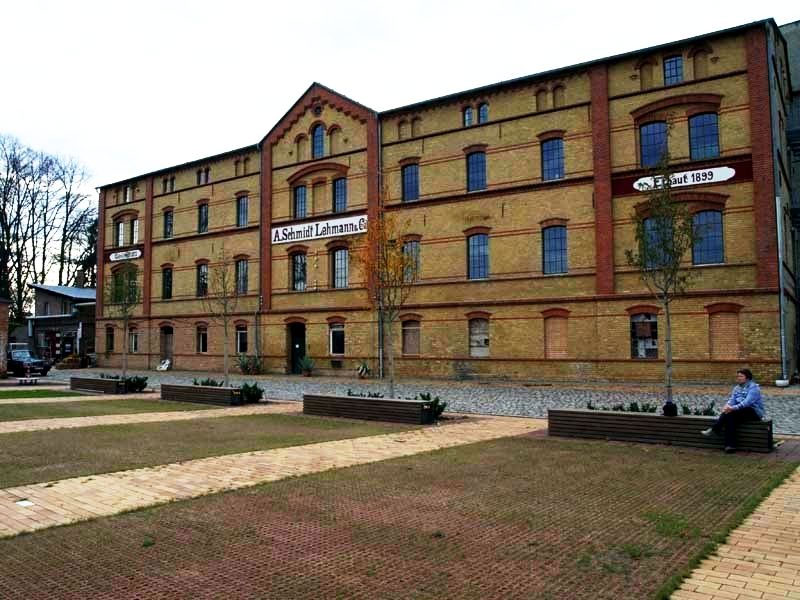
German artisans have always been receptive to new trends in technology and pedantic in their implementation. The Germans were so successful in the production of stoves that over the centuries, forms for the production of ceramics were purchased from them by many European manufacturers of stove tiles and tiles. This is probably why the largest collection of various tiled stoves can be found in Germany, where applied art keeps pace with architecture, repeating all the main trends in art: from the Gothic through the Renaissance to the Baroque, Biedermeier and Art Nouveau.
 Tiled stoves at the Museum of Kilns and Ceramics in Felten
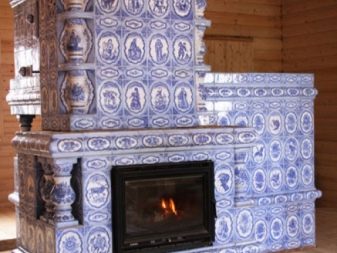
The heyday of German tile art falls on the 17th-18th centuries. The tiled stoves in the Hohenaschau castle in Bavaria, in the Heidelberg castle in Baden-Württemberg and in many other castles in Germany belong to this period.
It is impossible not to mention the beautiful rock ovens made at the Stockelsdorf faience factory in Lübeck under the guidance of another famous German ceramist Johann Buchenwald.
 Tiled stoves at the Museum of Kilns and Ceramics in Felten
Johann Georg Ludwig Boniface Buchenwald (1723-1806) - artist and head of several faience factories in Schleswig-Holstein, is one of the most important German ceramists.
Under the artistic direction of Johann Buchenwald, German faience became one of the best in Europe, including in terms of its historical and artistic value.
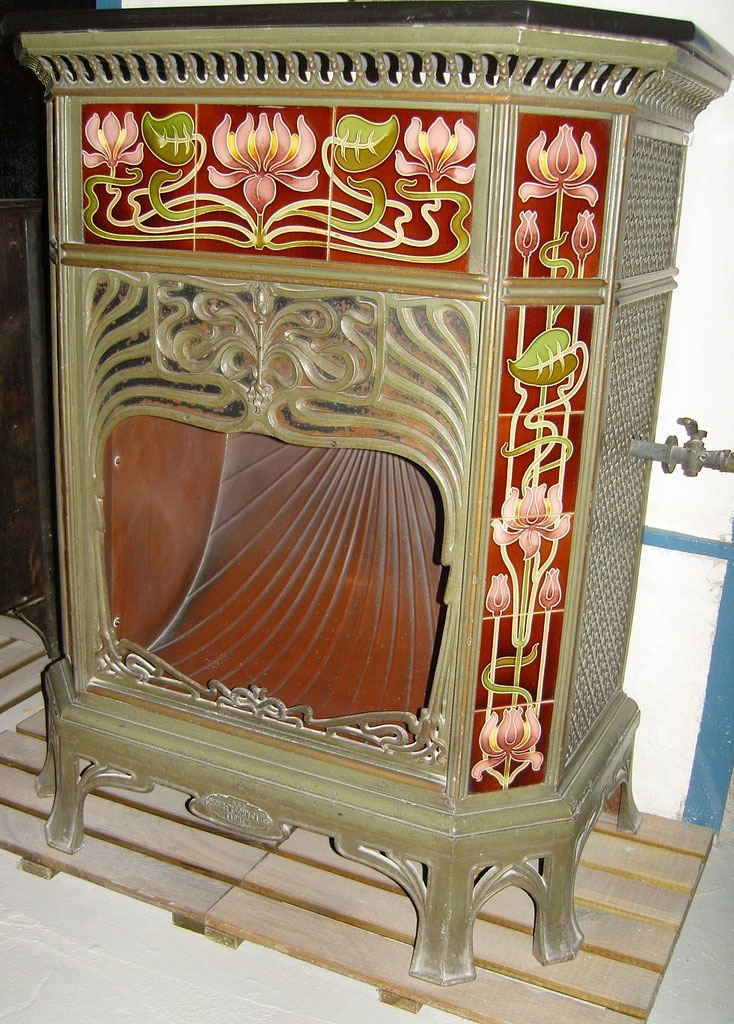 Potbelly stove with Art Nouveau tiles in the museum in Felten
Another manufacturer of tiled stoves in Germany is the Meissen manufactory, which gave rise to the company of Karl and Ernst Teichert, which produced tiled fireplaces and stoves until the middle of the 20th century.Noteworthy is the tiled wall produced by the Meissen manufactory, which still exists in Dresden.
But the largest collection of German ceramic tiled stoves is in the Kiln Museum in Felten. Such a large exposition of stoves of all eras and styles, collected in one place, is probably not found anywhere else in the world.
Here are ancient Gothic tiled stoves, extraordinary Renaissance stoves, wonderful miniature Baroque stoves, intricately curved Rococo stoves and, of course, marvelous Art Nouveau stoves.
 Empire style tiled stove at the Furnace and Ceramics Museum in Velten
Within the framework of one article, it is absolutely impossible to describe all European tile and stove art - an entire book could be devoted to this. But we hope that we managed to interest you and perhaps you will take the time to visit the places we have mentioned and especially the Museum of Furnaces and Ceramics in Felten.
Museum address:
Ofen- und Keramikmuseum Velten
Wilhelmstrasse, 32
16727 velten
Phone: 03304 / 3 17 60
Fax: 03304 / 50 58 87
- russian-mayolica.ru
Secrets of laying tiled fireplaces and stoves
Unlike a conventional stove, a feature of the tiled laying process is the installation of the tiles themselves first of all, only then - the attachment of a brick body to them.
Tiled stoves are erected in several stages, while facing them with tiles. Therefore, such masonry is quite complex and time-consuming, it can be entrusted only to good specialists.
Unlike other materials, tiling is done in parallel with masonry. It is quite complex and labor intensive. Therefore, it is necessary to trust such work only to masters who own all the secrets of this ancient art.
The tiles used to line stoves and fireplaces are non-standard piece products. Therefore, the first stage of work is always sorting them by color and culling tiles with glaze defects or cracks. Ideally, culling must be done even before purchase, but if there is already purchased tiles, then the lower rows are laid out with darker tiles, and those with small defects are inconspicuous places.
The second step is to adjust the size of the tiles by processing them with a grinder and grinding the sides. First, the first sample is processed, which is subsequently used as a standard, adjusting the rest to it. When fitting, first carefully cut the back edge, and then the glazed front one, so that when laying the glaze of adjacent tiles does not touch. Before laying, for better adhesion to the solution, they are soaked in water.
If the stove is placed simultaneously with the installation of tiles, fireclay-clay mortar is used. If the finished stove is tiled with tiles, then it is better to use a special Profix glue.
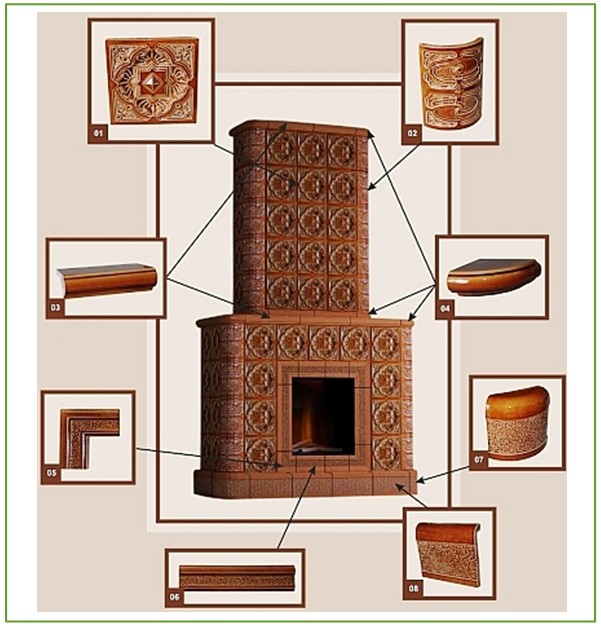
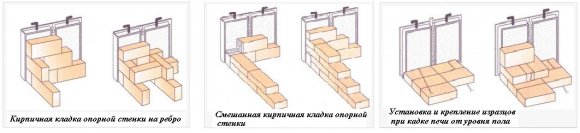
The construction of stoves and fireplaces begins with the laying of tiles. Then bricks are attached to their first row. In order to check the placement of tiles vertically and horizontally, experts recommend first laying a wall of tiles without mortar. After checking, it can be disassembled and laying on the mortar from the corners can begin. The order of tiling simultaneously with brickwork is shown in the photo: 1 - brickwork; 2 - tile; 3 - ramp; 4 - pins; 5 - staples; 6 - knitting rows with wire; 7 - fastening loops.
The rumpa is half filled with stones, pebbles or granite and clay mortar. The solution is applied at the level with the sides and the brick is pressed against the tile. The tile is fastened with wire when the brickwork reaches the height of its row. The wire is passed through the bent parts of the fastening crutches. Then the wire is brought into the masonry. In vertical rows, the tiles are installed closely and fastened with steel staples. In order for the tile to settle with it when the brick base shrinks, the thickness of the seams between the horizontal rows of tiles must be at least 3 mm.
Austrian tiled stoves
Hohensalzburg - an ancient fortress on the top of the Festungsberg hill in the city of Salzburg, built in 1077 by Archbishop Gebhard, is one of the largest medieval castles in Europe. Since then, the fortress has been rebuilt several times, so today only the foundation remains from the construction of Gebhard. Despite the powerful walls and the impressive appearance of the castle, he always surrendered to the enemy without a fight.
Throughout history, the castle was besieged only once, and even then it was an armed uprising of peasants in 1525, and frightened feudal lords sat in it. Now the castle has the largest collection of exhibits of the military history of Austria and one of the largest collections of military weapons from different historical eras.
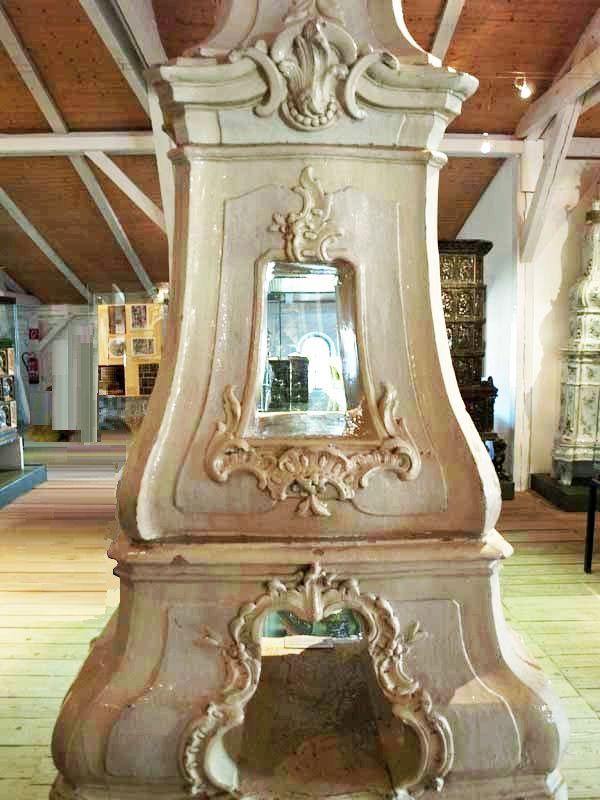
 Ceramic oven at the Innsbruck Crafts Museum
In the Hohensalzburg Fortress, two of the oldest tiled stoves in Europe from the 16th century have been preserved. These stoves belong to medieval Gothic art and are lined with ceramic tiles covered with lead glazes. On the tiles, beautiful sculptural images of religious scenes (“The Expulsion of Hagar” from the Old Testament), the twelve apostles and reigning persons have been preserved.
 Historical tiles found during excavations of the Lower Castle
Another masterpiece of Viennese architecture is the Kinsky Palace in Vienna. It is interesting not only because it is an unusually beautiful building in the Baroque style, but also because it is a fully functioning building. It hosts art auctions, as well as social and diplomatic events. For example, it was there that the EU negotiations on the status of Kosovo were held.
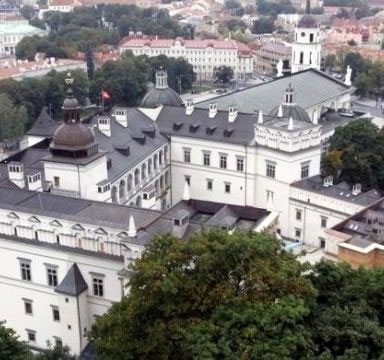 Lower Castle in Vilnius
The palace was commissioned by Count Wirich Philipp von Daun and its construction began in 1717 under the direction of the architect Johann Lucas von Hildebrandt. In 1784, the palace was sold to Count Franz Joseph Kinsky, the director of the Vienna Military Academy and the author of many works on military sciences. The palace is often called Down-Kinski after the names of its eminent owners. The palace belongs to the Baroque style, has numerous works of art in its interiors, and the facade and its decorative elements set the style for all of Vienna until the 19th century.
 Historical tiles found during excavations of the Lower Castle
A remarkable 1740 tiled stove has been preserved in the Kinsky Palace. This stove is a typical representative of the 18th century Viennese stoves, it has landscape and genre paintings, numerous relief friezes and, of course, sculptural “legs” in the form of lions.
 Reconstructed tiled stoves from the 16th century in the Lower Castle
Museum of Crafts in Innsbruck. In 1888, in the face of the coming industrialization and in the wake of the Arts & Crafts movement, Tyrolean artisans decided to open a museum of folk arts and crafts. By 1903, the museum was opened in the building of the former Franciscan monastery in Innsbruck. The museum's collection contained excellent examples of applied art belonging to various strata of society. Here are the things of peasant life, and cult religious objects, and exquisite art objects from the houses of the Tyrolean nobles and the bourgeoisie.
We present to your attention an elegant ceramic oven from the Innsbruck Museum of Applied Arts. This is a renaissance cobalt tiled stove with white faience bas-reliefs.
Finishing the stove with tiles
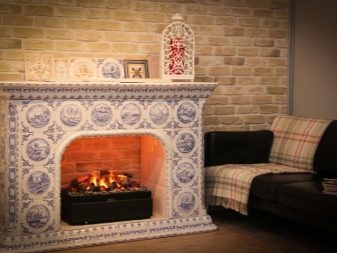
The tiled stove is very beautiful, hygienic and easy to maintain. In addition, the facing layer additionally covers the seams and increases the heat transfer of the furnace. Finishing work when facing with tiles is always carried out simultaneously with the laying of the oven rows. Such work requires high qualification and skill.
First of all, you need to select tiles. The selection is based on color, shape and size. The requirements for the absence of sags, external and internal cracks are imposed on the form. The color scheme is sorted by shades.It is customary to put a darker tile on the lining of the lower parts. The lighter the shade of the color, the higher the tile is located. Sorting by size should select standard tiles.
The non-standard size is trimmed with special techniques using a sharply honed steel strip and a steel rod. The use of an oven hammer or pickaxe can split the tile
The places where the tile is cut are carefully polished.
If necessary, cut the tile, it is recommended to use a thin steel wire. At the same time, the outer glaze is marked with a marker and an outer groove 2-4 mm wide is made along the cut line. Sawing is carried out down with the back side, holding the tile with both hands.
Tiling technique
Working stroke when moving the tile towards itself
After sawing, the tile is carefully and carefully polished with smooth circular movements, its horizontal sides are slightly beveled. A mandatory rule is wetting the tile before laying
Tiles are fastened using special rectangular brackets made of elastic steel strip, 15 mm wide and 2 mm thick. The requirement for rigidity of the bracket is related to the reliability of fastening the tiles.
The number of brackets based on two per tile. In addition to staples, you will need steel wire with a diameter of 4-5 mm for the manufacture of pins, one per tile. The pin has a bent end and is inserted into the holes of the tiller. The total length of the wire is found by the number of tiles and the length of the pin by 30 mm greater than the height of the tile. The length of the annealed wire for tying rows of tiles and organizing loops is approximately found by adding the product of the length of one row of masonry by twice the number of rows with the product of twice the number of tiles by 0.2 m. All data will be indicative and refined in the course of work.
Tiling begins with the laying of bricks selected for the outer wall without mortar and its subsequent dismantling, leaving one row. Expose the corner tiles of the lower row, using a level, a plumb line and a square, as a rule. Each tile is smeared with mortar, a thick layer of mortar is placed under the ramp. The space between these tiles is dry filled with the rest of the tiles of the row, their sizes are adjusted and adjusted. Tiles should fit as tightly as possible. If there are practically no vertical seams, then tiling requires a horizontal seam of 2-3 mm for shrinkage with brickwork. The tiles are fastened together with staples and wire twists; the tiles are attached to the masonry wall with special wire embedded loops.
We build and repair ourselves
How to choose a chainsaw Choosing a chainsaw is not a quick decision. If you want to use a chainsaw in the garden or on a country plot, then a household saw will suit you. As a rule, a household saw is used from time to time ...
Finishing the facade of a wooden house Of course, the wooden house itself has an aesthetic appearance. As if merges with nature, the natural color and the material that it has. This is what creates the feeling...
Polymer self-leveling floors Every day, decorative polymer floors are becoming more popular in residential construction. At one time they were designed to cover large areas in industrial and…
Installing the doors yourself In this article, I would like to talk about how to assemble a door frame and install it. If you are going to change the doors, and do not know where to start, then we will help you with this. The main…
Do-it-yourself home insulation Building codes of the present time prescribe mandatory thermal insulation of the walls of buildings. There are many types of facade insulation, but the most preferred ...
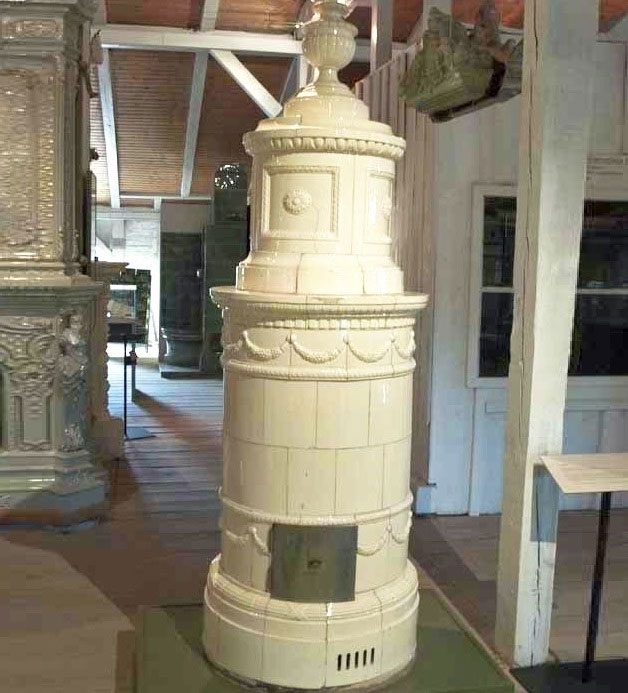
Lithuanian tiled stoves
 The main building of Vileišis Palace
One of the remarkable objects of the cultural and historical heritage of Lithuania is the Vilnius Lower Castle, which now houses the Museum of the Rulers of the Grand Duchy of Lithuania. Restoration of the castle is probably one of the most ambitious projects for the revival of Lithuanian statehood and the resurrection of many beautiful examples of medieval art from oblivion. The exposition is presented in chronological order, and it covers three main periods in art: Gothic, Renaissance, early Baroque.
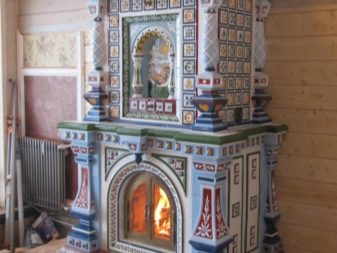
 Round ceramic oven in Vileišis Palace
During restoration and archaeological work, mosaics, ceramic and stone architectural elements and many old stove tiles dating back to the reigns of Sigismund the Old (1506-1548) and Sigismund Augustus (1548-1572) were found. In total, more than 300 thousand artifacts were found during the excavations. The exposition of the museum covers the periods from the 13th to the 17th centuries, up to the entry of the Grand Duchy of Lithuania into the Commonwealth and the loss of its statehood.
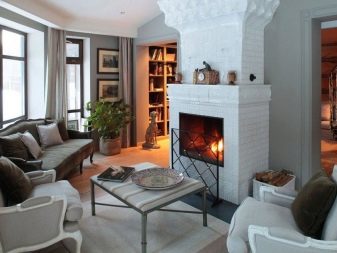
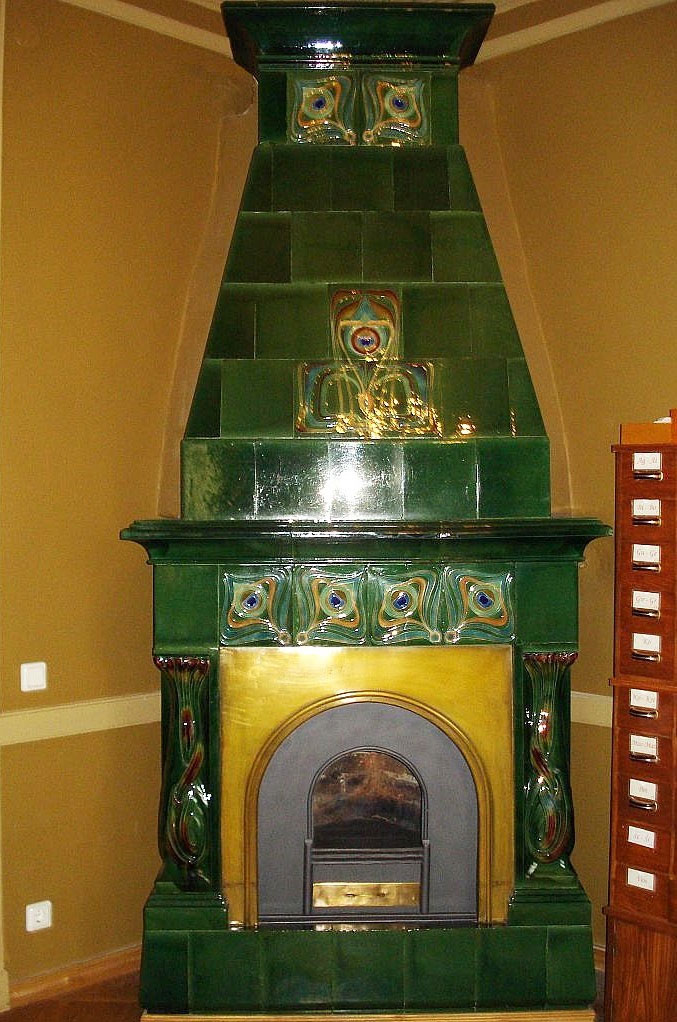 Modern green fireplace in the bedroom
Kiln tiles constitute the largest group of architectural ceramics of the Lower Castle. More than twenty different types of tiles were found with princely coats of arms and allegorical images of mythological and biblical characters.
The largest number of tiles found on the territory of the Lower Castle belong to the Renaissance. These are tiles with multi-colored glaze and scenes from engravings by famous German artists of the 16th century: Lucas Cranach, Albrecht Dürer, Hans Sebastian Beham. Today, in the Lower Castle, the furnaces of the 16th century have been reconstructed.
 Tiled stove from Abo kakelfabriks aktiebolag (AKF)
An equally outstanding example of the art of the early 20th century is the architectural ensemble in Vilnius - the Vileišys Palace, built in 1906 by order of Petras Vileišis by the architect August Klein.
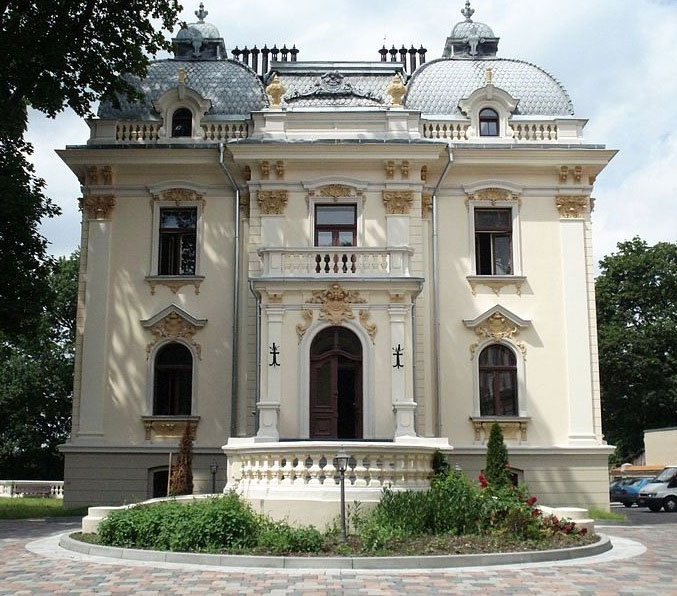
 Hoenashaw Castle
Petras Vileishis (1851-1926) - Lithuanian politician, engineer and philanthropist, educator and devotee of the revival of Lithuanian writing and national Lithuanian culture.
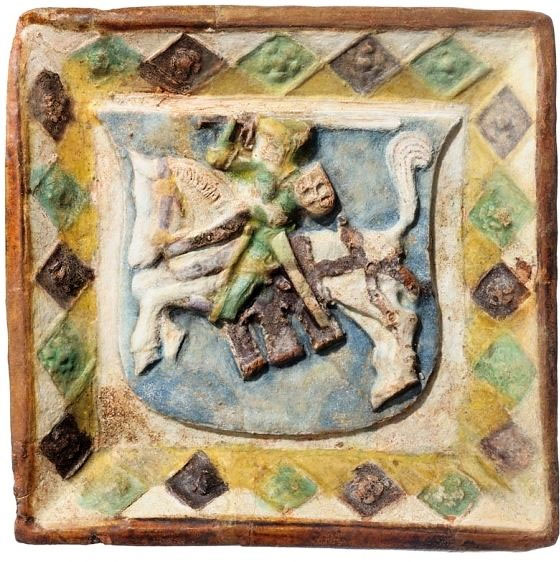
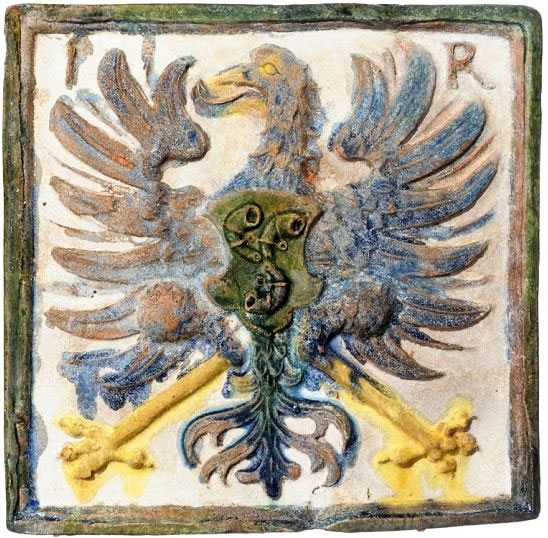
 Relief tile by Hans Kraut
Initially, the architect proposed two projects for the palace - in the neoclassical style and in the neo-baroque. Vileišis chose neo-baroque because of the proximity of the future castle to the Baroque Catholic Church of Saints Peter and Paul, which is rightfully considered the pearl of this style.
The palace was built by Vileišis not only for the residence of his family, but also for various cultural events. Since 1907, art exhibitions of Lithuanian artists have been regularly held in the palace.
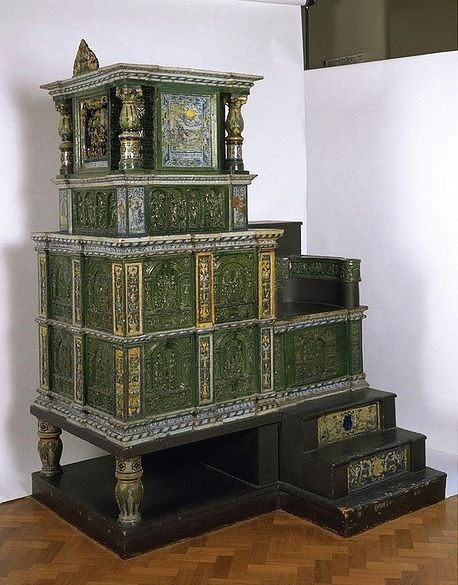 Kraut's tiled stove in the Victoria and Albert Museum, 1577
After World War II, the building of the palace was transferred to the Lithuanian Academy of Sciences, and since 1947 it has housed the Institute of the Lithuanian Language and Literature.
In the palace, which has interiors in the classical, neoclassical and baroque styles, thirteen stoves made in the same styles have been preserved.
Particular attention is drawn to the green fireplace, made in the style of then fashionable Art Nouveau.
 Gothic tiled stove at Hohenaschau Castle
Tiles for stoves in the palace were produced by the Finnish Abo factory - Abo kakelfabriks aktiebolag (AKF), whose models we actively use in our work and which we wrote about in our article about Finnish tiled stoves of the early 20th century. An interesting fact is that in the living room of the Vileishis Palace there is exactly the same baroque tiled stove as in the reconstructed Vsevolozhsky Manor in Moscow.
What are tiles
The meaning of the word (etymology) is interpreted by many in different ways, but it happened
it is from the old word "to express", i.e. to cut. In essence, tiles are tiles made of
fired clay (ceramics), which differs from others in its configuration, namely,
the presence of a ramp.
Rumpa, what is it and why is it needed?
Rump tile (see. Fig.) Is a box-shaped
protrusion on the reverse (rear) side of the tile. Rump attached to tiles
strength and increases the heat capacity of the furnace. It is slightly smaller in size
products.
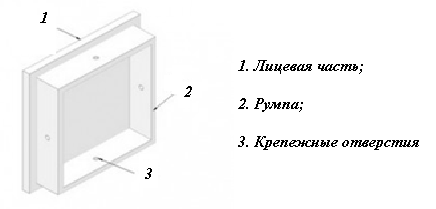
It is this key feature that makes ceramic tiles
ideal facing material for home stoves and fireplaces.
The same hollow construction is also characteristic of tiled
decorative elements for cladding walls, facades, fireplaces and stoves.
Advantages of tiles over tiles
strength and rigidity. Achieved due to the thickness of the product -
a tile is 2 times thicker than a ceramic tile;
ability to withstand any temperature;
resistance to temperature extremes;
heat storage. A well-heated oven is capable of
give off heat during the day;
environmental friendliness. It is achieved due to the fact that in production
clay is used, and also due to the fact that on the surface of the tiles (in
particularly glazed) does not retain dust. It does not burn or emit
substances harmful to users;
ease of care;
fuel economy. The tiller chamber retains heat for a long time,
due to this, fuel consumption is reduced and the duration of heating is increased;
elimination of the possibility of burns on contact with
oven surface. Due to the internal chamber, the temperature of the tiled stove
(outer walls) not high;
low rate of moisture absorption;
the heat generated by a tiled stove is comparable to the sun;
long service life, proven by practice;
historical value. The old tiles are well preserved.
in the estates of the Russian nobility. And today, many users seek to make housing
in traditional style.
Of course, the aesthetic properties of tiles are beyond competition.
Thanks to the variety of their types, any
design project. A tiled stove will fit perfectly into any design - from classic to
modern. Even laconic hi-tech could not resist the charm of stove tiles.
Facing the stove with tiles step by step instructions
Tiling technology, like any building
the process is sequential, begins with the formation of the first row.
The first row of tiles or the so-called "hooves" set the tone
to all construction. Their correct installation is the key to fast and high-quality
further installation.
Installing the first row
tile preparation;
- selected and numbered tiles are immersed in water.
This will avoid a situation where the clay of the tile will draw moisture from
solution; - after extraction, rump each tile to half
filled with clay. Filling the tiller increases the heat transfer of the furnace; - then the filler is stuffed into the clay. As such
brick, gravel, pebbles can act; - the resulting voids are filled with clay;
Note. Many masters use the finished mixture for
filling the ramp. Composition of the mixture: clay, quartz sand and brick in proportion
(ratio) 1:2:2.
laying tiles begins with the installation of corner elements;
installation of central tiles. After the first row
laid out, it is necessary to pull the tiles together with a steel pin. To
to prevent the tiles from slipping, it is recommended to bend the pin from above. lower
edge it will rest against the rumpa;
tiles in vertical and horizontal rows are connected
each other using steel brackets.
soft wire attached to the pin will allow you to connect
a row of tiles with a row of brick ovens. The wire is tied to the pin. At her end
a loop is formed, which is wound into the brickwork. For a secure connection to
each pin should be tied to two loop wires.
Note. Loops for tying with the stove masonry are installed
during the construction of the furnace. Installed in advance, they will interfere with work.
The order of fastening the tile is shown in the photo.
After the first row is laid, you need to clear the seams. V
this will help to apply the grout more accurately in the future. Also clean up
tiled surface from washing.
Laying subsequent rows of tiles
After the first row is laid, in the same way
another one is posted. After that, the masonry of the stove or fireplace itself is carried out.
After several rows of bricks are laid out, the space between them and the tiles
also filled with clay.
Cleaning the oven and grouting the joints between the tiles
The lining of the tiled stove is completed by cleaning the surface.
To do this, use a soft cloth or paper. The final touch is
sealing joints (grouting), if any, are allowed in the process of work. For grout
joints between tiles use liquid gypsum dough, which is used to lubricate the joint
gaps. After 10-15 min. after the dough has dried, its remnants are removed with a soft
rag.
Note. No matter how much you want to heat the built and
lined oven, do not do this earlier than a week after
completion of all work. And even then, the trial firebox lasts no more than an hour. Full
the test can be performed after the clay mortar is completely dry -
after 3-4 weeks.
Peculiarities
A distinctive feature of such a tile is the presence of a rump - a protrusion that has a box-shaped shape on the reverse side. Due to this feature of the products, their strength increases, as well as the overall heat capacity of the heating device. The production of elements in the form of volumetric products is a significant difference between products and ceramic tiles.
The unique structure of the tile makes it the best material for lining stoves. The raw material for the manufacture of tiles is clay. As the temperature rises, its expansion rate is the same as the expansion rate of brickwork, so that the material obtains excellent heat transfer properties.
The main advantages of tiles include:
- resistance to temperature fluctuations;
- a good indicator of strength, which is achieved due to the thickness of the product;
- heat accumulation - a heated stove will give off heat to the room for about a day;
- low rate of moisture absorption;
- ease of maintenance;
- fuel economy;
- low level of injury risk of the material - contact with the surface does not cause burns;
- long service life;
- historical significance.
The attractiveness of tiled tiles is unrivaled. A stove decorated with such products will perfectly harmonize with the interior of a room in a modern hi-tech style or in a rustic style of decoration, which was popular even under the king.
Modern models of stoves are designed in such a way as to use a minimum of fuel, which means saving money on space heating. Modern universal designs work great on natural raw materials, as well as alternative fuel options.
Preparing the tile for facing
Considering the way the tiles are made, it can be noted that
All tiles will vary in size and shade.
It is easier with the size - all tiles are adjusted to the same size with
using a grinder and grinding with a rasp. Moreover, if you need to cut the product into
parts first need to be washed down with a glazed front surface.
Note. In order not to damage the surface of the tile when
further grinding, first on the glazed surface you need to do
small bevel. Thus, the tiles will lean against each other with an edge, and
not a decorative surface. This will not affect the quality of the installation in any way.
But if the size can be brought into a single correspondence, then
color needs attention. Products should be grouped in such a way that
so that the transition between shades is as less noticeable as possible
At the same time, the masters
it is advised to lay tiles with dark shades at the bottom.
Products with detected defects (cracks, chips,
pattern defects) may be useful for trimming. They can also be placed in
junction with a wall or other inconspicuous places.
Options for laying tiles: the first pattern - with sorting, the second - without.
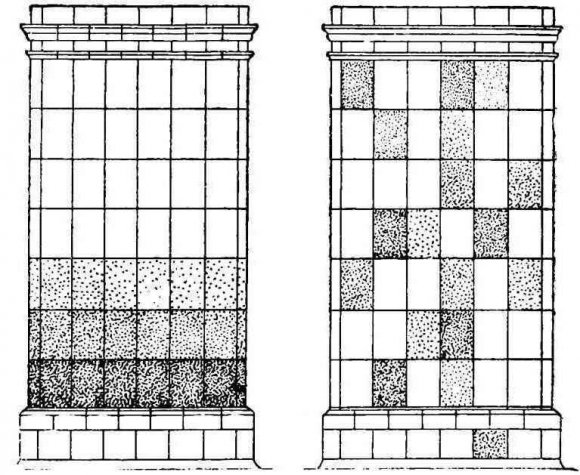
At this, laying approaches are not limited and are determined
drawing, tile relief and the author's imagination.
The material was prepared for the site www.moydomik.net
Layout of tiles
Sorted products must be laid out in accordance with the drawing
on a flat surface.

Note. Before laying out the tiles, it is convenient to designate
outlines of the oven with masking tape.
If the size of the tile exceeds the size of the stove, the edges of the tile
need to be sanded (grinded) to the desired size. If less, you can increase
the thickness of the seam between the tiles. However, its thickness should not exceed 1 mm. for
vertical seam and 3 mm. for horizontal.
The laid out tiles are numbered on the reverse side and proceed
directly to the oven lining.