Pros and cons of dry floor screed
The price for the installation of this type of coating ranges from 200-500 rubles per square meter. However, do-it-yourself dry floor screed installation does not require special skills, a special tool, and takes a couple of days in a small house, after which the coating can be immediately used. This allows, without pouring a concrete screed, to get a flat floor for less money.
This screed is perfect for:
- level the floor with large height differences;
- mount the screed in the cold season in a room without heating;
- to strengthen the old floor;
- close the wiring and heating pipes passing through the floor;
- perform a quick laying of the floor.
Advantages of dry screed
Like any other coating, such a screed has its pros and cons. The advantages include the following points:
- Ease of laying the cover. Due to the fact that installation does not require special expensive tools and materials, installation of a dry screed can be done by hand without much effort.
- Installation speed. The technology involves the use of ready-made floor elements with a sufficiently large area, so this method of forming a screed takes 2-3 days for houses up to 100 square meters.
- Cost of materials. The main cost item when using bulk floor technology is gypsum fiber floor elements. However, in any case, a dry screed is cheaper than a concrete screed, or a semi-dry floor screed.
- High strength. Despite the apparent non-solidity, the dry screed has sufficient strength characteristics. Conducted experiments have proven that such a coating is able to withstand the weight of the car.
- Good thermal insulation and impact noise protection. Due to the use of fine expanded clay, which has a porous structure, as a backfill, the bulk screed has sufficiently high soundproofing qualities. The absence of direct contact of GVL floor slabs with floor slabs allows the floor to remain always warm.
- Perfectly flat surface. One of the main advantages of a dry floor screed is to obtain a perfectly flat surface with minimal differences without bumps and depressions, which does not require pouring the self-leveling floor. On such a surface, you can immediately lay out a laminate, parquet, or other topcoat.
- The minimum weight of the finished screed. This advantage plays a big role when installing in houses with wooden floors, when you want to get a smooth, non-creaking surface.
- The possibility of laying electrical wiring in the screed, as well as pipes for water supply and sewerage.
- Lack of dirt and dust during installation, unlike other types of rough floor screeds.

Cons of dry screed
There are no serious shortcomings in this type of rough coating. However, those that are often play a significant role in the choice.
- Fear of moisture. In no case should such floors be exposed to wetting and spilling water into the interior. In the event of a dry screed spill, you will have to open the coating and dry the bulk material, and then re-install it. Otherwise, stagnant moisture will lead to the formation of fungus.
- Dry screed is quite demanding on compliance with the installation technology. If mistakes were made during installation, then in the future, due to uneven loads on the floor surface, voids may form under it. Voids lead to pavement deflections that result in the loss of the "hard floor" feel.
- According to manufacturers, the service life of dry screed components is at least 10 years, which is much less than traditional rough coatings.
The disadvantages of a dry screed are most often manifested due to installation errors. Studying the technology and installing a dry floor screed with your own hands will help to avoid the flaw of unscrupulous craftsmen.
Why dry
For many decades, traditional types of cement screeds have been successfully used in practice. The classic components for such screeds were necessarily:
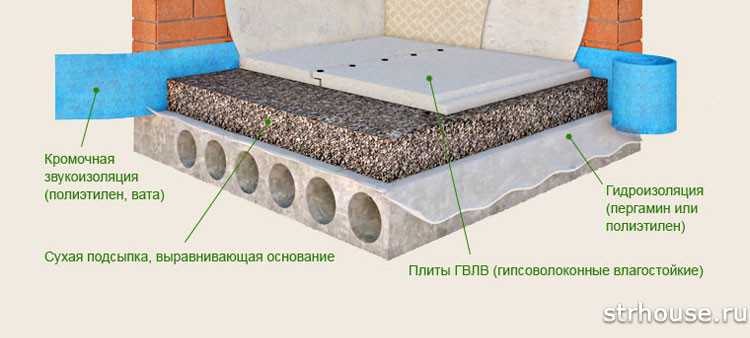
Only their ratio and the quality of individual components changed. But here the specialists from the German company Knauf undertook the implementation of a new project suitable for leveling the floor - it was they who came up with the joint use of materials such as dry screed and GVL (gypsum fiber sheets). The technology turned out to be so simple that it became accessible to everyone. Here, in addition to GVL, expanded clay sand is required as the basis of the screed.
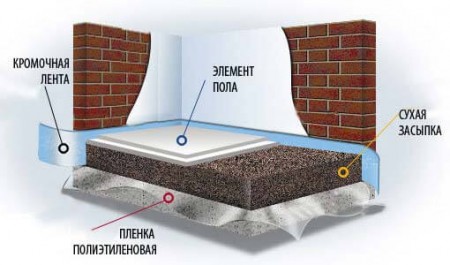
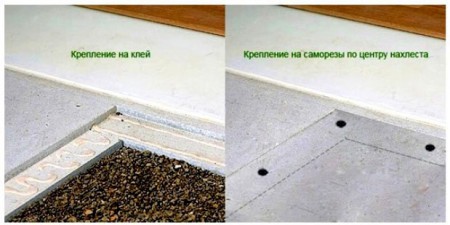
First, loose material is poured onto the subfloor - expanded clay, which is sprinkled with sand or perlite, and then tiled materials are laid on top: GVL, fiberboard, chipboard or plywood. The modules of the upper bonding layer are fastened with self-tapping screws and glued.
Dry screed laying technology
If a dry floor screed is chosen, its technology consists of several successive stages. These steps will be listed below with reference to the fact that expanded clay will serve as bedding.
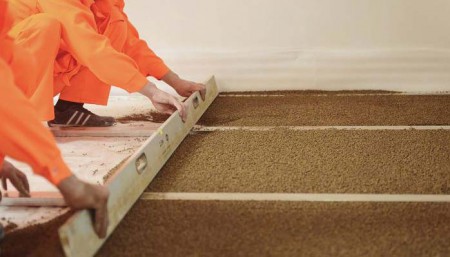
The installation process of a dry screed begins with the fastening of beacons as guide elements. It is with the help of them that the dry screed - expanded clay is leveled in height, they determine the thickness of the bulk layer. Some experienced craftsmen manage to do without beacons, but beginners are strongly advised to use them.
Exposure of lighthouses
Most often, for a dry screed, special T-shaped beacon profiles are used, which are fastened with screws to the base of the floor, but before that they need to be set using certain tools, which include:
- The laser level must be installed in the center of the room and turned on.
- After that, half a meter from one of the corners of the room, you should screw a self-tapping screw into the floor, install a rule on it vertically and mark a trace from the laser beam on it with a pencil.
- After that, on the diagonal of the room, closer to the other corner, also screw another self-tapping screw into the floor, put a rule on it and check the coincidence of the line drawn on it with the laser beam.
- If they diverge, then the self-tapping screw should either be screwed in even deeper, or unscrewed a little, ensuring that the mark exactly matches the laser marker.
- Carry out similar actions with all intermediate screws, or do it easier: pull a sufficiently thin and strong thread between the extreme fasteners, and, focusing on its level, screw the screws into the floor after 20 cm.
- Then you can check the work - put an even rail on the screws, and on it - the usual water level. If everything is done correctly, then the level will confirm the horizontal rail.

- After that, the lighthouse must be fixed with a cement or gypsum mortar.
- The guide element on both sides of the screws should be overlaid with a solution and allowed to dry.
- Do the same with all other beacons.
Expanded clay backfill
If it is not a dry screed with sand, but with expanded clay granules, then they should be as small as possible. After all, they will be supported by sheets of leveling material, which in the case of large granules will have a point, randomly located support and will deform from this, dips will appear.
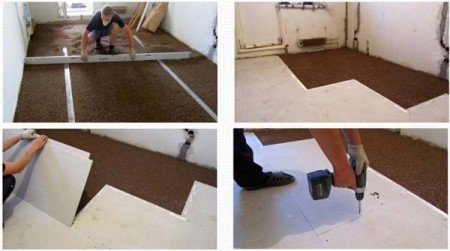
- Expanded clay for dry floor screed should not be poured onto the entire floor at once, but only its section.
- Having reached the level of the beacons in this place, you should immediately put a tiled leveling material on top, for example, GVL.
- The feet of a working person should be on a clean, expanded clay-free floor.
- After that, you can proceed to backfilling the next section and laying the next slab on it.
But a number of craftsmen also have an alternative approach - they first cover the entire floor with expanded clay, level it with the rule according to the level of the lighthouses, and then move along the floor, placing pieces of GVL or plywood under them.
Laying sheet material
There are a number of points that require special attention:
- If gypsum-fiber sheets are used for leveling, then it is advisable to lay them in two layers, which must be fastened with self-tapping screws, and then coat the joints with glue. Given this feature, Knauf began to produce ready-made double sheets with a seam connection - the “Knauf superpole”. With it, it is easy to create a beautiful floor covering that meets all modern requirements.
- In the case of using plywood or chipboard, they can be laid in one layer, but only if their thickness is at least 12 mm. These materials must also be treated with protective agents - bituminous mastic or hot drying oil.
- When laying sheets, you need to press them tightly against each other. If the gaps still turned out, then they should be filled with a putty solution.
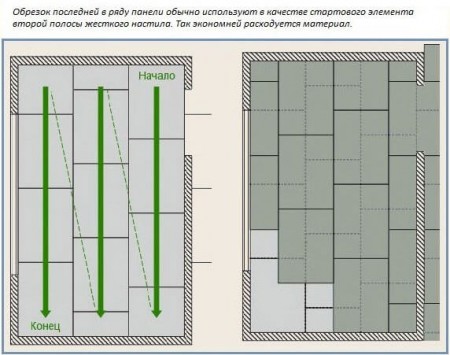
If expanded clay is backfilled in sections, then installation should begin from the corner farthest from the front door of the room. If the floor is previously completely covered with expanded clay, then installation, on the contrary, should be started from the front door, so that you can easily move along the previously laid slabs.
- In the case of using the "Knauf superfloor", the folds of the plates must be coated with glue and connected with special self-tapping screws having a length of 19 mm. These self-tapping screws have countersinking heads, thanks to which the fasteners are deeply recessed into the GVL. This helps in the process of laying to get rid of unnecessary height differences.
- When all installation work is completed, then all protruding edges of the damper tape and plastic film must be cut off, and the resulting gap between the walls and the dry screed must be filled with sealant.
Surface preparation
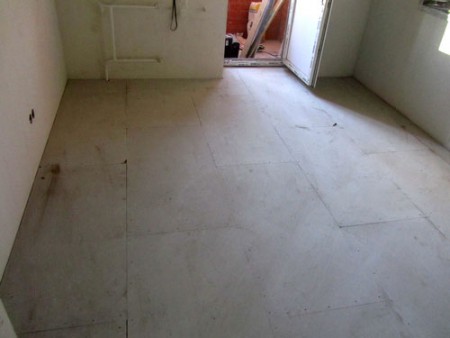
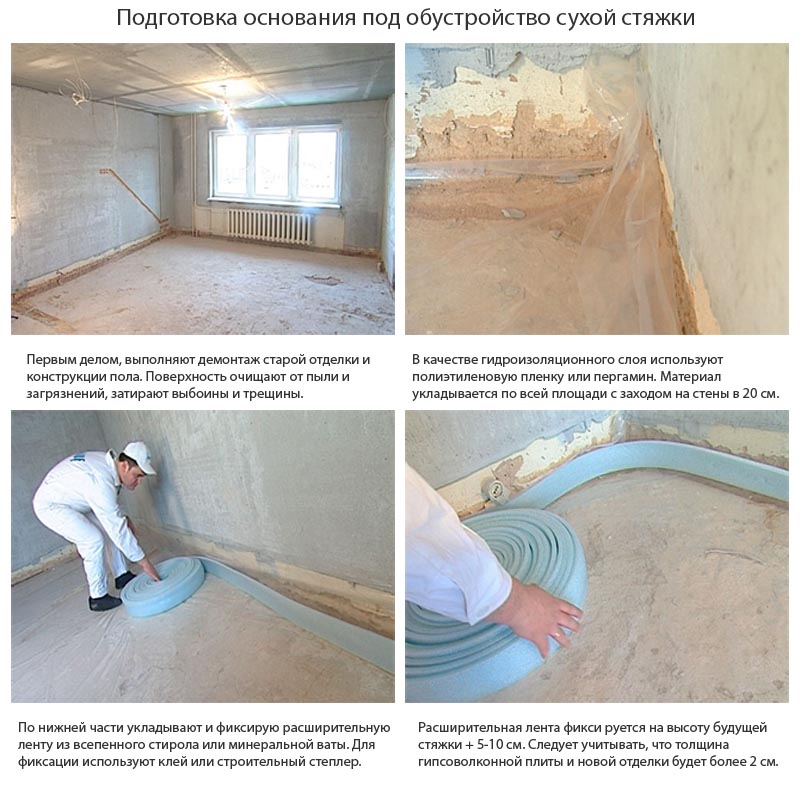
- If the repair takes place in the apartment, then before making a dry screed, you need to remove the old floor covering and all the layers under it until a reinforced concrete floor appears.
- The surface of the slab must be inspected and all defects found on it (notches, cracks, chips) should be repaired, using ready-made plaster mixture or cement-sand mortar for this purpose.
- The repaired places should be allowed to dry, after which the corrected subfloor should be carefully swept away from dust and dirt, in order to then put a waterproofing material on it - polyethylene. The film must completely cover the floor surface and “climb” onto the walls along the entire perimeter to a height determined by the thickness of the dry screed.
- The film is usually laid in the form of several parallel strips, which should overlap each other by 10-15 cm. To make the waterproofing airtight, the edges of the strips must be glued with construction tape.
The question may arise: if the screed technology is completely dry, then why is waterproofing needed? The thing is that the floor slabs are not monolithic, they have gaps that allow moisture to pass, albeit slowly, from the lower floor or from the underground (if we are talking about the first floor). Therefore, only high-quality waterproofing can stop the flow of moisture.
These precautions are justified by the fact that a dry screed does not like water ingress.
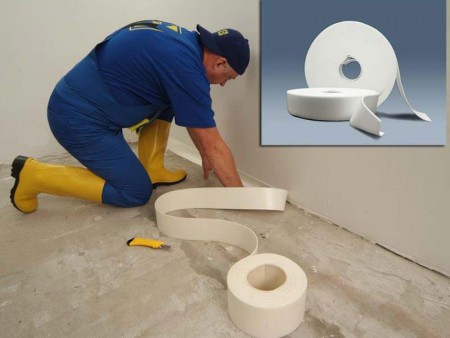
- Then, along the perimeter of the walls, you need to place a damper tape. This tape is made of foamed PVC, one of the sides of which is self-adhesive, protected by a polyethylene film. The protective film must be removed and immediately glued to the wall surface. The purpose of the damper tape is to compensate for the thermal expansion of a dry screed. In addition, it will prevent the leveling sheets from coming into contact with the walls, which will protect them from deformation, and residents from unpleasant creaking.
- After installing the edge strip along the perimeter of the walls, the entire vapor barrier structure at the base of the floor is considered complete.
Dry floor screed what is it
In order for the coating to last for a long time, it is not at all necessary to level it with a concrete mixture and wait for drying for about 28 days. A worthy alternative to the "wet" process is leveling using dry mixes. If the floors are to be repaired, a dry screed will be completed in record time, not inferior in quality and strength to a coating made using a different technology.
The emergence of this method of leveling the surface came from the 70s of the last century. Then for the first time prefabricated dry floors were used in mass construction. To date, the principle has remained the same, but the materials have changed. Draft floors made according to this technique have practically no drawbacks. Prefabricated coatings of a new type are widely used in construction.
Dry screed installation
It is necessary to start installation work with traditional preparation - leveling the surface. This is especially true for concrete floors. First you need to remove the old screed, carefully sweep out all the debris, vacuum the small residues and cover all the cracks, potholes and bumps with concrete mortar. After it dries, it should be cleaned. This is done so that sharp fragments do not damage the steam or waterproofing. This completes the leveling of the floor.
Then a vapor barrier layer is laid on the base surface. For these purposes, you can use a traditional polyethylene film with a thickness of at least 60-80 microns. But it is better, nevertheless, to use modern vapor barrier membranes, for example, DELTA. ISOROC. ISOLTEX. Dupont and others.
It is necessary to lay the vapor barrier in such a way that adjacent strips are “overlapped” with a degree of mutual overlap of 10-20 cm. For additional reliability at the joints, it is better to glue the film with double-sided tape. Also, do not forget to put the film on the walls and fix it there with the same adhesive tape. The height of the film on the walls is determined by the thickness of the future screed. It is better to do it with a small margin.
After laying the hydro-vapor barrier around the perimeter of the room, a damper tape is installed. This is done in order to compensate for possible linear changes in the screed materials due to its porous structure. Some manufacturers produce tape with a self-adhesive surface. But you can fix it with plastic dowels. In this case, it is necessary to monitor the tightness of the tape, the absence of air bubbles.
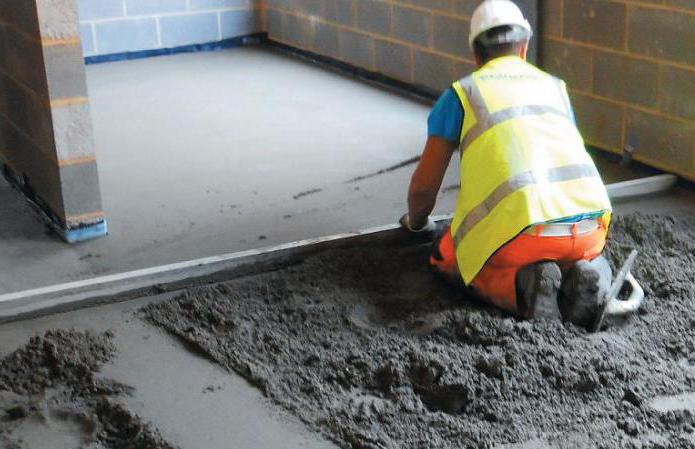
Now you can start filling the pillow
At this stage, it is important to do the work so that the resulting surface is strictly horizontal. The easiest way to control this is with a regular bubble building level.
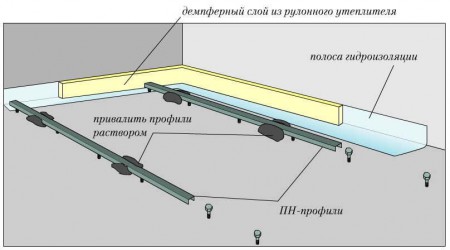
Experienced workers can ensure that the surface is level without additional tricks with just one rule. But it will be more convenient to work if you pre-install beacons. Usually, a metal profile for drywall is used as such.
Profile strips can be installed on concrete mortar slides. But it is better to pour a layer of expanded clay a third or half of the required thickness, and then lay the beacons. In this case, it will be easier to clean them up later. Yes, and the uniformity of the bulk layer will be observed.
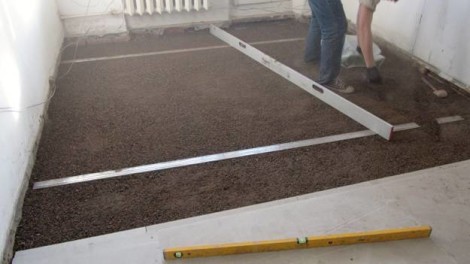
The distance between adjacent beacons should be 20-30 cm less than the size of the rule to be used for alignment. Then the space between the beacons is filled and leveled. It is better to start backfilling from the farthest corner of the room and move towards the front door. After backfilling and leveling, the muffins must be pulled out, and the grooves formed must be filled up.If this is neglected, then after the inevitable subsidence of the poured pillow, the sheets of the upper layer will rest on metal beacons and it is these places that will become potentially dangerous in terms of deformation and destruction.
The thickness of the bulk layer depends on the characteristics of a particular room, but cannot be less than 3 cm.
It is better not to walk on a leveled surface. But if such a need arises, then it is allowed to put plywood, OSB tracks for a while. drywall or similar material.
Now you can proceed with the installation of the upper plates (sheets). It can be gypsum-fiber sheets (GVL), OSB. Chipboard. But it is better to use sheet materials specially designed for this. So, for example, GVL "KNAUF" is popular on the market.
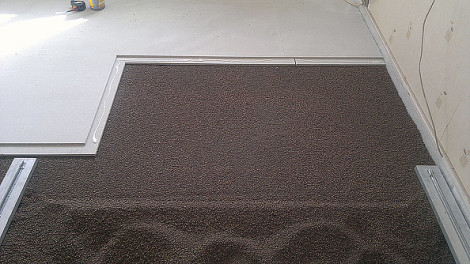
Laying of plates starts from the door and moves along the finished surface to the far corners. It is better to glue the joints of adjacent sheets with PVA glue. The second is laid on top of the first layer. Moreover, the top layer is placed with an offset. This will block the joints of the lower layer, and prevent dust from the bulk pillow from entering the room through them. The places of the upper joints must also be coated with glue and fastened to the lower layer with self-tapping screws in increments of 10-15 cm.
When laying along the walls, one must not forget about the compensation gap of 10-15 cm between the plates and the enclosing structures of the room. At the end of the work, it can be filled with sealant.
After laying the plates (sheets), it is necessary to putty the joints and the places where the screws were screwed. Then carefully sand and you can start laying the final floor covering.
Screed recommendations
For leveling expanded clay, it is necessary to use a dry mix. To do this, add water to the mixture until the solution becomes viscous and homogeneous.
For high-quality compaction and leveling of expanded clay, it is used dry, not wet. Water is added to the prepared solution with expanded clay until it becomes viscous and homogeneous. The M100 solution is taken in the ratio of one part to three to four parts of expanded clay. When kneading, it is necessary to monitor its fraction. This brand of mortar will prevent the appearance of cracks as a result of an excess of cement. To prevent the appearance of splits in the screed, water is taken in not very large quantities. In this case, the size of the calculated pie of the cement screed should be more than 10-12 centimeters.
The implementation of a two-layer screed is necessary if large differences are found on the base where the future screed will be laid, if the horizontal is observed over the entire area at the level of ten centimeters or more. In order to qualitatively carry out all work on the installation of floor screed with expanded clay and normal cement mortar, you must follow the instructions below, carefully observing all proportions:
- Mix expanded clay with mortar using a mixer or an electric drill with a mixing attachment.
- Starting the preparation of the second layer of the screed, knock down all the protruding sharp parts on the floor. The recesses are compared with the common base of the floor.
- Lay polyethylene film for waterproofing. You can use waterproofing or liquid mastic.
- To produce isolon flooring, fixing it with adhesive tape around the entire perimeter. You can raise the material higher than the level of the screed.
- Lay, if necessary, masonry nets.
- After filling with expanded clay and leveling, wait two or three hours until all the water is absorbed into the expanded clay, and start installing beacons, which are metal slats or profiles.
- Pour the base layer with a finishing solution of a leveling cement-sand screed, add a plasticizer to prevent cracking for strength. The thickness of the layer should be about 40-50 centimeters for a mixture of gypsum plaster and tile adhesive.
- Leave the finished screed to dry for a month.
- Wet the floor surface regularly with water to prevent cracking.
In this way, you can save money by reducing the overall load on the base of the floor slabs. This technology, with its exact observance, allows not only to make the floor new and of high quality, but also to obtain a lighter screed, compared to other types with high sound and heat insulation.
Cleaning, repairing and waterproofing the base
The main stages of preparation, cleaning and waterproofing of the base
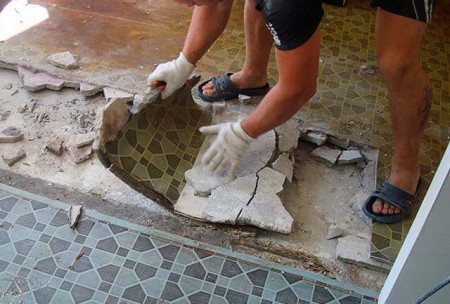
Preparing the old floor surface for do-it-yourself installation of a dry screed is a mandatory step provided for by the work technology, which will include dismantling the old coating and base structure, cleaning and inspecting the surface for flaws, eliminating possible damage, marking and arranging the necessary insulation.
To open the floors, any hand tools are used. When dismantling the old structure, care should be taken to avoid damage to the surface of the bases.
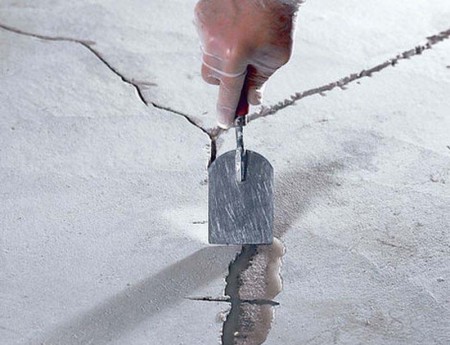
Cleaning of large construction debris is carried out manually; for dusting small particles, it is better to use a construction vacuum cleaner. In the presence of small chips, cracks and shells, they are eliminated by priming and puttying with a cement-sand mortar.
To repair deep damage, jointing is carried out by cutting perpendicular lines up to 5 mm thick, cleaning, priming in two or three layers, grouting with special compounds or a standard cement-sand mixture.
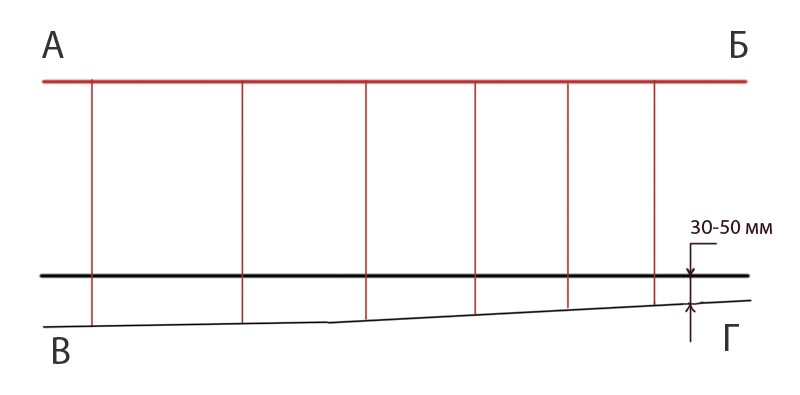
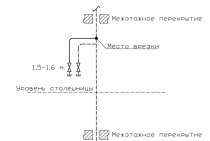
The calculation of the leveling layer can be performed by a simple method illustrated in the diagram
Calculation work is carried out with the obligatory consideration of the following points:
- Presence/absence of communication systems, “warm floor” systems;
- The degree of damage to the base;
- Thickness of gypsum fiber board, plywood sheets and DSP;
- distance to the ceiling.
When laying communication systems, pipes and wires are passed through a protective corrugation made of plastic or polyurethane. The minimum layer thickness above the protective corrugation must be at least 2 cm.
The maximum thickness of the bulk layer, regardless of the arrangement of additional systems, should be no more than 12 cm, which should be taken into account, especially in case of severe damage to the base surface. Usually the average thickness of a dry screed does not exceed 6-8 cm.
For marking, it is recommended to use a laser or building level. The estimated floor level is marked on the wall surface around the perimeter of the entire room.
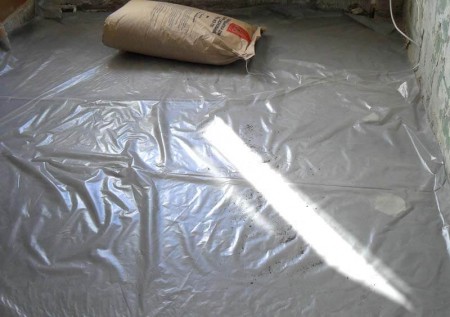
Laying waterproofing is carried out for any type of base and prevents the penetration, absorption and accumulation of moisture from the concrete floor slab or wooden flooring.
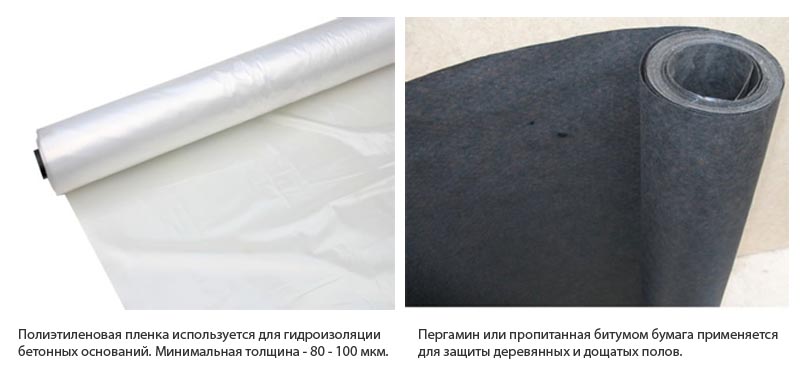
Polyethylene film and glassine - materials for waterproofing concrete and wood surfaces
Due to the type of load-bearing base or subfloor, the following materials are used for arranging insulation:
- Polyethylene film - used for waterproofing concrete floors. It is desirable to use a material with a thickness of at least 100 microns;
- Glassine - used to insulate wooden floors and decking.
The laying of the insulating coating is carried out along the perimeter of the entire room with an overlap on the plane of the walls of 15-20 cm or slightly higher than the height of the bulk layer. When joining two canvases, an overlapping seam of 10-15 cm is performed and the joint is glued with paper tape.
In addition to floor waterproofing, a damper tape should be glued along the lower edge of the walls - this is an expansion joint that serves as a compensator for thermal expansion of the aggregate, reduces the passage of sound waves from adjacent structures and prevents the formation of cold bridges.
The tape is glued taking into account the height of the screed, rough flooring and flooring.That is, it is recommended to carry out sizing 5-7 cm above the leveling layer, and after laying the necessary cladding, trim or cover the remains with a plinth.
What is a dry screed
This is a "young" but promising way of rough flooring, which can be used both in renovations and in the arrangement of a new building. Such a floor is able to withstand huge loads - up to 500 kg / m². Moreover, it does not creak when walking and does not exfoliate in the event of temperature changes (which cannot be said about the traditional wet screed).

Advantages of dry screed
Here are the main benefits of dry screed
- low cost of materials;
- absolute evenness of the surface;
- speed of installation work;
- lack of so-called wet procedures;
- sound and thermal insulation;
- reliability, strength.

Advantages of dry screed