Preparatory stage
Preparatory work can, in fact, be divided into two main steps:
- Leveling and priming;
- Markup and layout.
So it is worth talking about each of these steps separately.
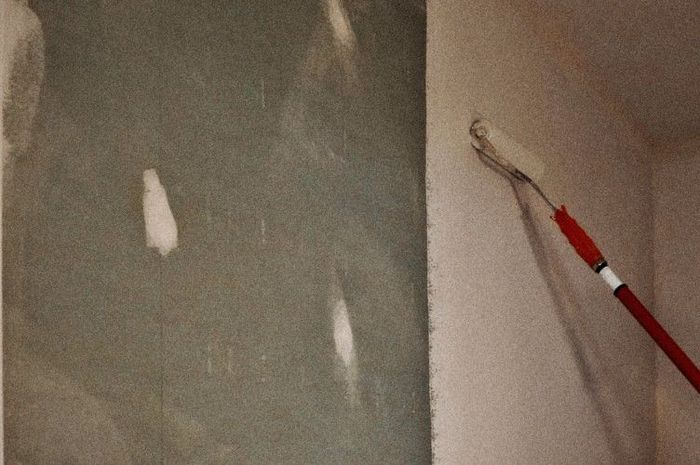
Leveling, primer
Having prepared materials and tools, do not rush to immediately prepare the glue. To begin with, you will have to get rid of everything superfluous in the room, remove plumbing, remove old finishing materials.
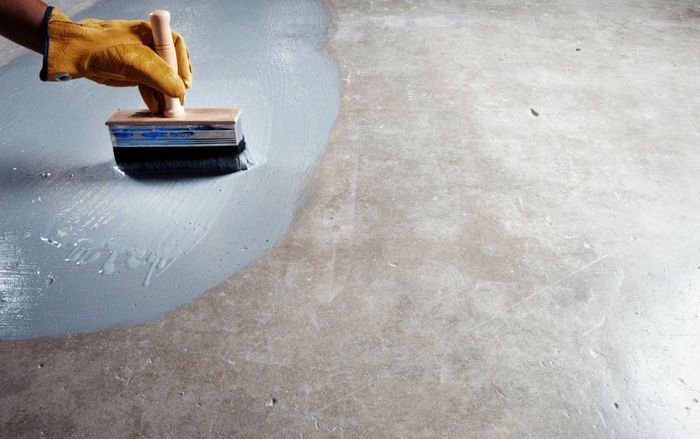
Achieving a perfectly flat surface is what you need now. To do this, use the level and plumb line, determining the presence of irregularities, drops. Alignment is carried out using a cement-sand mortar, if the problems are large. If the irregularities are small, then ordinary putty will do.
After waiting for the walls to dry, apply a layer of primer with a roller, and after that you can start coating with waterproofing materials. Now both ready-made formulations and blanks are offered, which can be mixed directly by yourself.
Experts recommend making a double layer of waterproofing, as well as adding special protective compounds against mold and fungus.
Markup and layout
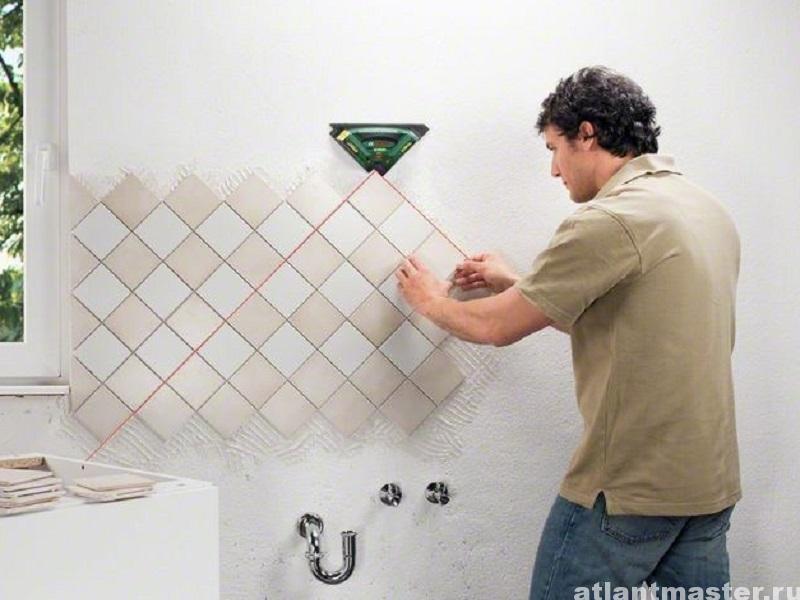
When leveling is complete, you should think about how exactly your wall tiles will lie on the surface. The layout of the first row plays an important role.
- Mark the point in the corner where the first row will be located using the hydraulic level;
- With the help of a second person, dot all the corners accordingly. This will draw a straight line.
Having at your disposal the markup, it will be much easier for you to determine the layout, that is, the position of the tiles, borders on the wall. There are currently three main options:
- A straight seam, where the plates are glued joint to joint.
- brickwork method.
- Diamond laying, that is, diagonally. This option is only suitable for square tiles.
Not infrequently, techniques are combined, thereby achieving a unique layout. When the preparatory stage is completed, you can already proceed to the laying process.
Wall cladding
A variety of tiles are used for wall cladding of premises: ceramic, glass, concrete, terrazzo, brecciated and polymer (plastic and polystyrene). If you want to buy ceramic tiles for yourself, look here.
Ceramic facing tiles are produced by the industry square and figured (seamless) with a glazed and unglazed surface, as well as hexagonal unglazed. Glass, concrete, terrazzo, breccia and polymer tiles are used only for wall cladding. Small ceramic and glass tiles are glued onto paper cards to speed up the cladding. Such maps are called carpet mosaics. Square tiles from various materials can be installed in a dressing (in a row) or "seam to seam".
For rooms with a high height, tiles are sometimes placed diagonally. In some cases, the surface is divided into panels (figures). To do this, the entire surface to be lined is divided into separate squares or rectangles, separated by tiles installed directly. The resulting figures are filled with tiles set diagonally. All tiles, except for polymer ones, are attached to the surface to be lined with cement mortar or adhesive mastics. Polymer tiles are installed on special adhesive mastics.
How to glue ceramic tiles to the wall
Ceramic tile is a finicky material, it is not attached to the base without the use of a special adhesive. The reason for this is that ceramics has a strong absorbent property, and therefore needs additional material to bind it to the wall or floor due to the return of its moisture.Such an adhesive material should increase its properties when moisture is lost. But even the use of glue does not guarantee reliable fastening of the tile, if some nuances were not taken into account, which subsequently lead to the material falling off.
Reasons why tiles fall off
If the ceramic tile has fallen off the wall along with the adhesive material, then the reason for this may be:
- the surface, which before facing was not prepared for this work - contained old remains of plaster, chalk or putty;
- lack of a primer on the surface that has undergone cladding;
- low quality glue.
Therefore, in any case, before gluing ceramic tiles to the wall, it is necessary to prepare the surface to be treated in accordance with all the rules, then the adhesive will thoroughly perform its functions and hold the tile firmly.
If the tile has come off the adhesive surface, then this can be caused by:
- uneven and incomplete application of glue to the tile;
- poor adhesive composition.
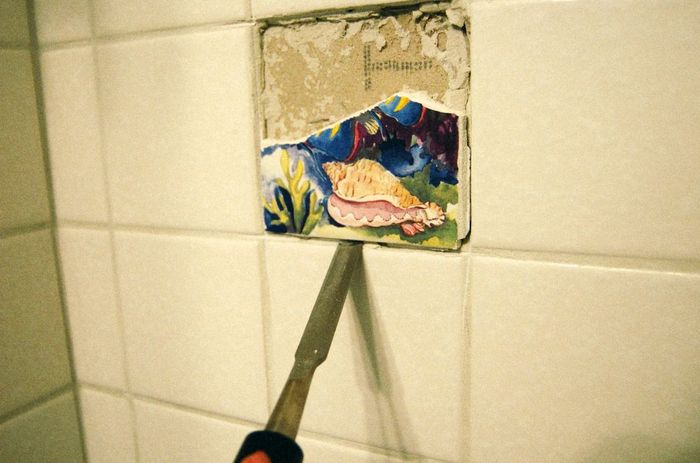
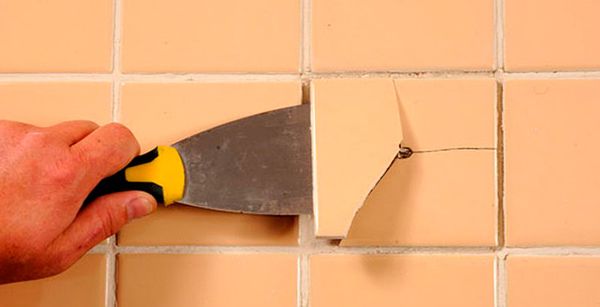
Cleaning loose tiles
If there is a supply of facing material, then use it, or buy the same ceramics, if not, the fallen off finish is cleaned of the solution. To do this effectively, in a way that is gentle on ceramics, use a grinder with a dry cutting disc. The tile is soaked in water for half an hour to soften the glue and reduce the amount of dust. Then the ceramics are laid face down on a flat wooden surface, pressed with a clamp through a rubber pad and the old mortar is cut off or grinded off at an acute angle to the surface. The edges of the tile are cleaned of grout with sandpaper.
How to prevent peeling
What measures can be taken to prevent tiles from peeling off? First of all, it is necessary to follow the technology of laying tiles. No exceptions can be made. Otherwise, you will inevitably have to redo the repair. It is possible to veneer only the prepared leveled surface.
If you are going to install the coating on a wooden base, you need to make a plywood substrate and a screed to level the movement of such a dynamic material. Be sure to use only the correct adhesive for the particular surface. For wood materials, special mixtures are produced that are more viscous and mobile, but at the same time do not violate the integrity of the tile.
Before applying the solution, care must be taken to improve the adhesive properties of the base. To do this, it is carefully primed and continue to work only after complete drying. For cement glue, you must first soak the tile in water. Work only on dry and clean surfaces. Apply only as much grout as needed for the type of tile, otherwise it will often fall off again.
To prevent the tiles in the bathroom from falling off in the future, use latex, silicone or epoxy mixtures for grouting and sealing joints. Well, if it was not possible to avoid the problem, try to fix it as carefully as possible.
It happens that all the tiled masonry walks, protrudes and strives to collapse. If the tile is beautiful, do not rush to break it in order to stick it on a new one. If the entire masonry is movable, then there are voids under it. At the joints of the tiles, where the crosses stood, drill through holes in the glue with a 3 or 4 mm drill with a drill (you do not touch the tile) And drive the foam from the can into these holes. Having passed all the sections, press the protruding places with a spacer in the form of a large mop and after 2 hours the tile is in place and does not move.
Good afternoon. Can you tell me the name of the foam can? Thank you.
A similar problem: the tiles in the bathroom are intact, but moving away. Could you tell me what kind of foam should be glued?
We strongly do not recommend using this method.Since, having gone too far with the amount of mounting foam, expanding, it can destroy the masonry and squeeze out the peeled tiles, which, when dropped, are likely to break or, at least, get chipped. And it is impossible to calculate the exact amount of mounting foam in this case, since we do not see exactly where the delamination has formed and cannot determine the volume of voids in any way. In this case, we recommend that you carefully remove all loose tiles and put them back on the adhesive solution.
Thank you for quick response. I won't use foam.
And I used foam, but on the floor, you just need to put something heavy and that's it)
It has disappeared on the wall near the heating boiler along with the solution, can it be glued to what with the same solution? Since the layer of glue from the tile can not be cleaned off.
home → Repair and maintenance → We glue the fallen off tiles in the bathroom
SERGEY repairman
Copying site materials is allowed only if an active link to the source is placed.
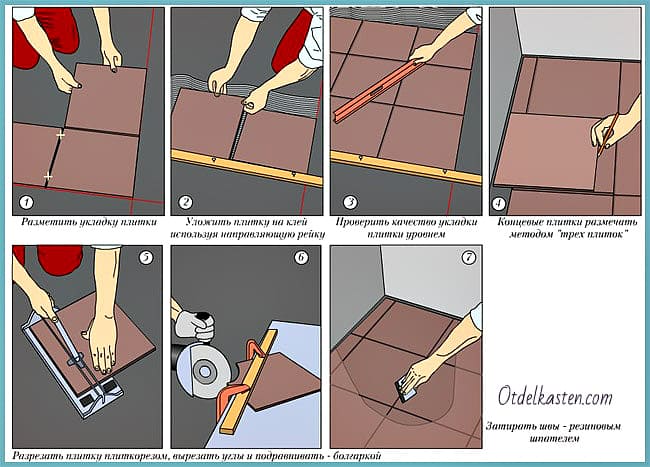
Tile installation technology
Do-it-yourself tile laying begins with the placement of beacons. It is easier to install beacons if you use a thread-lace stretched without sagging. The thread must be stretched with an indent of 5 mm from the tile. On a stretched rope, the placement of beacon tiles and the plane of the rest of the horizontal row of the laid tiles are subsequently controlled. During the laying process, the vertical rows of tiles must be checked for level. To install beacons, it is better to use alabaster, because this composition hardens and peels off the tiles faster. In the future, beacon tiles will need to be removed and glued to a permanent base.
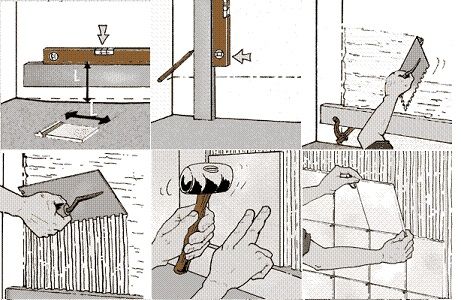
Wall cladding starts from the center to the corners of the walls. The center of the wall is marked with a vertical thick line from the ceiling to the floor. From the drawn line, begin the installation of tiles. Using a checkerboard pattern when laying, the joints of the two tiles of the bottom row should fall on the center line, and the tile of the top row should go to the drawn axis in the middle.
During the installation of tiles, each horizontal row should first be drawn with a marker. Laying tiles start from the bottom row. To install the first row, a long rail is attached to the wall, if the floors are perfectly flat, then the laying can be started from them.
When gluing tiles, some rows may shift to align them using wedges. They are knocked under the bottom row of tiles.
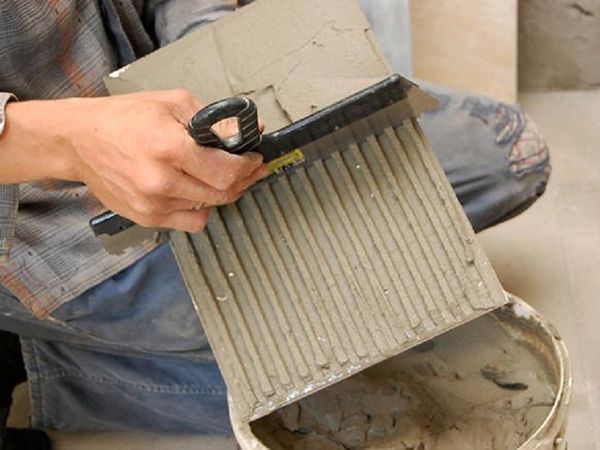
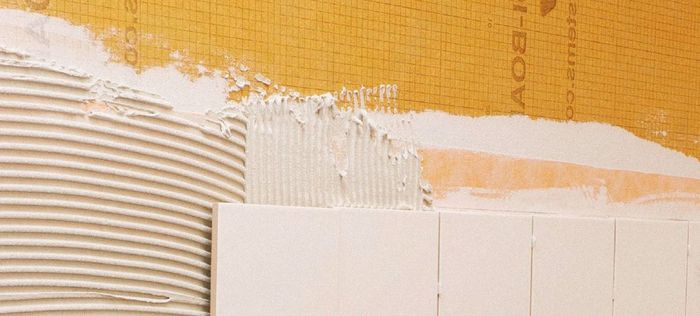
The installation process is as follows. A thin layer of glue from 7 - 15 mm is applied to the back side of the tile with a spatula, then it is leveled under the comb. The tile with glue is pressed against the wall and tapped with a rubber mallet. The glued tiles should be in the general level with a stretched cord. There should be no void between the tile and the wall, otherwise the tile with a small amount of glue applied may fall off in the future. Remains of bulging glue from under the tiles are removed with a spatula.
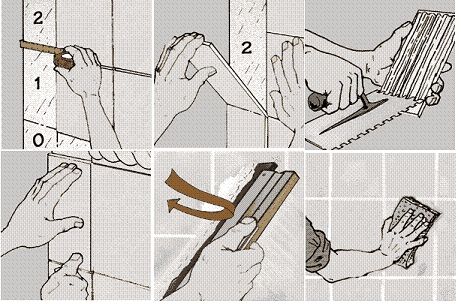
Tile crosses allow you to control the thickness of the seam. After laying the tiles, the crosses are removed, and the seams are cleaned of adhesive residue.
During tiling, some tiles will need to be trimmed. Cut tiles with a manual or electric tile cutter, a grinder with a diamond blade, a glass cutter.
Cutting tiles with a glass cutter is quite simple. Marks are made on the tile, a metal ruler is applied to them, and an incision is made with force with a glass cutter. Then the incised tile with the back side lies on the bar and a break is made along the notch line. If you need to drill a hole in the tile, use a drill with a feather. For large holes use a crown drill.
The final moment of laying tiles is grouting. The seams are rubbed only after the glue has hardened. The width of the seam of the laid tiles should be 3 mm, if its dimensions are from 10 to 60 cm.The tiled surface will look prettier if the seams are rubbed with colored grout, but white will also give a finished look to the repair.
It is convenient to rub the seams with a special spatula with a grater or a bag with a nozzle, similar to the one used by confectioners. The grout applied to the surface is evenly distributed along the seams. Excess grout is removed, the seams and tiles are wiped with a damp sponge.
Before grouting, matte tiles are moistened, and glazed tiles are rubbed without moisture. For grouting joints, special grouting compounds are used. Finished seams can be treated with silicone sealant, then they will not turn yellow.
Laying tiles on a concrete wall video
Laying tiles is a very painstaking work that requires increased accuracy. If you are not distinguished by perseverance and patience, it is better to perform tiling by professionals.
It is important to remember here that if a specialist takes a lot for his work, then, alas, this does not mean that he is a good tiler. But a good tiler cannot be cheap.
Check with friends and acquaintances, perhaps they have an employee whose work they can recommend.
Cladding a wall with tiles is a rather difficult process that requires careful adherence to the technology of all work. Leaving any of the steps unattended means that the finish will be of poor quality and, after a certain period of time, the repair work will need to be repeated. And this, in turn, will lead to additional costs of effort, time and material resources. Before laying tiles, you need to follow a few rules that will help to carry out subsequent work correctly. It will also be explained whether it is necessary to prime the wall before laying the tiles, in which rooms and for what.
Before you start laying tiles, you need to check if the wall is dry and clean. There is the option of laying ceramic tiles on previously painted plaster, the other wall covering must be removed. Modern technology suggests that new tiles can be laid on old ones, thanks to existing effective adhesives. Thus, there is no need to waste time chipping off the previous coating, cleaning and washing the room. Of course, an important condition is the strength of the fastening of the old tile to the base, otherwise it must be removed. If there are small chips or cracks, then they are not repaired, because, in the future, the mortar will do this when installing a new tile.
It is the preparatory work that is the key to the successful completion of the renovation of the wall surface, even if it takes a lot of time.
The technology of laying tiles on the wall

Laying tiles begin on the opposite wall from the entrance. There are three ways to lay tiles on a wall: butt-to-butt, to bandaging, diagonally
When laying tiles in the traditional way butt to joint, it is important to ensure that the horizontal and vertical joints do not move during laying. Tiles are also checked for the same dimensions.
With the method of laying tiles in a dressing, all tiles of the upper row must be displaced so that their middle falls on the seam of the tiles of the lower one. This installation method is considered easier than all the others. Because there is no need to control the same size of tiles.
Laying tiles diagonally is a laborious and expensive process.
With it, it is important to observe the perpendicularity of the seams and the uniform adjoining of the corners of the tile to the walls. This masonry method can be found in rooms with a large area.
Preparing walls for tiles
First of all, you need to check whether there is a horizontal or vertical slope of the wall. Permissible deviation is 2 mm per 1 m of wall length. The unevenness of the walls should be checked using a 2 meter level or a plumb line. Using a plumb line, try to set it as accurately as possible, then the slope error will be minimal.Plumb lines are attached closer to the ceiling in the corners of the room on nails driven into the wall. A long ruler is applied to them, allowing you to check the unevenness of the wall horizontally.

Tile installation will be successful if the wall plane is even. A long level or even beam applied to the plane will allow you to see all the depressions and bulges on the wall. Where the wall is uneven, there will be a gap under the lower level plane. If there are small flaws on the wall, they are puttied. Wall flaws not exceeding 2 mm are left unchanged.
The surface to be tiled must be durable. Before gluing the tiles, tap the surface for voids and shedding. Defective places must be repaired. If a void is found, then in this place the plaster is removed to the brick and a layer of cement-sand mixture or gypsum-based plaster is applied again. Sandy plaster can be strengthened with special mortars, for example, concrete contact.
Sticking tiles on a wooden surface should be done using waterproofing and a metal mesh. Bars are stuffed on a wooden wall at a distance of 20 - 30 cm from each other, a sheet of roofing material is attached to them, metal is mounted on top of the waterproofing. net. Next, the grid is plastered with a 15 mm layer of plaster. In the future, tiles are glued onto a flat surface.
During the preparation of the walls, make sure that there are no greasy stains, dirt, paint, etc. on it. Since the tile adhesive in this place may not grab the wall. It is difficult to remove old paint from the wall; it is enough to make not too deep notches on it with a puncher. Surface preparation also includes priming the wall.
Primary requirements
When tiling walls, the quality of work primarily depends on how well the base surface is prepared. Special requirements are placed on its evenness.
Why tiling on curved walls is undesirable
 Ceramic tiles have limited flexural strength per sq. m., which is why it is better to lay this material on even walls. In addition, wall irregularities significantly increase the consumption of the adhesive mixture.
How to level the surface
After measuring the wall with a level, when irregularities up to 10-15 mm are detected, cement or gypsum mixtures are used for leveling. If the indicators are higher, drywall is used.
Rules for assessing the evenness of the wall
 Since a flat surface is necessary for high-quality masonry, work begins with determining the evenness of the wall.
This can be done with:
- slats or rules;
- a plumb line with a load;
- building bubble level;
- laser level (level).
The most accurate and convenient way is to use a level.
What should be the angle
Of particular difficulty is the preparation of corners. After preparation and alignment, it should be exactly 90°, and the deviation along the line should not exceed 1 mm.
Fixing ceramics to the old mortar
If the old mortar on the wall is firmly held, or the work of a grinder is undesirable due to strong dust formation, then you can glue the tiles to the wall or floor in another way. Using a grinder with a dry cutter, a layer of clay 1-1.5 mm thick is evenly grinded off from the back surface of the ceramics. The surface of the base is primed, and after drying, it is finished with the resulting tile of smaller thickness, gluing it to the surface with a two-component epoxy-based adhesive.
On the walls with this method of repair, silicone or "liquid nails" can be used instead of epoxy glue, which are unsuitable for repairing the floor.
Tiles are glued directly to the exposed surface of the old cement layer
How to level a wall for tiling
An equally important preparatory moment is the leveling of the base surface, which should not have bulges, irregularities, concavities and slopes.The verticality of the wall is checked using a rule and a plumb line.
The brick wall is carefully tapped with a hammer and in the presence of weak areas, the coating is removed and everything is sealed with cement mortar.
To a concrete or brick wall, if the seams between them are filled, ceramic tiles will not attach, therefore, you should make notches with a hammer or chisel on the wall, and then moisten it.
The leveling of the concrete surface occurs by means of a cement-lime mortar, which is made in certain proportions. A primer before laying tiles is welcome, this further strengthens the surface, but is not required. If the repair goes to a concrete wall, then the tile will securely attach to the surface and will hold, provided that high-quality and correct glue is used. Therefore, whether it is necessary to prime before laying the tiles, or not, determine based on this information.
Waterproofing before laying tiles is required in those rooms in which there is a high probability of water leakage:
- Bathroom;
- Toilet;
- Bathroom combined;
- Kitchen;
- Garage;
- Balcony.
For a brick wall, you can use a lime-gypsum leveling mortar, which is prepared from 1 part lime, part gypsum and 3 parts coarse sand. Gypsum-based plaster can replace this composition, but only if the room has a normal level of humidity. It is imperative that the wall be primed on the surface prepared in this way before laying the tiles, so that when applying the tiles there is no peeling of the surface from getting wet.
A separate article will explain how to prime the floor before laying the tiles, but briefly indicates that in order to dedust and increase the time for tile correction, the floor must be primed, like the wall.
After erecting the walls of the house from cellular concrete, care should be taken to correctly lay the tiles on the foam blocks. For all its attractiveness, lightweight concretes have a number of features that determine the specifics of internal and external finishing works. Therefore, before answering the question of whether foam and aerated concrete can be faced, one should learn more about the physicochemical properties of these materials.
Aerated concrete is a light, porous building material, made on the basis of traditional cement and sand, but with the addition of a specialized foam and blowing agent.
The most popular types of lightweight concrete for monolithic and classic housing construction are:
- Foam concrete is a cement or cement-sand mortar, into which a foaming agent (SDO, glue rosin foaming agent) is introduced at the mixing stage. After hardening and shrinkage, foam concrete has a porous structure of concrete mass and many closed bubbles. Modern technologies make it possible to significantly improve the quality of foam blocks by supplying foam to a still dry mixture using a foam generator or by manufacturing the material under excessive pressure.
- Aerated concrete is a concrete mix to which the blowing agent is added at the stage of mixing dry ingredients. The formation of spherical, communicating with each other pores occurs during a chemical reaction with the release of hydrogen when lime water is introduced into the mixture.
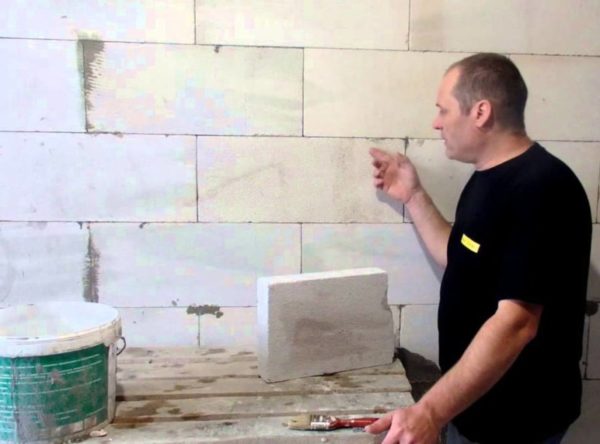
Cellular concrete is strong, but at the same time it is easy to process, cheap, heat-resistant, has a low mass, and has good thermal insulation properties. These advantages make it possible to create a favorable, environmentally friendly microclimate for living in a house built from foam blocks.
However, porous concrete also has a disadvantage: high moisture permeability. At the same time, due to its structure, aerated concrete has higher hygroscopicity than foam concrete. Moistening of cellular concrete and subsequent exposure to negative temperatures leads to a break in the structure of the material and the loss of its structural properties.At positive temperatures, the water entering the pores reacts with the carbon dioxide emitted by the residents, which leads to carbonization shrinkage and the destruction of the walls. For these reasons, the porous concrete surface must be protected from moisture penetration before tiling.
We lay tiles on the wall without the help of professional repairmen
There is no fundamental difference: to lay tiles on a new plaster base or on old samples. The algorithm is almost the same. The only difference is the surface preparation, which we talked about above.
This is very easy to do: buy larger tiles than the one you will be covering. Start laying from a visible lower corner and gradually move according to the horizontal markings made using a plumb line or laser level.
Stock up on "crosses" that will help separate one tile from another at an equal distance. Thus, the seams will be even and uniform in thickness. The joint should be above the door, where it will be least noticeable.
Glue should not be spread on the tile, but on the wall. Make sure the layer is even.
The glue usually takes several days to dry. After that, you can safely remove the "crosses" and process the seams with a fugue.
Watch the video to find out how to do it without problems:
Types of violation of the integrity of the finish and defects in ceramics
- Separation of the cladding area together with the mortar from the base.
- Detachment of ceramics from the adhesive composition on the surface area.
- Violation of fastening and falling of a separate tile.
- Cracks in firmly seated ceramics.
- Shells and chips on the surface of the tiles.
To determine the causes of the destruction of the finish, it is necessary to examine and analyze both the materials used in the repair and other factors that are not always noticeable at first glance.
Both old tiles and newly glued tiles can fall off
Possible causes of ceramic finish damage:
- incorrectly selected tile;
- incorrectly selected primer;
- deformation of the base under ceramics;
- physical wear of the coating;
- base not primed before laying tiles;
- uneven base under the tile;
- low-quality tile adhesive;
- incorrectly applied layer of adhesive solution;
- aggressive operating conditions (detonation);
- mechanical damage from impacts;
- sealing technological and mounting holes.
Any of these factors or a combination of several circumstances can cause the destruction of a section of a facing coating or individual products.
Consider the methods of repairing a tiled surface, depending on the type of damage.
We glue the fallen off tile back instructions
VIDEO INSTRUCTION
https://youtube.com/watch?v=p2un144NUbo
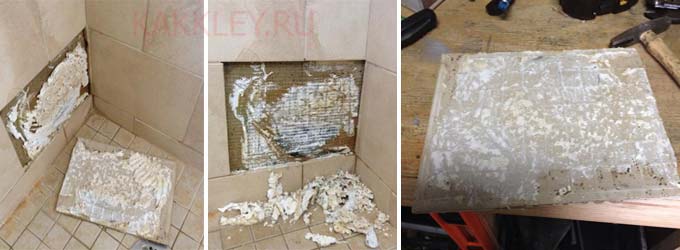
- Surface preparation. At this stage, the remnants of the cladding are carefully removed, the seams are cleaned, and the remnants of the solution are removed. If the old layer of glue is very dense, it is soaked with water and overwritten. Irregularities on the wall are eliminated with putty.
- Dirt removal. The surface is cleaned of dust and other contaminants, degreased and reprimed. The surface must be dry, and if a cement-based mortar is used, the tile is moistened with water.
- Treatment of the wall with an antiseptic. Recommended for bathroom and kitchen.
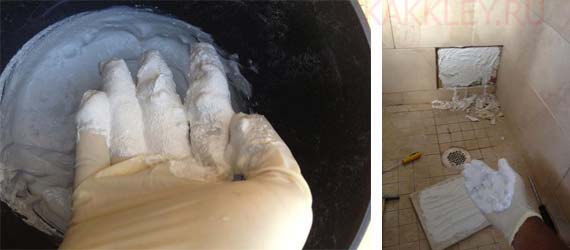
- Applying adhesive to tiles. The layer of glue is made in such a way that it is possible to level the surface level, taking into account the additional screed.
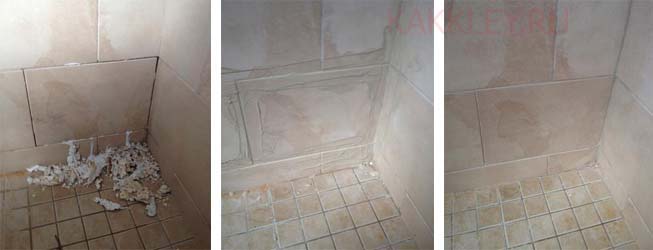
- Gluing tiles. The fragment is pressed tightly against the wall and tapped with a mallet to evenly distribute the glue.
- Removing excess at the joints and fixing the distance at the seams.
- Seam grouting. It is carried out after the lining has dried.
It is quite possible to glue tiles according to this algorithm at home and without special skills.
What is the reason for peeling tiles - how to prevent the problem in the future
The reasons for falling tiles can be different.The main ones include the following:
- Void. They form in layers of glue and if their area exceeds 10%, the tile may fall off.
- Gluing is not according to technology. If the temperature regime, adhesive consumption rates and other requirements were not observed, then the service life of the material will be minimal.
- Bad adhesion. Insufficient adhesion of the adhesive and the surface occurs when its preparation is poor.
- Uneven surface. Height differences cause destruction, loosening of elements.
- Bad glue. Low-quality compositions, as well as a violation of proportions, lead to a quick peeling off of the tile.
- Not enough glue or, conversely, its excess.
- Constant exposure to water. The contact of water and glue leads to the softening of the latter and the falling off of the tile.
- Mechanical impact, such as impact.
- temperature fluctuations. They can even cause cracking of tiles.
- Large surface loads. Typical for floors in rooms with high traffic, large furniture.
- Shrinkage of the building. Most often found in new homes, when the structures have not yet taken their final position.
VIDEO DESCRIPTION
To avoid tile falling off, it is necessary to strictly observe the tile laying technology, otherwise the “repair” will not be avoided soon. If the installation of ceramic tiles will be carried out on a wooden base, a plywood substrate is required, as well as a screed.
It is important to choose the right glue, taking into account the characteristics of the surface
Particular attention should be paid to improving the adhesive properties of the surface. It must be primed and waiting for complete drying before continuing work.
If cement glue is used, the tiles are pre-soaked in water. Do not apply too much glue, otherwise the solution will begin to crack. Work only on clean and dry surfaces.
If you are not sure that you can handle the gluing of tiles on your own without violating the technology, contact the professionals.