Pre-testing
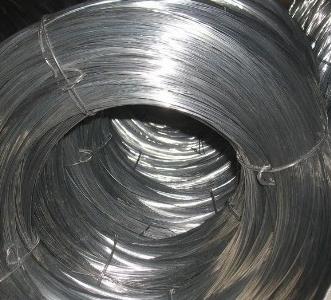
Nichrome wire (thread) as the main heating element
A preliminary experiment is needed in order to determine the required power of the heater.
In financial terms, you will not suffer, since the materials are usually used at hand.
Nichrome wire is a semi-finished product made from an alloy of nickel and chromium. It is characterized by high electrical resistance.
The percentage of nickel in this alloy is up to 80%, providing ductility and corrosion resistance.
The presence of chromium in the composition of the wire adds to it increased hardness and resistance to high temperatures.
If the resistance of the nichrome wire is unknown, then it is advisable to install it yourself. To do this, twist a spiral from a piece of wire 1 m long.
Having placed a thermometer inside it, connect the wire to a power source with a transformer.
At the moment when the temperature on the thermometer reaches 40 ° C, it is necessary to record the readings of the ammeter and voltmeter.
They will help determine the resistance of the conductor.
Also, if the diameter of the wire is known, you can find out its resistance from the calculation table:
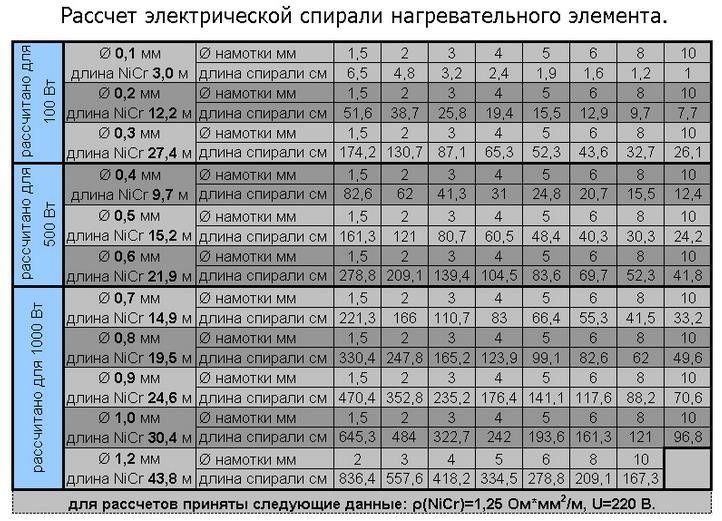
Table of resistances of nichrome wire for a heating device
Further, given that a home-made heater will work from a 220-volt outlet, you need to find out the amount of wire to get AC power of 100-120 units. For example, for a heater with a power of 100 watts, you will need 24 m of nichrome wire with a diameter of 0.3 mm.
Major breakdowns
extraneous noise
Crackling, hissing, etc. may occur during operation of the appliance. This is the case when you do not need to disassemble anything: most likely, the heater leaned over, fell, etc. It was the movement of oil and air.
Place the device in an upright position for several days. The problem will fix itself.
Electrician
 To begin with, turn on the heater in another outlet, suddenly the problem is in it, and not in the device.
If the heater is broken, arm yourself with a multimeter.
With its help, we check the health of the electrical part (you need to start with this if the device does not heat up, the indicator light does not light up).
We check:
- serviceability of the socket and plug;
- is there a short circuit between the parts of the radiator.
A common problem: burning wires at their junctions.
The de-energized device is checked for serviceability of all switch keys
. This is done using a tester or multimeter:
- in the ON position, there will be a short circuit at the ends;
- and in the OFF position - nothing.
The thermostat is checked with a multimeter (there should be no short circuit, and the resistance should be small). The rest of the damage can only be reached by disassembling the case.
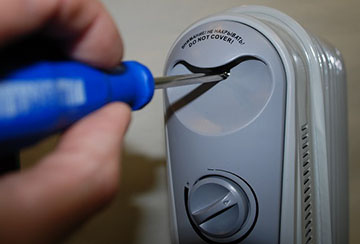
Disassembled oil heater
We examine the contacts in the control unit: they can burn out, oxidize and weaken. Maintenance consists of rubbing alcohol. Loose contacts are tightened with a screwdriver. The oxidized ones are cleaned with sandpaper, isolated. The most heat-resistant insulation is fiberglass tape (can withstand up to 200 degrees).
Check again for a short circuit. Maybe this is the end of the renovation. If the heater does not work, we will look for another breakdown.
Before starting disassembly, unplug the heater from the socket and do not connect the device to the mains until it is completely assembled!
Thermal fuses
There may be several. Having called and found a faulty fuse, we remove it, and we isolate the wires and connect them together. This procedure is safe if there is more than one fuse, if the only one is out of order, then it will have to be changed to a working one.
Bimetal plate
 It may be deformed, the plate needs to be replaced.
For this:
- The temperature controller is disassembled.
- The minimum heating t is set.
- The regulator knob is removed from the screw, the nuts are unscrewed, the frame is removed.
- The bimetallic plate is removed, a new one is installed.
Severe damage to the plate often provokes oil leakage.
Oil leak, tank repair
If there is an oil leak, then there is damage to the housing. Tank repair is a responsible and not always justified business.
If you decide on it, it is important to know the following:
- The oil needs to be drained.
- When sealing the tank, not tin solder is suitable, but brass, silver or copper-phosphorus. You need to use a torch.
- In order for the seams to “seize”, it is necessary to clean the edges well from rust.
- During work, water is poured into the tank (it will protect it from fire), and after work, the tank must be dried.
- When the tank repair work is completed, the oil will need to be changed. Here, too, there are certain subtleties:
- Oil should fill 90% of the tank, and the rest - air.
- Transformer oil is suitable, but not mining (from it the heating element will clog with scale)!
- Mineral oils are not compatible with synthetics.
Just a couple of decades ago, the choice of radiators was not even talked about, because everyone was content with the standard cast-iron version. Now the range has become huge. . Why they are called the "gold standard" in their sector.
We will consider the types of energy-saving heaters for the home in the article. Oil heater, convector and other types.
Breakdown of the heating element
This element cannot be repaired, only replaced! But it only makes sense to take on the replacement of the heating element if your heater is made with a removable heating element.
A new heating element is selected equal in power and, preferably, copper.
Pay special attention to the joint between the housing and the heating element. The gasket is filled with sealant
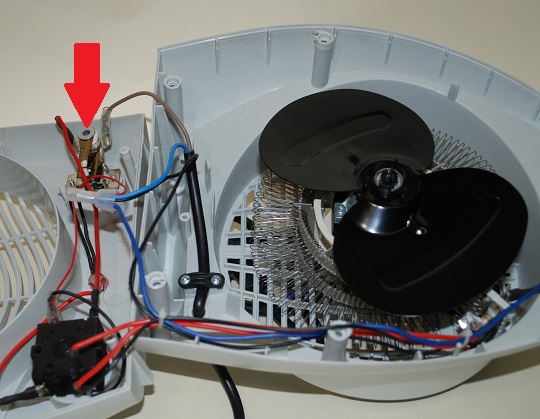
The fan heater can be used as additional electric heating for the house and summer cottage. If your system does not cope or you have not yet turned on the central heating in the apartment, such heaters can come to the rescue. But what to do if after the summer the fan heater does not turn on or blows, but does not heat? In this case, you can try to repair it yourself, which is actually not very difficult. Next, we will provide the most common causes of breakdowns and do-it-yourself repair methods.
Progress
https://youtube.com/watch?v=zTXpVq-C3-U
First, we separate the cooler grille from the fan, it will also come in handy for us. We put the fan with the right side (so that it blows out) into the jar, and fix it on the bottom with a few screws. It will be needed in order to drive hot air into the room from a hot wire. Now we turn the wire itself into a spiral - it can be wound around a thick pencil and removed. This is necessary for greater heat transfer when air passes past the spiral. We fix the spiral inside the case, the ends must be brought out and connected to the wires. Our heat is almost ready. It remains to cover the case with a grill from the cooler, for safety. It seems to be specially created for this - it turned out to be an excellent device, reminiscent of a hot hair dryer.
The main advantages and disadvantages of film infrared heaters
The benefits are:
- positive health effect. It is especially noticeable in winter, in the absence of the sun, when infrared radiation compensates for the lack of natural light and makes up for all the losses of the body associated with this problem.
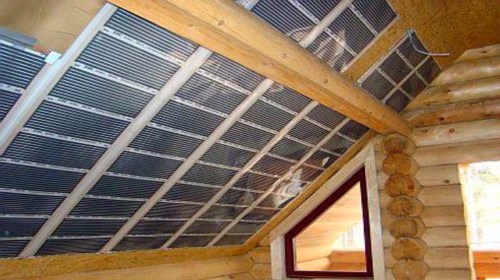
- Easy installation. For example, a wall panel film heater is mounted quite simply and quickly. Moreover, this can be done independently, without the participation of specialists, but after carefully reading the instructions. The same can be said about ceiling and floor devices.
- Long service life. It is 25 years or more.Does not require maintenance due to the design features and simplicity of the device.
- Low financial costs. The equipment itself has a low cost, in addition, installation and subsequent operation may not bear any financial burden.
- Fire safety. Typically, the surface of the heater has a temperature of no more than 80 degrees, which is a safe limit.
- No noise and high environmental friendliness. The operation of such a heater does not cause noise, in addition, in the process of using an infrared film, there is no drying and burning out of oxygen.
The main disadvantages of film heaters:
- Fast cooling after shutdown. If you read reviews about film heaters, then this is one of the main drawbacks voiced by consumers.
- Weak heating. Some buyers note the low quality of heating. Although it may refer to a small area film hanging on the wall. If you completely cover the ceiling or floor, then this problem is not observed.
- Heating household appliances. Such a disadvantage is typical for a ceiling film infrared heater.
- Impossibility of surface treatment. When using such heaters, there are some restrictions in the design of the room as you wish.
How to connect a thermostat
For the correct functioning of the future electric heating system, a thermostat (or, in other words, a thermostat) is needed. With it, you can achieve in a short time the temperature that will be comfortable for you. The thermostat will monitor the temperature regime that you set for it, turn off and turn on the heaters as needed, which will lead to the complete automation of the heating system and its even greater efficiency. You will not need to constantly think: has the room warmed up enough? Isn't it time to turn the heaters on or off? The thermostat will do everything for you - this is a very big helper and your reliable friend.
The thermostat should be installed at a height approximately equal to half the height of the room. This is done so that in his work there is the least probability of error, because the middle of the room is the boundary between the lower cold and upper warm air flows. Again, this is ideal, so do whatever works best for you. But in any case, try to achieve results that are close to optimal.
First you need to decide what type of thermostat you want to install. At the moment, according to the method of installation, they are distinguished by 2 types:
The outlet thermostat is the most convenient type of regulator. It is a device in the form of a small block that is inserted into the outlet, and the plug from the panel is already inserted into the regulator itself. There is an electronic display on the control panel, which sets the temperature in the room. When the room is heated to the set temperature, the thermostat will open the electrical circuit and turn off the heater.
This type of thermostat is convenient because for its installation it is enough to have a free socket to start working. And you can always plug it into another outlet if you want to remove the heater and install it in another room. The only downside to an outlet thermostat is that it is installed where there is an outlet, and outlets can be within reach of children, although it does have a child lock feature. In addition, the outlet may be close to the floor level (as is now fashionable), and in this case the thermostat will be in the conditional "cold air flow". As we mentioned above, the optimal case is the middle of the room in height, i.e. air flow boundary.
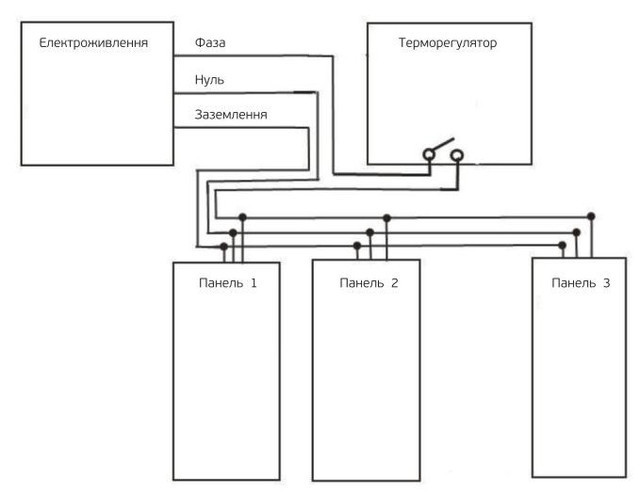
The wall mounted regulator is a bit more difficult to install, but can be placed wherever you feel comfortable.It is enough to attach it to the wall with self-tapping screws or install it in a trimmer (mounting box) and connect it to the panels. If you plan to install several panels in a room, then they are connected to each other in parallel:
That's all! There is nothing difficult in this. But still, if you have any questions about the installation of ceramic infrared heaters, call us, we will be happy to advise you. If you do not want to install the panels yourself, then our company will do it for you, but only within Kiev and the region.
Types of heaters and switching circuits
Heaters differ from each other in electrical circuits, types of heating elements, their number and the presence of a forced air circulation fan.
Most simple heater
consists of a heating element, a cord and a plug. It will only have to be disassembled to replace or repair the cord or diagnose the health of the heating element. The heating element is checked by measuring its resistance with a multimeter. It should be no more than 100 ohms (for a 500 W heater), with increasing power, the resistance decreases. If the multimeter shows an open, the heating element is replaced with a new one.
The heater is more complicated switch or key to turn on the power
. Sometimes a light bulb is added to the key, highlighting it when the device is turned on. An additional complication of the repair in this case is to ring the switch contacts with the tester in the on position. The device should show units of ohms or zero, if it shows a break or hundreds of ohms or more, the element must be replaced. If the heater is vital, the switch is excluded from the power circuit, securely connecting the wires to each other. But over time, it is better to replace it, since in this case the contacts of the socket and plug will inevitably burn when the device is turned on.
The following diagram additionally includes thermal fuse
. It fails when overheated and needs to be replaced. But at the same time, it is worth analyzing the reason for its operation: Was the heater covered with something and overheated, or was it operated at high voltage. The assembled device must be connected to the network and tested in operation. If the thermal fuse trips again, you will have to change the heating element. In some models, together with a thermal fuse, a tilt sensor or a sensor is connected that turns off the device when objects get inside.
In some heaters, to adjust their power, they use two heating elements
. To switch them, either two keys or a switch are used. The heating elements are set to different powers, then when you turn on one of them or both together, you can get three different heater powers.
It is necessary to check here each of the heaters and their power switches.
No matter how high-quality the electric heater is, sooner or later it starts to heat poorly or stops working altogether. Electric heaters are not complex devices and they very rarely break after purchase during the warranty period.
I must say right away that the simpler the design of the electric heater, the less often it will break down and it will be easier to find and fix the problem.
I don't recommend on my own.
repair oil radiators, because inside it is a special coolant - transformer oil. In order to disassemble it, you will first have to drain and then refill the transformer oil, and this is a very troublesome and time-consuming task. If oil just started to leak a little from the oil cooler, then I recommend soldering the place of the leak with your own hands or brewing it neatly with semi-automatic welding. In such cases, it is useless to use various sealants or glue to fix the leak.
Always unplug the heater from the socket
- before starting work on disassembling or dialing the device components with a multimeter.
In order to quickly and efficiently find and fix a malfunction, you need to know the device of the electrical appliance, as well as how to check all its components for serviceability. For convenience, further I will immediately talk about the device of the electric heater, and then about checking and repairing all components in order.
How does an electric heater work?
Practically heaters are arranged similarly. Both simpler and more complex models are available. We will consider the device of the most complex version. In simpler models, a thermal fuse and a tilt sensor may not be in the circuit.
Let's consider a more simplified version with a single-key switch and one light bulb.
Often, heaters are equipped with a two-key switch and several indicator lights, the operation scheme will be similar, with the only difference being that instead of one key there will be two, and one heating element will be, as it were, two in one case. Convection versions often have an ingress protection sensor built in, but it connects and disconnects the power supply in the same way as a position sensor.
Any modern electric heater consists of
from a plug with a power cable, which, through a thermostat and a switch, is connected to the heating element installed in the housing - Teng. Very often, the heating element has not 2, but 3 contacts for connection. The first power wire is connected to one, and from the other from the socket, two other wires connected from a two-gang switch, which allows you to turn on either one spiral or two at once - at full power.
There may be a thermal fuse in the circuit
which automatically turns off the device for overheat protection. A tilt sensor can also be installed, which opens the circuit when the heater is tilted above the permissible angle. In expensive convection models, other sensors are also installed. For example, protection against ingress of objects inside the device.
In some models
there may be a fuse for protection against current overloads or short circuits, which operates in emergency situations.
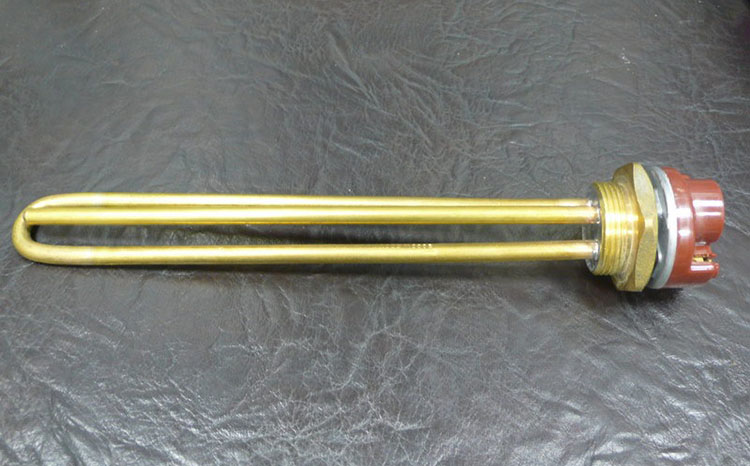
TEN device.
The heating element is an electric heating element made of a thin-walled metal tube (shell), the material for which is copper, brass, stainless and carbon steel. Inside the tube is a spiral of nichrome wire, which has a high electrical resistivity. The ends of the spiral are connected to metal leads, which connect the heater to the supply voltage.
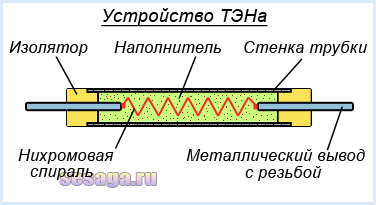
The spiral is isolated from the tube walls by a compressed electrical insulating filler, which serves to remove thermal energy from the spiral and securely fixes it in the center of the tube along the entire length. Fused magnesium oxide, corundum or quartz sand is used as a filler. To protect the filler from the penetration of moisture from the environment, the ends of the heating element are sealed with a thermal and moisture-resistant varnish.
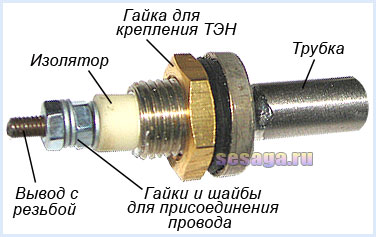
The heater leads are isolated from the tube walls and rigidly fixed by ceramic insulators. The supply wires are connected to the threaded ends of the terminals using nuts and washers.
The heating element works as follows: when an electric current passes through a spiral, it, heating up, heats the filler and the walls of the tube, through which heat is radiated into the environment.
When heating gaseous media, they are used to increase heat transfer from heating elements. ribbingmade of material with good thermal conductivity. As a rule, a corrugated steel tape wound in a spiral onto the outer shell of the heating element is used for finning.
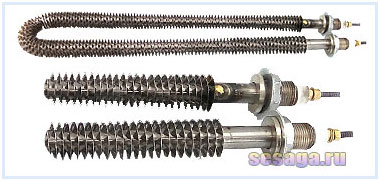
The use of such a constructive solution helps to reduce the overall dimensions and current load of the heater.
Malfunctions and repair of an oil heater
 If the heater was working properly yesterday, today stops heating up
, then there is no need to immediately run to the workshop, or to the store for a new heating device.
Many malfunctions are quite possible fix it yourself
having basic skills in repairing electrical appliances.
An exception may be faulty heater
, most often tightly rolled in the heater housing. It is quite possible to remove it, but it will not be possible to put it back in place. Even if the heater is equipped with a removable heating element, it will be difficult to achieve tightness of the device when replacing it.
Usually, the malfunctions that occur when the heater breaks down appear in more accessible places. The most vulnerable spot
The device is a cord, so its integrity should be checked first. If the design of the plug allows it to be disassembled, then you need to check the connection points of the cord cores with the pins of the plug.
When the plug is in good condition
the next step should be to check the condition of the cord itself, as well as the place of its connection to the power supply of the heater. To do this, the decorative cover of the device panel is removed and the tester checks the serviceability of the cord. If it is damaged, the cable is replaced with a new one.
If the cable is ok
, then the fault may be hidden in the state of the contacts of the power supply. Contacts may be carbonized and loosened.
In this case, the contacts are cleaned of soot. sandpaper
, and loose contacts are gently tightened.
The thermostat is located in the same place. If darkening is visible on its contacts, then they also need to be cleaned. The thermostat may be faulty. bimetal plates
. If their damage is detected, the thermostat is carefully disassembled, and the plates are replaced with new ones.
If the oil cooler is categorized energy saving
, then in its design there is a thermostat that ensures the device is turned on and off at the given parameters.
With excessive heat
heater, or low temperature, it also needs to be examined. If a malfunction is detected, this part is replaced with a new thermostat with similar parameters.
If there is a fan in the design of the oil heater, it is also need to check
. In this case, not only the contacts of the device are checked, but also the integrity of the winding of its motor. It may need to be replaced.
After completing the above checks and eliminating the observed malfunctions, the heater is assembled and then connected to the network. If the heating device still not working
, you will need to consult a specialist.
Most likely
that he would recommend purchasing a new heater. Some types of repairs can be so expensive that it's easier to go to the store.
You will find the device and the electrical circuit of the oil cooler in the video:
Do-it-yourself instructions for repairing (replacing a heating element) an oil heater in the video:
The good old oil heater broke. What to do? Logic suggests: “Take it to repair”, and ingenuity: “Look on the Internet and do it yourself!”.
Well, right! Repairing oil heaters is not easy, but it may only require a little maintenance. Therefore, without checking, do not rush to throw away the device and buy a new one!
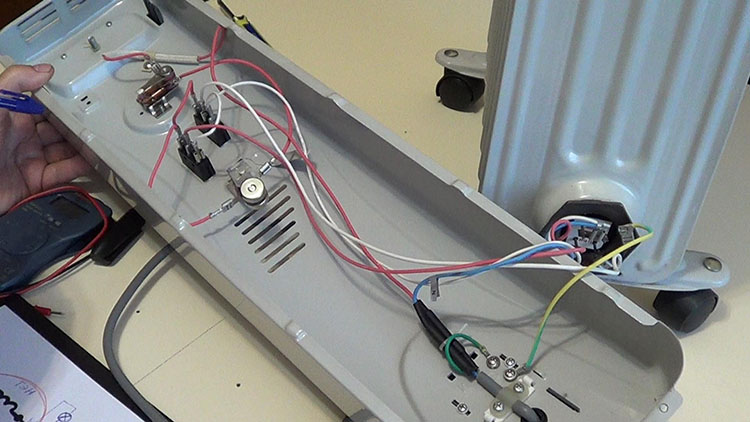
To correctly determine what is broken and repair, you must first understand how the heater works. Its design consists of:
- Cases - accordions with technical oil inside. In addition, you need to know that most appliances have some air in them.
- At the bottom of the device, a heating element is built in on the side, which heats the oil. Most often it consists of two spirals. This is necessary to make it easier to adjust the power of the device.
- Next to the security and control unit. At the top of the thermal relay, it does not touch the body.
- And a fuse (turns off the device in case of failures, for example, when oil leaks).Fuses can be disposable wire type and reusable (bimetallic).
- There are two light switches. Three wires are suitable for each of them: phase, zero from the heating element and ground.
The wiring diagram of heaters is similar to the wiring diagram of other appliances: irons, kettles, etc.
Everyone knows that the garage needs heating. Some prefer gas heating as the cheapest option. Overview of industrial models and safety precautions during operation.
You may not know everything about IR heaters yet. Read about the dangers of an infrared heater.
The climate in the house depends on the correct calculation of heating batteries. Here you will learn how to correctly calculate the number of radiators by area and volume of the room.
Creation of a future prototype and stages of work

Heater "Good heat" as a prototype of our
The device of a home-made heater is based on the principle of operation of the Good Heat heaters.
They gained popularity due to the rapid heating of small rooms. Despite the fact that the cost of electricity is small, the heat in the room is distributed evenly.
The design of these heaters is simple and practically safe. The fact is that the main heating element is enclosed in a material that excludes the possibility of fire. In addition, the compactness of the device will allow it to take up little space in the garage.
By connecting a timer to such a homemade heater, you can adjust its mode of operation. For the winter season, it is enough to set the mode “hour of operation, two - shutdown”.
In one hour, the heater will completely warm up the garage for a quiet car repair over the next two hours without it working. For warmer times of the year, the timer settings can be changed.
Spiral selection
Gynecological intrauterine devices come in different brands, both domestic and foreign. In addition, their cost can vary from 250 rubles to several thousand. Many factors influence this.
The Juno Bio spiral is quite popular among Russian women. It attracts, first of all, low cost. However, the low efficiency of this spiral entails a high risk of pregnancy. The Mirena intrauterine device has proven itself well, but it is one of the most expensive in its series. At the same time, the use of an intrauterine device is considered the cheapest and most affordable type of contraception.
This is a hormonal spiral. Its manufacturers promise that the Mirena spiral is less likely to shift in the uterus or fall out. Namely, this leads to the onset of pregnancy, therefore, patients are advised to regularly check the presence of an intrauterine contraceptive in the right place.
Standard voltage in the household power supply U=220V. The current strength is limited by fuses in the electrical panel and is usually equal to I \u003d 16A.
- Tables of physical quantities, I.K. Kikoin, 1976
- spiral length formula
An electric soldering iron is a hand tool designed to fasten parts together using soft solders, by heating the solder to a liquid state and filling the gap between the soldered parts with it.
Electric soldering irons are available for 12, 24, 36, 42 and 220 V mains voltage, and there are reasons for this. The main thing is human safety, the second is the mains voltage in place soldering work is done. In production, where all equipment is grounded and there is high humidity, it is allowed to use soldering irons with a voltage of no more than 36 V, while the body of the soldering iron must be grounded. The on-board network of a motorcycle has a DC voltage of 6 V, a passenger car - 12 V, a truck - 24 V. In aviation, a network with a frequency of 400 Hz and a voltage of 27 V is used.There are also design limitations, for example, it is difficult to make a 12 W soldering iron for a supply voltage of 220 V, since the spiral will need to be wound from a very thin wire and therefore many layers will be wound, the soldering iron will turn out to be large, not convenient for small work. Since the winding of the soldering iron is wound from nichrome wire, it can be powered by both alternating and constant voltage. The main thing is that the supply voltage matches the voltage for which the soldering iron is designed.
Power electric soldering irons are 12, 20, 40, 60, 100 W and more. And this is not accidental either. In order for the solder to spread well over the surfaces of the soldered parts during soldering, they need to be heated to a temperature slightly higher than the melting point of the solder. Upon contact with the part, heat is transferred from the tip to the part and the temperature of the tip drops. If the diameter of the soldering iron tip is not sufficient or the power of the heating element is low, then having given off heat, the tip will not be able to heat up to the set temperature, and it will be impossible to solder. At best, you get a loose and not strong solder. A more powerful soldering iron can solder small parts, but there is a problem of inaccessibility to the soldering point. How, for example, to solder a microcircuit with a leg pitch of 1.25 mm into a printed circuit board with a 5 mm soldering iron tip? True, there is a way out, several turns of copper wire with a diameter of 1 mm are wound onto such a sting and soldered with the end of this wire. But the bulkiness of the soldering iron makes the job almost impossible. There is one more limitation. With high power, the soldering iron will quickly warm up the element, and many radio components do not allow heating above 70 ° C, and therefore, the allowable time for their soldering is no more than 3 seconds. These are diodes, transistors, microcircuits.
The process of making a heater step by step

Fiberglass as a basis for attaching a nichrome thread
To make a homemade garage heater, you will need a sheet of textolite up to 1.5 cm thick.
It will serve as the base for the wire heating coil. Divided into two parts, fiberglass will not only protect against hot wire, but also quickly heat a cold room.
The entire surface of the textolite sheet is heating. However, a piece of 0.5 x 0.5 m of material on each side of the heater is enough to heat the garage.
The heater does not have to be square, any shape of a rectangle will do.
It is more important here that the parts of the textolite are the same, and the base for attaching the spiral securely closes it.
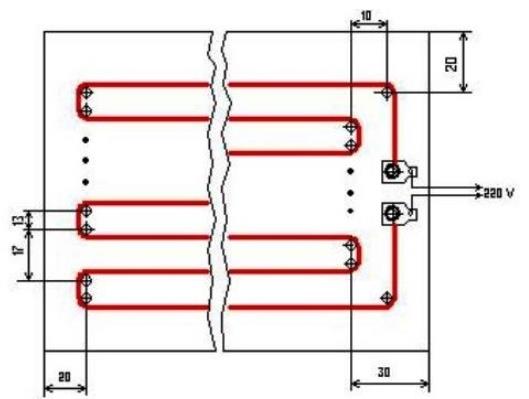
Schematic diagram of a garage heater
- Sheets of textolite on the inside of the future heater are processed with sandpaper.
- Next, markup is applied to the base. A field of 2 cm is left from the lower and upper edges, an indent of 3 cm is left from the side edges.
- Having marked the boundaries of the wire placement, it is necessary to calculate the number of its additions with a length of 24 meters. The length of the winding step is equal to the height of the marked frame on the basis of the heater (do not forget that the upper and lower margins are not taken into account).
- After calculating the number of wire folds, you need to note the distance between its turns. For our heater parameters, it is 8-13 mm. According to calculations, small holes are drilled along the edge of the marked frame, into which marks are inserted - matches or toothpicks.
- Next, two more holes are drilled for the output of the wire to connect to the power source.
- Without pulling, carefully, the wire is laid in a “snake”. Matches help form the heating element here. Having laid five to seven turns of the "snake", it is necessary to fix them with paper strips. Paper, 1 cm thick, with the help of Monolith glue fixes the filament.
- The edges of the "snake" are also, after removing the matches, glued with strips of paper.
- Metal rivets are inserted into the drilled holes for the network wire, onto which the end of the wire "snake" is wound.
- A washer is attached to the rivet on the outside of the heater. It is needed to securely fix the electrically conductive contact.
The power cord can also be connected inside the heater, not far from the incandescent spiral. To do this, the stripped ends of the electrical wire are wound on rivets from the inside of the heater wall.
Performance check, testing and appearance
One of the final moments in the manufacture of a heater is its safety and performance check. To do this, first the heater is connected to an ohmmeter, and then to the mains power supply.
To increase the strength level of the electrical appliance, it is covered with a layer of epoxy glue from the inside. With the dimensions of our heater (0.5 x 0.5 m), at least 150 g of epoxy will be required. The composition is applied along the "snake" of the glowing wire.
The construction is closed with a second sheet of textolite. In order for the structure to “grab”, a load weighing about 40 kg is placed on it.
After 24 hours, a hand-made heater can be used. The surface is decorated with some kind of finishing material (for example, a vinyl film or just a cloth).
Textolite sheets can also be riveted by installing additional fasteners for wall mounting on the surface. Just leaving the garage, do not forget to turn off electrical appliances, especially homemade ones.
This method of production of a heater is simple and low-cost. In addition to acquiring theoretical knowledge that allows you to make a high-quality garage heater in 2 days, the process of work and the result will bring pleasure here.
In what part of the room is it better to install a heater
It all depends on the free space in the room. Of course, the best place for a ceramic panel is the coldest wall facing the street. Why? Yes, because the rear surface of the heater will also warm up the wall, thus creating the so-called "thermal curtain". The heated wall will prevent heat loss from inside the room. Examples include shopping malls or supermarkets. Have you noticed more than once that in the cold season, going inside, you are surrounded by warm air? This is the thermal curtain.
But this is also the ideal case. Very often, such a wall can be filled with furniture, so feel free to install the heater in any accessible place, but do not block it with large furniture and household appliances. Place the socket out of the reach of children.
Kinds
Film heaters are of three types:
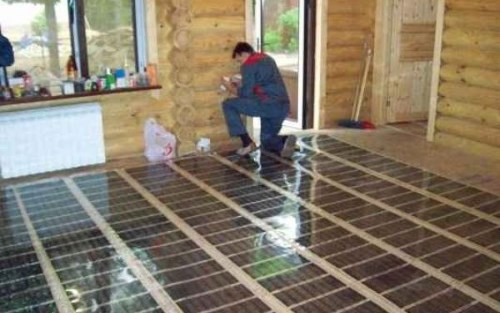
- floor;
- wall;
- ceiling.
Therefore, they are not suitable as the main type of space heating, but as an additional one, they are used everywhere.
Ceiling film infrared heaters are more efficient. Infrared radiation is directed downward and heats objects, from which heat is evenly distributed throughout the room. They can be mounted on almost any type of ceiling covering and their installation does not cause any additional inconvenience, as it may seem at first. In addition, the undoubted advantage of such a heater is the absence of the risk of accidental damage.
If you wondered how to choose a film heater for a summer residence, then for this purpose, the ceiling option is the most suitable.
- Firstly, the absence of apartments from above eliminates the possibility of flooding and damage to such equipment.
- Secondly, a large heating area does not require the use of additional heating systems.
The floor covering is mounted under any final covering. The main advantage is the lack of impact on household appliances. The disadvantage is the undesirability of being under heavy furniture, due to the possibility of damage.
Turns on but does not heat up
The second popular failure of the fan heater is blowing, but does not heat the air.In this case, the cause of the malfunction is most likely a heating element - a spiral or a ceramic heating element. Everything is simple here - you check the resistance in the circuit with a multimeter and if a break occurs somewhere, you need to replace the heating element with a new one. Sometimes it happens that the heater has stopped heating, because. damaged one of the sections of the spiral. In this case, you can try to repair the fan heater with your own hands by connecting a nichrome spiral.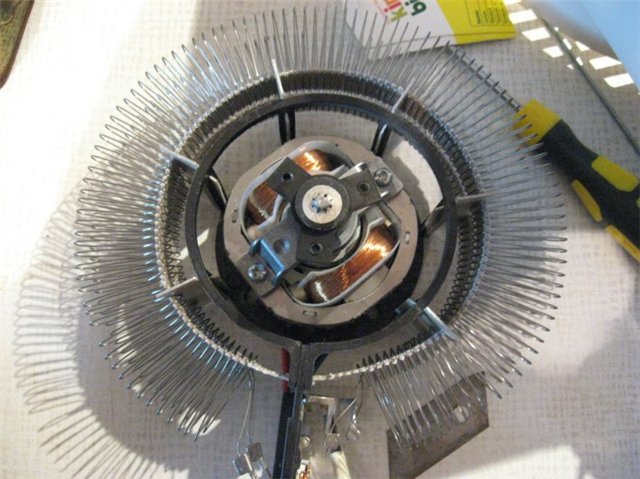
It is also not a rare case when the same fuse is the cause of the breakdown. If the fan heater does not produce heat, check the fuses using the technology provided above.
In addition, the bimetallic thermostat often fails (shown in the photo with a red arrow). For repair, you just need to clean its contacts yourself to a metallic color and warm it up yourself with a soldering iron. The thermostat should behave as follows: when heated, the contacts should open the circuit, and when cooled, close it again. If the device does not work as expected, try manually closing the temperature controller and connecting the heater to the mains. If it is working, the spiral should be heated.