A miniature oven from a can
This version of the stove is perfect for those who like to relax in nature. The finished product has a minimum weight and takes up very little space in a hiking backpack. Despite the simplicity of the design, the stove from the can is very convenient and productive - a liter of water can be boiled by spending a few small dry branches on it.
A miniature oven from a can
At the same time, such a home-made stove can work not only on branches, but also on leaves, cones and even hay. You definitely won't leave hungry!
The first stage is the preparation of components
Prepare three tin cans of different sizes in advance. Canned food containers are great. From the largest jar you will make the body of the furnace, place a medium-sized jar in the body, and make an impromptu burner from a small container.
Cans
Additionally, prepare scissors, a bar, an electric drill and a felt-tip pen.
wooden block
The second stage is the manufacture of the template
First step. Insert a wooden block vertically into the largest jar and, approximately at the level of the lid, mark a couple of lines on the wood at a distance of about 8 mm.
Insert a wooden block vertically into the largest jar and, approximately at the level of the lid, mark a couple of lines on the wood at a distance of about 8 mm
Second step. Saw out a rectangular recess of such a size that the top edge of the container can freely enter into it.
Insert the bar into the jar and draw two lines with a marker approximately at the level of the lid
We drill a notch according to the markup
Third step. Set the bar so that the can rests steadily on it, while the upper edge of the large can, at the same time, is held in the previously prepared recess in the bar.
We put the jar on the bar
The third stage is the preparation of a large jar
First step. Draw a line over the bottom edge of the largest jar. This line will serve as a markup to create vents. The line can be applied with an ordinary felt-tip pen.
Making markup
Second step. Drill holes along the marking line. The optimal number of holes can only be selected empirically. Excessive ventilation will lead to too rapid combustion of the fuel, and if there is insufficient draft, the stove simply cannot work normally.
Making holes
Therefore, make a small number of holes to begin with, and then, if necessary, drill them after the initial tests of the furnace.
The fourth stage is the preparation of the middle can
We drill holes under the upper edge of the middle can
Drill many holes in the bottom of a medium-sized container. Choose the size and number of these holes so that the loaded fuel does not fall out in the future. As a result, the bottom of the can will look like a sieve.
Drilling the bottom of the middle jar
Fifth stage - assembly of the stove
Insert a medium-sized jar into the largest container. The pairing should be sufficiently rigid, but not tight - a small gap is required between the walls of two cans for air circulation.
Insert the medium jar into the large
The sixth stage - the manufacture of the burner
To create a burner, use the smallest tin can.
Cut off half of a small jar, make holes closer to the edge, as well as one hole in the bottom
First step. Prepare holes in the side of the jar in the same way as you did with the previous containers.
Second step. Cut out the bottom of the can with metal shears.
Third step. Carefully align the edges of the burner and clean them with a file.
The seventh stage - checking the stove
We stack the chips
We load the chips into the middle jar and set fire to
Take the main part of the stove (medium container inserted into the large one) and load fuel into it (cones, wood chips, leaves, small branches, etc.). If possible, load dry knots directly from the trees into the oven, as fuel from the ground may be damp.
The smallest detail is the burner. We put it on top
Ignite the load and let it warm up. At first, you may not be very good at it, but very soon you will learn how to kindle the stove with literally a couple of matches.
We heat food or put the kettle on. Camping mini-oven is ready
Let the fuel flare up intensely, place a burner on the stove, and a pot, kettle or other container on it.
An improved model of a mini-supercharged stove
The process of building a small-sized furnace
 The small-sized furnace occupies only 0.4 sq.m. It is laid out from a brick placed on edge or flat. If you know the basic rules for building a furnace, then its construction will not even require a diagram or preliminary calculations.
Due to the relatively light weight of the mini-oven, it does not need a foundation, but in this case a thick, durable board should be used for the floor, well fixed on the logs.
Masonry order
- The first stage is traditionally the choice of a place and its preparation for the construction of the furnace. To do this, it is necessary to lay a piece of plastic film, roofing felt, hydrosol or glassine 78 by 53 centimeters in size on the surface. Pour dry sand over the bedding (layer thickness 1 cm) and level it.
The first brick row is laid out on the sand (12 bricks without fastening are used) strictly horizontally, which can be checked with a level. On top of the first row, we thinly apply a solution of clay and install a blower door. Pre-wrap the door with a piece of asbestos cardboard or wrap it with a cord. Secure it with wire.
- We are laying the second row of our oven.
- The third row is laid out from fireclay bricks. We install a grate on it, which will be located strictly above the blower.
- In the fourth row, the bricks are laid edgewise. And inside the chimney, a stand is mounted on which an internal partition will be installed. When laying the back wall of the stove, do not use clay, but provide for the so-called knockout bricks (for this they should protrude slightly).
- The next mandatory element of any stove is the firebox door. Wrap it with asbestos cord before installation. We fix the door with wire, use two bricks for temporary fixation: one at the back, the second at the first, and install the door on top of them.
- Bricks in the fifth row are laid flat, repeating the contours of the fourth row.
- We put the bricks of the sixth row on the edge, and then we rub the walls of the furnace with a damp rag.
- For the seventh row, lay the bricks flat again. At the same time, in order to ensure a bunch of this and the next rows, you need to start with a three-quarter. Then put two bricks on the edge and proceed to the construction of the back wall.
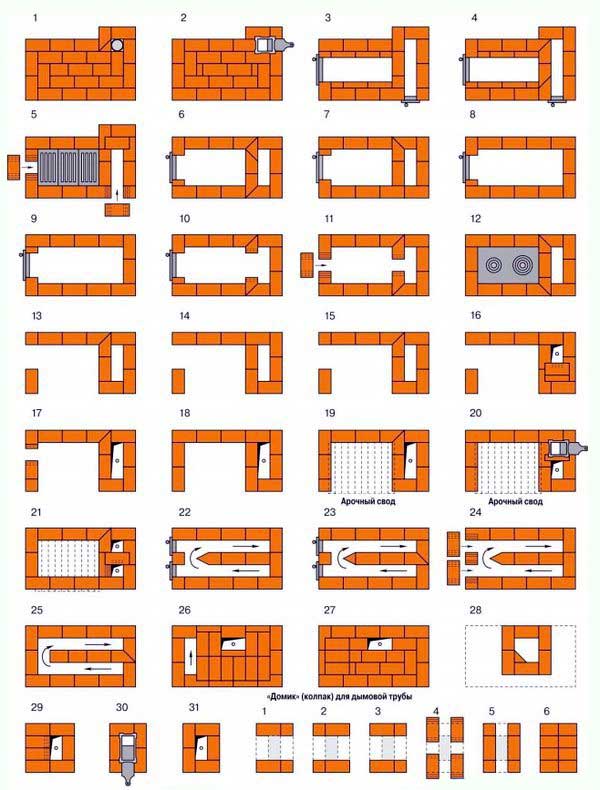
Step-by-step instructions for making a mini-oven
Considering the layout of the mini-oven for giving, let's get to work.
Masonry from 1 to 12 rows
The first row is laid out, and in the second it is necessary to provide a place for the blower door. The rows must be coated with a solution. Before installing the blower door, it must be wrapped with asbestos, and the door will be fastened with wire.
Next, a row is laid out in which refractory bricks and a mixture of refractory clay are used.
During the laying of the row, a grate is installed. Starting from this row, up to the laying should be done with refractory bricks.
In a row, a firebox door should be installed, with which the same work should be done as with the blower door (wrap with asbestos, secure with wire).
lay out the row according to the layout. Each layer must be coated with a solution. 8, 9,10, 11 and lay out the rows in accordance with the layout.
Masonry from 13 to 24 rows
From the row we begin to form the combustion chamber and vertical channels. The main thing here is to carefully follow the orders, otherwise you can violate the correct design.
On the 15th row it is necessary to lay out a layer of clay-cement mortar. It will strengthen the bottom of the cleaning chamber, after which you can install the door itself.
Masonry from 25 to 35 rows
Further, up to a row, we lay the masonry in accordance with the instructions.
In the 25th row, the bottom surface of the second cleaning chamber should be repaired, also laying this row with a clay-sand mortar, and then install the door.
Next, we lay a brick in accordance with the order, while forming a chimney channel.
In the 28th and 32nd row, two valves should be installed, with the help of which the thrust will be regulated.
next we begin to raise the chimney, as shown in the layout.
If everything is done correctly, after completing all the work, you should get such a compact model.
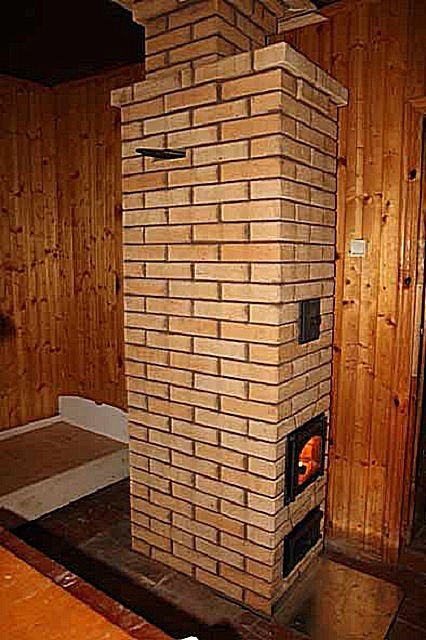
This model has the following dimensions: 51 cm wide, 89 cm deep and 2.38 m high. Even beginners can make such an oven. In addition, if there is no experience in the furnace business, then it is not recommended to make more complex models, since you can get confused in the orders and violate the integrity of the structure, which will affect the quality of its work and service life.
Small size and the ability to quickly and efficiently heat up are the main reasons for the construction of small-sized brick ovens. These characteristics are achieved in many ways, differing in masonry and design options.
What is this article about
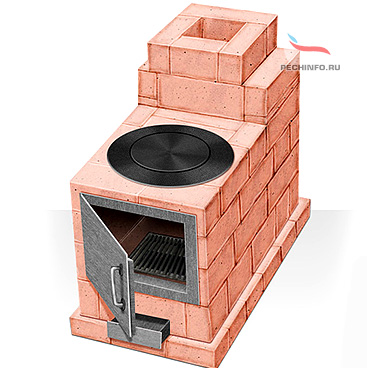
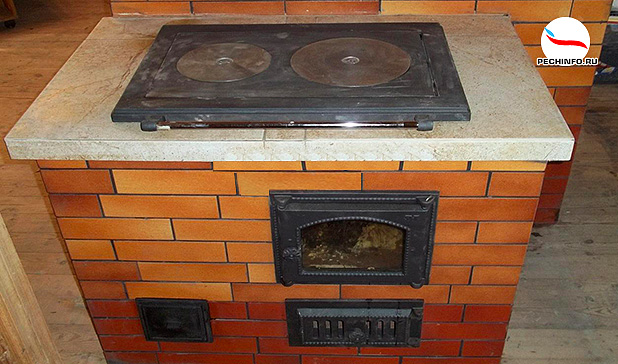
Swede cooking oven
A small combined design equipped with a hood is designed not only for heating, but also for cooking.
Strict observance of the order, the use of a plumb line and a building level will ensure the construction of a geometrically correct, functioning structure. Excessively thick mortar joints or the presence of voids in them are not allowed. It is recommended to monitor the indicators of the cross-section of smoke channels, in order to avoid their narrowing.
At the end of the work, the finished furnace is cleaned of dust and excess solution and left to dry for several days. High-quality materials, compliance with the technology of work and fire prevention measures will ensure a long period of its flawless service.
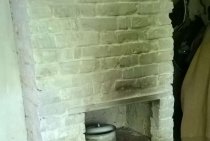
All lovers of country rest dream of a stove in their cozy cottages in summer cottages. As you know, a brick stove is the oldest universal design for space heating. Its effectiveness and high performance has been proven for centuries.
It is not necessary to build a serious bulky structure. Sometimes a small-sized stove is enough, which you can build with your own hands. Models may differ in shape, size, type or chimney layout, but in general, their construction will not take you much time and will not require serious stove-setting skills.
Types of mini ovens
Steel ovens. This type of mini-oven is not expensive and easy to install, but the service life of such a model will be short-lived.
Cast iron stoves. The cost of such furnaces is quite high, but it can also last for a very long time, but only if it is not subjected to sudden changes in temperature.
Brick mini-oven. This type of furnace is the most popular today and there are reasons for this:
- Keeps warm for a long time
- Ability to do it yourself
- Available fuel
- Possibility to make an oven with stove or oven
- High reliability
Due to the availability of material and ease of execution, even a novice stove-maker will be able to make a mini-oven with his own hands.
Most often, a mini-oven for a summer residence is performed with or without a stove for cooking. It is the second option that we will consider in more detail.
A simple brick oven for the home
Novice stove-makers are advised to pay attention to just such a simple brick stove. The finished structure is small in size - the total occupied area is no more than 0.5 m2
Set for laying a mini brick oven
Start by preparing the fixtures necessary for the construction of the unit in question. You will need the following:
-
red oven brick;
-
fire-resistant brick;
-
chamotte and construction clay;
- sifted fine sand;
- roofing iron;
- ruberoid;
-
doors for the furnace, cleaning and blowing chambers;
-
grate;
-
stovetop for one burner;
- valve;
- steel pipe;
-
plumb;
- yardstick;
- protective gloves;
- trowel;
- level.
Furnace masonry
mini oven
Do-it-yourself baby oven
Having prepared all the necessary devices, go directly to the stage of arranging the “baby” brick stove.
First step. Choose a place for arranging the heating unit. The distance from the walls of the furnace to the nearest walls of the room must be at least 300 mm.
ordering
Second step. Lay out a brick foundation measuring 76x50.5 cm. The depth of the foundation should be at least 5 rows of bricks. Dig and level a hole of a suitable size, lay a layer of clay on its bottom, carefully compact it and cover it with a layer of roofing material.
Third step. Lay out a platform of 12 bricks. Coat each brick with a clay solution.
After laying out three rows of the base, cover them with a second layer of roofing material and continue laying. The level of the foundation must match the level of the floor.
Fourth step. Lay out the first floor row. Lay out the second row in the same way, but provide a place for mounting the blower door. Before installing the blower door, wrap around the edge with a strong asbestos rope. Secure the door with wire.
Fifth step. Lay out the third row of the fireclay brick oven. For masonry, use a separate refractory clay mortar.
Sixth step. Install a grate in the fourth row and continue laying, placing bricks on the ribs. In the fifth row, lay the brick flat, in the sixth - again on the edge.
Seventh step. When laying the eighth row, install a beveled brick. In this design, it will take on the functions of a smoke tooth and will provide a displacement of fire when the furnace door is opened.
Eighth step. Wrap the door of the combustion chamber with asbestos cord and install it in its place.
Installing the furnace door
Ninth step. When laying the ninth row, mount the hob.
Tenth step. Continue laying the stove until you reach the beginning of the chimney device (starting from the tenth row). In the chimney, prepare supports for installing the internal partition. Place a protruding (knockout) brick in the rear wall of the furnace unit. It is not necessary to lubricate it with a solution, because. by the end of the work, this brick will need to be removed.
Eleventh step. When laying out the eleventh row, install a valve previously wrapped with asbestos rope. Install a metal flue pipe.
Twelfth row. Remove the protruding brick that was not fixed earlier.
Let the stove dry for a week and you can start using the unit. The best fuel option is wood.