Main types
Types of electric floor heating:
- with electric cable;
- electric mat;
- infrared warm floor
Each of the types has its own nuances in connection and operation.
Underfloor heating with a cable is preferable, because it is quite easy to install. Installation can be done in floor screed or tile adhesive. Even a non-professional can handle it. Manufacturers of heating systems give a guarantee for the operation of the equipment even if the installation is carried out by the buyer himself. The system is connected to the electrical network. What to choose a warm floor under porcelain stoneware, sellers in specialized stores will advise. It is also worth asking the advice of professional builders.
Builders and apartment owners leave the most positive reviews about the electric warm field for porcelain stoneware.
Floor heating with an electric cable is the most used. In addition, it is one of the most sought after. The essence of his work is to heat the nichrome alloy with an electric current. Nichrome is most commonly used in a heated core system. Each individual heating branch has protective shells that protect the floor surface from overheating and current access, and also preserves the integrity of the core in case of possible mechanical damage.
The thickness of the cross section of the cable is 7 mm. It comes with one or two strands. Two-wire at the ends is equipped with a coupling and a wire connected to the network. Professionals choose a system with two cores, and today single-core cables are almost never used. This choice is due to ease of operation and installation, since the less popular electric heating does not have an end sleeve and is more difficult to fit.
You will be interested in: Foundation cushion: dimensions, characteristics, requirements and norms

What are the differences between ceramic and porcelain tiles
Ceramic and porcelain tiles are closely related, made of clay, reinforced with high temperatures during firing, and glazed to give a smooth, hard-wearing floor surface. However, there are some notable differences between the two.
clay type
Ceramic tiles are made from darker clays, while porcelain tiles are made from whiter clays. The clay used in the production of porcelain stoneware is more refined than that used to make ceramic tiles and is often mixed with other minerals such as quartz, feldspar and sand to create a hard and durable form. Porcelain stoneware is also baked at a higher temperature than ceramic.
Tile finishing
There are also key differences in how prefabricated stoneware and ceramic tile structures are applied. While ceramic and porcelain tiles can come in any design and color, the pattern on porcelain stoneware usually runs through the entire structure of the tile, while the pattern on ceramic is simply applied to the surface.
Certificates
Porcelain stoneware must also be certified by industry groups to be considered a quality product. PTCA (Porcelain Stoneware Certification Agency) evaluates porcelain stoneware based on water absorption.
| Ceramic tile | Porcelain stoneware | |
|---|---|---|
| Humidity | Absorbs more moisture | Absorbs less moisture |
| Strength | Softer | Harder |
| Price | Cheaper | More expensive |
| Usage | For indoor use only | Can be used both outdoors and indoors |
| cutting | Easier to cut | Harder to cut |
General recommendations for floor installation
To put porcelain stoneware on the floor you need:
- start work from the middle of the room with symmetry in relation to it;
- draw a marking line using twine;
- lay porcelain stoneware in the center of the room, and trimming - along the edges with the obligatory leaving gaps between the tiles;
- knock with a rubber mallet for better adhesion with glue;
- check the evenness of the application of the first layer using the building level;
- treat the tile with a protective layer for long-term preservation;
- seal the seams using special crosses.
Solid tiles are best placed in the center of the room in places of greater visibility, and trimmings and remnants - along the edges and hidden areas.
After about 4 days, the tile will begin to gain strength, after which it will be possible to rub the seams with a rubber spatula, removing the remaining glue from the surface. Wipe the tiles with a sponge soaked in kitchen cleaning solution and leave to dry completely.
After 2 weeks, the tile will be completely dry and will be suitable for processing with conventional detergents. The technology of laying porcelain stoneware on the floor is not complicated, and it is quite possible to lay it out with your own hands, but with the observance of the technology, the presence of the necessary necessary tool in the work.
Porcelain stoneware has rather unique technical characteristics. High-quality styling will delight the eyes of the owners for many years.
Video: Do-it-yourself porcelain tile laying
A selection of questions
- Mikhail, Lipetsk — What discs for metal cutting should be used?
- Ivan, Moscow — What is the GOST of metal-rolled sheet steel?
- Maksim, Tver — What are the best racks for storing rolled metal products?
- Vladimir, Novosibirsk — What does ultrasonic processing of metals mean without the use of abrasive substances?
- Valery, Moscow — How to forge a knife from a bearing with your own hands?
- Stanislav, Voronezh — What equipment is used for the production of galvanized steel air ducts?
Where and why to put a warm floor
For many who are going through a difficult stage of repair in an apartment, the question arises sharply: should I put an electric underfloor heating at home, and if so, in which rooms?
The answer to this question depends on many factors, and above all, on the type of flooring. You need to decide whether it is possible to lay a warm floor under tiles, laminate, porcelain stoneware or even under a parquet board.
The second important point is the budget you are counting on.
Moreover, not only the price of a warm floor is important, but also the subsequent costs of electricity.
Will the purchase be profitable and how much will it cost you to use it?
And, finally, durability. After all, laying the cable is not an easy task, so it makes sense to do repairs with high quality - so that at least 10-15 years is enough.
To answer all these questions, you need to carefully study the product range, reviews of underfloor heating on construction forums; find out from friends if they have underfloor heating in their apartment and whether they are satisfied with their choice.
We will give you some answers to the most important questions about the warm field.
First of all, we note that for a city apartment this is the most acceptable option if you want to make your home warmer and more comfortable.
You can buy a warm floor everywhere and at an affordable price, its installation is offered by sellers.
You can also install it yourself according to the instructions - the long-term guarantee is preserved.
Under what types of flooring should this type of heating be placed?
Underfloor heating under laminate
The feasibility of laying underfloor heating under laminate and parquet remains in great doubt.
The reasons for this are: a large number of restrictions for this use case imposed by manufacturers, and its limited effect.
The maximum permissible heating power for parquet and laminate, which is allowed by manufacturers, is 100 W/sq. m. Otherwise, they remove the warranty.
On the other hand, buyers note that even at this temperature, drafts leave the floor surface. But if you don’t have them in the room anyway, then putting a warm floor under the laminate is not entirely advisable.
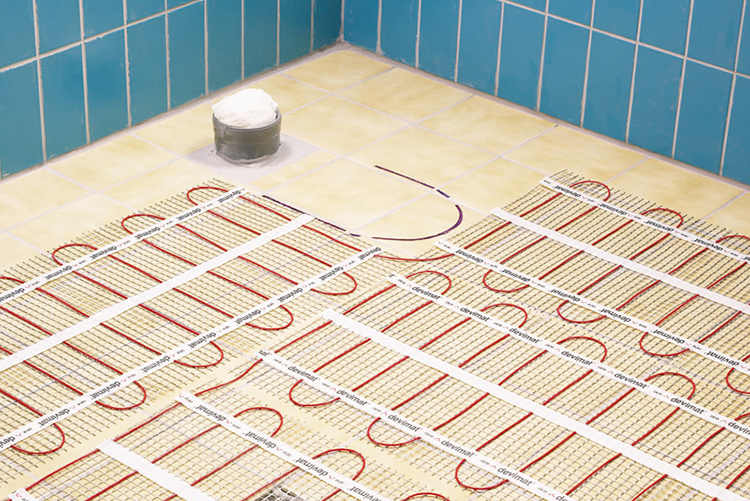
Underfloor heating under tiles
Laying a warm floor under tiles (most often in a bathroom or toilet) is the most acceptable and effective option. Its advantages are undeniable:
- The full effect is 100%. The temperature on the surface of the tile can reach from 28°C to 30°C, and some argue that there is more. It all depends on the heat loss of the room. If you have a cold bathroom, electric heating will help make it warmer.
- Reducing the level of humidity in the room, its "drying", which is very important, given the general dampness in our homes in the autumn and spring. Laying a cable or mat in the bathroom will also be useful if you use it to dry clothes.
Underfloor heating under tiles
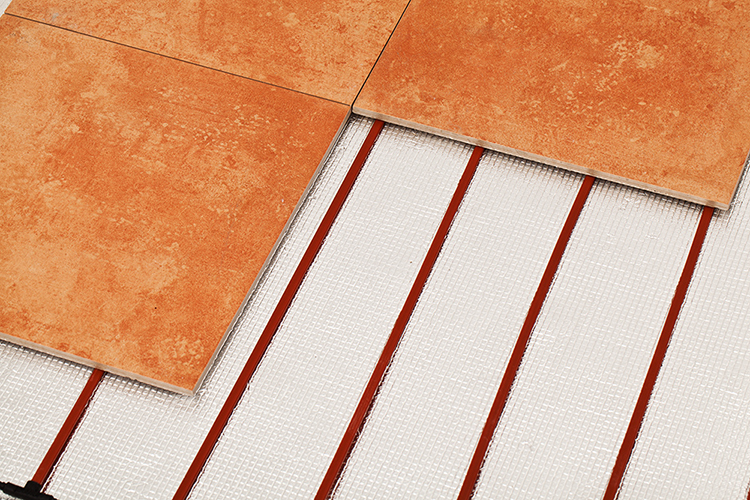
Underfloor heating under porcelain stoneware
In this case, everything is very similar to tiles:
- The temperature on the surface of porcelain stoneware is from 28°C to 30°C.
- They dry the room, that is, there will be no mold on the tiles and under the bathroom due to high humidity.
- The floor surface itself will dry quickly, which guarantees safety, as the floors will not be slippery from water.
- Additional space heating.
The cable under the tile can be laid not only in the toilet and bathroom, but also in any other room in the house. For example, in the hallway.
Warm floor in the hallway
Here are the advantages of installing this system in the corridor:
- The temperature on the surface is from 28°С to 30°С.
- The absence of drafts on the floor surface, especially from the front door towards the rooms and the balcony.
- The floors will not be slippery from the water.
- Dirt from shoes will not be throughout the apartment, as it dries immediately and is then easy to clean.
- The possibility of drying shoes directly on the floor at the front door without special devices.
- The mat will dry instantly upon entry.
Thus, the benefit of underfloor heating in cold and damp rooms under tiles, porcelain stoneware and granite is quite obvious. The reasonableness of using the system for laminate and parquet remains a big question.
Heat-insulated floors Energy is a wide choice of heating mats and a cable for heating of rooms of any type.
Step-by-step instruction
So, let's start directly laying itself.
- First of all, we knead the adhesive mixture, after which we apply it to the surface. First, level with an even spatula, then with a notched one.
- Next, lay the tile on the edge, and level it. Note that it is necessary to check in all positions.
- In the next step, we also fit the subsequent tiles. But they already need to be slightly moved away from the previous ones, leaving a small gap. For this, special crosses or systems for laying tiles are usually used.
- Each new, laid tile must be checked with a level. Within the next 10 minutes after laying, it can still be corrected and corrected.
In addition, the control of voids between the seams becomes quite an important factor, since this can lead to cracking of the tile itself. Speaking about the timing of control, we can say that the glue itself usually dries out in a day, while the full strength of the coating comes only after three days.
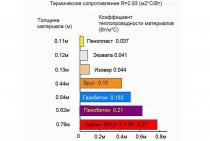
Properties of ceramic tiles
The thermal conductivity of ceramic tiles varies from 0.2 to 0.8, which is much less than stone, but more than other coatings. This difference in the thermal conductivity of different tiles is due to the different porosity of the materials used by different manufacturers; porosity depends on the way the tiles are made.
In addition to thermal conductivity, it is sometimes important to take into account the surface roughness or, in other words, the depth of the tile relief. Because rough tiles transmit less (and sometimes much less) heat to the foot standing on it than smooth tiles.
Well, this is understandable: on a rough surface, we touch the tile not with the entire surface of the foot, but with separate points, as it were:
By the way, and the opposite effect: when the floor is turned off in the summer, it will be less cold on the rough tiles.
So, the tile conducts heat well when the heating is underfloor heating. On the other hand, when the heating is turned off in the summer, it is uncomfortable to stand barefoot on the tiles, so you need to look for some way out or a compromise, as described in the article about the properties of flooring.
Application area
Thanks to the rather beautiful and rich appearance of porcelain stoneware tiles, you can drastically change the look of the room. The material is used as a floor covering for the floor in the rooms of the house or on the street. They often ennoble balconies, terraces, gazebos.
On the street in the summer, it is most pleasant to walk along a porcelain stoneware path or terrace. The thing is that the properties of the material are such that it always remains cool.
Considering the properties of the material and its strength indicators, the floor should be covered only with porcelain stoneware, and the walls should be tiled with ceramic tiles.
The cost of a durable facing material is much higher than the cost of a fragile tile. Despite the narrow palette of colors, porcelain stoneware will last longer than floor tiles. Making repairs in an apartment or house, you need to properly prioritize.
Mounting technology
We will figure out how to properly install the grid for laying a warm floor.
It does not matter which mesh you decide to use - reinforcement is carried out over the entire floor area. If the length of the surface to be poured is large, it is allowed to lay the mesh for overlapping reinforcement, followed by a wire connection.
Do not forget that indents are made from the walls. If a complex base with smooth transitions or steps is reinforced, the relief must be repeated. In such cases, the mesh is mounted on special fasteners so that it is suspended at a distance of two centimeters from the base.
Preparatory work
First you need to correctly place the grid for the floor screed.
Install it at a certain height from the base, taking into account the thickness of the future screed for underfloor heating and the size of the mesh rods. For this, it is allowed to use various devices - wooden blocks, fragments of bricks, a metal profile, etc. The main condition is that the supports must have the desired thickness, allowing the solution to penetrate under the heating elements.
Before you start pouring the screed, you need to lay out layers of sand, gravel, hydro and thermal insulation. After the device of such a “pie”, it is allowed to install a reinforcing mesh and pour the solution.
Nuances of reinforcement
There are general rules for the device and reinforcement of the screed, which should be followed in the work:
- despite the different types of mesh for reinforcement, plasticizer components are added to the sand-cement mortar to increase strength and elasticity. The mixture gets the opportunity to penetrate into cells of any size;
- before starting work with the mesh, it is recommended to study the accompanying instructions from the manufacturer.
There are certain features of reinforcement:
- whatever happens, the grid should be located directly in the thickness of the layer, and not on the subfloor;
- grid cells are determined in such a way as not to create obstacles for pouring the concrete mixture.
- reinforcing mesh should not be contaminated;
- mesh elements should not protrude onto the surface of the screed. This will prevent the formation of corrosion on the metal rods.
Mesh laying
The reinforcing mesh is placed in the lower third of the poured layer. The supports are placed in the points of the intersections of the rods. For ease of installation, it is possible to purchase special stands made in the form of crowns, racks, chairs, etc.
When installing the grid, one important feature is observed - the installation step of the supports depends on the thickness of the intended screed.
If you decide to use a composite or plastic mesh, then you will have to act a little differently:
- having carried out the preparatory work on the device of the cake, it is necessary to fill in the third part of the solution and level the layer;
- after that, the mesh is laid, recessed into the mortar layer;
- as soon as you lay the electric cable or a warm water floor on the grid, the rest of the solution is poured, for the alignment of which beacons are set;
- these types of grids are allowed to be laid directly on the pipes of the underfloor heating system, but there is a possibility that the solution will not completely fill all the void areas.
The use of each known version of the reinforcing mesh has its own advantages and disadvantages, and this must be taken into account at the initial stage of work.
Peculiarities
Most often, a warm electric floor is mounted under floor coverings such as tiles and similar ones, since they are considered “cold”. Under a wooden or fabric coating, laying a warm floor is rarely carried out, this is due to the fact that these materials have poor thermal conductivity.
In addition, wooden elements under the influence of heat can dry out and lose their appearance, and synthetic coatings can release harmful substances during heating.
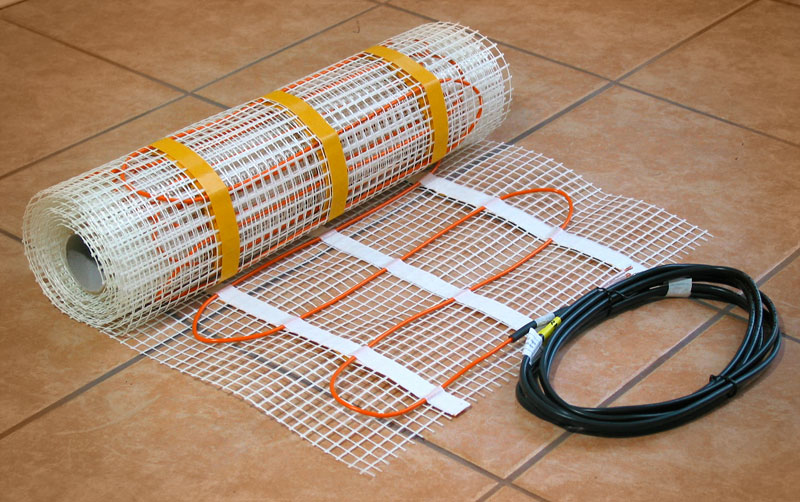
Laying cable underfloor heating
Infrared warm floor appeared relatively recently, its advantage is that it is laid dry, so it can be mounted under floor coverings such as carpet, laminate or parquet.
The main advantages of electric underfloor heating:
- there is no possibility of leaks;
- silent operation, as there is no boiler and pump;
- takes up little free space;
- uniform heating of the floor;
- simple control, just set the temperature on the thermostat;
- long service life.
Underfloor heating under tile
Despite the presence of a large number of advantages, a warm electric floor has its drawbacks:
- electricity consumption, in large rooms it is better to install a water floor;
- emits electromagnetic waves, although manufacturers claim that they are completely safe for health.
Installation steps
The calculation of the cost of heating is carried out along with the preparation of an installation plan. Heaters are placed only on a furniture-free area, so it is required to mark its location on the plan, and indent 5-7 cm from free walls. The rest of the space is divided into strips equal to the width of the heaters and the required amount is calculated in meters.
It is necessary to lay infrared warm floors under the tiles in several stages:
- prepare the base for IR heaters;
- install a heating system;
- connect and test it;
- lay the base for the tiles and stick the material.
Training
Base" must be cleaned of debris and potholes repaired. The technology of installation of an infrared warm floor provides for laying insulation from heat-saving materials. For this, coatings with low shrinkage and without a foil layer (cork, EPS, etc.) are used. You can attach them to the rough base with liquid nails, and to concrete dowels with self-tapping screws. It is desirable to lay thermal insulation over the entire area of \u200b\u200bthe room. On the floor, make markings according to the plan, indicating the boundaries of the installation of elements and strips of material.
Thermal film installation
Before laying the infrared floor heating film, the rolled material must be cut into strips according to the markings. It is necessary to cut the material only in specially marked places where scissors are shown. Tapes of infrared heaters should not overlap each other, leave a gap of 5-7 mm between the strips of the film floor. You can fix the tape to the floor with liquid nails.
Connection

Assemble the infrared floor heating system in the following sequence:
- Install the terminal clamps at the exit points of the copper busbars, press them down with pliers.
- Determine the location of the thermostat on the wall.
- Cut the installation wires of sufficient length to connect the underfloor heating to the network.
- To connect the wire to the clamps, insert them into the terminals and crimp with pliers or a special tool. Connect adjacent tapes in parallel.
- Glue the joints and edges around the perimeter with adhesive tape, insulate the terminals and edges of the tires with bitumen tape.
- Lay the temperature sensor under the film. Lead the wires from the film strips to the point of connection to the network and install them. Check the performance of the system with a tester, determining the absence of an open circuit on each tape, and then on the entire system.
Subfloor installation
Depending on the choice of a dry or wet method, prepare materials: mix a self-leveling compound with water or cut GVL. For moisture insulation, cover the installed TP system with polyethylene, leaving allowances of at least 5 cm along the edges. Carefully glue around the perimeter with adhesive tape. Depending on the peculiarities of laying the film floor under the tiles on a concrete base, proceed as follows:
- Dry way. Cover the entire area of \u200b\u200bthe room with cut plates of GVL or LSU. Attach elements to liquid nails or self-tapping screws with dowels. Screw the threaded fastener carefully, into the gaps between the TP tapes or into the places intended for cutting off parts. Do not drive a screw into a tire or carbon strips. If necessary, the rough coating is performed in 2 layers, overlapping the seams of the lower level.
- wet way. Lay out a reinforcing plastic mesh on top of the moisture insulation (do not use a metal mesh). Its edges should go beyond the perimeter of the TP and polyethylene by 20 cm, the mesh is fixed with self-tapping screws. Pour the base and the IR film system with the self-levelling compound. Layer thickness - 8-10 mm. The coating should set within 24 hours.
Laying tiles
Before laying the ceramic coating, the surface of the base must be treated with concrete contact in 2 layers. Install insulation around the perimeter of the wall to create a thermal seam. Prepare tiles. We apply the adhesive with a notched trowel, in separate sections that can be filled with tiles in 30 minutes.
Align the ceramic elements in height by pressing them against the adhesive. Allow the glue to harden, fill the joints with grout, pressing it into the gaps with a rubber spatula. Remove the remains of the composition from the ceramics with a wet cloth, not allowing them to dry. After laying, care for ceramics should be carried out according to the general rules.
>
Choice of tile adhesive
Among the features of a material such as porcelain stoneware, one can note the complete absence of water absorption, which plays a big role in choosing tile adhesive for underfloor heating. Due to this feature, the selected adhesive should provide an increased level of adhesion. In this connection, the use of a standard cement composition is highly undesirable.
In addition, before choosing an adhesive for laying a warm floor, you need to familiarize yourself with its characteristics, in addition, carefully analyze future operating conditions. Accordingly, in the presence of large loads, a composition with a high level of stability is needed. It is also necessary to take into account the temperature regime, which is acceptable for certain types of glue.
Well, now let's go directly to how to put porcelain stoneware on a tile or floor.
Preparatory work
Laying porcelain stoneware on the floor with your own hands is not complete without the presence of a number of devices and tools at hand to facilitate the work. The tile is durable and it will be difficult to cut it with a conventional tile cutter if necessary. What are the main tools you will need:
- level;
- tile cutter;
- Bulgarian;
- spatulas in the set;
- container for mixing the solution;
- construction mixer;
- tile adhesive;
- perforator;
- diamond crowns when drilling round holes in tiles.
There are different options for laying porcelain stoneware. If the floor is rough and without a base, then it is necessary:
- clean the coating from dirt and debris;
- set the logs horizontally and pour expanded clay between them to the top;
- fix the boards on self-tapping screws, leaving gaps up to 10 mm;
- lay a waterproofing layer.
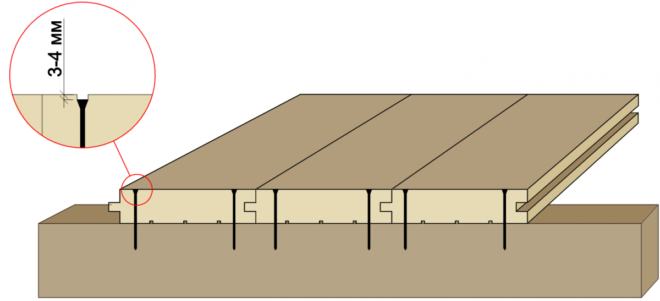 Fastening the board with self-tapping screws
Next option:
- lay a metal mesh, secure with screws;
- set beacons;
- pour a cement screed, leveling the floor horizontally with a level;
- lay moisture-resistant gypsum-fiber or plywood sheets and fasten to the logs with self-tapping screws;
- close the seams, grind;
- apply a layer of primer.
In the presence of a plywood base, a polyurethane-based adhesive is used in the work.
Underfloor heating tiles
The rules for laying it on a warm floor do not differ from the rules for facing a conventional surface. The exception is the choice of tile adhesive. For a warm floor, there is a special adhesive with increased plasticity. It contains thermoregulating additives.
Materials and tools
- Tile adhesive for underfloor heating;
- Grout for seams;
- Deep penetration soil or concrete contact;
- Comb trowel, 100-150 mm;
- Rubber spatula, 50-70 mm;
- Crosses for seams;
- Electric drill:
- Rubber mallet;
- Mixer nozzle;
- Building level, 700-1000 mm;
- Tile cutter or glass cutter;
- Mastic;
- Paint roller, 250 mm;
- Protective rubber gloves and goggles;
- Thin cord and chalk.
Material Quantity Calculation
First of all, the area of \u200b\u200bthe room is calculated. Then the number of boxes with tiles is determined. Each one has an area. A margin of 10% is added to the result obtained for trimming and fitting.
The amount of adhesive depends on the unevenness of the base and the thickness of the layer. Average values for consumption per square meter are given on the packaging. Soil norm 200-300 gr./m2.
Training
Before laying the tiles, preparatory work is carried out. Most often, the base of a warm floor under a tile is a cement-sand screed. It is impregnated with deep penetration soil or concrete contact. Concrete heated floors are covered with plastic wrap or impregnated with bituminous mastic.
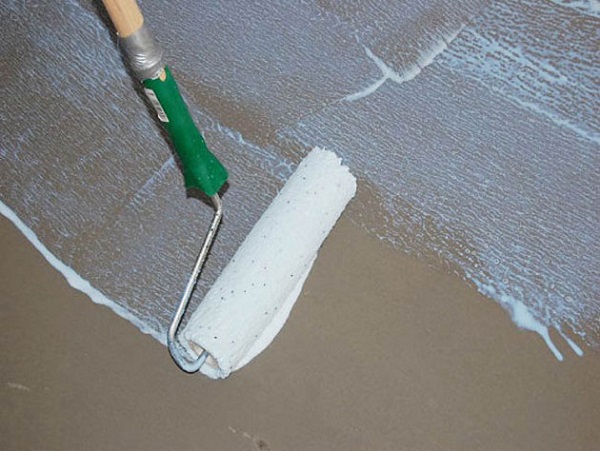 Application of a deep penetration primer on a cement-sand screed
Room layout
There are two main ways to lay tiles on a warm floor: in rows or in a run. In the first case, all horizontal and vertical seams of the rows coincide. In the second - the warm floor is laid in a checkerboard pattern. The laying method does not affect performance.
The layout of the room starts from the longest wall. With the help of chalk and a thin lace, the first row is beaten off. From it the rest of the room is marked. This method is suitable for classic styling without additional patterns.
When it is necessary to lay ceramic granite with a pattern, then diagonals are beaten off. This is done with rope and chalk. The intersection point is the center of the room. The whole drawing is laid out from it.
Laying technology
Preparation of tile adhesive for underfloor heating. For its kneading, use a plastic or metal bucket. Glue is prepared in two stages. At the first, part of the water is poured, and the dry mixture is poured. The components are mixed using an electric drill with a grout nozzle. On the second - the rest of the water and the dry mixture are added to the bucket. Everything is thoroughly mixed. The finished consistency should be slightly thicker than sour cream.
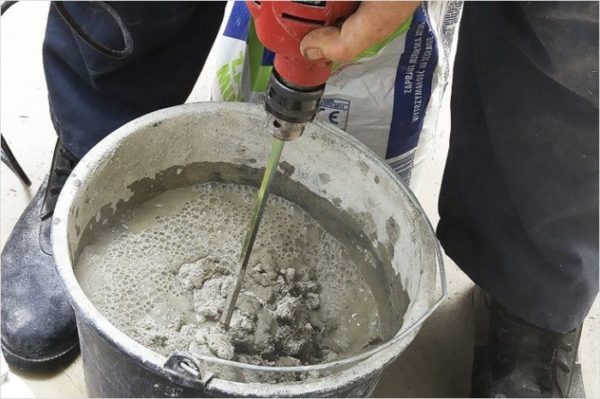 Mixing tile adhesive in a plastic bucket with a drill
- The adhesive is applied either to the base or to the tile. When applied to the substrate, a regular and comb trowel is used. Normal - the mixture is leveled, comb - furrows are made for better adhesion to ceramic tiles. The size of the surface to be glued at one time should not exceed 1 m 2 . When applied to tiles, a trowel and a comb trowel are used. The glue is applied by the master to the back side of the ceramic tile. With a comb spatula, it is stretched over the entire surface.
- Laying.In both cases, each element is applied to the base and slightly pressed in with smooth wave-like movements. Then it is tapped with a rubber mallet. The action is repeated with the next element. Using the building level, the horizontalness of the surface is checked. If the tile sank or reared up, then it is removed, the defect is corrected. She then returns to her seat. To maintain an equal distance between the tiles, crosses are inserted into them: two on each side of the tile. A gap of 10-20 mm is left between the wall and the tile. It plays the role of a deformation seam. After the glue hardens, all crosses are removed.
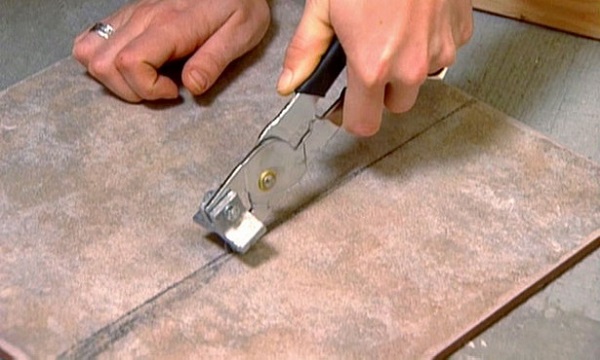 Using a glass cutter to cut porcelain stoneware
Seam processing
They are of two types:
Installation - between the tiles. Their width varies from 1.5 to 3 mm. Less than 1.5 mm is considered a seamless installation. The joints are sealed 24 hours after the installation of the flooring is completed. First of all, all the crosses are taken out. Then all seams with a rubber spatula close up with grout. The movement of the spatula is strictly along the seam.
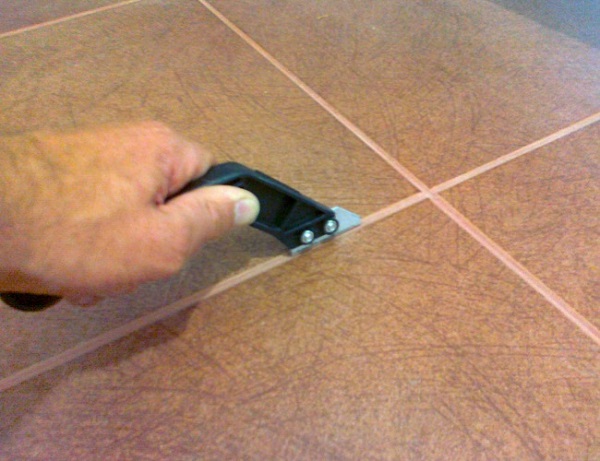 Sealing joints between tiles with a rubber trowel
This completes the laying of ceramic tiles. This is a durable and reliable coating that:
- perfectly withstands hundreds of cleaning cycles;
- does not change color when chemicals come into contact with it;
- complies with all hygienic norms and rules;
- evenly distributes heat throughout the room;
- pleasing to the eye.
Option 1. The floor level is raised by 35-50 mm heating cable into the screed
 If it is possible to pour a screed with a thickness of 35-50 mm, a heating cable can be used as a warm floor. Its main advantage is that by changing the laying step, you can lay any power per sq. m. heated area, so it can be used both as a comfort floor heating system and as additional or full space heating. And the use of special thermal insulation for the heating cable will minimize heat loss, reducing energy costs and increasing the efficiency of the underfloor heating system.
Mandatory conditions:
- If the thickness of the screed is more than 50 mm, there will be a slight heating of the surface and increased power consumption, if less than 30 mm - alternation of warm and cold zones (thermal "zebra").
- The cement-sand screed must be free of sharp stones and air pockets, so as not to damage the heating cable and prevent it from overheating.
- The heating cable must be securely fastened and the coils of the cable must not move when the cement screed is poured. Displacement of the cable turns can lead to uneven heating of the surface - a “thermal zebra”, and in some cases, even to overheating and cable failure, if the minimum distance between the turns is not observed (less than 40 mm.)
This is interesting: The technology of laying a warm electric floor - we tell in detail