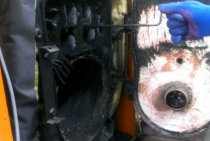
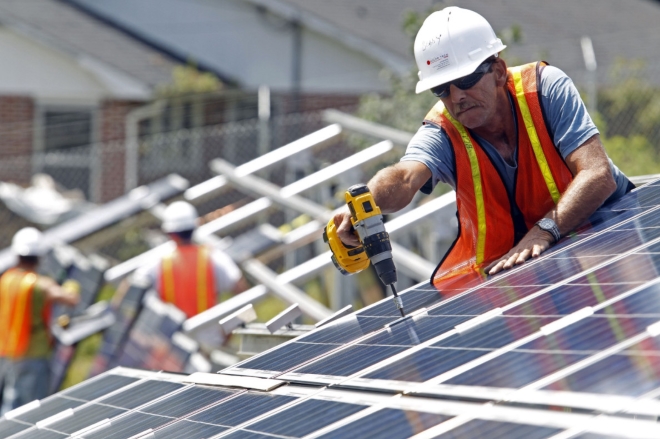
Installation of solar panels
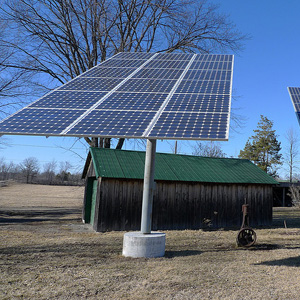
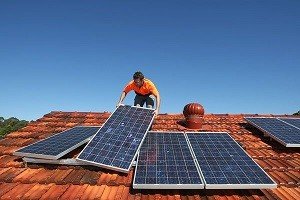
The panels are installed both directly on the roof and on a supporting structure specially designed for this purpose.
 ustanovka-2
 ustanovka-1
In the first option, the panels will be placed at a fixed angle, which will create certain difficulties in their operation, for example, during periods of low sun intensity. Thus, the only acceptable type of panels will remain only those that do not depend on the activity of the sun.
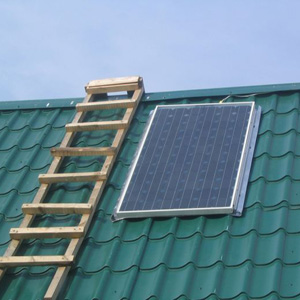
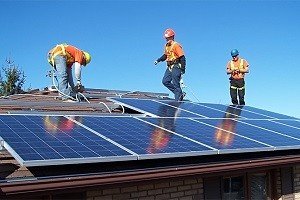
More often, the second method is used during installation, especially since it is applicable to any roof. The supporting structure, in addition to giving resistance to atmospheric influences, for example, strong gusts of wind, makes it possible to regulate the angle of inclination.
On a note
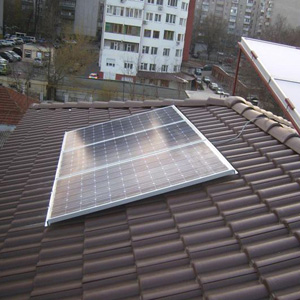
The roof of the house can have any configuration, with the exception of pitched ones with a slope of more than 40 °.
- If the slope of the roofs for solar panels does not exceed 40°, then in this case the installation is carried out either on a frame structure or without it.
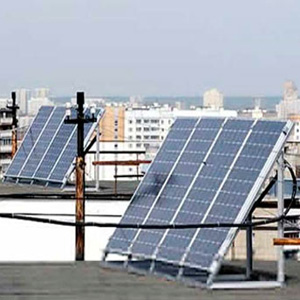
- On flat roofs, installation is performed on an inclined plane of a special metal frame.
- Such batteries are rarely installed on the wall. As in the previous case, installation is carried out on a frame structure, always with a slope.
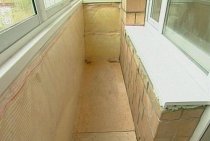
- Solar systems in apartments are usually installed either on the roof of a balcony or loggia or from the outside.
Healthy
Although solar panels on the roof of an apartment building will be more expensive than individual ones, they will reduce operating costs. Do not forget that there are no blackouts on the roofs of skyscrapers, which means that the modules on them will work with greater productivity.
 ustanovka-3
 ustanovka-4
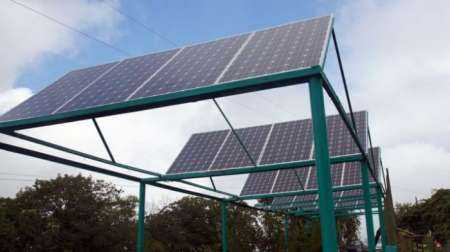
Installation on the ground is carried out on a special support structure located at least half a meter from the ground. This option is recommended, in particular, for regions with heavy snowfalls.
What points to pay attention to when installing
- Check if the roof is able to withstand the total load formed by the weight of the frame and the panel itself.
- Objects that are nearby should not cast a shadow on the panel. Otherwise
- due to the lack of solar energy, the efficiency of equipment will decrease,
- in the system, a number of panels will not work due to the shadow falling on their surface,
under these conditions, so-called stray currents can occur, which will disable the battery.
How the frame is arranged
- The structure is fixed with metal squares measuring 5 * 5 cm and 2.5 * 2.5 cm. The latter are used for spacer bars.
- Fastening is carried out using six- and eight-mm bolts.
- Under the roofing, the frame is suspended using 12 mm studs.
- In the squares, holes are pre-drilled for the screws with which the panels are fixed.
Attention!
The frame should not be skewed, because otherwise, due to the stress that has arisen on the surface of the glass, it may simply burst.
In conclusion, see how solar panels are installed in practice.
https://youtube.com/watch?v=Zns2Hw2QWAw%3F
2019 stylekrov.ru
Assemble yourself or with the help of specialists
 The choice is entirely yours! If you have working hands and “have a head on your shoulders”, you can safely proceed with self-assembly of the solar battery.
But before that, study the literature on self-installation of solar panels, choose the right place based on the above features, stock up on the necessary tools and feel free to proceed with the installation.
The advantages of self-installation are unconditional - saving money and gaining invaluable experience, which may come in handy in the future. But there are also disadvantages - you will lose your time, and in case of incorrect installation and, therefore, low battery efficiency, only you will be to blame.
 If you turn to qualified specialists, you will receive a quality service, and, in case of malfunction, you can turn to them in order to eliminate the error.
You will not spend your time on this, but you will incur material losses.Therefore, weigh all the pros and cons on your own before making the final choice of installation option.
The process of installing solar panels
The efficiency of solar panels directly depends on the correct installation. Therefore, before installing solar panels on a pitched roof, you must:
- check the strength of the roof surface, the ability to access batteries;
- the location of solar panels should not be blocked;
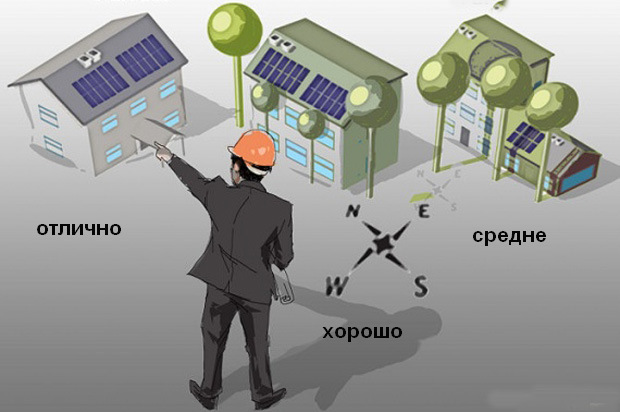
- it is best if each plane is directed towards the south.
There are several ways to build solar panels. To achieve the highest efficiency, several systems can be combined at once:
- Swivel mechanism. This design is the best, because it has a built-in electric motor that can change tilt and turn, you can continuously track the position of the sun and get the most energy from it.
- Frame construction. This type of solar panel installation is considered the most common, as it is suitable for most modern roofs.
- Installation without substrate. If the slope of your roof is close to forty degrees, this method of installation will be the most relevant. In this case, it is possible to replace the conventional roof with solar panels.
Installation of solar panels using a frame structure
This type is the most acceptable for many users. For the installation of such a structure, it is necessary:
Calculate if the roof can support the weight of the equipment.
It is recommended to strengthen the rafters in the places where the solar panel is installed.
If you plan to mount several batteries, for this you need to purchase a corner profile that has a size of 25x25. If you plan to install more than ten square meters on the roof of a house, then a metal corner, 50 × 50 in size, is suitable for the base.
It is desirable that the overall frame be welded, it is more resistant to wind gusts
Or you can connect the parts with 6 and 8 mm bolts.
If your house is located in a calm area, you can use an aluminum profile to mount the structure, despite the high cost of such a profile, its light weight will not create a heavy load on the roof.
It is important that the bevel is adjustable. To do this, the parts must be movably connected at the bottom.
To fix the base to the roof beams, a hairpin is used, its diameter should be 12 mm
The attachment point can be reinforced with washers and pads.
After the frame fastening procedure, you should connect the device to batteries, inverters, controllers and to the mains of the house.
Important: If you install panels in several rows, make sure that the front row does not darken the subsequent ones. The solar panel can be used in a house that is many kilometers away from the mains
An autonomous electrical system is much more profitable than electricity, since you will pay for the purchase and installation of equipment only once, and you will be able to use free electricity for many years
The solar panel can be used in a house that is many kilometers away from the mains. An autonomous electrical system is much more profitable than electricity, since you will pay for the purchase and installation of equipment only once, and you will be able to use free electricity for many years.
Application
Solar systems are used to provide electricity to enterprises, hotels, hospital complexes, holiday villages, villages that are located at a considerable distance from power lines or experience frequent power outages. Photovoltaic devices can be found on ships and trains.
Solar systems can act as an auxiliary and independent device for energy production. They can be connected together with the main network, wind, solid state and liquid generator.With the simultaneous connection of the main electricity and installation on photocells, the current from the photocells is consumed first of all. If it is not enough, the system starts to take electricity from the main network. But if there is a power outage. Electricity from the solar system will also stop flowing.
In addition to generating electricity, natural light is used to heat buildings. In this case, solar collectors are installed. Their capacity is enough to heat water up to 200 C, and the cost of the system is comparable to the price of not the highest quality electric water heater, which consumes a huge amount of electricity, but heats up to 98-100 C. The advantages of collectors compared to other systems are undeniable:
- run on free energy
- environmentally friendly
- do not require careful maintenance
- safe
- powerful
- relatively inexpensive
Features of solar panels
 As for the home use of such converters, the following advantages can be distinguished here:
- Long service life. Over time, the original opportunities are not lost.
- Rare breakdowns. In most cases, there are no malfunctions in the operation of solar panels. Therefore, you are unlikely to need specialized service.
- The use of alternative sources will allow you to significantly save on gas and electricity.
- The operation of solar panels is simple and easy.
The disadvantages are the following:
- This is an expensive technology.
- The efficiency of batteries is significantly inferior to conventional energy sources.
- To obtain alternative energy, additional equipment will be required - this is an additional cost item.
- The use of solar energy is impractical for those household appliances that require more power.
Stages of installation work
So, before installing panels on the roof of a residential building yourself, you must make sure of the following:
Based on all these points, you first need to choose the right place for yourself to install the system on the roof of the house. It should be immediately noted that the system should be located on the south side of the building, since it is this area that accounts for the maximum amount of solar energy per daylight hours.
After you decide exactly where the panels (or collectors) will be placed, you need to move on to assembling the frame structure and installing it on the roof. Be sure to use only metal corners and profiles. It is not recommended to make a frame from a bar, because. it will lose its strength properties faster. It is best to use a square profile 25 * 25 mm or a corner, but at this stage everything is purely individual - if you decide to install a large area solar panel, the profile section should be an order of magnitude larger.
Complete overview of installation work
Installation of roof mounts
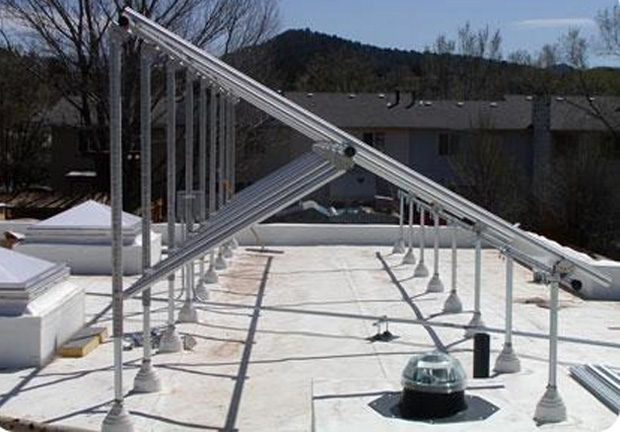
Special attention should be paid to the angle of inclination of the panels to the horizon plane, in other words, to the earth's surface. For each region, the conditions are slightly different, but usually in the spring it is recommended to install solar panels at an angle of 45 degrees, and closer to autumn 70-75
That is why you need to think about the design of the frame in advance so that you can manually choose at what angle to install the system under the sun. Usually the frame is made in the form of a triangular prism and is attached to the roof with bolts.
We immediately draw your attention to the fact that on a flat roof or on the ground it is not necessary to carry out horizontal installation of panels. In winter, you will have to constantly remove snow from the surface, otherwise the system will not work.
Another equally important requirement is that there must be air space between the roof and the solar battery (relevant if you decide to install the panel without a frame on a flexible or metal tile). If there is no air space, heat dissipation will worsen, which can further damage the system in a short period of time! The exception is roofs made of slate or ondulin, which, thanks to the wavy structure of the roofing material, will independently provide air entry
Well, the last important point of installation - solar panels must be mounted in a horizontal position (long side along the house). If this rule is neglected, uneven heating of the upper and lower areas of the panel may occur, which will significantly reduce the efficiency of using an autonomous power supply system or heating a private house.
You can install the power supply system of the site on the masts and the wall in this video:
How to properly install the structure on poles
Attaching panels to the wall
That's all I wanted to tell you about how to install solar panels for your home with your own hands! We hope that the provided instruction with photo reports and video tutorials was interesting and useful for you!
Also read:
- How to pay less for electricity legally
- How to choose solar panels for your home
- How to make a LED spotlight with your own hands
- Solar panels connection diagrams
Installation
Installation of solar panels on the roof begins with the construction of the frame. For this, an aluminum profile is used. You can also buy ready-made aluminum frames or frames.
If you decide to make the frame yourself, drill holes for the fasteners in the frame from the profile. Cover the inner surface of the corner with silicone sealant. It is applied evenly, without gaps and significant thickening. A sheet of transparent polycarbonate, plexiglass or anti-reflective glass is laid there, pressed and attached to the profile with hardware. Silicone must dry completely. A wet composition will leave streaks on a sheet of transparent material due to the evaporation of some fractions. This design provides high rigidity and secure fastening of the modules.
As hardware, special clamps or bolts are used, which are fixed through holes within the panels drilled at the factory. If you use self-tapping screws or drill the frames of the photocells yourself, the equipment will lose the factory warranty.
Next, the frame is fixed to the roof. If the roof is covered with tiles, the tiles are shifted in the places where the frame is attached, the profile is screwed, and the tiles are returned to their place. Panels are screwed onto the finished frame with hardware, each at four points.
In a standard project, 36 elements are used to assemble a battery. The size of the finished frame is 83.5X69.0 cm. When fixing, leave a gap of 3-5 mm. This is necessary to maintain the integrity of the structure, since thermal expansion / contraction of the frame occurs under the influence of temperature changes.
How to connect a solar battery?
The solar system consists of:
- photocell panels
- charge controller
- batteries (1 or more)
- inverters
- connection wiring
Different manufacturers supply equipment in different configurations. As a rule, controllers, inverters, batteries, and sometimes wiring have to be purchased separately.
The solar panel connection diagram is as follows.
1. Connect the battery and the controller with a copper cable (plus with plus, minus with minus).
2. Attach a photocell to the controller (plus with plus, minus with minus). When connecting several modules, assemble the circuit in series (total output voltage increases), parallel (total output power increases) or mixed (both parameters increase).
Scheme for connecting series-connected solar panels: connect the “+” of the first panel to the “-” of the second, “+” of the second to the “-” of the third, etc. The lead wires will be from the "+" of the first and "-" of the last panel.
When parallel, connect the "+" of the first element to the "+" of the second, the "-" of the first to the "-" of the second, and so on.
When mixed, assemble groups of parallel-connected elements, then connect the groups in series. The groups must have an equal number of modules.
3. Connect the inverter to the battery (plus to plus, minus to minus).
The order of connection must not be violated. This may damage the controller.
Recently, the cost of solar systems has been declining. This gives good hopes that in the near future the share of clean energy will increase significantly. Solar energy is already playing a significant role among renewable energy sources and continues to gain popularity.
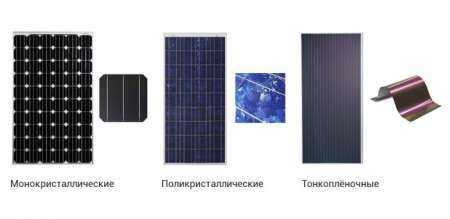
Types of solar panels
Solar batteries are actively used for heating country houses and country houses. Such devices form electrical energy into current when the sun's rays directly hit the surface and are output from the panel. One plate of 1 square meter can power a device with a power of 250 watts, therefore, in order to maximize the principle of operation, they are installed closer to each other. Often they build a whole roof in the form of solar panels. The current generated as a result of photosynthesis, through the distributor, enters the batteries and then into the power grid inverter.
Important: The duration of their daily operation directly depends on the volume of solar batteries. Batteries are recharged throughout the day while using the stored energy from the previous day
Pitched roof solar panels based on silicon semiconductors deserve great attention:
- monocrystalline panels. They are much more efficient than previous models, but their cost is several times higher than the price of the previous version. Their wafers are made of pure silicon. The crystals inside the structure are homogeneous and directed in one direction. After they harden, they are cut into thin plates. The efficiency of such a battery, if the weather is sunny, can reach 20 percent. Although with the onset of precipitation, battery activity decreases. The design is resistant to moisture, but requires regular cleaning from dust. It has a relatively small size and high power. The outer plates of single crystals are black and have a uniform structure.
- polycrystalline panels. There is an excellent ratio of the amount of energy produced and their cost. Installation of solar panels on a pitched roof does not require high costs and special skills. The composition of such panels includes silicon, although the technology for their production is simpler. The efficiency level of such solar panels is no more than 18 percent, but when it is cloudy, their efficiency does not decrease. Deep blue plates can be installed in private homes as an additional source of electricity.
- Batteries with amorphous silicon. They do not contain crystals, but silane and silicon hydrogen. They are elastic and can take any shape. The efficiency level of such batteries is only 6 percent, although during cloudy days such energy and heat sources perform well.
When choosing a solar panel, it is important to pay attention to the level of efficiency, service life and cost. If you are looking for designs with maximum performance and compactness, choose the monocrystalline option. Although the best option in terms of price-quality ratio is a polycrystalline model
If we talk about an amorphous structure, to get good power you need a fragment that is large enough in area
Although the best option in terms of price-quality ratio will be a polycrystalline model.If we talk about an amorphous design, to get good power you need a fragment that is large enough in area.
Important: Crystal batteries can last up to 25 years, the total life is 50 years. Amorphous structures lose up to forty percent of their power after only three years of operation
Battery selection
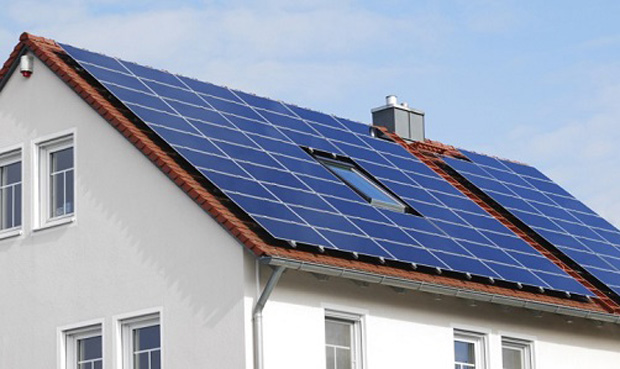
When choosing solar installations for the home, the first thing to do is to choose batteries. Recommend lead-acid, maintenance-free due to their high performance and economics. Then the amount of energy that the solar panel can provide is calculated. This determines the time that the batteries can work without recharging. It is also necessary to consider the nature of the application of the future energy system. If your installation is planned for a country house, then it is better to choose powerful batteries that will charge for five days and give you energy for two days.
After selecting and purchasing everything you need, you can install the system. Solar panels need to be mounted on the facade or on the roof of the house. Install them where the illumination is maximum. It is better to direct the panels to the south, at an inclination of 45 degrees to the horizon. Make the installation cable as short as possible. to reduce voltage losses. Fastening batteries and control unit (controller) - do at a minimum distance from each other. Follow all instructions given in product data sheets.
Abroad, surplus electricity is bought from homeowners by the state, which gives a quick payback for solar panels and stimulates their use.
A big plus for the described system is environmental friendliness and safety for people. Even the high initial cost of these units, dependence on geographical location and weather conditions does not prohibit these units from conquering more and more new houses and constantly improving technically. The energy of the sun should be in the service of people.
Modern technologies allow almost everyone to use alternative sources of electricity that interact with natural resources. One such device is solar panels, which convert energy from the sun into electricity. The design assumes the presence of photovoltaic components, which, when combined, are able to provide the required power. In the article we will consider the principles by which solar panels are installed in private homes.
In today's market, you can find a wide range of panels designed to convert solar energy. However, products can fundamentally differ both in the type of material and in other parameters.
In addition, it is important to know how to install solar panels with your own hands.
Advantages and disadvantages
So, what gives the installation of solar panels on the roof of the house?
As a rule, first of all, the following advantages of solar systems are distinguished:
- a fairly long service life, and the performance of the panels will not change;
- such equipment rarely creates problems, we can say that they do not require service;
- installation of an alternative source provides significant financial savings, as the cost of electricity and gas is reduced;
- modules are easy to use.
Of the shortcomings, we note:
- high cost;
- solar panels are less efficient than standard energy sources;
- when using solar systems, it is necessary to synchronize the energies received from different sources: solar and traditional sources. This is done with the help of additional equipment, which, of course, is associated with new costs.
- these modules cannot be used with electrical appliances that require high power to operate.