People always strive to make their home unique and beautiful. And no matter how difficult it is to achieve originality in a typical apartment, there is always a way out. One of the most non-trivial and elegant solutions is to create bas-relief. Many novice masters think that this is too difficult work, but this is not at all the case. To fashion a wall panel, it is not necessary to be an artist or a sculptor. After watching the video with a master class on creating a bas-relief on the wall with your own hands for beginners, and getting acquainted with the step-by-step instructions below, you can easily cope with the task.

Necessary materials and tools
To create a bas-relief, you will need some specific tools that can be purchased at hardware and art stores.
The list of materials and devices that will be needed for work:
- thumbnail image;
- polyethylene film;
- trowel;
- pencil;
- marker or pen;
- stencils;
- gypsum or gypsum putty (you can also use clay or alabaster);
- special primer;
- paint brushes;
- palette knives (special blades of different sizes, which are used to create three-dimensional images, can be plastic or metal);
- sculptural loops;
- masking tape;
- latex gloves;
- for colored bas-reliefs - color or paint of the desired shade.

Training
All master classes in bas-relief begin with the preparation of a sketch. But the very first, preparatory step is the choice of a room and a wall where it is planned to create a three-dimensional composition.
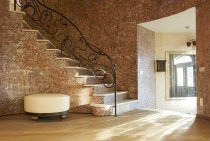
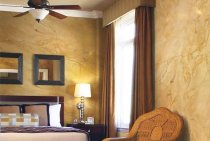
- First you need to think over the interior of the room where the bas-relief will be located. Volumetric images can be done in any room, but most often they can be seen in living rooms and bedrooms.
- Then you need to decide on the wall on which the bas-relief will be created. In this case, you need to consider how much space the panel will take, whether there is enough free space for it. Be sure to take into account the lighting, because the perception of the work depends on the light. If it is not enough, it makes sense to organize additional illumination of the bas-relief.

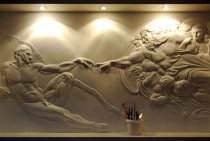
Now you can choose the appropriate sketch. Beginners should not immediately take on complex multi-layered and very voluminous figures. To gain experience, you can limit yourself to simpler forms: leaves, flowers or fruits. You should not immediately try to complete a complex plot picture, where there are many characters. But it also makes no sense to take too primitive images: they will not look very interesting.

It is easier for beginners to work with gypsum or gypsum plaster. They are plastic, keep their shape well, quickly seize.
Creating a bas-relief from gypsum plaster
start work on the bas-relief should from the preparation of the image, which will be transferred to the wall.
It is recommended to stop attention on the sketch with the most clear drawing.
Stage number 1. Working with a sketch
At this stage, a bas-relief sketch is created and transferred to the wall.
- First, the picture is transferred to paper, which is then covered with a film on top and the outline is redrawn on it. The drawing can be traced with a pen, marker or felt-tip pen. The most important thing is that it does not fade. The image is ready.

- Now prepare the base. A layer of acrylic putty or Marseille wax is applied to the wall. After that, you can treat the wall with fine-grained gypsum (satengypsum), then it will not be perfectly even, and the putty will stick to it better. This will be the basis of the future bas-relief. The putty is leveled with a spatula, then the layer is allowed to dry a little.
- When the material begins to set, after about 15-20 minutes, you can transfer your drawing to it. The film is fixed on the wall with masking tape. At the same time, one edge must be left free so that it can be lifted when necessary. Then the stencil on polyethylene is traced with a pencil or other suitable object, such as the back of a brush or a stylus. The image is imprinted on the wall.
Stage number 2. Main part
Now go directly to the formation of a bas-relief. This is the longest stage, during which the image gradually becomes embossed.
- Putty layer by layer is applied to the wall along the drawn contour.
- Each layer is allowed to dry, and only then the next one is applied.
Putty should be moderately thick, plastic and harden gradually.
- All details of the bas-relief are drawn with palette knives, and sculptural loops are used in difficult places.
If the parts are very convex, then it is advisable to screw self-tapping screws into the wall, which will reinforce the structure. This will allow the bas-relief to keep its shape and not crumble.

Stage number 3. Refinement, fixing and coloring
The final stage is the fixing of the bas-relief and its subsequent coloring.
- The finished panel must be well dried.
- Then you can trim the bas-relief with sandpaper, smooth out the roughness and sharp corners. It is important here not to overdo it and not to remove too much. At the same stage, all minor flaws are corrected: gaps are covered, small details are cut through, etc.
- The finished bas-relief is treated with a primer, and after it dries, with paint. For putty, water-based paint is best suited.
Advice. To prevent the wall around the bas-relief from looking too flat, you can apply a layer of plaster on it, and then walk along it with a folded plastic bag or crumpled paper. The surface will immediately become textured.

Creation of a bas-relief from plaster
Separately, you should analyze how to make a bas-relief on the wall with your own hands from plaster, because the technology is somewhat different. With this plastic material, which offers many options, it is convenient and easy to work with both professionals and beginners.
For sculpting volumetric parts, it is better to use a mixture of gypsum and PVA glue. The consistency of the material should resemble plasticine.
- It is not necessary for a long time to form layer by layer each detail of the bas-relief. For most typical images, ready-made forms are produced. They can be found in specialized stores and departments for creativity. Gypsum mixture is poured into molds and dried. The finished elements are taken out of the molds and the panels are glued in the right places. Simple compositions can be fully assembled from such elements.

- Some details will have to be molded by hand and then stuck to the wall, for example, grape brushes or a miniature leaf are made this way.
- If the parts are quite large, then it is advisable to place a wire inside the mold, which will reinforce the structure.
- When the image is ready, all the cracks are closed. To do this, you can use both the solution itself and white sealants.
- The finished picture is covered with a primer, thanks to which the bas-relief will not crumble and get dirty.

A primed plaster bas-relief can be painted if desired.
Creating a bas-relief with your own hands - quite a feasible task even for a beginner. If, after reading the instructions, some points remain unclear, be sure to watch the master class on making a three-dimensional picture on the wall.