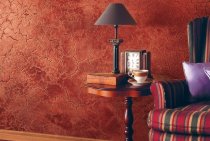
Walls are an active part of the interior, a blank slate that can accommodate diverse design ambitions. Venetian plaster is a beautiful and durable wall covering. Born in ancient Rome and experienced a surge in popularity during the Renaissance, the Venetian to this day enjoys great sympathy among both venerable designers and home craftsmen.

Advantages and disadvantages of Venetian plaster
The merits of Venetian plaster are confirmed by centuries of its use as a decorative finish.
- Environmental friendliness. The composition of Venetian plaster includes safe gypsum, marble dust, slaked lime and some polymers.
- Antiseptic properties. Lime prevents the formation of mold and mildew.
- Strength. Temperature fluctuations and mechanical influences do not affect the durability of the Venetian. The drawing, once applied to it, retains its original appearance, without being erased or fading.
- acoustic features. The property of the Venetian to amplify sounds is used in the decoration of concert halls and conservatories.
- Endless variability and uniqueness of drawings. None of the cases of drawing a Venetian will be crowned twice with the same pattern, all the drawings at the output are unique.
- Fire safety and moisture resistance.
- No unpleasant odors during and after finishing.
- Luxurious effect of monolithic natural stone.

The disadvantages of this decorative coating are associated only with its exacting requirements for the qualification of the master and whimsical application. In terms of time and labor costs, this work is long and painstaking, and doing it yourself is not easy enough. In addition, relative to other types of finishes, the cost of Venetian plaster is quite high.
Varieties of Venetian plaster
Types of Venetian decorative plaster have beautiful Italian names and differ in the method of application and external signs in finished form.
- Veneto is the most popular type, relatively easy to apply. Similar to matte marble, wear-resistant.

- Encausto - reproduces the natural texture of polished stone with small inclusions of brown color like granite. The basis of this type of Venetian plaster is two-year-old lime, which has good antiseptic characteristics.

- Trevignano is a Venetian plaster characterized by translucent layers that create the effect of light from within. It has a polymer base and a moderate cost.

- Marbella - creates a visually velvety surface with a faceted gloss on the veins. It is successfully used in rooms with high humidity. Easy to apply, polishes well.

Important! Real Venetian plaster can only be called a decorative coating, resulting from the application of a trowel (trowel) on the wall of the plaster mass in short strokes. Everything else - simplified technologies, the participation of a brush or roller in the process - is a fake, liberally called "imitation".
The process of applying Venetian plaster
Venetian implies space or at least classic interior style – empire, baroque, Art Deco. In small rooms, with its help, you can beat niches, piers, ledges, focus on one wall, choosing the right type of Venetian plaster and its tone.

An important point: only a master can apply Venetian plaster qualitatively and beautifully. And not just a master, but a qualified professional who has worked with a Venetian more than once. Doing such a coating with your own hands is difficult and without experience is not recommended.But who knows, maybe hidden skills are dormant in you, and you are able to cope with Venetian plaster at a decent level without special training. In addition, it is useful to know the basic principles of this technique: very often the work of hired craftsmen requires control and stimulation from the owner.
Preparatory stage
It is necessary to carry out the application of Venetian plaster with your own hands, strictly observing the entire technological sequence.
For work you will need:
- trowel - a special flexible spatula with rounded ends and a high resource;
- narrow and wide additional spatulas;
- roulette;
- level;
- ruler;
- grinding grater or sandpaper;
- steel graters for leveling and mashing the solution;
- rag.

Initial work includes the following steps:
- An indispensable condition for successful puttying of the wall is its perfectly flat surface. The wall must be cleaned of the old coating, all cracks, chips, irregularities repaired and sanded.
- Then the first layer of putty is applied. After drying, it is carefully polished and cleaned with a rag from the resulting dust.
- The stage with puttying, sanding and cleaning is repeated again.
- Ideally smooth surface is covered with a primer.
Even preparing to work with Venetian plaster is a laborious and lengthy process and can take about a day.
The sequence of applying Venetian plaster
The order of work with the Venetian is as follows:
- The wall is visually divided into sections of 0.5–1 m2. Putty is applied in small portions from site to site, capturing the borders of neighboring ones.
- The base coat is applied continuously. With the help of a trowel tightly attached to the wall, Venetian plaster is distributed in a thin layer in arcuate movements. Excess material is removed with a spatula. The layer dries for 6-8 hours, then polished with a spatula.

- The second layer of Venetian is applied with short cross movements, the so-called "butterfly". This application forms characteristic veins. The dried layer is polished with a spatula or grater.
Advice. Work must be carried out without delay, as the material hardens very quickly, and its belated leveling can lead to cracking of the layer.
- After complete drying, the third layer of Venetian plaster is applied. It is distributed in wavy strokes without right angles. To create additional effects, Venetian plaster of different colors can be used. And again, the layer is polished after drying to give a gloss.

Important! So that there are not the slightest scratches on the finished layer of Venetian plaster, it is necessary to do all the work only with clean tools, without traces of dried material.
- The number of Venetian layers can be up to 9. Each of them adds an additional effect to the existing ones. Of course, it is hardly worth it for a beginner to do all 9 layers, but it is quite possible to try to reproduce a couple of them with your own hands.
- After final drying, the surface of the wall is polished. This should be done with fine sandpaper, then cleaning the wall of dust.
- After about a day, the plastered wall is treated with matte or glossy wax, due to which the Venetian plaster acquires water-repellent properties. Wax is applied in a thin layer with a spatula or sponge in soft circular motions.
- The process is completed by polishing the wall to give the Venetian a mirror effect and depth.

Helpful Hints
The following tips will help you master the wisdom of applying a Venetian and do everything correctly with your own hands:
- Every 2-3 strokes, clean the tools from sticking plaster to avoid scratching the finished coating.
- The amount of plaster on the trowel should be optimal: its excess goes beyond the scope of the trowel, and its lack leads to the appearance of traces of an oval shape.
- Large influxes of plaster must be dispersed with the movements of the tool at a right angle.

- When leveling Venetian plaster in hard-to-reach places and around obstacles, move in the opposite direction from them.
- The most important stage is ironing or rubbing - giving a gloss to the finished surface. Errors at this stage can no longer be corrected. When ironing, the trowel must be held with both hands and, with increasing pressure, moved alternately in different directions.
- Expert opinions vary about waxing: some do not recommend waxing finished Venetian plaster, as it, in their opinion, makes it look like plastic.
- You can continue working in the room where the plastering took place after a day.
A marble bath or a malachite living room is an option, rather, from the realm of fantasy. But Venetian plaster can be a worthy solution for the average realities of our lives.