Do-it-yourself aeration fields
Aeration fields, irrigation fields or even filtration fields - all these names describe one drainage treatment plant that helps with the removal of treated wastewater into the ground.
The principle of operation of filtration fields for a septic tank is the distribution of purified water over a certain area. Properly made aeration fields clean up wastewater, and according to some information, by another 20-40%. This is a very good result, which means that you do not pollute the soil of your own summer cottage with a similar system.
 Most septic tanks operate according to a fairly simple scheme, but it is optimal and effective only if all indoor units and system elements are properly installed and connected.
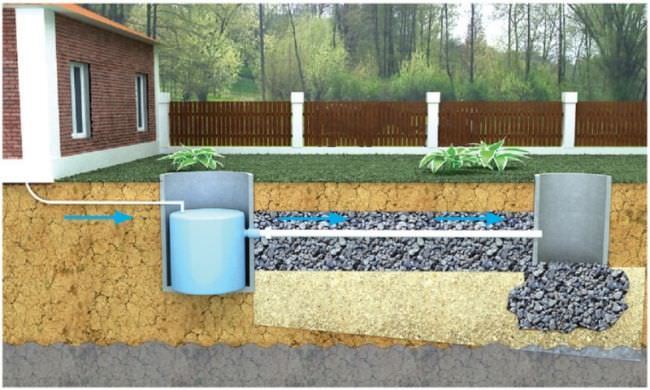
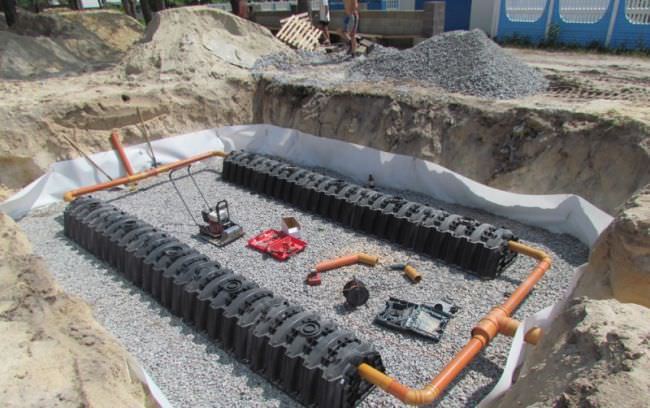
Building filtering fields is quite simple. To do this, you need to dig several trenches, under the number of pipes-branches from the septic tank. Next, fill these trenches with sand and gravel, creating a 20 cm cushion over all of them. After that, install perforated pipes above the trenches, which will produce a distributed discharge of water.
What do experts in filtering fields recommend?
There are many opinions of masters on installing drainage systems, but we have chosen the most significant of them:
For aeration fields, plastic perforated pipes are used, at the edge of each of which a ventilation outlet is necessarily installed.
To prevent perforation from silting, the pipes are wrapped with geotextiles, backfilled with gravel, and special load-bearing platforms are built.
The system is laid in an unused place in the country house so that it does not interfere with the plants with an increased amount of water in the territory, and the plants do not spoil the system with their roots.
The whole system is assembled with obligatory attention to the requirements of the septic tank and the discharge of water, as well as depending on the characteristics of the soil. By the way, the system is being built on sandy loam, loam and sandstone, always below the freezing level.
For laying pipes, the same slope is selected and set for the correct distribution of water.
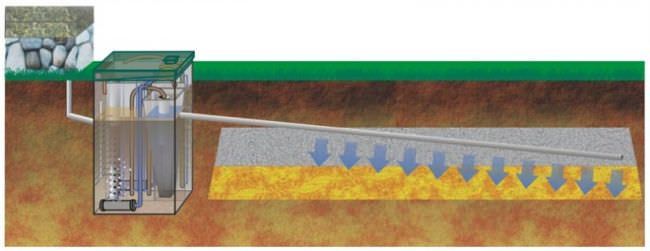 Autonomous sewer systems or local treatment facilities, the same VOCs and septic tanks from many manufacturers are an excellent alternative for a summer cottage
How to organize a drainage system
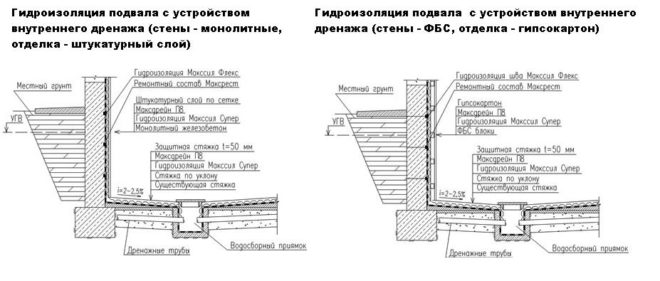
So that there is no dampness in the basement, it is necessary to equip the pits with a drain system, which will allow organizing the drainage of water from the building. Additional waterproofing of the walls of the well and the connecting seam may also be required.
Diagram of a pit with a drainage system.
If the building is located on a waterproof cushion, a simple drainage system can be dispensed with. To do this, under the bottom of the pit, you will need to leave a pipe with a diameter of 6-8 cm and a length of about 1 meter. The pipe hole that goes into the basement pit should be closed with a special drain grate. In order for water to drain more efficiently, the floor must be laid out with a slight slope from the building (towards the drain hole). The bottom of the well should be covered with a layer of gravel about 3-4 cm. Such a simple procedure will prevent the earth from shedding, and debris will not clog the pipe.
Additionally, waterproofing of the walls and expansion joint between the pit and the building will be required. The walls of the well can be treated with bituminous mastic. The seam is sealed with geotextile or roofing material. Waterproofing in conjunction with the drainage system will reliably protect the building from moisture from the wells of basement windows.
Drainage inside
It is important to understand that building regulations do not know any internal drainage.Internal drainage is arranged either in industrial buildings, where it is essentially a system for collecting spilled liquid or condensate, or for draining basements from flood waters
Approximate sequence of work in case of a flooded basement:
- Before starting work, it is necessary to drain the basement.
- Apply waterproofing to the surface of the walls and especially to the seams, joints and cracks. Impregnation, coating or injection waterproofing is usually used.
- A layer of crushed stone (15-20 cm) is poured at the bottom of the basement. Perforated pipes are laid on crushed stone. Pipes should bring water to the storm system. To do this, the pipes are laid with a slope (1-2 cm per meter of pipe) and a hole is made in the foundation for the passage of the pipe without drops.
- A layer of crushed stone (15-20 cm) is laid on top of all this. And the floor is organized (concrete screed or slabs).
The disadvantage of this scheme is the loss of 40-50 cm of basement height.
As an alternative, you can form a floor in the basement that slopes towards a drain well or a drain pit with a pump. The pump must be able to handle contaminated water.
https://youtube.com/watch?v=fZSclsFzx9U%3F
Causes of water in the basement
If measures are not taken to protect the basement from groundwater during construction, then eliminating the consequences of flooding will become a more costly solution.
In the upper layers of the soil, the first aquifer is formed. Moisture gets into it from atmospheric precipitation and melted snow and ice cover, nearby reservoirs. In spring, moisture is abundant, the groundwater level above two meters deep is considered high.
On the way of water penetration into the house, the owners erect two main barriers:
- waterproofing of the foundation, floor and walls of the basement, plinth, which protects the thickness of the concrete and brick layer from gradual seepage of water through microcracks and pores of the material;
- a drainage system under the foundation, around the basement or the entire house, which collects most of the moisture and removes it outside the internal zone.
The most common causes of flooding are:
- violations of the technology for arranging external waterproofing of the house;
- clogging, silting of drainage pipes or the volume of effluents exceeding the capacity of the system;
- breakage of water supply or drainage pipes;
- abundant condensation due to poor ventilation of the basement.
It is possible to determine the high level of groundwater occurrence on the site even before the construction of the house with the help of geological expertise, or it is possible according to folk signs: a high water level in the well in nearby areas and the presence of plants such as reeds, willow, alder, horsetail.
Discharge point for drainage water
The choice of a place for the discharge of drainage water is chosen first of all, focusing on the volume of water and the intensity of flooding. For the case of seasonal water inflow into the basement, a drainage well or drainage trench is allowed. To construct a drainage trench, we make the last part of the discharge pipe perforated, fill the bottom of the trench with crushed stone and sand, and wrap the pipe itself with geotextile.
Approximately, for the removal of 1 m3 of drainage water, about 6-8 m of a drainage trench will be required. With large volumes of drainage water, it is necessary to lay your own trench to the drainage system of the village.
Therefore, it is necessary to take measures to eliminate the causes of basement flooding, including the installation of ring drainage.
Rules for the construction of a drainage system for a septic tank
 With the help of a septic tank, it is possible to arrange a full-fledged sewer, regardless of joining the central one. For the most part, for suburban areas, this option is the only one. When choosing a treatment type of septic tank, the installation of a drainage system, depending on the composition and depth of freezing of the soil, can be up to 75% of the scope of work on the installation of an autonomous sewer.
The drainage system is perforated pipes, or drains, that can interact with the septic tank and domestic sewer system. The sewer pipe is installed at an angle of 2-3 degrees at a depth of 0.45-0.65 m. The septic tank is arranged at a depth of no more than two meters, otherwise the post-treatment process becomes more complicated.
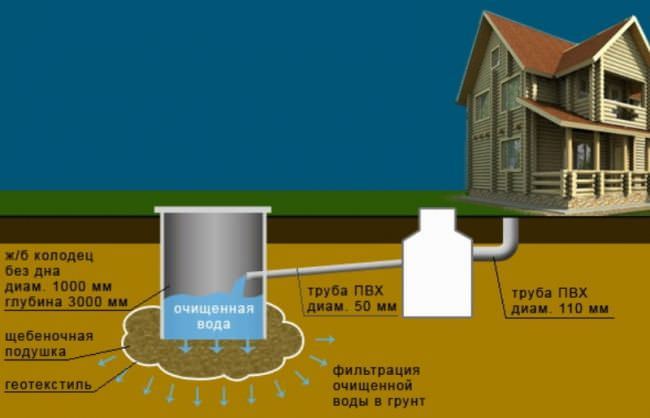
For the installation of the system, pipes with a diameter of 0.11 m should be selected. In the upper part of the drain pipes, the holes are slightly smaller in diameter than in the lower part. This is done to improve the distribution of wastewater. Their number at the very beginning of the system will be somewhat larger, while the holes are smaller in diameter, due to which the waste liquids will not flow out immediately. The greater the distance at which the holes are located from the distribution well itself, the larger the diameter will be, and at the end of the pipes the holes are located at the bottom.
A visual diagram of the installation of a septic tank and the arrangement of the drainage system.
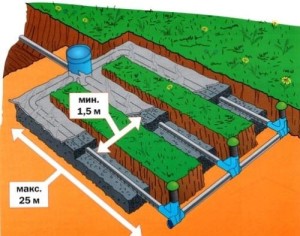
Basic principles for installing a drainage system
- For each of the drainage pipes, the length, starting from the well and ending with the place where ventilation is installed, should be no more than 25 meters;
- Between drains located in the neighborhood, a distance of at least 1.5 m should be maintained;
- It is necessary to install drainage pipes at a depth of 1.5 m;
- The trench for the pipe must be made at least 0.5 m wide. The most common option is a trench of 1 meter.
Filtering drainage well
This structure is similar to a cesspool, but with certain differences. Treated effluents from the septic tank come here, which are additionally filtered and go into the ground.
The option can be called the best solution for giving. It is simple, inexpensive, copes with small volumes of water (for more serious volumes, it is better to use other structures), and can be installed even on soils with partial problems.
 You can make the drainage well simpler - install a reinforced concrete ring in the pit, in which you can also fill holes for water drainage. You can make the drainage well simpler - install a reinforced concrete ring in the pit, in which you can also fill holes for water drainage. in which you can also fill holes for water drainage. You can make the drainage well easier - install a reinforced concrete ring in the pit, in which you also fill holes for water drainage
Which is good, and the drainage well practically does not take up space, and therefore, if you have a small area, then there is nothing to worry about.
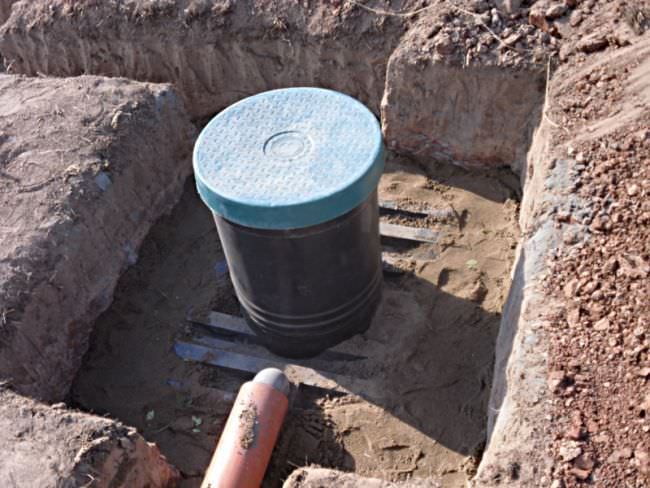
How to make a drainage well with your own hands?
There are no problems in the construction of a drainage well, and for summer residents who have been with us for a long time, they were engaged in even more serious construction, and even more so.
You need to dig a hole and properly equip the pit. There are several options for arranging such a well, and all of them are affordable.
You can immediately stop at a used brick, which is laid in a circle of a pit, near the walls. Perforations are left between the bricks, gaps without mortar, so that water can escape not only through the bottom, but also through the walls.
You can make the drainage well easier - install a reinforced concrete ring in the pit, in which you can also fill holes to drain water. A similar option is to install a large plastic barrel without a bottom in a pit.
 Aeration fields, irrigation fields, or even filtration fields - all these names describe one drainage treatment plant that helps with the removal of treated wastewater into the ground.
Drainage Well Expert Tips
Don't waste your money on waterproofing. Here it is not needed, and even vice versa, it will suit us when the water evenly goes into the ground.
The drainage well is installed in the area of the site where there are no problems with a high level of groundwater. It is also recommended to set the depth of the structure below the clay layer.
For better water absorption, elimination of problems with heaving of the soil, as well as for maximum post-treatment, a layer of coarse sand and gravel, 20 cm each, is laid on the bottom of the well.
Perforation is made at a level of 50-80 cm from the bottom, water will also go through it.
So that the perforation does not silt up, expanded clay or the same gravel is sprinkled around the circumference of the installed barrel or concrete ring.
Be sure to think about the correct choice of location - away from residential buildings, a well, a well
Also, do not violate the law with your construction.
It is necessary to accurately calculate all the parameters of the structure, which must correspond to the amount of water discharged.
You will also need waterproofing and insulation of the upper part of the drainage well, high-quality ventilation.
It is important to install a removable cover on the well, which will give access to the inside.
 Drainage systems differ mainly in the ability to remove a certain volume of treated wastewater
Drainage in the basement
One of the possible solutions to the issue of protection from water in the basement is a drainage device or a slope with a pit for installing a drainage pump. It is preferable to carry out work at the lowest possible level of groundwater 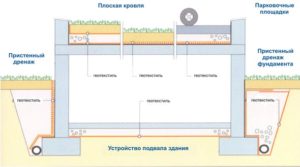 s: in dry summer or winter.
For basements with earthen floors, a drainage system is recommended - a network of drainage pipes located around the perimeter of the room. For its device, it will be necessary to dig a trench (depth of about 0.5 m) along the perimeter of the basement. The bottom of the trench is carefully tamped and covered with crushed stone or gravel to a height of 15-20 cm. We lay drainage pipes on top of the layer (perforated pipes, preferably with a geotextile coating). Pipes are laid with a slope towards a pit or drainage well. Slope - approximately 3 mm per linear meter of length.
We fill the laid pipes with crushed stone or gravel to the floor level. A prefabricated pit or well is installed at a lower point. A well is made of monolithic reinforced concrete or ready-made wells made of PVC pipes are used. We install a drainage pump in the well, which is controlled by a float.
In the event that wooden floors are arranged in the basement on top of the earthen floor, they should first be removed.
In addition to the drainage device, it is possible to waterproof the bottom of the basement.
We carry out waterproofing as follows: For a pit device, it is easiest to use a pipe D = 0.5 m, which allows you to install a drainage pump with 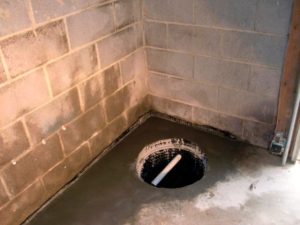 float, depth - up to 1 m. The recommended volume of the pit is 100 - 200 liters. You can purchase a ready-made perforated pipe or drill holes in a checkerboard pattern (diameter 10 - 15 mm, step 20 - 25 cm). Before laying the pipe, it is recommended to wrap it with geotextile or plastic mesh in several layers.
The bottom of the pipe must be closed, for example with concrete, with a layer of 5 - 10 mm with a rammer. The pipe is installed in the prepared pit, after installing the pipe, the space around is filled with crushed stone. The top of the pipe should be at floor level. For safety, we close the pipe with a grate, finished or welded from reinforcement. To pit a pit in an existing concrete floor, the concrete will have to be broken in the right place, a pit dug and a pit made of concrete with low water permeability.
Installation of finished structures
Modern construction companies today offer a fairly wide selection of ready-made structures for arranging pits. By purchasing such a product, you can equip pits in the basement without much effort: the only thing you have to work on is to dig a pit to fit the dimensions of the purchased structure.
Installation of the finished structure.
Today, ready-made pits are made from different materials. It can be galvanized steel, propylene, plastic or polyester.The last option, reinforced with fiberglass, has such strength that structures made of it can easily withstand not only the weight of an adult, but even a car. Therefore, such designs are the most popular.
Replacing old elements with new ones.
Metal, in particular, steel structures also have their advantages. Due to the galvanized surface, they are not exposed to moisture. In addition, most are equipped with anti-vandal devices. This option is perfect for country houses in which there are no permanent residents. Iron gratings for pits will protect not only windows from mechanical damage, but also the dwelling itself from thieves.
Usually, the following mandatory elements are included in the package of ready-made pits on the market:
- Well body.
- Lattice on the windows.
- Mounting kit.
The design and manufacture of pits is associated with certain technological subtleties, but it is not difficult to install ready-made pits. Any man (familiar with construction) will be able to cope with this work without the involvement of specialists.
The body of the well is installed in the finished pit, all communications are connected (drainage, drain, grate to the drain pipe). After all the above work, it remains to install a fence or grate for the pit, and the structure is ready. All structural elements are attached to each other and to the wall with special dowels, which are included in the product package.
The finished pit is also good because it does not need to be additionally insulated. The only drawback of prefabricated structures is their price. This pleasure is not cheap. Therefore, if you are not ready for high costs, you can try to make a do-it-yourself pit device.
Technological features of the construction of pits
The easiest and fastest way is to buy a factory-made design. In this case, you only need to dig a pit of a suitable size with your own hands and ensure the drainage of water.
The body is made from the following materials:
- Composite (propylene, polyester, reinforced with fiberglass). The grille is able to support the weight of the car. It is practical to equip them with recesses installed at ground level in places of possible movement of people and equipment.
- Galvanized steel. Together with the same grating, it serves as protection against someone else's penetration through the pits in summer cottages and country houses without permanent residence.
Finished products are available in various designs for the specified conditions: vehicle and pedestrian loads, high groundwater (reinforced waterproofing), installation on a foundation heat-insulating coating.
The standard kit includes the following items:
- frame;
- covering grid;
- mounting kit.
Pit under windows
It should be designed in stages, taking into account the prospects for changing geological, climatic and operational conditions. Data for the first 2 categories (multi-annual cycles and building plan) can be obtained from your local architectural office.
An individual pit design scheme is developed based on the following parameters:
- The width of the pit is chosen 1.5 times the same size of the window.
- The depth of the finished recess after laying materials and cladding should be at least 0.25 m lower than the frame in the opening.
- The area of the lower plane for the drain is commensurate with the surface of the window block. The rectangular shape will save house space on the ground surface. The distance from the wall is obtained within 0.8-1 m.
The main nuance is the disposal of wastewater. If the waters are located significantly below the foundation, then the drain occurs through a perforated pipe into a well with a depth of at least 1.5 m. The moisture will spread into a cushion of crushed stone under the base.
High water in the soil will require pipes to be connected to a drainage system or a separate well with removal outside the site.Before installing the floor, waterproofing and insulation of the underlying base are carried out. The lower plane is made with a slope towards the drain.
At the stage of pouring walls with concrete, formwork is made of boards or plywood. The thickness of the monolith is chosen at least 15 cm. To prevent leakage of liquid from precipitation or cleaning the territory, the ingress of large debris during strong winds, it is advisable to raise the upper edges of the pits by 0.15-0.2 m above the blind area. Reinforcement in this design is rarely used - it is only necessary to provide a rigid connection with the wall using anchors (for example, long nails driven in half). Additional protection from rainwater will be a decorative visor.
Drainage wells
So that the water in the basement can be pumped out from one point, drainage recesses are equipped, to which the floor slope is directed. The walls are concreted in the form of a rectangular well with a wall thickness of 0.13-0.15 m.
Step by step operations are carried out according to the following scheme:
- Dig a hole with a volume of 1 cubic meters. m under the pit in the center of the basement. The size is directly proportional to the area of the underground.
- Make another recess in the bottom of the diameter of an ordinary bucket. A stainless steel container is inserted into it - there will be a suction pipe of the pump.
- The walls are laid out of solid red brick (silicate is less resistant to water).
- The brick can be protected with 3 cm cement mortar or covered with ceramic tiles.
- The top is covered with a lattice of reinforcement, which allows the hose to be lowered, but the leg not to fall through.
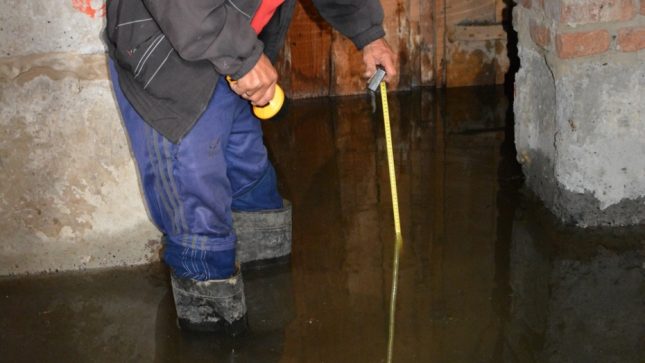
In a frequently flooded cellar, pits can serve as an indicator of the rise in ground seasonal moisture. For this purpose, do-it-yourself stainless (aluminum) tanks with a capacity of about 250 liters with drilled holes in the walls are installed below the floor level. When water appears, the electric pump with float automatics is switched on, and it is pumped out into the storm sewer. This approach prevents flooding at an early stage. Over time, the amount of water entering the basement decreases and the pump works several times less frequently.
Construction of a pit to drain water from the basement
It is not difficult to properly equip pits in the basement with your own hands if their functional purpose is taken into account in accordance with the geological and climatic conditions of the site. In some cases, their presence is assumed by the installed technological equipment. High groundwater or cyclical rise will require a more careful design approach so that the cellar can be used for its intended purpose regardless of the season or weather outside the house.
Types and functions of pits
Perform 2 main tasks:
- collection and disposal of water;
- basement natural light.
Building codes do not regulate the mandatory installation in low-rise private houses, but for effective protection against the destructive action of water on the base of the building, a prudently made recess is indispensable.
1. Pit at the windows.
The device of the cellar is often not limited to the creation of a small warehouse for products - the entire internal space of the foundation is settled. In the basement basements, windows are built that go below the soil level (blind areas). For this purpose, recesses are made in the ground near the outer wall of the foundation. They allow sunlight to penetrate inside, arrange additional natural ventilation. They are built in such a way that precipitation and groundwater cannot enter the window, and already numb moisture is discharged into the drainage system or wells.
Pit can be of the following forms:
- rectangular;
- trapezoidal;
- semicircular.
Some additionally perform the function of technological openings for supplying equipment and bulky items to the basement. The minimum distance from the outer edge to the wall should not only ensure the illumination of the room, but also let the fire hose with bends through without fractures.
It is desirable to have organized water collection in order to protect material assets (workshop, gym, wine cellar, garage) from natural disasters or accidents on internal pipelines. Under the windows in the basement, recesses must be made if the openings are located at a distance of less than 0.2 m from ground level. This provides protection from storm flows, melting snow and splashing when drops fall on the blind area of the building.
2. Drainage pits.
The need for them necessarily arises when groundwater appears in the spring in the basement a few years after the construction of the house. The following reasons contribute to this:
- violation of technologies, the use of low-quality materials at the stage of building construction;
- incorrect calculation of loads, formation of cracks in the foundation, destruction of waterproofing;
- a significant increase in the water level in the underlying soils (excessive precipitation / melting of precipitation, the emergence of new sources, the creation of artificial barriers in aquifers due to new construction in neighboring areas);
- exit from the standing drainage system (blockage with debris, squeezing by subsiding soil, failure of the drainage pump automation).
The project provides for an electric pump for pumping out liquid, if an individual heating point is taken out into the basement. The slope of the floor should be directed towards such a recess.
What to do if the basement floods
FORUMHOUSE readers are well aware that the construction of a cellar or basement is a responsible undertaking that requires competent calculation. Despite a number of benefits that the arrangement of “0” level premises promises, their operation may be complicated due to the high level of groundwater. Therefore, it is necessary to think about how to drain water from the basement even at the design stage.
Most often, the following scheme is proposed to solve such a problem:
1. Completely dig out the basement around the entire perimeter.
2. Make additional waterproofing of the basement walls.
3. Arrange a drainage system at the level of the base of the foundation.
4. Make a clay castle.
Despite the seeming universality of this solution, practice shows that there are no schemes suitable for all situations.
The choice of method for constructing a drainage system depends on the data obtained during a hydrogeological study at the site.
This is done like this - they drill 2-3 wells 2-3 meters deep below the basement level.
After that, they look at what level the water will appear in the wells, and whether it will be above or below the level of the foundation mark. The perch is usually collected in the soil used to backfill the foundation sinuses.
Therefore, the device for drainage and waterproofing should be considered as a complex, one without the other is not done.
The drainage system cuts off water from the walls of the basement, and the waterproofing does not let moisture in.
It is also necessary to divert the water coming from the roof from the foundation when the snow melts, for which a blind area is arranged, a drainage system is installed and a storm drain is organized.
If these measures did not help, then wall drainage will have to be done, and the water collected in the basement should be pumped out through the pit.
The forum member made the pit as follows: he took an aluminum tank of 500 liters and cut it in half. The result was a container with a bottom, 1.7 meters high and 90 cm in diameter. To the bottom of the tank Dodge45 screwed 4 corners that protrude beyond the dimensions of the container. They serve as an anchor and do not allow the tank to float. Then, in the lower part of the tank, in a circle, the forum member drilled many holes with a diameter of 20 mm. They are essential for better water collection.
The next step was digging a hole in the basement 1.5 meters deep with a distance of 2 meters from the wall.
The user then dug two sloping trenches to the pit, with a height difference of 60 cm to 100 cm.He sprinkled the bottom of the trenches with granite rubble, laid sewer plastic pipes with a diameter of 150 mm with holes drilled at random with a diameter of 13 mm, and covered the trenches with rubble. Got drains. The forum member put a pump in the barrel to pump out the collected water. Then it merges into a roadside stream.
Basement water drop schedule:
- 2006 The pump turns on every 20-30 minutes.
- 2007 The pump turns on every 1 hour 30 minutes - 2 hours 30 minutes.
- 2008 The pump turns on every 2 hours 30 minutes - 4 hours.
- 2009 The pump turns on every 4 hours 30 minutes - 6 hours.
- 2010 The pump turns on every 6-12 hours.
- 2011 The pump is switched on only by force. The water level at the bottom of the barrel is stable - 6 cm.
A year later, a member of the forum buried a pipe under the road, into which he laid a sewer plastic pipe with a diameter of 150 mm and made a stainless steel receiving well to drain water from the pit.
Another option for a pit to drain water from the basement
I drilled many holes in the body for water drainage, and at the bottom of the tank I fixed a siphon from the kitchen sink with a pipe with a diameter of 70 mm. Then da4hik dug a trench under the foundation with a slope towards the storage well, located at the far end of the site.
He brought a plastic pipe from the pit into the drainage trench. Instead of a perforated drainage pipe wrapped in geotextile, the forum member, on the advice of his neighbors, threw trunks of sawn trees onto the bottom of the trench. Water collected in a storage tank in the basement is discharged along a natural slope through a drainage ditch outside the site.
- Thus, I not only removed the water from under the house, but also partially drained the site.
All information about GWL, perched water and drainage is collected in this topic. A FORUMHOUSE user's story about how he built the basement is available at this link. A photo report on self-draining the basement is here.
And from this video you will learn how to build a basement with a high groundwater level.
Subscribe to the channel so you don't miss the next post!
Purpose and characteristics
The main purpose of this element is to restrict access to that part of the walls of the building where the basement windows are located. The pit device protects the windows themselves, and the basement as a whole. This structure will not allow snow, melt water, debris and animals to get into the basement, and thanks to such protection, the windows will last much longer.
The lattice protects the windows from mechanical damage and practically does not prevent light from entering.
An important purpose of the basement window is the access of daylight to the room. Light wells should be designed in such a way that the maximum amount of sunlight enters the basement through the windows. The presence of windows in the basement or cellar allows you to reduce the cost of electricity for lighting, as it makes it possible to use natural daylight hours.
And if you apply maximum imagination, then you can make a spectacular decorative element of the facade of your house from this design.
The dimensions of the pits are calculated depending on the size of the windows themselves, and on how deep they are planted into the ground. As a rule, the length of the pit (the part that runs parallel to the wall) should be one and a half times the width of the window. And the second side (perpendicular to the wall) should not protrude more than 1 m. The best option is 70–80 cm. The depth of the pit is determined based on the location of the lower edge of the window frame: its bottom should be about 20 cm below the window. Also, it is advisable to plan a slight slope of the bottom of the well (about 3-5 degrees).
There are also special SNiPs - these are building codes and rules that structures must comply with. When designing, be sure to specify what these standards are for your building.