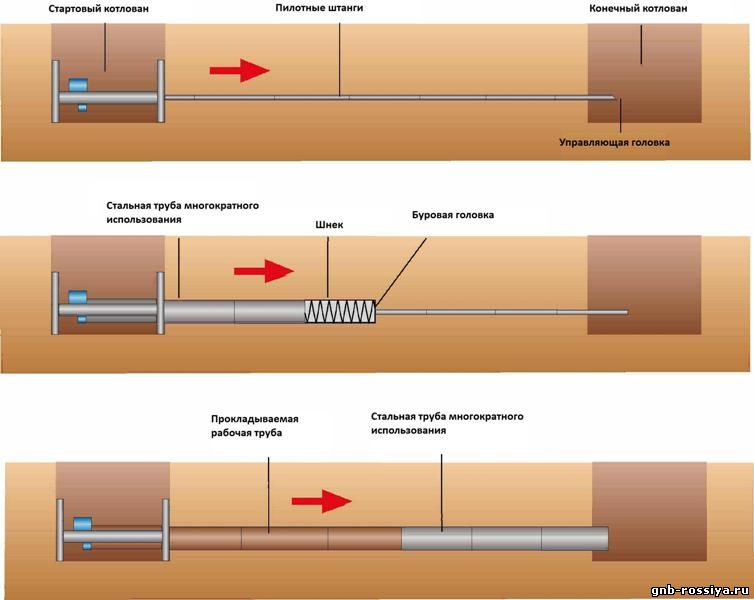
1 Purpose and advantage of HDD technology
In industry, inclined drilling is in demand in the oil and gas sector, in construction, and the method is also widely used to create underground utilities.
Directional drilling is used to perform the following work:
- Creation of wells for oil and gas production;
- Drilling for mining;
- Laying of pipes for water supply and sewerage;
- Laying of gas supply communications;
- Installation of oil and gas pipelines;
- Arrangement of cable lines.
Today, directional drilling is the most economical way to create underground utilities and perform any underground work. Directional drilling, in comparison with digging trenches with your own hands, has the following advantages:
- Minimization of time and financial costs.
- The possibility of laying communications without destroying the asphalt pavement.
- Drilling wells (both normal and mini - to a shallow depth) can be carried out under water bodies, transport routes and in places where ground construction work is prohibited.
- Work can be performed by a mini team of 3-5 people.
The first thing to do is to agree on a construction project, reconstruction
Performing a puncture under the road without a plan and coordination is not worth it, primarily for two reasons.
First reason
it's personal safety. It may turn out that under your site there are already certain types of communications that you did not know about. There were rare cases when hidden pre-war communications were not known even after the project was agreed. It is still worth making sure not to pierce the gas pipe adjacent to your site - the consequences can be disastrous.
The second reason
on which it is better to make an agreement - a fine from the city government for uncoordinated actions. This is especially true for those types of communications that go beyond your personal area: cases when you need to enter a common main pipe, etc.

Sequencing
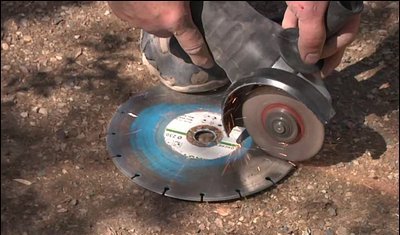
With the help of an angle grinder, a piece of reinforcement up to 2 m is sharpened, and the sharpening should be uniform and maximum. When using a cut of more than 2 m, the risk of bending is high.
Now you can directly start horizontal directional drilling. This segment is driven into the ground with a sledgehammer in the right direction, and the blows must always be uniform.
After the segment is completely driven in, you need to weld the next one on it. Thus, work is progressing to the required depth. At the junction with the rock, you can bend the rod a little, so you need to be careful. The work ends exactly at the moment when the working “head” appears at the exit point. Thus, a guide rod is formed.
Now a pipe of a larger diameter is taken and put on the fittings. Another small piece of a slightly larger diameter (glass) is put on top of the pipe, which will protect the pipe from flattening during impacts, and after it is no longer necessary to beat, the glass should be removed. The pipe must be sharpened without fail with a grinder, so that the progress of work is maximum.
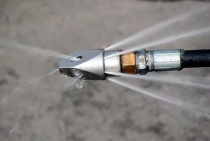
After the pipe is driven to the maximum (no more than 2 m), you need to install a pump with water into it and turn on the supply. To artificially increase the pressure, nozzles are used to reduce the diameter. Water will come out of the open part of the pipe, for which a 200-liter barrel was prepared.
When work with the segment is completed, you need to remove the barrel to the side and empty it. Now you can weld another cut on top and continue in the same way until the pipe exit is fixed on the other side. It is worth considering that one glass is used for all work.
A horizontal directional drilling rig is quite expensive equipment. But if there is no financial opportunity to purchase such special equipment, then there is the option of making a mini HDD with your own hands.Such an idea is quite feasible, which many craftsmen have repeatedly proven by demonstrating their HDD installations at specialized forums. This unit is perfect for domestic use.
Let's see what is required for the manufacture of such an installation, in addition to "straight hands":
- Welding machine;
- Grinding machine (Bulgarian);
- Good sledgehammer;
- Reinforcement with a diameter of at least 20 millimeters and a length of ten centimeters more than the road width. You will also need steel pipes of the same length;
- Pump with hose;
- A barrel with a volume of at least 150 liters (more spacious is recommended) with a wide “throat”;
- A drill with which drilling will be carried out (you can also make it yourself);
- Funnel with a fixed hose at least 2 meters long.
Methods for laying pipeline lines
Among all known methods of laying pipe lines, the following are most widely used:
- direct puncture;
- the so-called "punching" of the soil;
- drilling (horizontal);
- penetration using shields.
In order to choose the appropriate pipe laying option, you will need to decide on the following things:
- the condition of the soil in the wiring area (including the presence of natural waters in it);
- the nature of the development;
- isolation parameters of the channel being laid from external factors;
- the length of the laying;
- pipeline diameter;
- economic rationale for this particular method of laying.
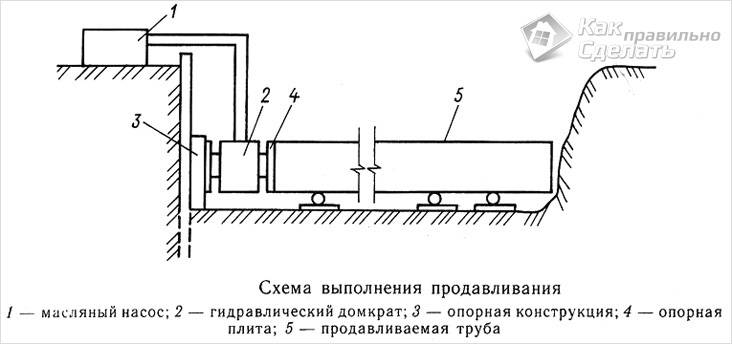
Advantages of the puncture technique
One of the most used methods of pipe laying is a puncture used when working in clay and loamy soils (with pipes up to 550 mm in diameter). We note right away that the length of the section laid in this way should not be more than 60 meters. In addition, in such a situation, you can not do without special equipment (winches and jacks, in particular).
The use of this method has undoubted advantages, thanks to which it is possible to carry out all the work without destroying the roadway (or any other building structure). Indeed, in this situation, you are laying a pipeline directly under structures or structures located on the surface of the earth.
Recently, the method of laying pipes, which does not involve digging any trenches, has become increasingly popular with builders and is gradually replacing other options for their wiring. Experts consider the “puncture” the most reliable method and attribute this to its advantages such as:
- Preservation of the integrity of the site, "pierced" by puncturing the soil.
- No threat to communications located in the neighborhood.
- Opportunity to refuse special (heavy) construction equipment.
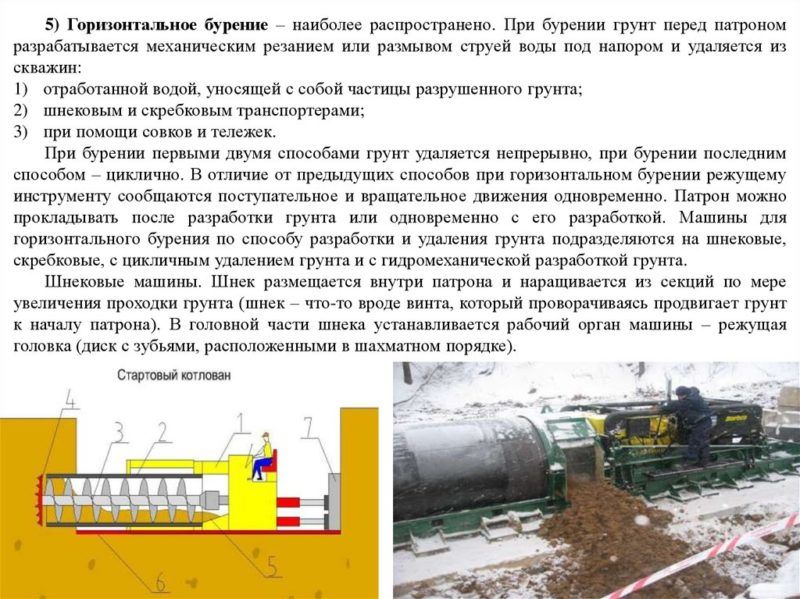
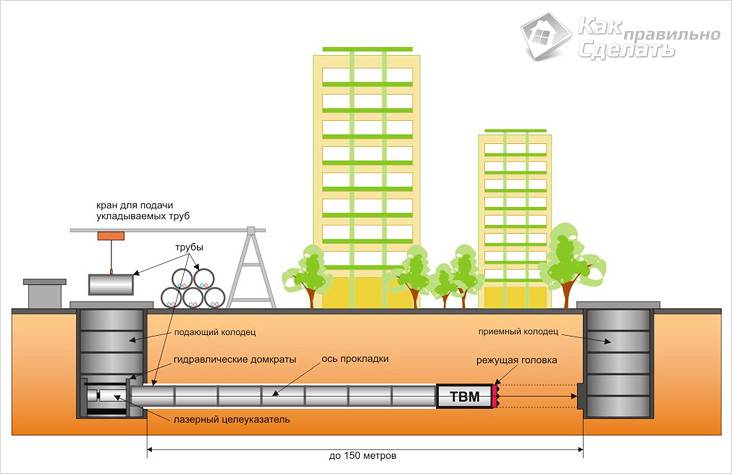
Drilling rig
 Horizontal drilling machines, as one of the automated options
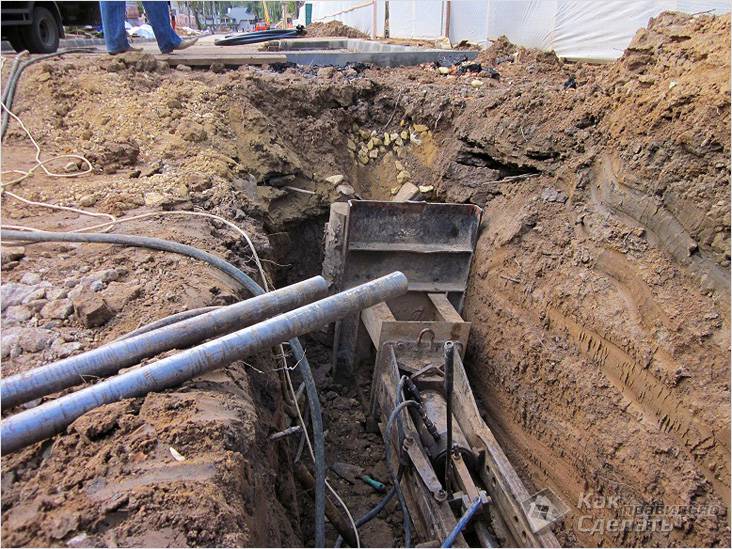
Well construction is carried out not only with a sledgehammer, as they also use a more modern method using a special horizontal drilling rig. This allows you to perform large-scale work. But the use of such equipment increases the cost of work several times.
The main thing when using such an installation is not to forget that it must be installed in accordance with technologies and standards. Working with drilling equipment requires taking into account all the rules, so before you start working, you need to read the instructions. The drilling rig is divided into two types.
Manual installation
With the help of the rotation of the pipe, gradual drilling occurs. The soil is washed out in the manner described above; for this, work sometimes has to be interrupted. In this case, it is also desirable to use reinforcement.
 Types of equipment for manual drilling
Electrical
 Horizontal drilling - the most common
UGB moves on the rail, so the drilling speed is higher.But in this case, problems often arise when it hits the rock, but if it is not very strong, then the installation will cope with it. The process is faster, but the drilling rig is expensive.
Drilling with the help of modern, high-tech equipment is not always fast, because dense rock is often hit. If the process proceeds automatically, then a pump with a filter for pumping out must be connected to the tank for the leached earth.
After drilling with your own hands, in all cases, the pipe is left in place, but sometimes it is changed to polypropylene, because it has a longer service life.
Related video: Horizontal drilling with a homemade drill
A selection of questions
- Mikhail, Lipetsk — What discs for metal cutting should be used?
- Ivan, Moscow — What is the GOST of metal-rolled sheet steel?
- Maksim, Tver — What are the best racks for storing rolled metal products?
- Vladimir, Novosibirsk — What does ultrasonic processing of metals mean without the use of abrasive substances?
- Valery, Moscow — How to forge a knife from a bearing with your own hands?
- Stanislav, Voronezh — What equipment is used for the production of galvanized steel air ducts?
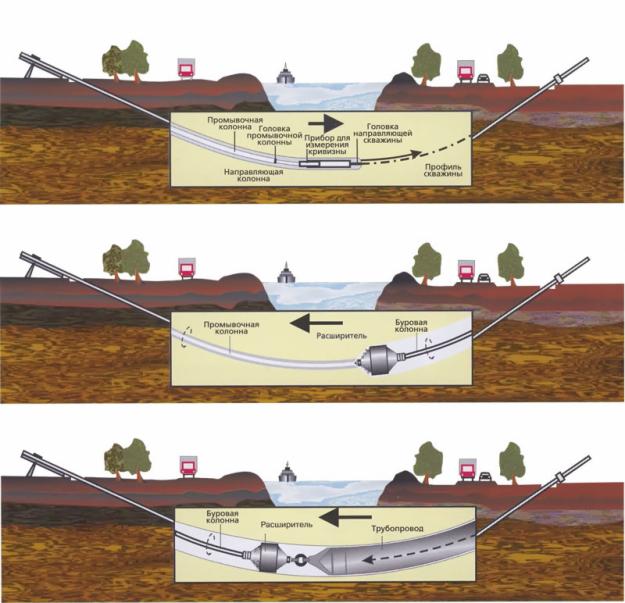
Laying pipelines underground
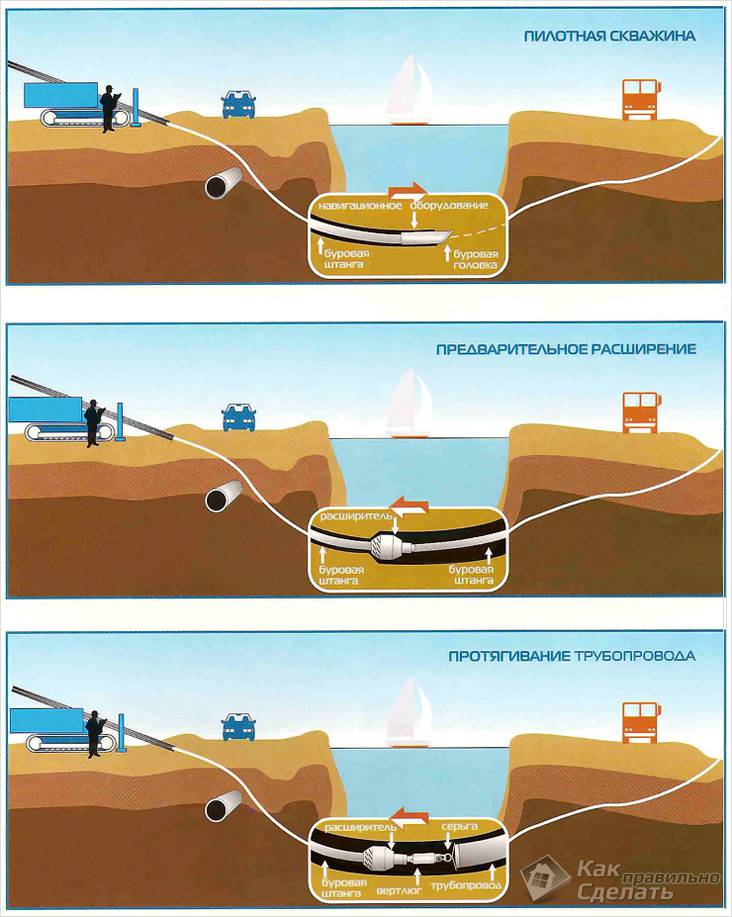
- Horizontal Directional Drilling (Navigator Vermeer drilling system);
- Ground piercing (mini ground piercing machine)
The construction of external underground utilities by directional drilling and mini soil puncture allows you to carry out work:
- In the conditions of the city (a large number of existing engineering networks and roads).
- Under highways, railways, dams, rivers and other natural and artificial barriers. more
- In summer cottages and cottage settlements, preserving the landscape and protecting the peace of neighbors. more
- In cramped conditions, for example, between a fence and a road, neighboring houses, working in a basement and cellar, etc.
- Year-round (winter-summer).more
We have the following cities on our account, where trenchless pipe laying by HDD and puncture was carried out: Dolgoprudny, Reutov, Zheleznodorozhny, Domodedovo, Taldom, Podolsk, Tula, Yaroslavl, Korolev, Likino Dulevo, Klimovsk, Schelkovo, Serpukhov, Ivanteevka, Pushkino, Krasnoarmeysk, Lyubertsy, Krasnozavodsk, Pavlovsky Posad, Dmitrov, Khimki, Balashikha, Zaprudnya, Dubna, Vidnoye, Zelenograd, Kubinka, Kashira, Narofominsk, Ruza, Khotkovo, Zagoryanka, Voskresensk, Sergiev Posad, Monino, Iksha, Noginsk, Staraya Kupavna, Povarovo, Sofrino , Stupino, Aleksandrov, Tutaev, Chekhov, Elektrostal, Fryanovo, Fryazino, Orekhovo Zuyevo, Moscow (more than 200 underground passages completed). As well as settlements, settlements, such as: Muranovo, Lesnoy, Barvikha, Lesnye Polyany, Pestovo, Kishkino, Tolstopaltsevo, Bear Lakes, Alabino, Nikiforovo, Discord, Razvilka, Rasskazovka, Sokolovo, Tishkovo, Moscow, Komyagino, Eldigino. Nikolina Gora, Gorki, Bakhchivanzhi, Testaments of Ilyich, Klyazma, pos. Biokombinat, Zevalovo, and many others.
The laying of external engineering networks underground by the method of puncture and HDD for private households is very relevant. In almost each of them it is necessary to carry out or change an underground water supply system, bring out a pressure or gravity sewer, introduce an electric cable, or a case for a gas pipeline. There are neighbors around, there is a road, a lake or a river, a forest or a ravine nearby, that is, cramped conditions for laying engineering communications in a trench way. Laying communications using the horizontal directional drilling (HDD) method or puncturing the soil with a mini puncture installation remains the only way to build your underground networks.
Let us avoid serious expenses!
Save the road, buildings, the surrounding landscape! Saving nerves to yourself and your neighbors!
In the case of imposing strict requirements to prevent damage to the landscape and the environment, trenchless technologies are the only way to carry out work on the installation of engineering communications (pipelines).
Flexible pricing policy and individual approach to each Client,
Self-puncture is performed using the following technology
- Steel reinforcement is hammered with a sledgehammer along the intended puncture line with a pointed end in the working pit. It serves as a guide for the pipe and warns of difficult obstacles in its path.The length of the reinforcement rod should not exceed two meters, otherwise the material may be deformed under the blows of a sledgehammer. As it enters the ground, the next segment is welded, and again it is clogged. Work continues until the end appears on the other side of the road;
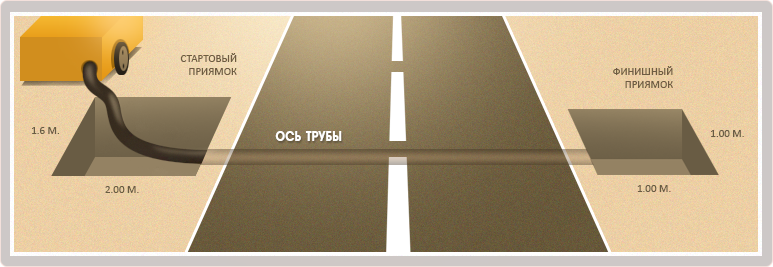
- On both sides of the road, under which it is necessary to lay communication, two pits (pit) are digging symmetrically. The depth of the pits should be slightly greater than the depth of the pipe laying. Through the first pit, a horizontal clogging of the pipe will occur until it appears on the other side. The dimensions of the working and receiving pit are selected taking into account the foregoing and should provide for the possibility of a person being free in it;
- Using the same technology, a puncture is made with a pipe dressed on fittings. In order not to break the ends, a nozzle with jagged sharpened edges is installed in front, and a nozzle in the form of a glass at the back. Under the blows of a sledgehammer on the bottom of the glass, the pipe begins to go into the ground. As it advances, the earth is compacted in the pipe and the movement is stopped. With a jet from a water pump, it is quite easy to remove it. Further actions are sequential until the nozzle appears in another pit.
There are various variations of this method:
- Using a bailer made from a large hydraulic cylinder;
- With the help of a mini horizontal drilling rig or various aids for driving reinforcement, such as a drill;
- Puncture at the base of the pump.
Having surfed the Internet, we found another thousand and one ways of “author's” laying communications underground. We have never doubted the unique abilities of craftsmen, but we still recommend that you use one of the methods we have proposed, since these methods are the most reliable and have a technical justification. Better not take the risk.
Since the issue of self-piercing is mostly of interest to owners of private real estate who wish to either modernize their site or bring communications to it, it is worth remembering that even if the land is in your property, you cannot just take and drill under it. This is especially true for works that, according to the plan, provide for going beyond the boundaries of private territory. We also note that punctures over 10 meters in length are performed using special equipment and using the HDD method.

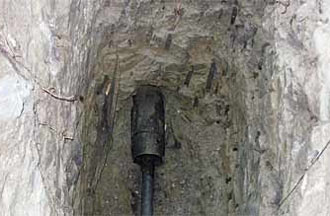
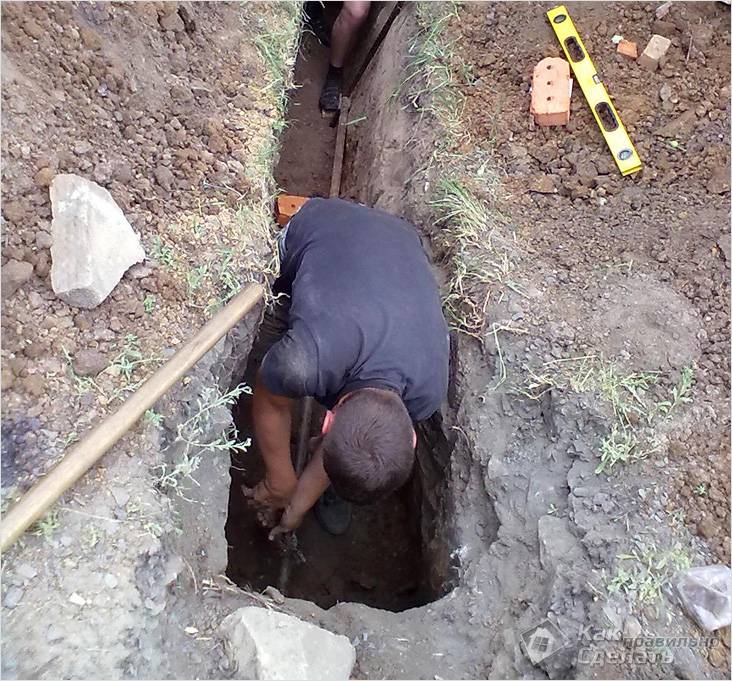
Photo
How to make a puncture under the road with your own hands? - this is almost the most popular question according to the statistical search engine
Yandex Wordstat
on the topic of trenchless laying of communications. In many cases, it is set by the owners of private land plots. Today we will figure out whether it is possible to make an underground puncture on our own, and what you need to know before starting work.
The desire to save on laying communications is quite justified - horizontal drilling costs a lot, and there is always a need for communications: when building a house, the need to overcome natural obstacles (lakes, rivers) or passing through a roadway.
Savings with self-laying communications can range from 30 to 70%. It all depends on what kind of actions you will perform on your own, and which ones you will order on the side.
Approximate costs when performing a puncture with your own hands / when contacting specialists
Parameters
On one's own
from 800 rub. per running meter
Appeal to specialists
from 2500 rub. per running meter
Project approval
Earthworks: from 300 rubles, depending on the length (pipe and puncture) and the organization in which you need to get approval.
Project approval: from 1000 rubles, depending on the length (pipe and puncture) and the organization in which you need to get approval.
Included in the price
Soil research
Executive survey of underground utilities from 300 rubles. for one p / meter
Invitation of a surveyor with his own tool from 5000 rubles. for the challenge
*Price may vary depending on the type of work required for your site
Included in the price
Payment for the work of specialists
Is free
From 2300 rubles m.p.
for pipes up to 110 mm in diameter
(included in total price)
Buying a pipe
Steel pipes from 40 r per p / m
PE pipes from 150 rubles per p / m
*Prices depend on size, pipe diameter, material and quantity
You can purchase the pipe yourself, or it can be provided by the piercing company.
The cost of the pipe is paid.
Purchase
additional tools and materials
Free if you have the necessary equipment.
Installation of mini-gnb: from 120 thousand rubles.
- Barrel (200 l): from 250 rubles;
- Welding machine: from 12,000 rubles;
- Sledgehammer: from 200 rubles;
- Shovel: from 700 rubles
- Bulgarian: from 1,500 rubles;
- Pump equipped with a hose: from 2,000 rubles;
- Installation of mini-gnb: from 120,000 rubles.
*The final price may vary depending on the method you choose and the availability of tools
Not required, specialized organizations have all the necessary materials
Improvement restoration
Is free
(Backfilling of pits, leveling the ground, sowing the lawn)
From 100 rub. per sq.m
(usually included in price)
We will not focus on what tools to use or what pipe to choose (you can read this
).
Today we will give recommendations to those who make a decision and want to save money.
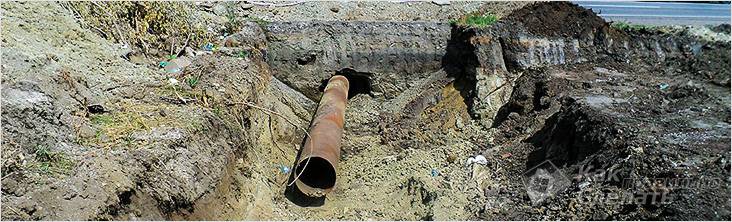
Puncture under the road
—
a method of trenchless laying of communications, when, under the influence of the pressure of the drill, the soil is compacted (a small part of the soil is selected for cleaning the well), and the pipeline is pulled into the resulting hole. This leaves the pavement intact.
Horizontal Directional Drilling Process
When all the preparatory work is completed, you can proceed to the direct drilling of a horizontal well. Now you will have to arm yourself with a sledgehammer. With the help of it, a pointed piece of the bar must be driven into the ground in the direction in which the second pit is located.
After you completely drive the segment into the ground, using a welding machine, we weld the next one onto it and continue like this until it reaches its destination - in our case, this is the second pit. If suddenly on your way you meet a hard rock, for example, a stone, you can slightly bend the bar, so be vigilant and extremely careful.
Now you need to take a metal pipe of a larger diameter and put it on a piece of reinforcement. On top of this pipe we put on another even larger diameter, it is he who will protect the main pipe from possible shocks that quite often accompany the work process. The pipe also needs to be sharpened to achieve its maximum efficiency.
After you manage to drive the pipe to the maximum possible depth, you can run a pump with water into it, which will clean it of dirt, in this case mainly represented by earth.
Do-it-yourself drill for HDD
The main element of the HDD installation is the drill, it is on it that the main function of the drilling process lies. The drill can be purchased at a specialized construction equipment store. But, since we decided to make the HDD installation with our own hands, we will try to cope here on our own.
To make a drill, you will need the following:
- a strong pipe with a diameter of up to 5 centimeters and a length that will correspond to the length of the required well;
- two small tubes with a diameter of 4-5 centimeters and a length of 10-12 cm (future pen);
- a piece of sheet steel with a thickness of at least four millimeters;
- machine for cutting hard metals;
- electric welding machine;
- burner (blowtorch).
Let's start making a HDD drill with our own hands:

- We cut a circle from a piece of sheet steel so that its diameter matches the diameter of the future well.
- In the central part of the circle we make a hole according to the size of the main pipe.
- Remove one segment from the resulting ring. Its size depends on the size of the stones that prevail at the drilling site.
- Using a sledgehammer, we "fold" the steel ring into a spiral shape. The extreme, cutting part must be sharpened for more efficient drilling.
- Now you need to make a tip. This can be done with a small piece of sheet steel. We heat the steel with a burner, after holding it in a vise, after which we give the piece of steel the necessary shape.
- The resulting tip is welded to the end of the main pipe. The tip should be like a continuation of this pipe, increasing its length.
- Weld two pipes to the main pipe, which will serve as future handles.
Stages of work when performing HDD with your own hands
Horizontal directional drilling with a self-made HDD installation is carried out in several stages:
Training.
At this stage, two holes (small pits) are dug parallel to each other, opposite an obstacle (a road, for example). The depth of the pits should be approximately 20-30 centimeters more than the planned pipe laying depth.
Pilot well.
At this stage, a preliminary well is made between the pits. The first piece of pipe is taken, the pipe guide must be sharpened with a grinder. The pipe is driven in with a sledgehammer with a sharp end towards the receiving pit. Having completely clogged the pipe, the next pipe section is welded to its end and also driven in. This continues until our point appears in the receiving pit.
A driven rod, between the starting and receiving pit, further performs the function of a guide axis.
The final stage.
The pipe is driven in again, similar to the previous stage, but larger. After that, with the help of a pump, under pressure, excess soil is washed out of the pipe.
It is worth saying that such a do-it-yourself HDD requires a lot of labor and patience. To make a horizontal well, even a small dyne, you have to make a lot of effort.
How to make a puncture with your own hands
The practical implementation of the method of trenchless pipe laying with your own hands is possible only in a relatively short section (no more than ten meters), and also if you have a good physical shape that would allow you to perform heavy work operations. As for the equipment necessary for such work, you will definitely need the following simple tool:
- the simplest welding machine;
- ordinary "Bulgarian";
- a small sledgehammer;
- reinforcement not thicker than 20 millimeters;
- steel pipe of your chosen diameter (several pieces);
- pump equipped with a plastic pipe;
- plastic barrel with a neck (capacity up to 200 liters);
- funnel with a hose up to 2 meters long.
The trenching process usually includes the following steps:
- Preparation of a ditch on both sides of the track (with a margin of 12-13 cm). When it is dug, the axis of the pipe that you plan to lay is outlined.
- After that, a pipe blank is taken and that end of it, which is intended for driving into the ground, is sharpened. In this case, it is best to cut the teeth on it using the "grinder".
- As you carry out all these operations (after each next pushing of the pipe), you should wash out the soil from its hollow part.
- After each next “flushing” of the pipe, it should be continued driving with a sledgehammer.