Use of bricks and hard materials
If you are faced with the question of how to raise the bath above the floor level to a considerable height, then installation on solid materials would be a suitable version. The advantages of this method include:
- increase in the area of racks;
- stability;
- exclusion of structural deformation;
- installation of plumbing at any height;
- creating the desired slope.
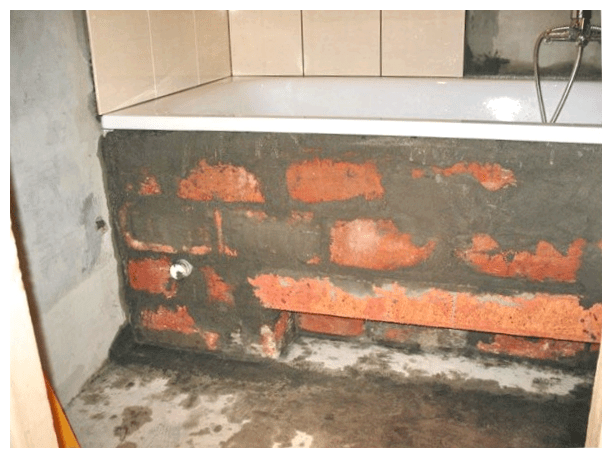
Basically, this method involves the construction of supports made of bricks and other materials that have sufficient strength. Brick coasters are constructed using mortar. This allows you to give them stability and strength.
As an addition, walls are used that surround the plumbing along the perimeter. This method makes it possible to perform a reliable installation of the bath, regardless of its weight. At the same time, it looks quite aesthetically pleasing. The space under the plumbing is completely hidden behind a brick wall.
Important! If materials with low moisture resistance are used for installation, then additional insulation work must be performed. This will protect the supporting elements from the negative effects of high humidity.
Frame application
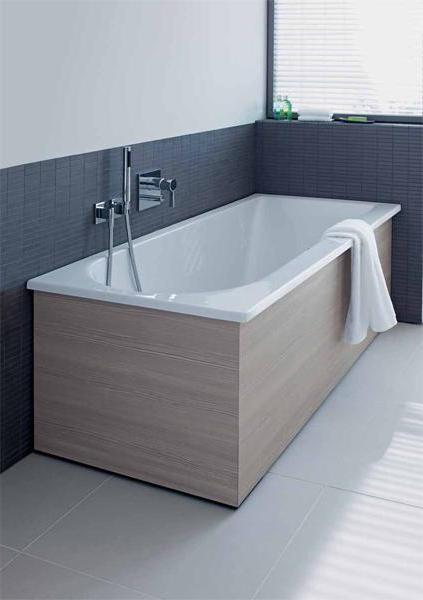
Installing an acrylic bathtub, especially at a considerable height, has some difficulties. This is due to the fact that the product has a low strength. To perform a safe and secure installation, it is recommended to use the frame method. This allows you to evenly distribute the load over the area of \u200b\u200bthe bath.
You can make a frame structure with your own hands from steel corners. For large bathtubs, it is recommended to use a welded frame, as it has high strength. To make it, you need to have at hand the following materials and tools:
- square pipe;
- metal corners;
- saw for metal or grinder;
- welding machine.
The fabrication of the frame structure is carried out in the following sequence:
- Take measurements and draw up a design diagram. The design of the frame must be approached very carefully. The main thing to remember is that the main task is to evenly distribute the load from the bath onto the structure.
- Make blanks. Frame elements are cut in accordance with the created project. All dimensions must be accurate, otherwise, difficulties will arise during the construction of the frame.
- Perform joining workpieces. Then clean the welding spots and paint the structure. Performing paintwork will protect it from high humidity and corrosion.
- Install the frame in the selected place and make sure that it is level. If the bath has a factory defect (insufficient slope), then put the structure under a slight slope. Of course, such a factor should be provided for at the stage of creating the frame.
- Install the bath and connect it to the drain. Check the tightness of the connection.
To give the bath aesthetics, the frame is hidden behind decorative panels. The peculiarity of frame mounting is that it can be used to install any bath. The frame is often used in cases with acrylic products.
There are many things to consider before raising a bathtub off the floor. First of all, the result of the work should be convenient and safe for family members. So, plumbing should be stable and comfortable to use. This can only be achieved by calculating the installation height and installation method.
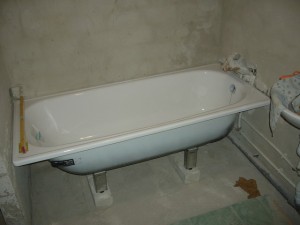
Lifting on legs
Often in a set with factory baths there are specialized legs, which are attached specifically to the plumbing system. But, their length may not always be enough.What to do in case when the factory legs for the bathroom are quite short? Everything is quite simple: you should purchase new, longer screws.
At home, you collect 1 leg, and then with it, as an example, go to a nearby plumbing store, or to the market. There you look for and purchase screws with the thread length and size that suits you. Then, upon returning home, simply replace the purchased screws with factory ones, and mount them on the bath.
When purchasing, attention should be paid to the quality of the goods. Do not forget about the load that the legs will hold back - this is a bathroom filled with water, in which a person sits
For excellent durability of the bath, and the safety of your loved ones, you should select only products from trusted companies.
This option will enable you to raise not only ordinary bathtubs, but also unusual models with artistic legs. Raising a bathtub is not difficult, and the new screws will be virtually invisible.
How to fix a bathtub on a tiled floor on legs with an adhesive backing
Read the attached instructions, make sure that all items are complete and in good condition. Check the condition of the flooring using one of the methods described above. This type of bathtub can be mounted on both concrete and wooden supporting structures.
Step 1.
Tip the bathtub upside down, making sure that the distance to the drain hole will ensure a good connection to the sewer pipe.


Step 2
Degrease the bottom of the bathtub at the locations of the double-sided tape. It is better to degrease with special solvents, if they are not available, then it is allowed to use alcohol or vodka. After vodka, the surfaces must be thoroughly dried. Places for gluing adhesive tape are marked on the bottom of the tub.

Step 3
Remove the protective oiled paper from the tape on the legs. Place them carefully along the lines and press firmly. Do not rush, work with utmost care. If you make a mistake, then tearing off the legs will be problematic. In addition, the adhesive surface will significantly degrade its original properties, fixing will be unreliable. You will have to change double-sided tape, and it is rather difficult to find high-quality in stores, and you will have to lose a lot of time searching.


Step 4
Tighten the adjusting bolts on the legs until they stop and check their location with a level. They should lie in the same horizontal plane, if this is not the case, then readjust them.


Step 5
Assemble and install a siphon on the bath, the specific work algorithm depends on the design features of the equipment.
Step 6
Measure the distance from the legs to the sides, it is necessary to mark the location of the side stops of the bath.

We have already mentioned that light steel and acrylic bathtubs cannot be fixed to the floor only on legs. This is due to the fact that such structures are very unstable, during use they can tip over or slide on smooth ceramic tiles. It is possible to specifically fix the legs to the floor with anchors only in some cases for bathtubs installed in the middle of the rooms. And then such work is not recommended for two reasons: you need a lot of practical experience in installing bathtubs and you have to drill holes in the tiles.
If it becomes necessary to replace or move the bathtub to another place, the drilled tiles must be changed. This is quite difficult for two reasons. Firstly, most often you will not be able to buy exactly the same replacement tiles, there will be traces of replacement on the floor. Secondly, it is difficult to dismantle well-laid tiles from the base, there are high risks of damage to nearby ones.
Step 7
On the walls of the room under the level, draw lines at the height of the sides. Make sure all corners are at 90°.

Step 8
Temporarily put the bath in place and mark the fixing points for the side stops. Move the tub aside and drill holes for the dowels.


Step 9
Apply a layer of silicone sealant along the drawn lines, install the bathtub on hangers. The thickness of the sealant must be such that all the irregularities of the tile are covered. Squeezed out excess material should be leveled and removed.


Step 10
Finally align the legs and attach them to the floor. If it is made of wood, then it is enough to tighten the screws. If the floor is made of ceramic tiles, then for fixing it is necessary to pre-drill holes for the dowels and, after installing the bathtub, drive the dowel-nails into the plastic parts.

Step 11
Check the tightness of the siphon connection. This can be done under pressure using special equipment or by gravity. Fill the bathroom before overflowing, place sheets of paper under all pipe connections. Open the valve and wait for the water to drain completely. Remove the paper, if there were minor leaks, then wet spots will appear on it. If problems are found, they must be corrected immediately.

The final step is the installation of a decorative screen. It can be made from masonry materials or shields, tiled with ceramic tiles or plastic panels can be used.


Installation of the structure in the floor
Properly equipped receiver will help to properly build a bath into the floor. To do this, it is enough to dig a hole, revet the walls and floor with concrete, thereby providing the necessary space for the operation of the bath.
The receiver device has several nuances:
- Its contours should follow the shape of the bath, and its top should be completely covered by the sides of the bath structure. When lowering the bath into the receiver, it can lean on its sides. In this case, the bearing area should be as large as possible.
- The depth of the pit is calculated from the conditions that the legs of the bath will be unscrewed to the maximum, by about 5 cm, and after installation they will return to their normal position. Thus, the structure must lie on the finished floor, but at the same time not fully rest on it.
- It is necessary to equip access to the receiver in order to connect and install the bath.
- Water pipes are brought to the pit and sewerage is removed.
Now you can proceed to the direct assembly of the bath:
- The first step is to install the drain siphon and attach the legs.
- Next, the bath is arranged in a sink, after unscrewing the legs to the maximum.
- After the sewer pipe is connected, and only then the water supply. It is better to use in this case not flexible hoses, but a metal corrugated stainless steel sleeve.
- Upon completion of installation, a capacity test must be carried out. To do this, pour as much water as possible, check the serviceability of the sewage system and the sealing of the connections.
- You can lower the legs of the bath only after laying the floor.
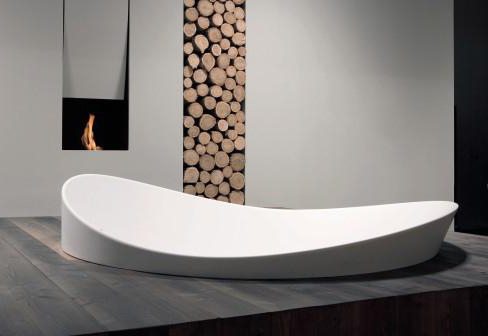
Acrylic is the best material for a built-in bathtub. From it, the design will be light and reliable. The sides when arranging a bath in the floor should be high. This will prevent water from overflowing while diving or moving. The ideal solution would be the arrangement of a warm floor.
At the same time, it will not only be comfortable to step on the floor when leaving, but the problem of puddles will also be solved. Additional functions are selected according to individual needs.
The built-in bath is the center of attention in itself, so it is better to choose the surrounding details discreetly so as not to distract from the main structure. The floor can be tiled with any classic option, or you can resort to modern 3D technology and turn the room into something unique. It all depends on your imagination and financial capabilities.
An overflow tray will also become an important element here, which will collect excess water and drain it into the sewer. Close it with a grate. You can also arrange horizontal sliding doors.
So, we figured out how to build a bath into a podium, and not only.
Installing a bathtub is a rather responsible matter that requires a clear understanding of the installation process and possible nuances.The installation height of the bathtub from the floor is determined by technical templates and requirements. It's not about some ossified and irrelevant stereotypes, but about the real determination of the optimal height for the comfortable operation of a plumbing fixture.
The main criterion that you should pay close attention to during the installation of any type of device is the standard installation height of the bath. This indicator is very important, because it is associated not only with the functionality of the product, but also with your immediate safety.
Installation of the structure in the podium
How to embed a bath in a podium? This question is asked by many owners who make repairs. This will make the room more functional and comfortable.
The material for the podium can be drywall, foam block or brick.
- The first stage of installation will be the installation of the bath on a leveled base and connection to the drain.
- Next, mark the contours of the future base. To do this, a plumb line is applied to the edge of the bath and a point on the floor is marked, later they are connected with a marker.
- The podium wall will be built along a line that is marked in depth from the base line by the thickness of the facing material.
- It is also necessary to provide an opening through which communications will be available in case of an emergency. Such a window can be decorated with facing tiles. It can be easily dismantled if necessary.
- Reliable in design will be materials brick and foam block. But with their arrangement, difficulty arises due to differences in the size of the bath from below and above. Elements require undercutting for further styling. Before embedding the bath in the tile, the wall must be leveled and plastered.
- Drywall is better to choose moisture resistant. It will need a rigid frame device, otherwise the wall from it will vibrate. This will not allow the tile to hold for a long time. The installation of a metal profile fastened with self-tapping screws or rivets is suitable.
- Also, with a drywall wall, you can arrange a frame from corners fastened by welding. Either of these options must be secured to the floor or wall.
- Before you build a bath into the podium, you can foresee niches for storing small items in its lower part. This will save space.
- When making a podium from several levels, its steps can be filled with expanded clay or cinder concrete or laid out from blocks or bricks.
- In this case, the steps will be the width of the tile (22-25 cm).
- The relief profile of the edging will help prevent injuries due to slippery tiles.
Why a threshold is needed
Based on the documents, this is required by the joint venture “Poly. Updated edition of SNiP 2.03.13-88.
Part 4.8 states that the floor level in these rooms should be 15-20 mm lower than in the rooms, or be separated by a threshold.
Subject to availability and waterproofing devices
with a plant on the walls of 15-20 cm, a sufficient amount of time can pass to detect a leak and eliminate it.
There are four possible types of thresholds or compliance with the rules of this SP:
1. The floor of the bathroom is the same level as the floor of the apartment:
The most common option: in this case, everything is simple - the floor of the bathroom and the corridor are of the same level, but they are separated by a threshold 15-20 mm high. During the repair work, it must be waterproofed.
2. Bathroom floor below the floor level of the apartment:

A somewhat less common option, since not many owners want to make a step, even a small one, inside the bathroom. Such a bathroom is called a tub-bath or a bucket-bath.
3. Bathroom floor above the floor level of the apartment:
A fairly common option, especially when redevelopment in panel houses of series II-49, II-57, P3, P44, P44T
etc. A feature of these houses is that the walls of sanitary cabins are demolished quite easily, but the pallet is very hard and difficult to dismantle.
Therefore, many owners dismantle the walls, and leave the pallet.The disadvantage of this option is that the bathroom level itself is higher than the floor level, and it is still necessary to make a threshold. And the result is an almost complete step.
Violation - missing thresholds in bathrooms and toilets:
It should be noted that the concept of "sills" means a real sill. Below are photos of "decorative" sills, which do not replace
real.
"Decorative" sills:
Additional information on the topic
Often, owners do not want to make a threshold in the bathroom and install quite useful systems against water leaks, which, when leaking, block all water drainage to the apartment. With this system, they seem to want to “fend off” the absence of sills. Like, why is it needed, if the system against leaks still works, and there will be no flood.
But objectively, the situation looks like that all the coordinating bodies work according to the documents of those years in which not only there is no mention of the installation of leakage protection systems, but the person who invented this system has not yet been born.
But about the sills everything is written in detail there, so even when installing this system, the sills will be required.
And in each redevelopment project there is a section where this threshold is clearly reflected:
Different opinions often arose about the height of the sills, and in order to exclude them, we wrote a request to the housing inspectorate, and an exhaustive and unambiguous answer came to our request, which you can see below:

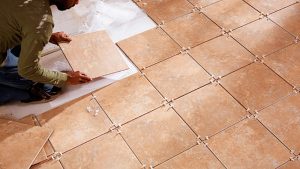
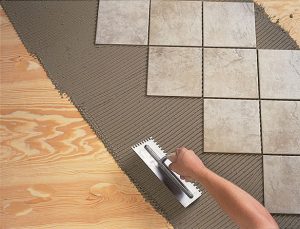
Ceramic tiles are the best flooring solution for bathrooms. It has many undoubted advantages and advantages, which allows you to install plumbing equipment of various types and sizes on it. Bathtubs are considered one of the most complex and demanding accessories. The technology for fixing a bathtub on legs depends on the characteristics of the floor in the room.
Before starting direct work, you should briefly familiarize yourself with the differences in flooring.
| Type of tiled floor | Description of technical characteristics |
|---|---|
|
|
The most durable coatings that can withstand significant forces. Only on such floors is it recommended to install heavy cast-iron or stone bathtubs. The tile is laid on a leveling cement-sand screed on concrete, there is no insulation layer. If various heaters were used to reduce thermal conductivity, then it is not recommended to mount heavy containers. |
|
|
Ceramic tiles are installed on sheets of plywood or OSB. Wooden beams are used as load-bearing elements. Such a base does not have high rates of physical strength; it is not recommended to install heavy bathtubs on them. The fact is that wooden structures change linear dimensions due to fluctuations in relative humidity. As a result of such movements, the degree of adhesion of tiles and glue is significantly reduced. Loads from the legs of the bathtub speed up this process and increase the risk of tile delamination. |
|
|
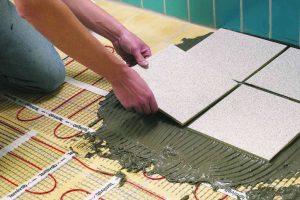
In terms of strength, they occupy an average position. The thickness and strength of the screed over the heating system cannot guarantee the integrity of the coating; chiseled loads from the legs of the bath can cause critical damage to the coating. |
Be sure to consider the features and specifications of the floors before buying a bath.
Some nuances when raising the bath
As mentioned above, bathtubs are different, so depending on the material from which they are made, a slightly different approach is required to implement the idea of raising them to a higher level.
Cast iron bathtubs are, for obvious reasons, one of the heaviest items. Probably only stone baths made of natural rock can compete with them. It is because of the very high weight that cast-iron bathtubs should be treated with particular care.
As for bathtubs made of acrylic components, they can be raised above the floor only with the help of some corners, which are simply mounted on the wall. You can raise a steel bath above the standard level with a cement screed. Moreover, such a screed is made only where the bath itself will be located. In this case, it is necessary to make the correct slope for water flow. To do this, you can put any square pipe, or an ordinary channel, under the rear supports of the sanitary ware. In addition, you can use wide round washers, and threaded studs a meter long. In this case, it will be enough to drill holes in the brick support to the floor. The hairpin is cut into four equal parts. They are inserted into the prepared holes and poured with mortar. After it dries, the bath is installed with legs on these studs. This design provides high reliability and immobility of the plumbing device.
When installing a bathtub on masonry, it is important to know that when raising the bathtub higher above floor level, it is very important to ensure its unshakable stability. Under no circumstances should she wobble and stagger
The leg mounts themselves must have a very high reliability. Raising the bath to a very high height (more than 10 cm), you should make several steps, and in no case not one. A podium that is covered with wetted tiles can be very slippery, which is fraught with injury if you fall. To prevent such troubles, it is enough to come up with and install some kind of reliable handrail near the bathtub, which you can grab onto in a critical situation. You can also use porcelain stoneware instead of tiles, which is safer due to the fact that it is not so slippery.
We really believe that this article helped you gain the necessary knowledge in how to raise the bath higher above the floor level.
It doesn’t matter at all which option you choose, the main thing is to remember that you need to strictly follow the instructions and use only high-quality and convenient materials in your work. This will allow you to avoid various "unforeseen", and do-it-yourself lifts, frames or mounts can be safely operated for many years
It is extremely important to know
When raising the bath above the floor level, it is again extremely important to ensure that it becomes very stable. Only did not wobble, and did not stagger
Fasteners for the legs must also be as reliable as possible.
Again, your attention should be drawn to the fact that a large bath is not always convenient (not for all family members). So, if you plan to raise the bath above the floor, it is recommended to make one or a couple of steps more than 10 cm.
It must also be remembered that a podium covered with tiles can be slippery, especially if it is wetted with water. Eliminating accidental falls and slips is very simple - it will be enough just to install a handrail that can insure you in any situation.
We really hope that our note was able to help you figure out how to raise the bath above the floor level above. Regardless of which option you choose, do not forget that you must always follow the instructions and use only good materials. This can help you avoid "accidents", and the lift, frame or fasteners you have completed can be used much longer. Good luck with this difficult task.
Have you read the note - Raise the bathtub off the floor
During the installation process, it is often necessary to raise the bathtub higher off the floor. The need to raise the bathtub may arise, for example, when laying new tiles or if the water drains from the bathtub too slowly and the process needs to be accelerated. The way in which the bathtub will rise above the floor depends on its type.
How to raise a cast iron bath with bricks
1. To raise a bathtub made of cast iron, either bricks or paving slabs must be used.
2. It is imperative to lay bricks or tiles on the mortar, otherwise the structure may collapse during the use of the bathroom. Do not replace the solution with mounting foam or sealant.
3. To make the structure more aesthetic, it can be tiled on the outside with bath tiles.
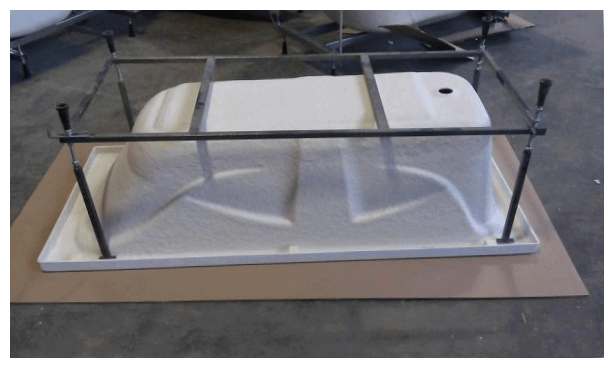
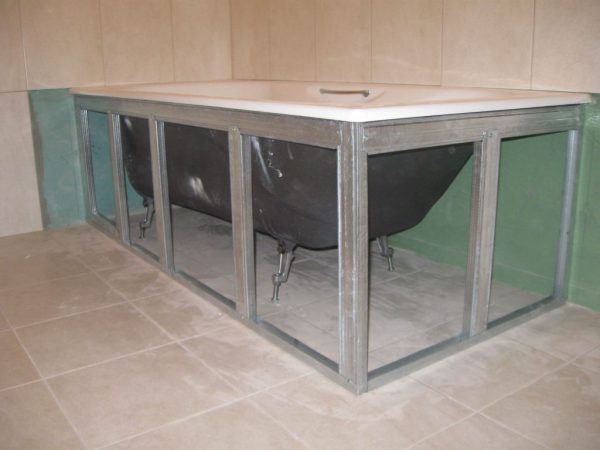
How to raise a cast iron bath with a frame
 1. The frame is made of metal corners.
2. Weld the frame in such a way that the bath rests on it with all its four sides.
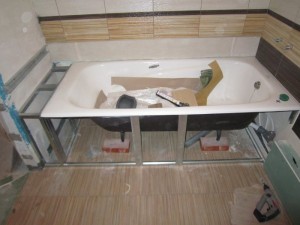
3. When the bath is raised to the desired height, additional supports must be installed under its legs. These supports can be made from wooden blocks, or bricks. Bricks, of course, need to be filled with quick-hardening cement.
How else can you raise the bathroom off the floor
 1. With the help of a tie.
In the place where the bath should be, a screed is made. It should be above the floor level of the bathroom. To make a slight slope, when installing the bathtub on the screed, you need to place either a square pipe or a channel under its legs.
2. Using washers and steel studs.
You will need four fairly wide washers and a steel stud one meter long, size M10. Through holes are drilled in the brick support. The hairpin is cut into four parts. Each piece of stud is inserted all the way into the legs of the tub. Homemade legs are placed in holes made in bricks.
3. with long bolts.
The threaded bolts must match the original bath legs. Bath supports are replaced with purchased bolts. Thus, the legs of the bath become a little longer, and she herself is taller.
Often, in the process of repair work, a question arises with the arrangement of the threshold in the bathroom
Indeed, after the completion of the repair, the inspector of the housing inspection comes to the apartment to check the compliance of the redevelopment with all building codes and rules, and one of the first points that he draws attention to is the presence of a threshold between the bathroom / bathroom and the corridor in the apartment
Great option for a bathtub
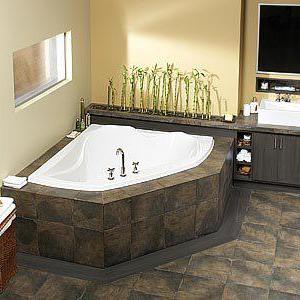
In many cases, the bathroom carries not only technical and hygienic roles, but also is a decor item. In most cases, these bathrooms have unusual shapes, beautiful curly curves, and, in general, rather short legs. What to do in this option? How to raise the bathtub higher so as not to damage all this beauty? The solution has been found! The best solution is to raise the level of the floor under your bathroom. Of course, raising the floor is a much more time-consuming task, but after the repair work is completed, your bathroom will look just like a king. So, the pedestal you built can come out from under the bathroom in the form of a straight line, or a figured step. Again, you can do more than one. This option can help you add originality and special sophistication to the bathroom.
If you live in a house with several apartments, you definitely need to remember about the weight of the elevation. Do not forget that a bath with water will be placed on it. This all becomes a big load on the floors. You can somewhat lighten the weight of the future pedestal if you use the frame system. It should be noted that although a wooden frame is considered very strong, it cannot support the weight of a filled bath. Because of this, you will need to provide footrests for your bath, as in the second option. If, for example, your bathtub has no legs at all, then for proper weight distribution you will need stands in the middle of the pedestal being built. In addition, they must be on the perimeter. To build a frame elevation, you will need the following materials:
- saw (jigsaw);
- screwdriver;
- hammer;
- drill;
- plywood;
- bar;
- self-tapping screws (anchors, and other fasteners);
- corners for fasteners;
- construction level;
- polyethylene;
Work on the development of the elevation will go like this. If your pedestal will be adjacent to the wall, and not in the middle of the bath, you need to use a level and a simple pencil to mark the top level for the upcoming pedestal.
In order to insulate the bath floor from moisture, you must perfectly lay a layer of polyethylene. If you wish, you can additionally use a cork substrate. In another step, you need to put plywood on the place where you are going to build the podium, and fix it to the floor with nails, or dowels. Then, you must assemble a frame of the appropriate size from a bar and fasten it with screws or dowels. Do not forget that all frame joints must be strengthened with corners. If your bath has legs, you must prepare specialized metal or wood supports for them. Then 1 more layer of plywood is attached, and the podium can be considered actually finished. All you have to do is design it in the theme of your bathroom.
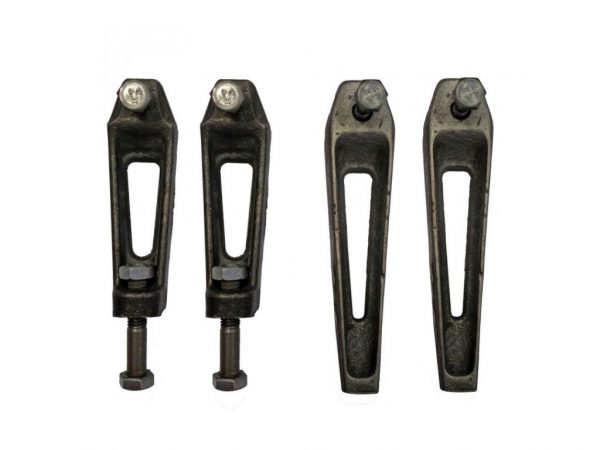
Leg extension
The most common way to install bathtubs is to use supports or simply legs. With this mounting option, models made of cast iron, steel, and even acrylic can be installed. The legs included in the scope of delivery usually have a standard height.
If the legs are made in the form of a screw, then they can be adjusted. If the height of the standard legs is not enough, or with the help of them you need to give the bath a slope towards the drain for better water drainage, then they can be lengthened.
To do this, proceed as follows:
- First you need to detach the waste-overflow from the bathtub and lay it on its side to make it easier to dismantle the standard legs.
- Then you need to remove the old legs, take one as a sample to the store, and then purchase a metal stud of the same diameter, but longer.
- Then you need to fix new screws, if necessary, the height of the knife can be adjusted to give a slope towards the drain hole.
- After that, connect the drain and set the bath to its original position.
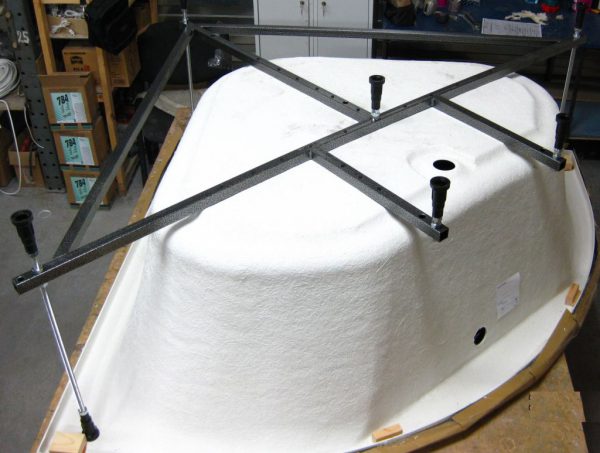
Frame mounting
If you lift an acrylic bathtub with legs, it can deform or even burst under load. To evenly distribute the load and increase the area of \u200b\u200bthe supports, thin-walled fonts are installed on the frame.
The frame can be made of stainless steel metal corners. It can be prefabricated or welded, and the second option is characterized by increased strength.
Before working on the installation of the frame, you need to make sure that you have everything you need:
- Corners made of stainless steel, the section of which is sufficient to support the weight of the bath.
- Bulgarian with a disk for metal.
- Welding machine.
- Self-tapping screws and anchors for attaching the frame to the walls and floor.
- Perforator for making fixing holes in the wall and on the floor.
- Screwdriver.
- Putty for the treatment of seams in order to protect against corrosion.
Conclusion
I hope you understand how to connect the bath to the sewer - the siphon is simply inserted into the outlet (tee or corner). Perhaps you will have some additions or questions on the topic - write about it, do not be shy! And in addition to the topic, watch the video in this article!
If you want to express gratitude, add a clarification or objection, ask the author something - add a comment or say thanks!
Many owners want to have in their possessions such an element of plumbing that is gaining popularity as a built-in bathtub. It is not available to everyone, but it looks luxurious. not possible in every home.
This element will be massive and heavy, so that the floors in an apartment building are unlikely to withstand such a load.But the owners of private ownership can please themselves with such luxury, but it is also worth considering the required load, preferably at the design stage. There are several ways to build a bathtub. But most often it is on the podium or on the floor.