Spool filling capacity
Before fixing the fishing line, the spool is removed: unscrew the screw that is in front of the spool and press the button located on it (if the clutch is rear).
Next, you need to open the logger. We install the spool on the axis and tighten the screw. No force is required during installation. The fact that the spool is installed is indicated by a latch with a click.
Having closed the line stacker, we proceed to winding the fishing line. For a more even winding, it is recommended to pull the fishing line. In order to avoid problems during the operation of the reel, at least 2 millimeters must remain from the edge of the spool to the fishing line.
The spool capacity is indicated by the reel manufacturer in the user manual.
Manufacturer
The creation and improvement of this device is carried out by ASpromt LLC, one of the leaders in the domestic scientific and technical market. The company has been operating since 2001 and during this time has achieved significant success in the production of mobile plasma complexes.
To date, ASpromt LLC sells Gorynych to 11 countries of the world and the number of orders is increasing year by year. You can officially purchase this device from nine dealers in Russia and the CIS countries. In addition to sales, dealers provide service and warranty service, if necessary, and also distribute related products.
Gears and Parasitic Gear
The fewer gears in the main pair, the weaker the coil. For spinning you need increased gears.
FluiDrive Gearling - The gears of the main pair are a gear mechanism with smooth movement.
Digital Gear Design is a reel marking, in the production of which computer technologies were involved.
Haper Gear is a reel whose gear teeth are additionally machined to improve grip and reduce backlash.
Parasite gear in shape can be in the form of a square or a circle. The square-shaped gear contributes to a more even winding of the fishing line on the spool, including at the sides. The parasitic gear is also ellipsoidal, and the carriage is joined to it by means of hinges.
The basics of arc welding
In various instructions on how to cook with electric welding, the emphasis is on the beginning of the welding process. The first electric welding for beginners in this business should be under the supervision of an experienced welder who corrects the shortcomings and gives recommendations to the beginner.
Welding with an electrode begins with a secure fixing of the part. In order to avoid a fire hazard, pour cold water into a bucket and place it near the welding site.
You can not engage in welding work on workbenches made of wood and superficially treat any scraps of the electrode elements used.
In order for the electric arc to ignite, you must perform the following steps:
firmly fix the clamp "grounding";
isolate the cable wire, then carefully thread it into the holder;
set the current value on the welded machine - in accordance with a certain diameter of the electrode element;
install the electrode element relative to the welding part at an angle of 60 degrees;
you need to carefully run the electrode over the metal surface - and it will sparkle;
bring the electrode element to the metal and lift it to a height of 5 mm.
If the above actions were carried out in the correct order, then the arc will light up.
A gap of 5 mm must be observed during the welding work - from start to finish.
With proper welding of metal by electric welding, the electrode slowly burns out, and therefore it is carefully brought closer to the metal. Do not move the electrode element quickly because it may get stuck. If such a situation arises, you will have to move it a little to the side.
If the arc itself does not ignite, the current should be increased.
After the arc has ignited, it is necessary to slowly move the electrode element horizontally, making it small fluctuations. Metal that has already melted will move closer to the center of the arc in this situation.
As a result, a seam with small waves is formed.
In such a situation, it is necessary to change the old electrode element to a new one, remove the slag and resume the welding process.
Further, at a distance of 12 mm from the seam of the recess - the crater, the arc should be ignited. In this case, it is necessary to bring the electrode to the crater in such a way that an alloy of the old and new electrode elements appears, after which it is necessary to resume welding the seam.
WATCH VIDEO
The trajectory of the arc movement when welding parts has 3 directions:
- progressive. The arc is moved along the electrode axis. In this case, the length of the arc is preserved;
- longitudinal. In such a situation, a welding thread roller is formed. Its height is related to the speed of movement and the length of the electrode element.
The result is a thin seam. So that it does not disappear, when moving the electrode element along the seam, transverse movements must be made;
transverse. In this situation, as a result of oscillatory movements, a specific seam width is established. The amplitude of such oscillations is set depending on the size of the seams, their position, etc.
Experienced welders use all 3 directions of arc movement.
Features of welding technology
According to the generally accepted classification, there are two options for an ideal weld, in particular:
- Detachable view.
- Unbreakable look.
Detachable technology includes seams and connections that can be separated without damage, without disturbing the connecting elements. The simplest elements are a bolt and a nut. One-piece connection refers to high-strength structural solutions, the parts are in no way separated, the uniqueness and integrity of the structure is not violated. This option includes riveting and welding technologies. Experience shows that in order to achieve ideal quality, the heat-affected zone of the weld, which provides a high connection result, is an excellent option.
Operating principle
In terms of its design features, this device is a classic low-temperature plasma generator. Plasma is obtained using an electric arc that occurs between the cathode and anode. The liquid is heated to an extremely high temperature and under high pressure turns into a narrowly directed plasma jet.
Both water and alcohol can serve as a working fluid that is heated. It is worth noting that only distilled water or a solution of distilled water with alcohol (alcohol content of 45%) can be used.
This circumstance makes the device "Gorynych" universal, able to work with a variety of materials and perform various types of work.
Despite the rather complicated principle of operation, the device for welding and cutting consists of three main components: the plasma generator itself, the power supply and the control system.
Ceiling seam welding technology
For beginner welders, it will be useful to familiarize yourself with the general video tutorial on manual arc welding:
General recommendations
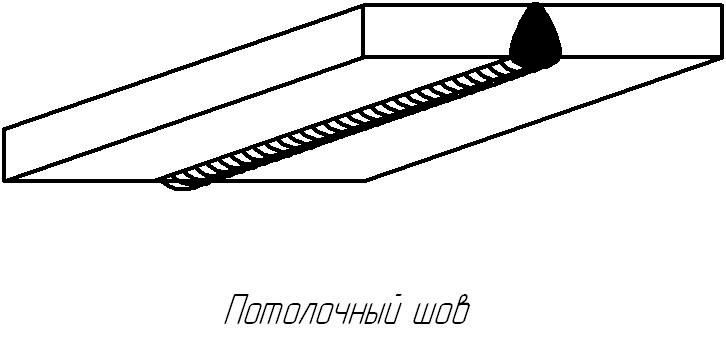
Ceiling weld
During welding, the molten metal is held from falling by the force of surface tension. That is why it is necessary to reduce the size of the weld pool as much as possible. To do this, periodically move the electrode to the side so that the metal has time to harden slightly.
In addition, the width of the rollers is reduced.As a rule, it is 2-3 electrode widths. Usually, electrodes with a diameter of not more than 4 mm are used for the welding seam. At the time of arc removal, undercuts are sometimes formed. Hold the electrode at the edges to avoid this.
The electrode must be dry, otherwise the gases released may enter the weld, reducing its quality. When welding by this technique, the evaporation of slag and gases from the molten metal is reduced. Therefore, welds in the ceiling have lower metal properties than those welded in other positions.
It is recommended to carry out welding on the ceiling on yourself, this will allow you to observe the process well, select the speed and method of cooking. Materials with a thickness above 8 mm are welded in several passes. The root suture is usually performed with a 3 mm electrode, and subsequent sutures with 4 mm.
Methods for cooking ceiling seams
Crescent - the electrode should be at an angle of 90-130 ° to the ceiling. With oscillating movements in the shape of a crescent (zigzags), the electrode continuously enters the hardened part of the metal. This method requires several passes, and is the easiest for beginners.
Crescent welding method
Ladder - the electrode is at an angle of 90-130 ° to the ceiling. He is brought to the ceiling and an arc is lit. When molten metal is formed, the electrode is slightly removed (5-10 millimeters) and returned back, blocking the dried metal by 30-50% of its length.
Ladder welding
Back-and-forth - the end of the electrode constantly returns back to the hardened part of the metal, thus constantly lengthening the seam. This is the most difficult and time-consuming method, but at the same time it is the most durable.
Reciprocating way
Spinning reel spool feeder
The movements of the spool feeder are reciprocating. There are 2 types of such a mechanism:
- with screw gear;
- with pinion gear.
The rocker device includes a small gear, a parasitic gear, a carriage and guides for it, a rod for feeding the spool and its fastenings. The handle rotates, the small gear also starts to rotate and transfers the force to the parasitic gear, which, in turn, sets the carriage in motion.
The spool on the rod moves in the same way as the carriage. So the fishing line fits on the spool evenly.
For spinning, it is better to use a BC with a screw spool feeder.
Screw feeder
The rotation from the main pair is transmitted to the carriage through the cam shaft of the drive gear. Most BC models are equipped with endless propellers. The threads of such screws are cross-cut, the groove pitch is different.
Due to the different pitch, the spool moves forward at one speed, backwards at another.
This ensures high-quality laying of even very thin fishing line: its upper layer does not sink into the lower one, and the fishing line does not get tangled.
How to catch a lot of fish
Fishing gives pleasure in its process - each of us knows about it. But after all, besides this, we always want to get results from fishing - to catch not three perches, but a dozen kilogram pikes - this will be a catch! Each of us dreams of this, but not everyone knows how.
How long have you had a really BIG CATCH? When was the last time you caught TEN BIG PIKE/CARP/BREAM?
A good catch can be achieved (and we know this) thanks to good bait. It can be prepared at home, you can buy it in fishing stores. But it is expensive in stores, and to prepare bait at home, you need to spend a lot of time, and, to be honest, homemade bait does not always work well.
Do you know that disappointment when you bought bait or cooked it at home, and caught three or four bass? Certainly familiar. So maybe it's time to use a really working product, the effectiveness of which has been proven both scientifically and in practice on the rivers and ponds of Russia?
There is such bait and it's not a myth - Fishhangri. Yes, yes, it is her. Many people know it, many love it, but only a few know how to use it, which is why there are so many angry reviews about it on the Internet. Some people just don't know how to read instructions...
Bait FishHungry gives the very result that we cannot achieve on our own, especially since it is cheap, which distinguishes it from other means and you don’t need to spend time on making it - ordered it, brought it and go!
Of course, it is better to try once than to hear a thousand times. Especially now - the season! A 50% discount on your order is a great bonus!
Hurry up and order Fishhangri!
Handle
The handle sets the rotational movement of the mechanism. Many BCs have a handle folding system that is triggered by pressing a button, as well as a screw device for changing the location of the handle.
There are models with no push-button system. You can fold and rearrange the handle in them using a screw mechanism.
To do this, the screw is loosened, the handle is set in the desired position, and the screw is tightened again, fixing this position.
To rearrange the handle in this case, the screw is unscrewed, removed, the handle is moved to the opposite side of the reel body, the screw is screwed into the hole until it stops.
Speed reels are equipped with a double handle. They may have one handle, but supplemented with a compensator that prevents vibrations due to the imbalance of the handle.
Weld cleaning
After welding, scale splashes, drops of metal and slag remain on the metal surface. The suture itself is usually convex, protrudes above the surface. All these shortcomings can be eliminated: clean up.
Cleaning the seams after welding is done in stages. At the first stage, with the help of a chisel and a hammer, scale and slag are knocked off the surface. On the second, if necessary, compare the seam. Here you need a tool: a grinder equipped with a grinding disc for metal. Depending on how smooth the surface should be, different abrasive grits are used.
Sometimes, when welding ductile metals, tinning is required - coating the weld with a thin layer of molten tin.
https://youtube.com/watch?v=n3DtsW-YPQg
Welding process technology
Metal welding is a high temperature process. When welding various metal products, an electric arc is formed and retained, which connects the electrode element and the welding part to each other.
Under the influence of the arc, the product and the rod of the electrode element are melted.
Then, a weld pool appears, in which metal and electrode elements are mixed. The parameters of such a bath are associated with the selected welding mode - they are indicated in millimeters: the length is 10–30 mm, the width is 8–15 mm, and the depth is 6 mm.
When the electrode coating melts, a gas zone appears near the arc and above the weld pool. It pushes air out of the weld zone and prevents oxygen from reaching metals that have already melted.
Also in this zone, vapors appear that produce metal and electrode elements. Slag appears on top of the seams, which prevents the molten part from coming into contact with oxygen, which degrades the quality of welded work.
After the removal of the electric arc, the metal crystallizes and a seam appears, which unites the welded parts. On top of the seam there is a protective layer against the ingress of slag, which is removed after joining the welding parts.
Manual Arc Welding Technology
Welding pipes with manual arc welding is not the easiest welding for beginners in this business. Welding training should be conducted by experienced people in this field, who give useful recommendations and correct the shortcomings of beginners.
During welding, the electrode performs certain actions: translational, longitudinal, transverse. From these combinations, different types of seams are obtained.The most used are shown in the figure.
In order for welding to be of high quality, it is necessary to monitor the movement of the electric arc. If too long an arc is formed, then the molten metal oxidizes, its drops are sprayed throughout the product, as a result of which the seam becomes porous.
Manual arc welding has the following advantages:
- such work is done in a separate room;
- many electrodes are produced for such welding;
- you can quickly move from one welded product to another;
- welding machines used in such a welding process can be easily moved from one place to another.
At the same time, arc welding of metals has several disadvantages:
- during such welding work, a lot of harmful substances are released;
- has a low efficiency, unlike other types of welding;
- the quality of the welding work performed is directly related to the qualifications of the welder
Performing semi-automatic welding
Semi-automatic welding is not the easiest welding job. Before starting welding parts with a semi-automatic device, you should carefully read the instructions for this machine.
The semi-automatic setting can be done in this way:
first you need to calculate the current strength, which is determined based on the thickness of the welded metal. Information about these 2 parameters can be found in the instructions for the semi-automatic.
Semi-automatic welding is considered poor quality at low welding current;
- adjust the wire feed speed. The speed must be adjusted on the interchangeable gears that are included with such a device;
- set the desired voltage and current;
- check the correctness of setting the modes on the test part;
- click on the "Forward" button;
- add flux to the funnel;
- make the installation of the holder - the tip of the mouthpiece must be in the welded area;
- at the end of the adjustment of the welded machine, it is necessary to open the flux funnel shutter, click on the “start” button and strike at the welding place. As a result, a fire will appear on the arc, and the cooking process will begin.
Semi-automatic welding machine will produce high-quality work with various steel grades
Differences between the Gorynych plasma generator and the closest analogues
- One of the main differences between this device and similar ones is its highest environmental friendliness. The release of harmful or toxic substances during operation is zero. Moreover, during the intensive evaporation of water, the air is saturated with oxygen.
- It should also be noted the large working capacity of the gun. In total, about 100 grams of water or an alcohol solution is placed in it, and this is more than enough for 20-25 minutes of continuous operation.
- It is also worth noting the incredible unpretentiousness to the level of voltage that can be applied to the device. Its range can range from 130 to 240 volts, and over the entire range, the generator is capable of producing a steady stream of plasma.
What work can be carried out using the Gorynych plasma generator
The applications for this device are very large and continue to increase as people find more and more uses for this device. At this point in time, you can use it as follows:
- Welding of structural, stainless, alloy steels, non-ferrous metals, as well as their alloys.
- Soldering and welding of products from non-ferrous metals.
- Cutting steel, cast iron products, non-ferrous metals, as well as their alloys.
- Soldering with hard and soft solders with high and low melting points.
- Melting metal in small quantities in crucibles.
- Surface heat treatment.
- Auxiliary processing of metals in the foundry production process.
- Processing of refractory materials of inorganic and organic origin (basalt, quartz, granite, quartz glass, concrete, marble, asbestos cement and other materials).
- Burning of small items.
- Powder coating of products.
- Thermal oxidation of parts.
- Hardening of metal parts.
- Heat shrink processing.
- Applying glaze.
- Manufacture and processing of glass products.
- Fiberglass cutting.
- Obtaining chemical compounds.
- Removal of oxides from metal surfaces.
- Cleaning the surfaces of heat-resistant products and various holes in them from organic and other contaminants.
- Cleaning surfaces and micro-holes from organic contaminants in platinum dies.
- Melting of concrete surfaces to reduce hygroscopicity.
- For jewelry needs.
- In case of minor fires in the working production area, it can be used in the extinguished arc mode for instant fire extinguishing.
As shown by many years of use, a plasma generator on the farm can replace such devices as a grinder, a hand saw, a blowtorch, a welding machine, a gas burner, and even a high-temperature laser cutter.
If necessary, "Gorynych" can even be used as a bright enough lantern to illuminate the premises.
Application in artistic cutting and metal welding
The vast majority of people believe that such a device can only weld or cut metal, but in reality everything is different. If you apply a little imagination to Gorynych, then with its help you can create real works of art.
For example, having pre-prepared forms, you can cast figures from metal, glass or plastic. To do this, it is enough to heat the starting material in a crucible and pour it into the mold. Usually heating takes no more than 5 minutes, and in the case of glass and plastic, everything happens even faster.
Also, you can weld metal together and thereby create any abstract shapes and designs, limited only by your imagination.
Using a plasma unit, you can change the properties of solid materials. An example is the classic granite tile. If it is heated, it will become a tone lighter, and its ability to absorb water will increase by an order of magnitude. Thus, even the most slippery tile can be turned into a rough one and thereby eliminate the possibility of slipping.
The mechanism and speed of rotation of the rotor in the BC
The rotor mechanism includes a main pair and a spool feeder. The rotor has a wheel that drives a gear on the main shaft. It starts to rotate due to the rotation of the handle. It is mounted in a 4-sided hole located on the shaft. The main pair is a gearbox, it has a specific gear ratio.
The speed at which the rotor rotates depends on the gear ratio of the drive and how fast the handle is rotated. According to the gear ratio, BCs for spinning are classified as follows:
- Power (the coil makes one revolution, and the rotor during this time from 3.2 to 4.3 revolutions) for trolling, adapted for slow wiring.
- Universal (from 4.5 to 6.1 turns). Any pace.
- High-speed (from 6.2 to 7.2) for twitching, jig.
welding process
The welding process in the manufacture of stainless steel products, as in cases with welding of other metals, is divided into three stages - preparatory, the stage of welding itself and the final one.
Preparation stage
At the preparatory stage, it is necessary to mark the parts that are planned to be welded, clean them, and degrease them using a special chemical composition. If this is dictated by the thickness of the parts to be joined, it will also be necessary to cut the edges to better form the weld.
Main works
The main stage of welding consists of the following steps:
- connecting the inverter by creating a reverse polarity (the cable with the electrode holder is connected to the “+” connector, and the ground cable is connected to the “-” connector).Such a connection will provide greater melting of the electrode compared to direct connection, as well as avoiding material burn-through by reducing the penetration of parts;
- after the parts are fixed in the positions in which they will be welded, the primary tack welds should be made. The length of such seams and their location along the contour of the planned weld is determined depending on the size of the seam, and also depending on the thickness of the parts to be welded;
- in the event that we are talking about creating a long-term weld, a stepwise method should be performed, during which welding is carried out from opposite sides with short seams;
- if it is necessary to perform several layers in one seam, then after each new layer, wait a while so that the previous layer has time to cool before applying a new one;
- in the case of a large seam (extended in distance) or if it has a complex configuration, more tacks will need to be made compared to simple or short seams, each of which will be of a small length located along the edges of the seam. This action will reduce the risk of deformation of parts near the seam.
Final stage
After the welding work is completed, you should proceed to the final stage. At this stage, the seam is cleaned from the resulting slag in order to visually determine its quality. In addition, at this stage, the places where there are lack of penetration are identified. If such places are found, repair or completely cut out the joint and weld, repeating the entire algorithm.
Care and Precautions
- The fishing line must not fall on the rotating parts of the reel.
- When leaving the coil in storage until the next use, care must be taken to ensure that it is dry.
- Every year it is recommended to open the coil body and lubricate its mechanism with a special grease.
- The coil should be used according to the instructions, otherwise, in the event of a breakdown, you will have to rely on your own strength: the warranty does not cover damage caused by incorrect use of the BC.
- After use, the reel must be wiped with alcohol (open places) and the line roller must be lubricated with grease.
There are many details in a spinning reel. "Inertialess", because there is no inertia on the drum when casting, the position of the spool in the reel is fixed. This is a complex device.
If you take care of it and follow the precautions, the BC will last for many years. When working properly, it is not recommended to disassemble the coil more than once a year
With the knowledge of how the spinning reel is arranged, no breakdown will take you by surprise!
For the prevention of the inertialess coil, see the video. Happy viewing!
How to weld thin profile pipes with your own hands
When working at home, profiles are most often welded with an inverter, which is characterized by low weight, ease of use, a wide range of adjustments and the presence of additional functions that facilitate work.
The second important task is to determine the correct polarity of the electrodes. It is well known that the positive contact has a higher heating temperature, and with the correct polarity, "minus" is supplied to the electrode holder, and "plus" to the body of the part
Accordingly, when welding elements with a large thickness, it is better to use reverse polarity.
Rice. 12 Do-it-yourself pipe preparation and connection
Butt welding of a profile pipe with an inverter
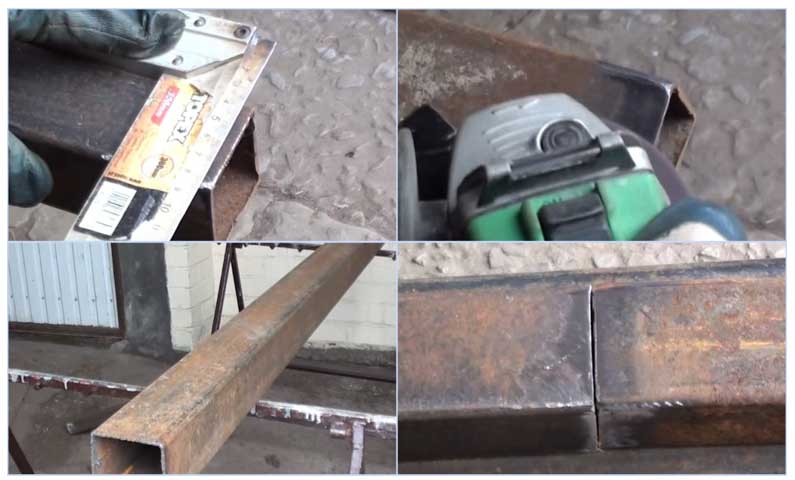
Before carrying out work, a flat surface is prepared at a convenient distance from the ground; as a support, it is better to use thick-walled square or rectangular profiles, on which the metal profile to be joined will be laid.Welding work after placing pipes on a flat surface is carried out in the following sequence:
- Prepare profile pipes for welding. To do this, their ends are cut off with a grinder at a right angle and cleaned of rust with the same grinder or sandpaper.
- Align both workpieces. A metal corner or any even and long object with a flat surface is applied to their side walls, if the profile has a weld, it must match. The distance between the ends for high-quality penetration should be from 1 to 2 millimeters.
- With the help of spot welding with a rutile electrode, the pipe profile is connected in several places. First, this is done in the middle, then the corner edges are welded, if high accuracy is required, all four corners and the central edges are connected.
- Weld from the edges to the center, trying to evenly heat the seam, do not linger in one area, then turn the workpiece over and repeat the operation on the other side. For beginners, it is better to weld in short sections with a gap, making sure that the edges have time to melt - this will avoid burning through the metal.
- At the end of the work, the slag coating is knocked down, if it is necessary to obtain a flat and smooth surface, the protruding seam is protected by a grinder.
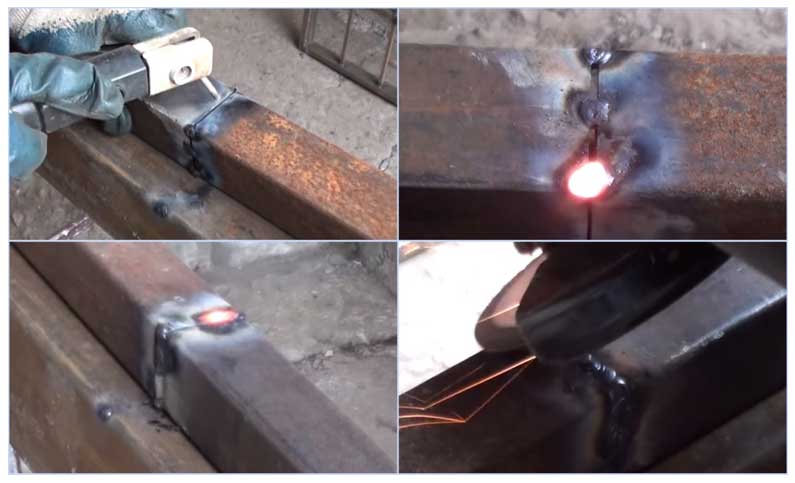
Fig.13 How to weld a profile pipe 2 mm. butt
How to weld profile pipes at 90 degrees with a tee joint
Preparatory operations are carried out according to the above scheme, the order of the main work is as follows:
- After connecting the parts, tacks are made on the side edges on both sides.
- First, welding is carried out in the corners, continuously moving the electrode in small circular (counterclockwise) or zigzag movements from the bottom up - this allows you to expel the slag from the weld pool. The angle of inclination of the electrode should be 45 degrees relative to the horizontal plane
- Next, weld the side edges located in the same plane.
When welding, it burns a profile pipe - what to do
The following methods are used to combat burns:
- Welding is carried out with a separation in short sections or pointwise.
- To prevent overheating, a piece of massive metal bar with a cross section as close as possible to the internal dimensions of the workpieces is inserted inside the joint.
- Reduce the distance between the edges of the workpieces.
- Work in the mode of the maximum output current.
- Increase the speed of the electrode movement.
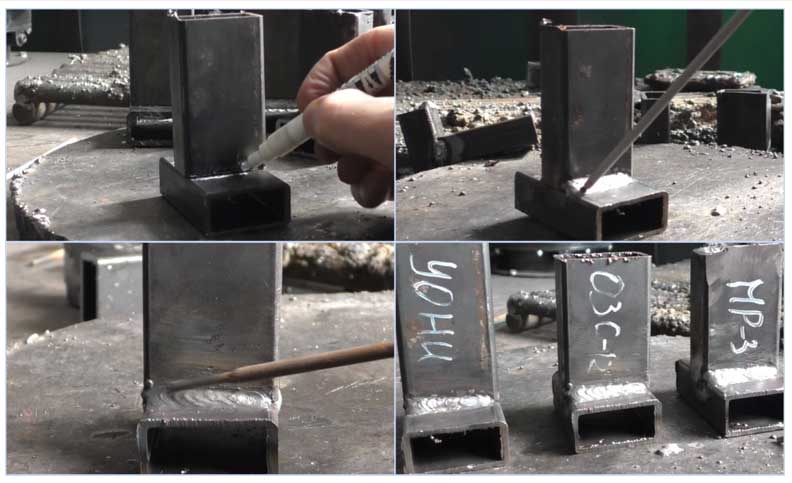
Fig. 14 Welding a thin profile pipe with a tee connection