Mortise structure installation
First of all, a cutout is made in the countertop for the sink. To do this, use the template that comes with the sink. If there is none, then it is made by hand. To do this, the shell is turned over and placed on a cardboard sheet. A line is drawn along its perimeter, which will indicate the shape of the hole. It is either round or rectangular.
Further, the same line is drawn inward from the applied line, showing the shape and size of the landing area. Application distance - 1-2 centimeters. On the second line, a hole is cut in the cardboard. After that, the template is applied to the countertop at the exact location of the plumbing fixture, a stroke is made on the surface, along which holes for the sink are cut.
The easiest way to cut out is to drill a lot of through holes along the perimeter of the applied line with a small drill with a diameter of 6-8 millimeters. An electric jigsaw blade is inserted into one of them, which cuts the material around the perimeter. If the countertop is made of laminated chipboard, then many holes do not need to be made, since this is a rather soft base, and the jigsaw will easily cut it.
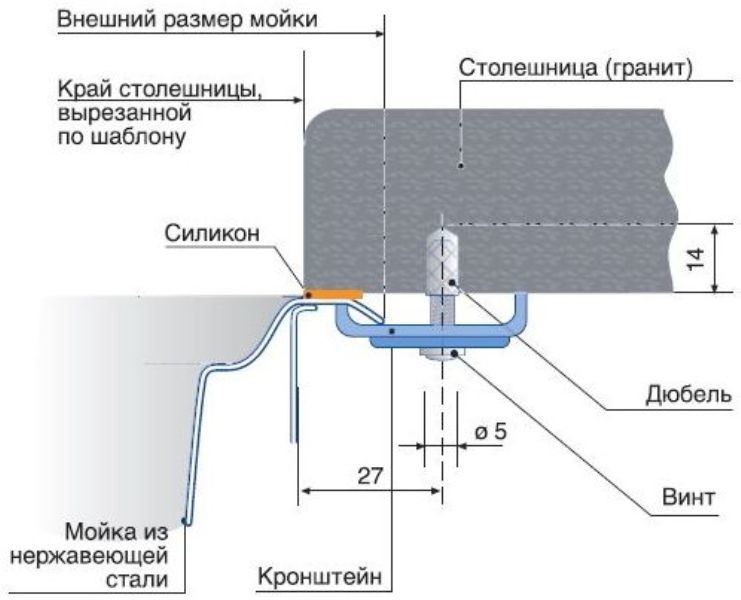
Further, all cut planes are treated with silicone sealant, and a butyl tape is placed on top of the countertop along the perimeter of the cut hole. Both seals are designed to seal the joint and perform additional waterproofing functions. Now the most important point - fixing the sink from below. For this, a special metal bracket is used, consisting of two parts: a clamp and a holder. The first one has teeth at the end, which, when pulled together, will cut into the material of the countertop and prevent the fasteners from moving. The second end is installed in the side of the sink, holds it, and when the screw is tightened, it presses the product to the plane of the table.
Both parts of the fastener are interconnected by a screw, often spring-loaded. By screwing or unscrewing the screw, the clamp is strengthened or loosened, respectively. In this case, the connection between the two parts is hinged, that is, the lower clamp rotates relative to the upper holder, which simplifies the installation of fasteners.
The bracket is made of metal: stainless steel, galvanized. Today, manufacturers offer a fastener with plastic inclusions. It is clear that metal products are stronger. As in the case of overhead sinks, all threaded fasteners are screwed in with a screwdriver.
Installation technologies
The easiest way to install is to mount the surface model.
- The floor cabinet of the kitchen set is set in a horizontal plane with the help of a short building level.
- If the landing dimensions of the plumbing fixture correspond to the mounting parameters of the pedestal, then the installation and fastening of the first is carried out on a silicone sealant. To do this, the upper surfaces of the ends of the cabinet are treated with a sealant, on which the sink is installed. It is pressed harder against the ends, for which some kind of load is placed inside the bowl. After 12 hours, the device is connected to the water and sewer networks and operates in the desired mode.
- There is a so-called regular mount. These are special brackets made of metal or plastic. They are installed on the inner walls of the cabinet with a self-tapping screw, which at first is not completely screwed. A bracket is put on it, pressing the top shelf of the sink to the ends of the cabinet. By shifting the bracket along the direction of the bevel angle, a tight pressing of the sink against the cabinet walls is achieved. After that, the screw is screwed to the end.Plumbers advise all work on screwing fasteners to be carried out with a screwdriver, and not with a screwdriver or drill. This is due to the fact that strong pressure on the thin metal of the sink leads to its deformation. The photo below shows this option.
- Almost the same option as the previous one, only instead of brackets for attaching the sink, wooden blocks and furniture corners are used. The sink is planted on bars, which are pressed from above with hands, and the corners are installed on the bar and the wall of the pedestal. The connection is made with self-tapping screws.
Table top preparation instructions
Now we will take a step-by-step look at the procedure for creating a multifunctional cabinet, on which a do-it-yourself countertop with a sink will be built into the bathroom:
An appropriately sized hole is cut into the countertop for the built-in washbasin.
The most reliable way here is to install the washbasin on the center of the countertop upside down, trace it along the contours with a pencil, and after dropping a couple of centimeters around the perimeter into the inside of the figure, cut out the hole.
Further, the bathroom countertop is protected from moisture penetration.
For this purpose, pasting its edges with patterned slats is used.
At the same time, the glue must necessarily be moisture resistant, since any other type will gradually collapse under the influence of constant contact with moisture.
At the next stage of construction, after the glue has dried, work on the tabletop continues by grinding the sides of the tabletop with sandpaper.
Then they are primed, and it is very important to use a special primer mixture that can penetrate deep into the wood.
The bathroom countertop is mounted on the side corners, which, in turn, are attached to the walls with powerful dowels and screws. The crate is attached in the same way.
Mounting the sink to the countertop
High-quality fastening of the sink is possible only with a normal thickness of the countertop.
Installation begins with the fact that you need to mark on the countertop the selected place under the future sink. To do this, you need to use the template, with its help you can easily determine the place of washing. After that, a hole of the required size should be cut in the countertop, for this a jigsaw and a drill are used. To make it convenient to work, the sink must be placed on the floor, then installation will be easier.
After the edges are made, they need to be cleaned of dust and sawdust, the existing sections are treated with a sealant, so the countertop is protected from the negative effects of water. To protect it, you can use epoxy or silicone. In the event that the countertop is made of plastic, then to process the sawn holes, you must use an alcohol sealant, such material is applied with a brush and a spatula. The protective agent should be applied in an even layer so that the holes are enveloped, after which excess will remain, they should be removed.
In order to attach the sink to the countertop, it is recommended to use fasteners. The sink is applied to the countertop and the place of future fasteners is marked. To do this, you need to use a cutting machine and a diamond disc, the place for fasteners should be made at the marked angle. With high quality fasteners, the countertop can be installed properly and when it is in use, the sink will not sway from side to side.
Before installing all the elements for fasteners, it is done, after which you need to check if there are any defective places, if everything is in order, then the installation begins and the required number of bolts is fixed in the slot.
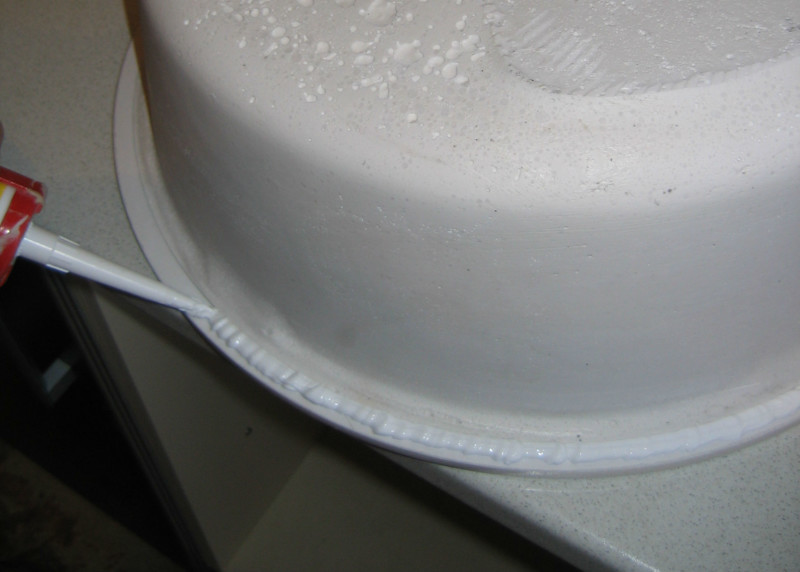
When the sink is attached to the countertop, you need to make sure that the sealant is completely dry, put a special gasket on the contours, you can lubricate its edges with silicone.
After all these steps are completed, the sink is carefully placed on the countertop, if there is excess silicone, then it should be removed in a timely manner
Fastening does not have to be done in such a way as to screw in the bolts with full force, this is especially important if the surface is made of soft material, for example, wood, as cracks can form
After this, the sink should settle properly, during which time all the hermetic materials that were used in the process of attaching the sink to the countertop stabilize.
It should be borne in mind that a do-it-yourself tie-in can only be carried out with a jigsaw. If there is no such jigsaw, it will take at least half a day to make a cut, but if the cut is made with an electric jigsaw, then it will take an order of magnitude less time. A successful tie-in depends on how correct and accurate the markup is. When the cut is made, several self-tapping screws can be screwed into the slot so that the countertop does not bend or break off at the end. In the event that the cutout is made from the inside, then it is recommended to place a wooden block under it, this is done so that there are no plastic chips when the drill exits.
Conclusions and useful video on the topic
This video visualizes the process of installing the sink and will help you see some of the subtleties of the wizard.
Mounting the mortise model:
The installation of a sink is a responsible task, on which the functionality of the workspace and reliability depend. Improper installation can lead to the rapid destruction of the countertop if water begins to penetrate under the sink.
The main thing in installation is high-quality sealing of the joint between the sink and the ends of kitchen furniture.
If you have experience installing a sink, please share the information with our readers. Leave comments on the article and ask questions. The feedback form is located below.
Reliable fastening of the kitchen sink to the countertop, cabinet or other structure is a guarantee of long-term operation of the plumbing fixture. Achieving a rigid fixation of the product is possible only if the process is approached correctly, in terms of using the installation method corresponding to the model of the installed sink. Therefore, fasteners for sinks to a countertop, cabinet or console are determined by the model of the plumbing fixture.