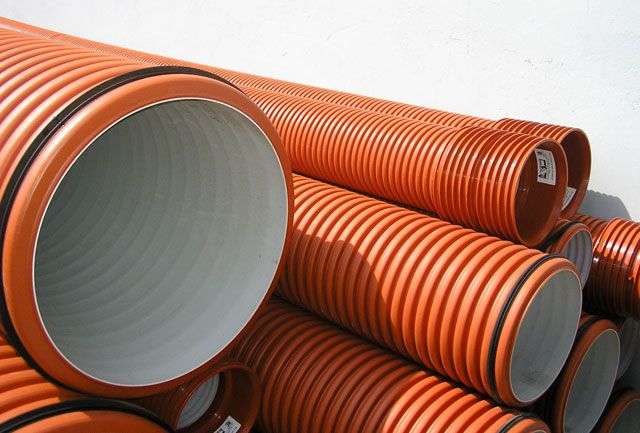
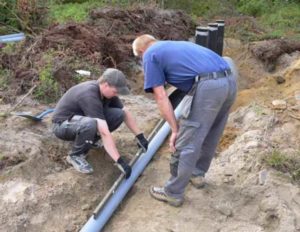
Corrugated plastic pipe for laying in a ditch
Quite popular and effective material for laying in a ditch are plastic corrugated pipes. Their dimensions can vary over a very wide range: the diameter of standard products is from 200 to 1000 mm, the wall thickness is from 22 to 140 mm, and the length is from 1 to 6 m.
In the manufacture of plastic pipes, several layers of raw materials are combined, resulting in a monolithic structure. Primary polyethylene or high density polypropylene is used as raw material for corrugated products.
It is very important that secondary raw materials are not added to the material during the production process - such mixing is the reason for a significant decrease in the elasticity of finished products.
To determine the elasticity of a corrugated pipe, it is enough to press on its edge - in the presence of impurities, the material will not return to its original state, while products made from primary raw materials will take on their original form. You also need to know that the outer layer of such pipes, in fact, is a light protective casing, with which it is possible to achieve a high stiffness index and the required wall thickness without weighing down the final products. When a load occurs, the plastic pipe for entering the site through the ditch slightly bends, but it is precisely due to this quality that this material retains its shape and integrity.
The role of the elasticity of this material cannot be underestimated, because it is this indicator that makes it possible for the pipes to bend, if necessary, without experiencing deforming internal loads. With a decrease in the external load, the pipe returns to its previous state, without ceasing to perform its direct functions. Proper arrangement of a ditch with a slope will allow the pipeline to be cleaned on its own, but even if the pipes are not sloped, it will be much easier to clean - the plastic is very smooth, and various solid impurities do not stick to it.
The stiffness of the pipe is indicated by the symbols SN and can be 4, 6, 8 and 16 kH/m2. The numerical value shows the strength of the pipe, which is expressed in pressure per square meter, and the permissible laying depth (from 2 to 8 m). The variability of rigidity allows the use of corrugated plastic pipes for driving through a ditch in a variety of places - from suburban areas to airfields.
In general, corrugated plastic pipes have a lot of positive qualities:
- Light weight, which simplifies the transportation and installation of the pipeline;
- Resistant to corrosion and most aggressive chemicals;
- Resistance to temperature changes (working temperature can vary from -35 to 75 degrees);
- High mechanical strength and resistance to deformation;
- High ring stiffness;
- Long service life (with proper installation, plastic pipes can work up to 50 years);
- Simple installation and versatility (if necessary, pipes can be cut or extended without problems);
- Small cost.
Among the shortcomings, one can only note the fear of open fire and the complete rejection of ultraviolet rays, when hit by which, corrugated plastic pipes begin to collapse very quickly.
How to strengthen the slope on the site choose a reliable method of protection against landslides
The cost of such a design starts from 7,000 rubles per 1 linear meter
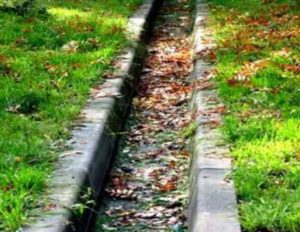
- concrete trays, like concrete pipes, do not allow water to pass through, therefore, just like in the first case, you will have to create a backup drainage system and cut outlets for it in concrete trays.
- a ditch made of concrete trays, although it looks neat, is absolutely unaesthetic. Smooth gray concrete walls will “delight” you with their dull look for the entire life of their service.
Method 3.
Concreting of the walls of the ditch.
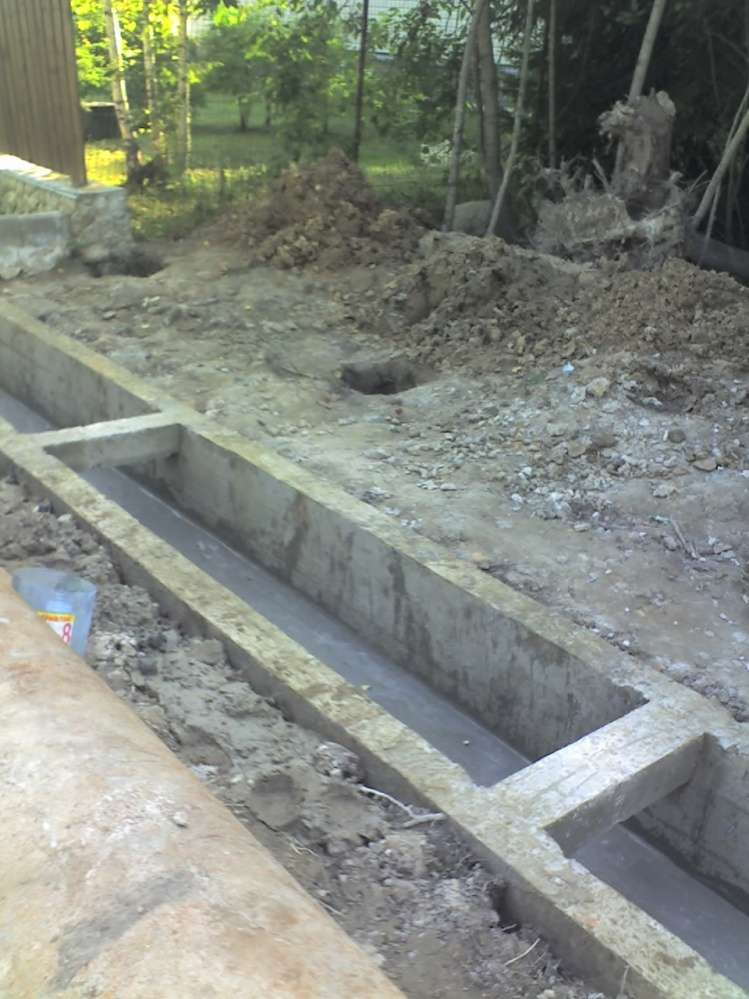
The pros and cons of such a design will be similar to reinforced concrete trays, with the only difference being that the total cost and labor intensity increase significantly. It is especially difficult to carry out such work during a rainy period of time, in which case a temporary drainage system is required. As an advantage for such a design, one can only indicate the possibility of working in cramped conditions, where the operation of large equipment is impossible. From the photo you can see what the surrounding landscape has turned into after the completion of the work, and also their general scale becomes approximately clear. Estimated cost - 10 -15 thousand per linear meter.
Method 4.
Here, perhaps, it would be worthwhile to consider all attempts to curb the recalcitrant ditch. Old slates, boards, spacers, bricks, tires, wooden pallets, etc.
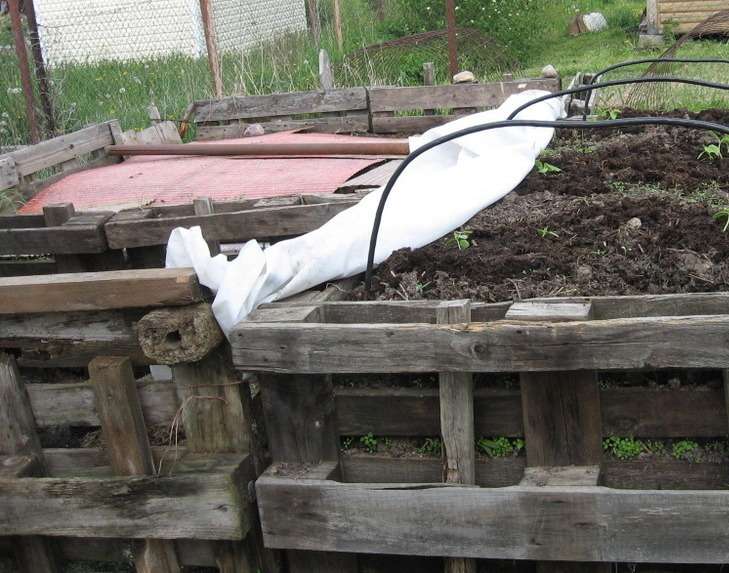
Such methods rarely achieve any acceptable appearance, not to mention durability. The wood quickly rots, and the forces of frost heaving easily break the slate.
Method 5.
The use of geogrids.
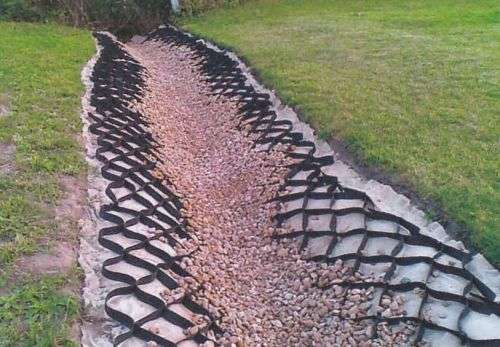
Quite a popular method in landscape design. Geogrids are durable, strong, and after filling them with soil, they are overgrown with grass.
Pros:
- good looks
- low cost
Minuses:
- if there is water in the ditch for a long time, then the grass in this part of the ditch dies off
- you need to clean the ditch very carefully so as not to damage the plastic grate
- such a ditch “eats up” an unacceptably large amount of space (about 3 meters), which, given the current cost of land, can be called waste.
Method 6.
Most of the above methods are either expensive or unaesthetic. So what to choose for an ordinary person without spending extra money.
There is a fairly simple and beautiful way to arrange a ditch.
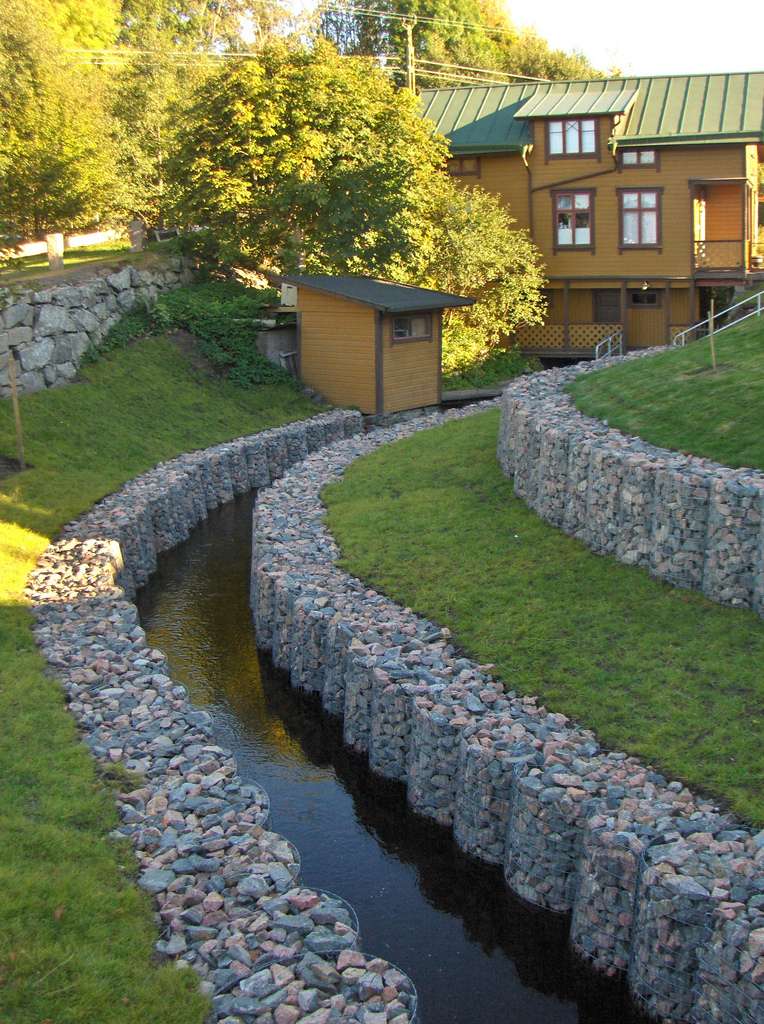
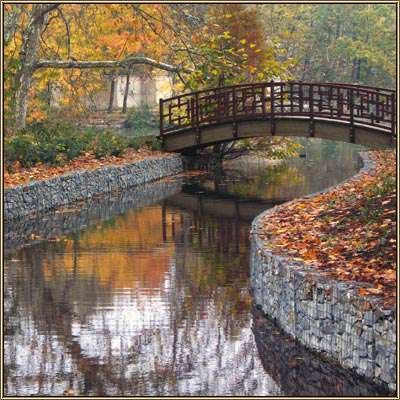
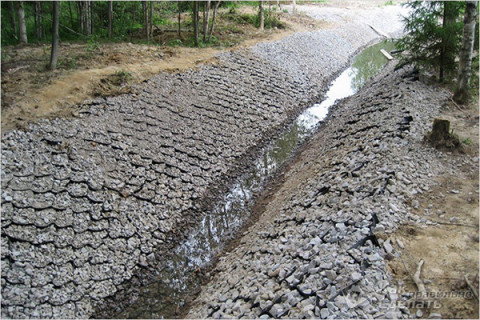
Mesh gabion structures are durable and combine a lot of positive characteristics of various structures.
- they are as aesthetic as natural stone retaining walls
- they are not afraid of frost heaving of the soil and do not change their shape when water freezes in a ditch
- the spaces between the stones can be planted with various types of plants, creating decorative walls similar to alpine slides
- they do not take up much space on the site, the width of gabions for drainage ditches does not exceed 50cm
– the ditch is always available for clearing and is not afraid of mechanical shocks, and even if they are damaged, they can be easily repaired
– gabion structures are durable, the service life of a galvanized mesh frame reaches 50 years, but even after this period, the walls of gabions will retain all their functions, because by this point they will be tightly bound by the roots of plants, the applied potion, etc.
– the cost of the gabion structure framing the ditch is 4000-5000 rubles (framing the ditch on both sides to a height of 50 cm, including all the necessary work and materials), which is almost half the price of the closest competitors.
- fences and barriers can be installed along the gabion structures. Moreover, the gabion structure itself can serve as a ready-made base for the fence.
- gabions easily pass water through themselves, while working as an effective drainage
Design features
... open type.
 Most often, open-type devices are found in country houses, in summer cottages. Ditches for collecting rainfall are buried in the soil a little below the top soil layer. Excess moisture escapes through gutters to treatment facilities or to places for disposal.
For open structures, any natural materials, such as trees and stones, are suitable. A device of this type requires a minimum of material investment, but requires physical strength and time to strengthen the side walls of the grooves.
Also for the open type, factory-made gutters are used to collect moisture. The material of the product dictates the cost of construction. Metal grooves are more expensive than plastic ones.
Open drainage ditches are covered with gratings from above in order to preserve the beautiful appearance of the site, also from large debris in order to avoid blockages.
... closed view.
Sewerage for the removal of storm drains in cities is arranged according to a closed type. Rainwater from roads and buildings is diverted through pipes laid in the ground to a disposal site. The pipe system is laid from the beginning, where excess liquid is collected, to the place where moisture is utilized.
This device requires considerable financial costs for pipes, as well as for related structural details.
Algorithm for laying a pipe in a ditch
The main task for which pipes are laid in a ditch is the passage of water only through the pipeline, without falling into the ground. To achieve this result, it is necessary to strictly observe the technology of pipeline installation and monitor the quality of all items.
A plastic or steel pipe is laid in a ditch according to the following algorithm:
- Preparation for work. This stage includes the design of the future system, measurements, site marking and a set of works to clear the ditch from the soil. Also at this stage, you need to select and purchase the necessary materials.
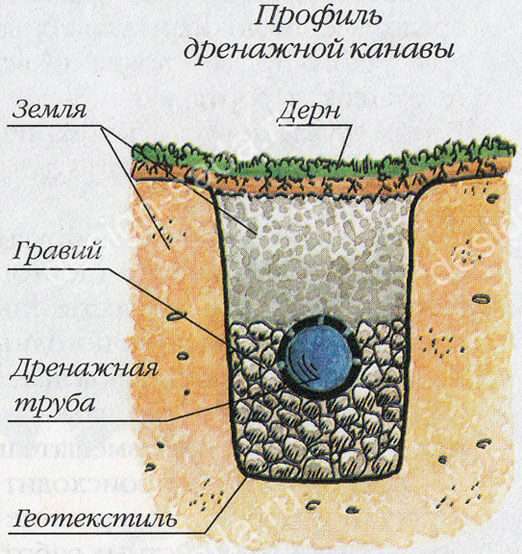
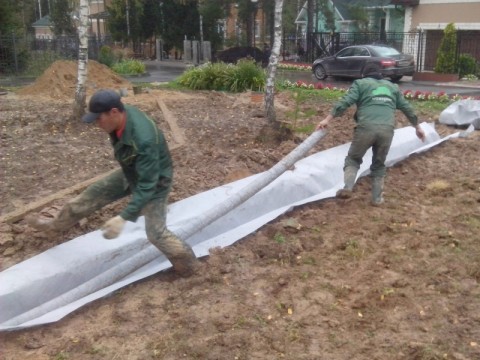
- Ditch preparation. The bottom and walls of the ditch are covered with geotextile fabric, which will prevent erosion of the structure. At the bottom of the ditch, a sand cushion about 20 cm thick is arranged. If the soil is too unsteady, you should first dig it about 10 cm and fill this space with rubble. The ditch should have a constant slope of 2 cm so that the water does not stagnate.
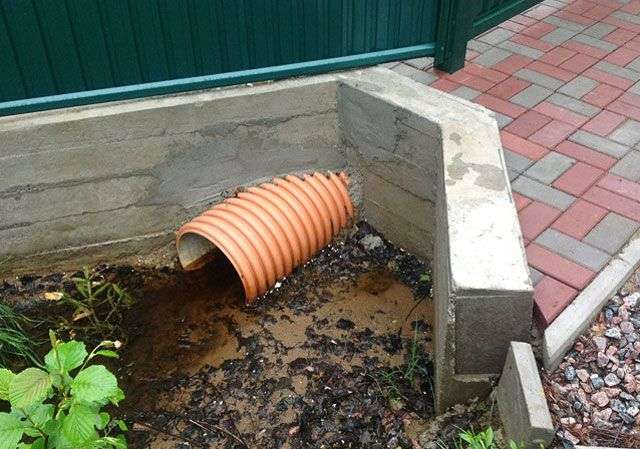
- Pipe laying. The selected pipe for the ditch to the cottage is laid exactly in the middle of the trench. Near the edges of the pipe, you can make small pits filled with gravel - this will protect the pipeline from silting. On both edges of the drive, it is worth installing a wooden formwork that will hold the embankment during operation. Later these places need to be filled with concrete.
- Embankment arrangement. The assembled pipeline is covered with sand, the thickness of which in the compacted state should exceed 30 cm. The next step will be the backfilling of a crushed stone layer with a thickness of about 20 cm. Gravel is poured on top, and at the very top there should be sand or small gravel. As a result, the drainage pipe laid in the ditch must be covered with an embankment at least half a meter thick, otherwise the structure will not withstand the mass of vehicles passing through it. It is possible to asphalt or pour concrete into the race only after the embankment has settled a little.
- Filling the sidewalls of the check-in. When concreting the sides of the drive, it is necessary to ensure that the ends of the pipes are open. To prevent debris from entering the pipeline, the pipe installed on the drive must be equipped with a metal mesh.
Conclusion
Laying a pipe in a ditch is a laborious process, but quite feasible. There are many ways to solve the problem, but only the goal remains unchanged - to prevent flooding of the site and create a reliable entrance for transport.
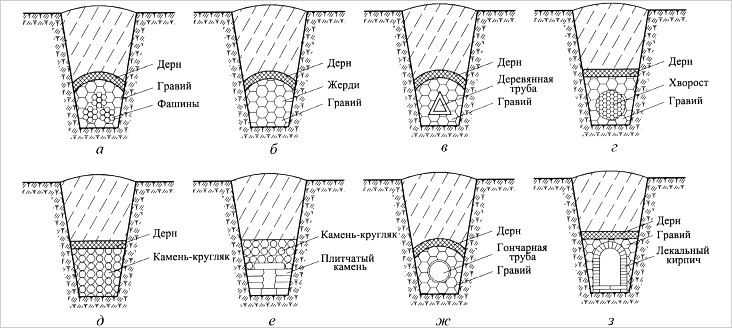
Simple options for drainage ditches
Even in ancient times, people built drainage systems, which means that they can be called almost the most ancient engineering communications. Just then they had the simplest design solutions. For example, bundles of rods with a diameter of 10 centimeters were placed in drains for drains, and then the systems were used for a longer time.
Such bundles were called "fascines" in ancient Rome. An ancient invention lies in the fact that the bundles prevent the collapse of the edge of the ditch and at the same time filter the drains. Such drainage systems are still often used in suburban areas.
Experts do not recommend covering fascinary drainage ditches with crushed stone, since over time the bundles of rods will have to be replaced. Digging up sand is much easier than shoveling gravel or small stones. Such drainage systems serve an average of about 15 years. When a drainage ditch is done by hand, they often use a principle related to an ancient invention, but for this they use modern materials and products, for example, car tires. Despite the fact that they are round, they are cut relative to the radius into 6-8 parts. Each of the segments results in a section of a U-shaped pipe open at the top. By laying them open up to the bottom of the drainage ditch, you can create conditions for redirecting drains in the right direction.
Old tires are practically eternal material, and in this case there are no financial costs. Tire segments should be laid on washed clay, and crushed stone, sand and other filtering and water-permeable building materials are poured on top of them.
Geomats
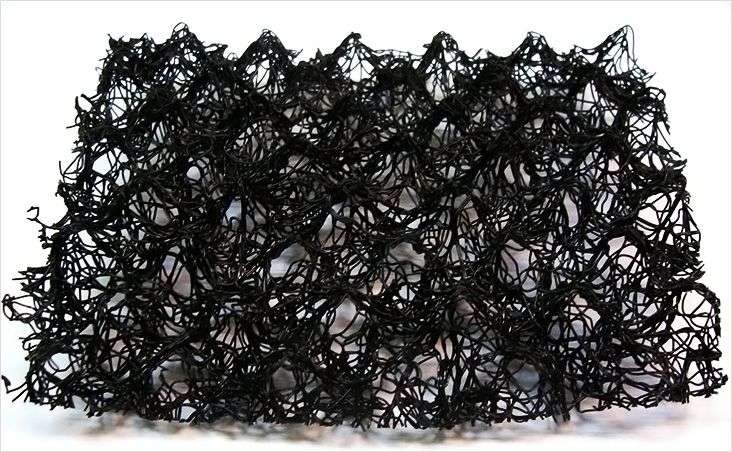
Installation of geomats is quite simple. First, the slope is cleared of debris and large plants (shrubs and tall grass). Then the surface must be leveled with a rake. After that, the edge of the geomat is fixed in the upper part of the slope with the help of anchors. Then the roll is rolled to the base of the slope and an extra piece is cut off. The lower edge of the geomat is also fastened with anchors. After that, by analogy, the next strip of material is laid. In this case, you need to make an overlap of 15 cm.
After the entire slope is covered with a geomat, it is covered with soil (3-4 cm is enough). Then it is desirable to sow the surface with seeds of herbal plants. So, you will improve the appearance and secure the material more securely.
Which withdrawal method to choose
The choice of a method for discharging treated wastewater depends not so much on the desire of the owner of the site, but on objective circumstances: the type of soil, the presence of open reservoirs and sewers, the level of groundwater, and so on. Due to the high degree of purification, it is possible to drain liquid to the ground, and when installing an additional post-treatment unit, to a lake or pond.
It is important to understand that a biological treatment plant and a conventional septic tank have fundamental differences. In the first case, aerobic bacteria “separate” wastewater into activated sludge and water.
The liquid thus has a degree of purification of about 98%. Simply put, it is not much different from river or lake water. The septic tank is not able to provide such a high level of purification, so the water from it needs additional filtration with soil.
Geogrid
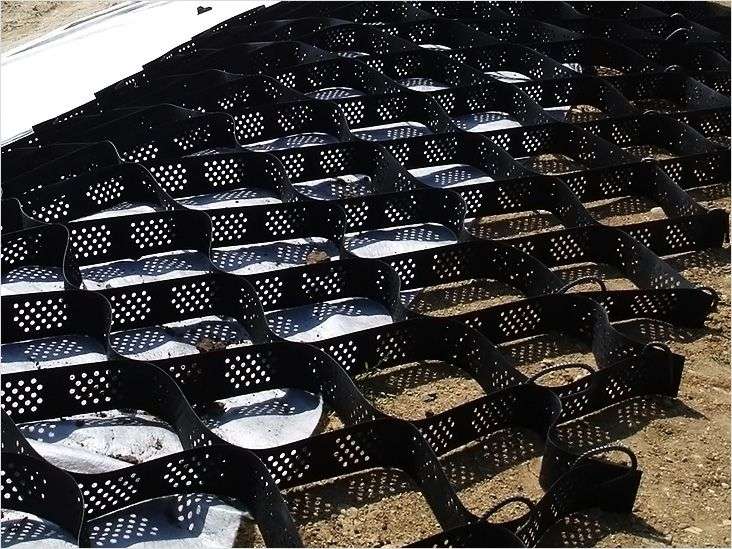
A more durable and reliable material for strengthening the walls of a drainage ditch is a geogrid. Such products are made of durable polyethylene or polypropylene. The geogrid is attached to the slopes using anchor fasteners (an L-shaped product, 50–80 cm long).
Before starting work, it is necessary to drain the ditch. Then the slopes and the bottom are cleared of debris and leveled. After that, the geogrid is laid out. Fastening is done in a checkerboard pattern at a distance of 30-40 cm from each other. After that, all cells are covered with sand or gravel.
The gabion is considered the most expensive, but also the most reliable strengthening of the slopes of drainage ditches. Such products are made in the form of a parallelepiped from a grid. In this case, a double-braided metal wire is used.
To protect against corrosion, the grid is covered with a layer of plastic. Large stones or crushed stone are placed inside the gabion. Such protection can last more than 50 years. At the same time, the appearance of the gabion is very attractive.
The sequence of the device of drainage ditches
Work on creating a drainage ditch is carried out in a certain sequence:
- When digging a trench, take into account that the ratio between width and depth should be early about one to two. The slope must be smooth.
- You will need a pipe for a drainage ditch. You can use plastic products with a diameter of 63 mm or even a larger section. Asbestos-cement "hundreds" will be even better. A pipe is needed to collect water and divert it in the right direction.In its upper part, holes are made in several rows at a distance of 10-15 centimeters with a diameter of 1.5 centimeters. It takes time to make holes.
- But the holes should not be left unprotected, since earth and other debris can easily get into the pipe, and as a result, it will soon silt up and clog. To avoid negative moments, the drainage pipe into the ditch must have a filter. It is not difficult to make it - the pipe should be wrapped with not too dense geotextile or a special fabric so that water can easily pass through it.
- The next step is to strengthen the drainage ditch. It is covered with small pebbles that ended up in a summer cottage, as well as broken bricks, crushed stone, expanded clay, dried cement mortar, coarse sand and other building materials. In a word, everything that is currently at hand (this can be called construction waste). The main requirement for it is that the layer must pass water well.
Grasses and flowers growing along the edges of the drainage ditch and at its bottom have a root system that will not only strengthen its walls, but also serve as an excellent natural filter. In addition, with their appearance, they will transform an unaesthetic trench for the better.
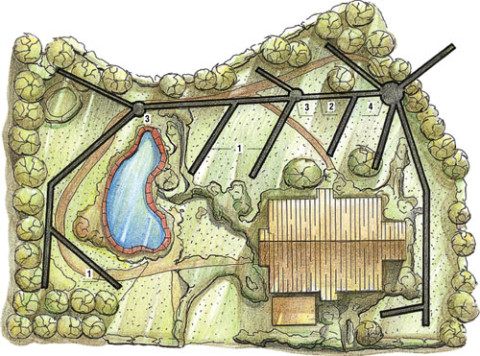
3. Design of drainage and pressure ditches
Drainage
ditches serve to divert water from the road
to the sides, to low places or to
culvert structures.
If the road
crosses over a short distance
several dens, water can not be missed
across the road in every depression, and
make drainage ditches,
intercepting water in small logs and
leading to the main log (Fig. 5.3). Usually
ditches 0.25–0.5 deep
m, collecting water from small dens, begin
in the very vein.

Rice. 5.3. Branch scheme
water from the side log to the structure in
main log
The ditches suit
with longitudinal slopes of at least 5 -
7 ‰,
length is taken no more than 500 m.
Drainage
ditches are also designed to release
water from lower areas -
drainless depressions that it crosses
road.
Water from a hollow
lead to the nearest logs or more
deep depressions, arranging drainage
ditches on both sides of the road (Fig. 5.4, a).
Another solution is also possible: device
culvert and drainage
ditches from the downstream side (Fig. 5.4, b).
The issue is decided on the basis of
situations: the presence of slides from two
sides of the road and technical and economic
calculations (it should be calculated which is cheaper
–
pipe or ditch).


Rice. 5.4. Branch scheme
water from a drainless depression: a -
without a pipe device; b -
with a pipe under the canvas
Recommended
cross a hollow not in the deepest
place, but on the side. Then deeper
part of the depressions will play a role
evaporation pool.
In the presence of
slope slope
water flowing to the road with a horse
parties, must be intercepted and
set aside from the road with
upland ditches (Fig. 5.5).
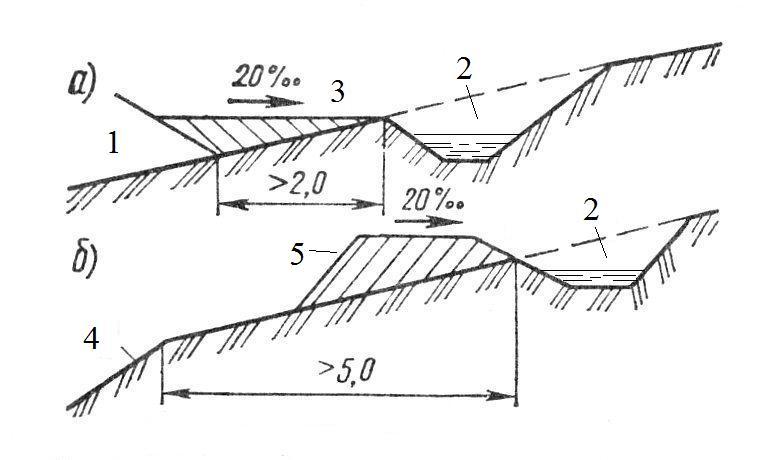
Rice. 5.5. Upland
ditches:
a - at the embankment; b -
at the notch; 1 - embankment; 2 - upland ditch;
3 - berm; 4 - slope
notches; 5 - banquet
Upland cross section
ditches are calculated according to the flow of water,
flowing towards her. Ditch attached
trapezoidal cross profile with
the smallest width along the bottom is 0.5 m.
ditch depth 0.5 m, steepness of slopes
1:1.5, longitudinal slopes not less than 3–5
‰.
If earthen
the canvas is laid along the slope in the embankment,
then the upland ditch is located on
distance of at least 2.0 m from the sole
embankment, and between it and the embankment they pour
berm with a slope of 20 ‰ to the ditch (Fig. 5.5, a).
If there is a cuvette
in the embankment and the location of the road in the cut,
to avoid slips and slopes
due to waterlogging of soils, upland
ditches are located at a distance of not
less than 5 m from the outer slope of the ditch or
notches (Fig. 5.5, b).To avoid
overflow recess flooding
upland ditch, between a notch and a ditch
pour earthen prisms -
banquets.
With a large influx
water on steep and long slopes
arrange two or more rows of upland
ditches. Ditches and upland ditches strengthen
turf, reinforced soil, paving.
Determination of the direction of movement of effluents on the site
When there is no drainage, water can flow anywhere, and it seems that the drains move randomly, but this is not so. All liquid flows down the slope.
To determine the lowest point of the relief, you can:
- study the relief map of the area available in Google Earth;
- observe the movement of rain streams during a downpour.
First of all, you should figure out where the ditch will go and mark its location. It will certainly be laid under a slope, but not too strong, since with the rapid movement of drains, the permeability at certain points may be insufficient.
Then the drainage of the site is calculated. Having marked the route of the ditch on it, they remove all the vegetation in these places and begin work on digging a trench.
How to build a ditch
… open type
Before the start of installation work, prepare equipment and materials in advance:
- -excavator, if the amount of work is large, or shovels.
- - large, small gravel.
- - gutters for collecting precipitation, or materials that reinforce the walls of the channels.
Ditch laying scheme. Works on the stormwater device are carried out in a certain order.
It is necessary to dig trenches along the fence of the site, leading to a place where water collects. Pipes in ditches are buried in the soil more than five hundred millimeters, have a width of four hundred millimeters. If special gutters are used for drainage, then the trench breaks out a little more than the dimensions of the gutters.
Next, the bottom of the ditch is covered with rubble, first of a large consistency, then fine. If it is planned to build in a storm gutter, then sand, not crushed stone, is laid on the bottom, forming a pillow for the gutter. Again check the quality of the entire system. At the entrance to the place of collection of water, a device is built to trap sand. The device must be connected to the drainage system on the one hand, and a pipe that discharges liquid into the reservoir, or a well, a collector for collecting water - on the other. Ditches for beauty are lined with stones, plants are planted, the gutters are covered with special gratings.
Excess water is diverted to a catchment well for irrigation of the site.
... closed type
Scheme of installation work. First, the pipes are connected into a single pipeline using special fittings required for the system. According to the prepared plan, the bends of the route are laid. Then the pipes are covered with geotextile or other heat-insulating material. Typically, pipes are used for the main structure with a cross section of one hundred and ten millimeters, and auxiliary pipes with a diameter of seventy-five millimeters.
 Next comes the preparation of trenches, the depth of the pipes should be more than six hundred millimeters, the width of the ditch will vary from the size of the pipes being laid. Do not forget about observing the angle of inclination of the trench to ensure gravity flow of the liquid.
The bottom is covered with sand, then gravel. Pipes are placed on the prepared pillow. The pipes are artificially filled with water and the system is tested for leaks and the quality of the passage of liquid to the collection container. A device is also being built to capture sand in front of the collection tank.
The pipes are covered with a layer of sand and gravel, then the ditches are compacted with earth.
Drainage ditches are designed to collect excess moisture after heavy rains or snowmelt. They are needed to avoid flooding of outbuildings and to preserve the crop on the site. Storm sewers can be economically built with your own hands.
Testing the drainage system
In the process of planning work on the arrangement of a drainage ditch and determining the technology for their execution, you need to know that sometimes everything does not work out right away. Therefore, after the trench has been dug, the ditch drainage, pipes and conduits have been laid, they should not be filled up immediately.
You need to wait until heavy rain passes and make sure that the drains are well drained. If necessary, you can correct the design. Only after making sure that the drainage structure is working, the ditch is filled up. Properly executed drainage, equipped around the house, is capable of supplementing the drainage system of the summer cottage.
Preparation of materials and site marking
The materials and tools that are needed to make drainage in the country with your own hands are in every home:
Shovels, pickaxes - in case you have to dig through hard rocky soil.
Wheelbarrows and buckets for carrying and transporting the excavated clay.
Pegs and fishing line, or tape - to mark the site.
From building materials you will need: the remains of bricks, slate; gravel of different fractions and sand. The choice of decorative materials depends only on the desire of the owner: you can buy gratings to protect the ditches from pollution or simply fill the trenches with stone in the form of paths.
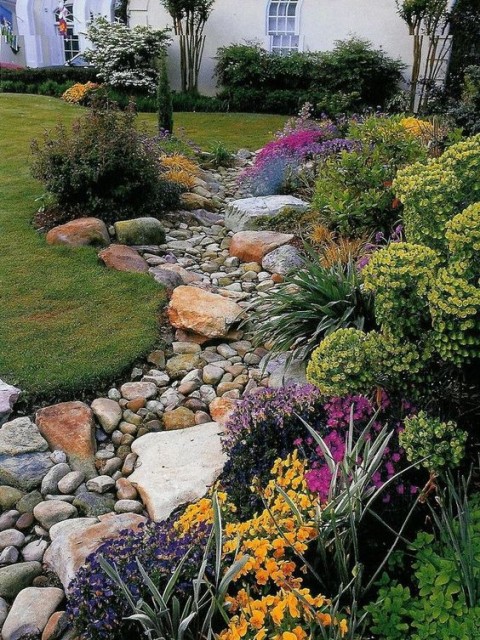
Drainage channel in the form of a rocky path
How to determine the correct trajectory and location of ditches without special tools? It is enough to observe the natural direction of the streams after a heavy rain or look at the footprints on the clay in the spring. Traces left by flowing water are an ideal place for digging ditches. It is advisable to make a preliminary markup on the diagram.
Scheme for planning the laying of drainage channels
The most time-consuming stage is earthworks. With open surface drainage, the depth of the ditches should be about half a meter. Width - from 40 to 80 cm, up to 1 m - at the drain point. Before starting work, the selected trajectory is marked with pegs with a stretched fishing line.
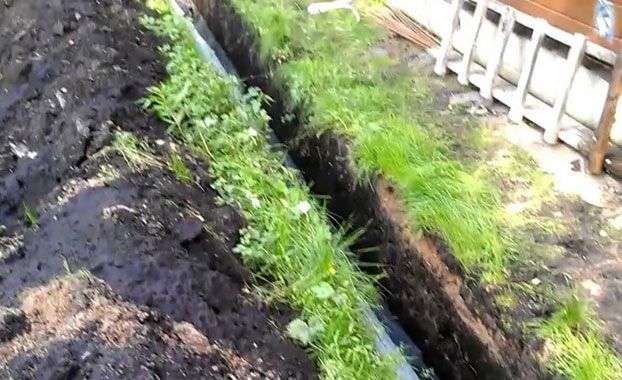
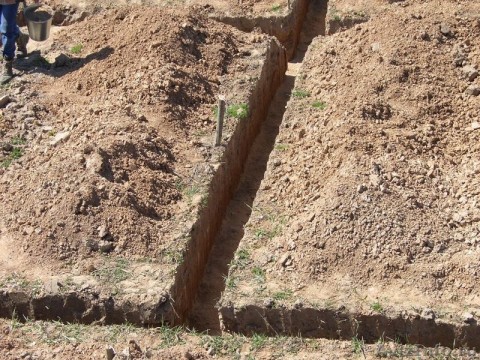
Grooves are dug along the marking line
Dig trenches starting from the top of the site. The excavated earth is stored on one side of the ditch. It will greatly simplify cleaning after completion of work with an ordinary polyethylene construction film laid on the edge of the trench. The extracted earth can be used for leveling and backfilling beds and flower beds.
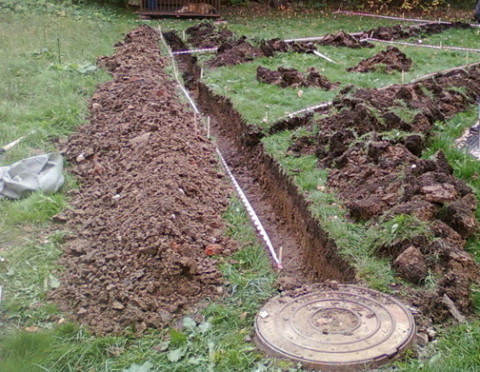
Trench with side outlets
The side walls must be formed at an angle. On an inclined surface, the liquid flows down to the bottom faster, in addition, there is no erosion of the bottom due to the impact of falling streams. Ready grooves must be rammed: the bottom and walls must be even and solid.

Rammed trenches
Dig a line to the junction with the receiving tank.
There are 3 options for arranging ditches:
Soft - with laying a layer of soil over the backfill.
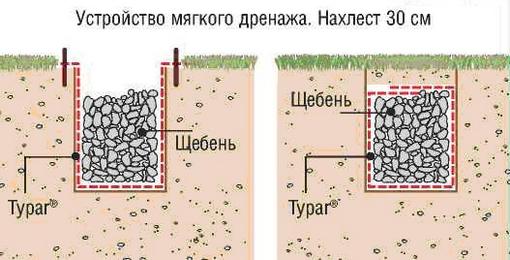
Soft drainage
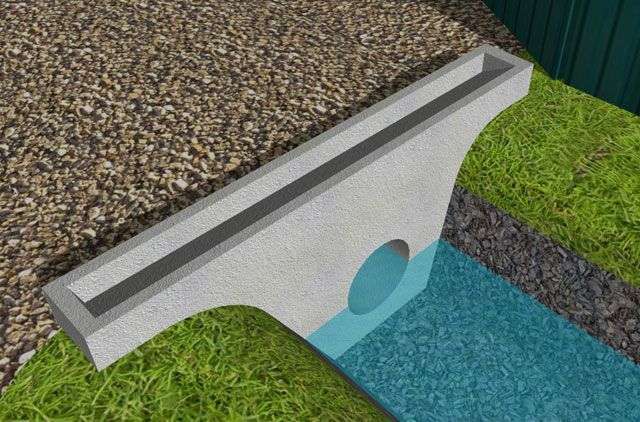
Gutter - a concrete gutter without a cover is laid in the prepared trench.

open ditch
Filling - carry out backfilling to the surface level.
To extend the life of the drainage system, it is necessary to strengthen the walls and equip bulk pillows to facilitate the outflow of fluid. A perforated film or a special geotextile fabric is laid in the trench. Water passes freely through the holes, partially soaking into the soil.
Channels with laid protective film
At the bottom, a layer of gravel or crushed stone of different fractions is necessarily covered: at the bottom - large, as it approaches the surface - fine fraction. Between the layers of backfill, it is advisable to install flow accelerators from improvised materials, which will perform the function of a pipe. They use cut plastic bottles without a bottom, large pieces of bricks laid with gaps, bundles of branches and brushwood up to 30 - 50 cm long.
Simple materials that can be laid in grooves instead of perforated pipes
The finished trench can be left open, or closed with a decorative grille.Mesh metal covers will protect the channel from clogging with branches, leaves. If the film is overlapped, then a layer of turf with lawn grass can hide the groove from prying eyes.
Mesh-reinforced main trench
Video tutorial on how to plan and make drainage in the country with your own hands, without investing in a complex system.
You can divert a moderate amount of water from the site yourself. But if it is planned to build a country house in the country house, a simple open system is not enough to drain the wetland, it is better to contact specialists. A system with a combination of a deep and surface network is difficult to plan and arrange, and an error in calculations can lead to water remaining on the soil surface.
Selection of pipes for laying in a ditch
Since it is impossible to simply fill up a dug ditch, because it will simply be washed away with water because of this, it is necessary to use a drainage that ensures the drainage of flowing water. For drainage, a pipe is laid in a ditch, the space above which is covered with soil, and according to the resulting design, it will be possible to safely drive a car.
Despite its apparent simplicity, a drainage ditch is an engineering structure, so the design has to be correctly calculated and equipped in compliance with a number of rules that need to be studied before laying the drainage pipe into the ditch.

When choosing pipes for passing through a ditch, you need to build on the following indicators:
- Mechanical strength and reliability. This factor is important, if only for the reason that heavy vehicles weighing several tens of tons can enter the site during construction, so the structure must withstand significant loads.
- Ditch dimensions. The amount of water passing through it directly depends on the dimensions of the ditch. In order for the water to be able to leave the ditch in full, it is necessary to select pipes of sufficient diameter.
- Affordable budget. There are a wide variety of materials on the market, so the choice is often limited by the finances at your disposal. In addition, the cost of delivery of materials and installation of the structure also varies widely, and this must be taken into account.
We use improvised materials
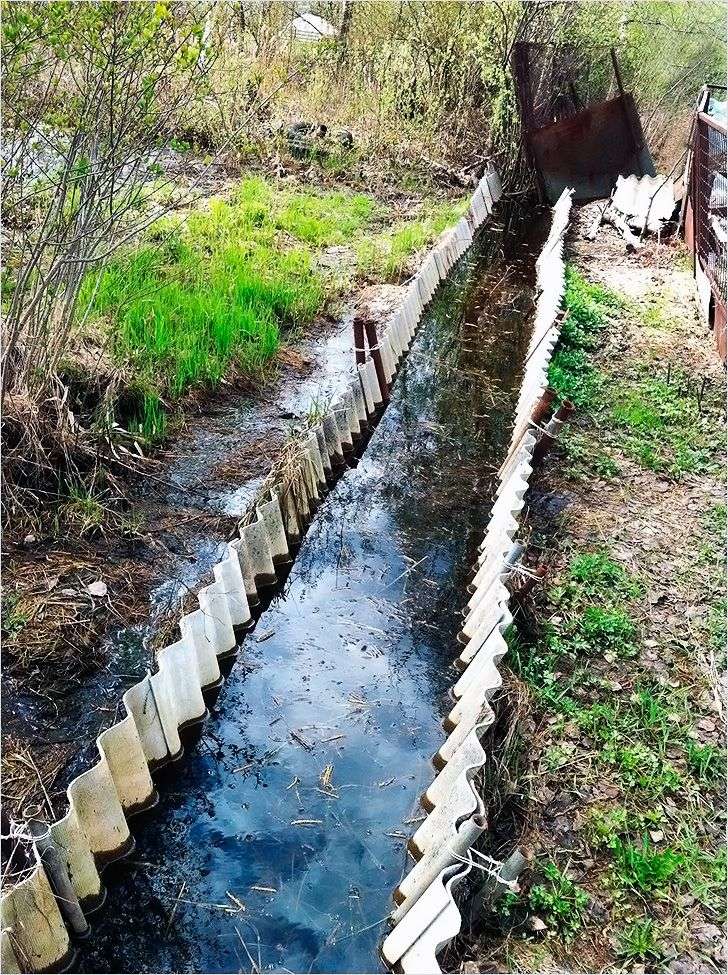 All of the above methods require quite decent financial investments from the owner of the site. But it is possible to strengthen the walls of the drainage ditch in a cheaper way. The most common option is to use slate.
To work, you need to prepare some tools and materials. You will need:
- Slate (you can use any, even used ones, the main thing is that there are no large holes in it).
- Metal pins or pipes 1 m long.
- Bulgarian.
- Shovel.
- Scrap.
First of all, sheets of slate are cut into identical pieces of the desired size. Then, using a shovel, we install them into the ground along the cleavage of the ditch, to a depth of 20–30 cm. Next, we drive in rods or pipes on both sides of the slate. Such strengthening of the slope does not look very attractive, and its service life is not long. But it might work as a temporary solution.
In addition to slate, you can use old car tires. But this option is acceptable if there is enough space on the site. In this case, the tires are stacked on top of each other along the walls of the ditch.