Variety of shovels for digging
For trenches
There are special shovels for digging trenches. This tool has a rectangular bayonet with a pointed tip. This design is ideal for clearing the sides of a ditch without destroying the surrounding earth. Another way to use them is to remove plants with a strongly overgrown root system.
Bayonet
The purpose of bayonet shovels is to dig up the soil. In this tool, the bayonet can be either square or slightly curved, with a pointed end.
The model with a flat square bayonet is used for digging up hard-packed earth, and the tool with a curved square bayonet is used for the same work as a garden shovel:
- transplantation and division of plants;
- digging holes;
- lawn edge trimming.
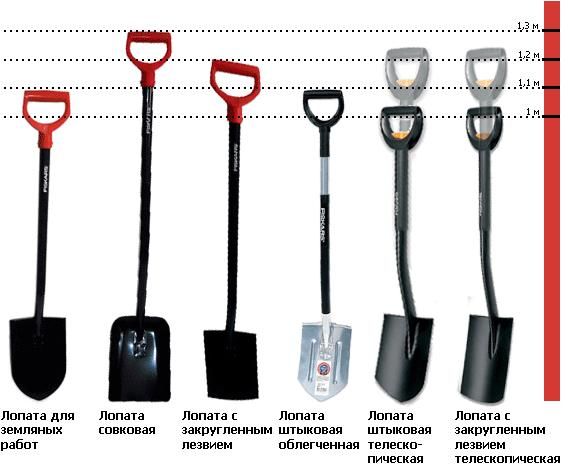
The pointed bayonet is suitable for digging loose soil, as well as planting shrubs and trees.
Tools with steel bayonets have a longer service life than those with aluminum bayonets. The handle can be wood, metal or composite.
Drainage
Drainage shovels have a very narrow, curved scoop. They are used for planting or transplanting plants and removing excess earth from already dug trenches.
Soviet
Shovel shovels have wide flat bayonets with rims. Due to their design, they cannot be used for digging holes or digging soil. But they are very convenient for transporting bulk materials such as coal, snow or grain. The bayonet can be made of steel or aluminum. The first option is much heavier than the second, but more durable and does not deform.
scrapers
Scrapers are also shovels. Their purpose is to remove snow and debris from roofs and roads, eliminate weeds, and remove roofing from shingles.
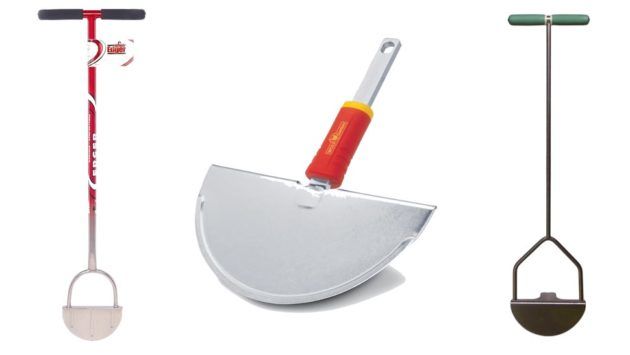
in the shape of a crescent
Crescent-shaped tools can perform a limited number of tasks. They are used for cleaning roads and curbs, cutting small sods and dividing plants.
Hand drill
This tool consists of two shovels connected to each other. It is suitable for digging holes (for plants, fences, etc.) in loose soil.
scoops
These are small spatulas with a short handle, designed for small jobs (sowing seeds or planting plants).
Advantages and disadvantages of self-digging trenches
In order to choose a method of digging a trench, you need to analyze the advantages and disadvantages of each of them. Using a shovel to dig trenches has several significant advantages. The cost of a shovel is much lower than renting a tractor.
 Manual equipment for digging drainage trenches in drained areas
A trench dug by hand is smooth and neat, while a tractor pulls out a lot of excess soil, which can increase the width and depth of the trench. In the future, this leads to unplanned consumption of building materials (sand, cement, etc.). And also the tractor is not able to dig trenches with right angles, which again forces you to spend additional building materials.
Manual digging allows you to monitor the straightness of the trench. The tractor, on the other hand, can dig a crooked hole, which then still has to be leveled manually.
Therefore, it can be concluded that:
- digging with a shovel allows you to dig a flat trench of the same depth and width, while a tractor digs a crooked hole;
- using a shovel will save a lot of money (according to the most rough estimates - from 20 to 25 thousand), since renting a tractor is not cheap;
- when using a tractor, you will have to spend money on additional building materials, since excess soil is removed during work;
- when using special equipment, digging a trench will take much less time and effort than when working manually.
https://youtube.com/watch?v=9iwcHgEt26U
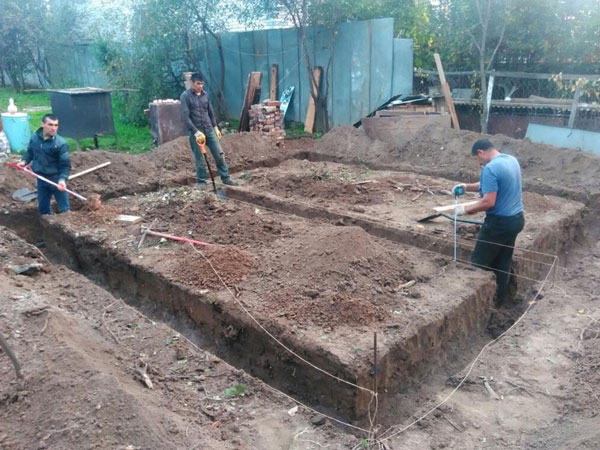
The shape and dimensions of the foundation pit
The shape of the pit directly depends on the foundation of the building.
Under a private house, it is customary to make a rectangular pit; a trench is dug under the strip foundation.
For a columnar foundation, a well is made using special equipment.
But the width and depth of the pit is determined depending on the location of groundwater and freezing mail.
note
The sole of the base must be immersed 40 cm lower than the depth of soil freezing. As for groundwater, the foundation pit should be above them.
When calculating the dimensions of the foundation pit, you should adhere to the basic rules: the width and length of the foundation should be 30-40 cm larger than the facade of the building.
The quality of the foundation directly affects the durability and reliability of the building. Therefore, when laying it, it is necessary to comply with all norms and standards.
Experienced specialists should be familiar with the technology of digging a pit. If you do not have experience in this field of construction, be sure to contact professionals. For a quality foundation foundation, you will need to hire several experienced specialists. They will take a sample of the soil and find out its type and characteristics with the help of a special examination.
Attention: it is advisable to conduct an examination of the soil before buying a site.
Most people make mistakes at this stage. Therefore, in the future they are faced with the need to sell a plot that is not suitable for construction.
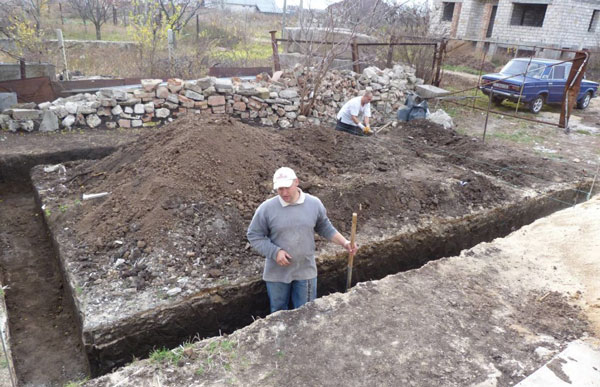
After a successful examination of the soil sample, you can start working:
- To begin with, the top layer of soil on which the vegetation is located is removed. It is necessary to remove this layer throughout the entire territory of the future building.
- For a blind area, it is worth capturing one meter on each side.
The height of the plant layer should not exceed 30 cm. But if the height of the fertile layer on the site is less, then the height of the layer to be removed should be less. This land should not be thrown away. It can be placed on the site where you will plant cultivated plants.
The next step will be the development of the soil, which in the future must be removed from the site. Soil removal is recommended to be done immediately, and not postponed until later. Since it will take up a lot of space on the site. For the removal of soil, you will need to hire special equipment.
As for the technology of digging a pit, this process can be done manually or with the help of heavy equipment. Earthworks when digging a pit are divided into the following stages:
- preparatory process.
- Digging a pit, this process includes:
- calculation of the size and scope of work;
- soil development manually or with an excavator (excavation and backfilling of the earth);
- water drainage;
- completion of the pit by hand.
Tape and column foundations can be dug manually. It will take more time, but it will cost much less than renting special equipment. Also, the manual method of digging a foundation pit is used in those areas where it is not possible to organize the entrance of special equipment.
Digging pits with an excavator is carried out quickly and efficiently. If, along with an excavator, you hire several dump trucks to remove the soil, the work will go even faster. Which excavator to choose, caterpillar or wheeled, depends on the structure of the soil. If necessary, dig a deep pit. then its walls can collapse. Therefore, measures must be taken in advance to prevent slipping of the soil.
What does depth depend on?
The SNiP lists some factors that affect the determination of depth, which must be taken into account when immersing a water line in the ground, these include:
- The depth of the caisson well above the source of water intake.This factor affects the location of the point of entry of the pipeline into the soil through the walls of the caisson, usually the pressure pipe is mounted as close as possible to the bottom surface.
- The degree of ring stiffness of the pipeline material affects its resistance to soil pressure on the walls, which can lead to damage to the pipeline. The factor must be taken into account when laying plastic water pipelines of large diameters, the maximum depth of which does not exceed 8 meters.
- Soil characteristics (loose, clayey, rocky), presence of vegetation cover, presence and level of groundwater.
- The installation of thermal insulators or an electric cable for heating water inside pipes or outside the water supply system can significantly reduce the penetration, in which case it is necessary to carry out complex calculations to accurately determine it.
- The location of the point of entry of the external line into the house through its foundation - the lower it is, the greater the depth of the water supply.
- The temperature of the water at the source of water intake.
- The climatic conditions of the region are the lower temperature limit in winter and the highest temperature in summer, the amount of precipitation.
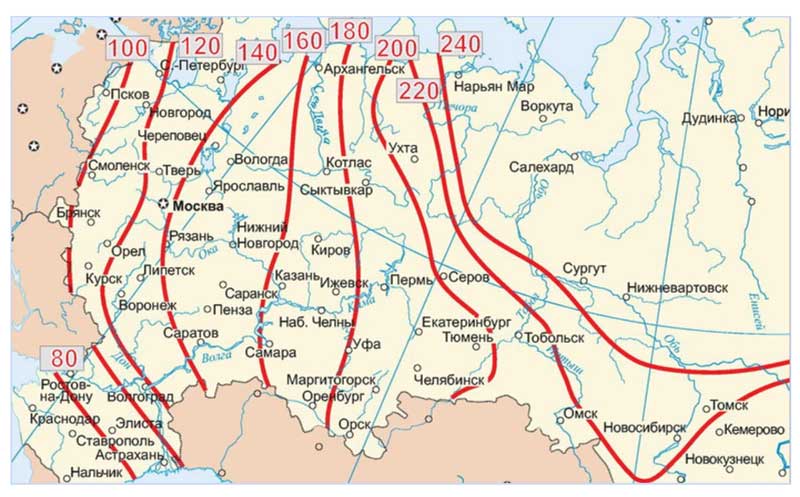
Rice. 3 Map of soil freezing in Russia
What tools will be needed
A puncture under the road can be done on your own. Before starting work, it is necessary to prepare the following set of materials and tools:
- an apparatus for performing welding work and a grinder;
- sledgehammer;
- steel reinforcement or bars, the diameter of which should be 25 millimeters or more, and the length should exceed the width of the road by ten centimeters;
- trimming a steel pipe of the required diameter and the same length as the rods;
- pump with a plastic tube with a diameter of 12 millimeters;
- a barrel for two hundred liters;
- funnel with a two-meter hose.
In addition to tools, you will need remarkable physical strength and patience.
Trench for plumbing
When organizing a water supply system in a private area, 2 options are possible:
- Inserting a new pipe into an existing pipeline.
- The device of a water supply system when leading to a well.
In the first case, you will have to draw up official documents, order a project and request permission from the administration for the sidebar. In the second, it is enough to drill a well and bring water supply to it. It is cheaper, faster (especially if a well or well already exists) and more reliable. Proper laying is needed here and, as a result, trench digging.
When excavating, it is recommended to first study the location of the communications available on the site - drainage pipelines, power cables, heat supply networks or a gas pipeline. Depending on the type of engineering networks, according to SNiP, it will be necessary to observe the distances from the location of the water supply in the trench to existing networks.
The shape of the trench can be:
Rectangular trench.
- trapezoid;
- rectangular;
- mixed.
A trapezoidal trench is considered the most convenient, since its walls do not require strengthening, however, it can occupy a much larger area on the site than a rectangular one. Unlike a rectangular trench, the mixed shape of the trench requires more work when excavating the soil and is used in places with high groundwater.
Excavation
These include preparing and digging a trench. To work manually, you need to stock up on the following tool:
- shovel and bayonet shovels;
- a coil of rope and pegs;
- tape measure and building level;
- pickaxe, crowbar, buckets for soil removal;
- retaining material for strengthening the walls (edged boards, flat slate);
- fasteners for props.
Earthworks are reduced to the preparation of the construction site and the digging of trenches. The step by step process will be as follows:
- The construction site is cleared of debris, the points of connection of the water supply to the water supply source are indicated on the surface (if water is supplied from the main line - tie-in into the main pipe, if water intake through a well - input into the caisson).
- The width of the trench is indicated (from 0.5 to 0.8 m). The width will depend on the shape of the ditch in the section.
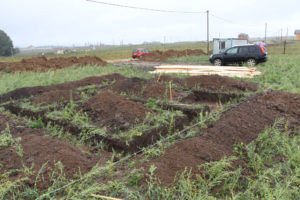
- The path for laying the water supply is marked with the help of pegs spaced in meter increments. A rope is stretched between them - this will be the contour of the water supply from the water intake point to the entry point into the house.
- After marking, you can start digging a ditch, having previously determined its depth. In this case, it is recommended to remove the earth layer by layer with a bayonet shovel, loosening the layers and throwing them to the side.

Marking under the trench.
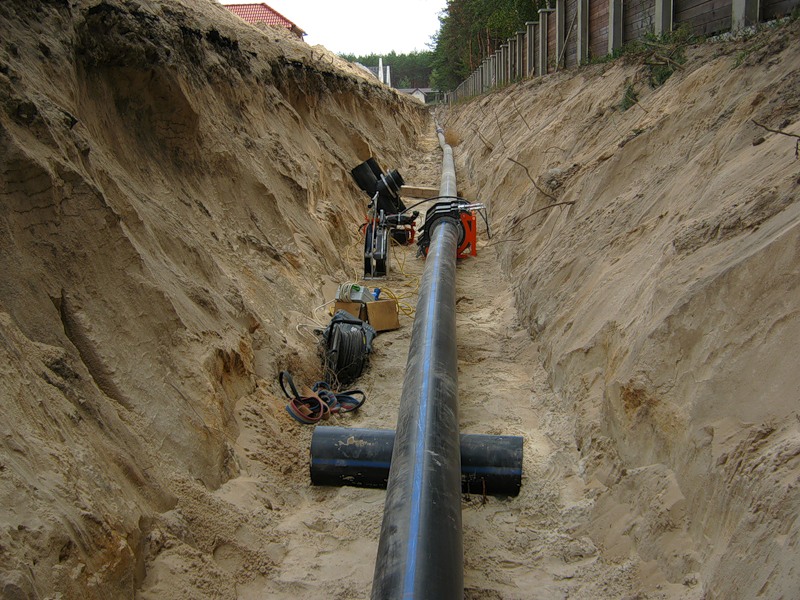
Laying water pipes in the ground
After the trench is dug, they begin to prepare the bottom for laying the water supply:
- A sand cushion is poured with a layer height of 20 cm. The sand is spilled with water and carefully compacted.
- In the place of the plant in the house (most often this is the foundation), a hole of the desired diameter is drilled. For wells, it is necessary to make a hole for the input in the well shaft.
- A pipe is laid on the sandy bottom, soil is poured on top and the place for laying the water supply is carefully rammed.
Next to the communication, you can lay a heating cable or insulate it immediately before laying it in a trench. The process of laying a water pipe will be the same for any type of pipe, the difference is only in the depth of the trench dug for each region.
| Region | Northern | Southern | middle lane |
| Laying depth | 3-3.5 m | 1.2-1.5 m | 2.3-2.5 m |
It is recommended to lay the water supply system at least 0.5 m below the freezing depth of the soil. It is undesirable to fill the soil on the laid branch so as not to damage it - first, the earth is sprinkled from the sides of the pipeline, tamping and compacting it with crushed stone of a fine fraction. It is recommended to lay the sealing layer in the pit at a distance of 5 cm from the protruding edge of the water pipe, in order to then fill it with earth.
Which pipes are suitable for laying in the ground
For water supply systems, plastic or galvanized products are suitable. The former are durable, but over time, their galvanized layer wears out and they begin to rust. The latter have a shorter service life, but they have increased anti-corrosion properties and are less prone to clogging.
Plastic are divided:
- on polyethylene;
- for polypropylene;
- for polyvinyl chloride.

polymer pipes.
As for the diameter of the water supply, then the length of the laying and the average speed of water movement should be taken into account - up to 2 m / s.
Polypropylene pipe laying
You can lay them with your own hands using fittings (fittings) or by welding. In the first case, installation is carried out directly when laying pipes in a trench, in the second case, it is preferable to use the route method. This means that individual sections need to be welded and mounted directly on the construction site, carefully laid in the ground and without violating their bending radius.
Plastic heating time - from 9 to 12 seconds, depending on the diameter of the product. After welding, it is necessary to check the system for strength for several days and only then fill the trench with earth.
Laying of water pipes made of steel
Steel systems are stronger than plastic, so they can be laid directly into the pit on a natural base. The rest of the installation process is similar to the installation of a plastic water pipe.
https://youtube.com/watch?v=jERSB8p8bqs
Features of laying pipes for hot water supply
In this case, water parameters are of great importance, therefore it is recommended to use products made of polypropylene marking PN20 or PN25. These models incorporate a reinforcing layer of thermal insulation. When flowing through such pipes, water will not deform them.
Digging a trench by hand how the price per linear meter is formed
In our time, when mechanization has reached a high level of development, when machines and mechanisms are actively used, the need for manual labor still exists.
Earthworks by hand are still in demand, and there are objective reasons for this.
Dig by hand
The work of a digger is not easy. Such work as digging a trench is considered unskilled, primitive, but there are cases when manual labor is indispensable. The most effective manual digging is recognized for such tasks:
- trenching in hard-to-reach places,
- digging wells,
- laying communications in the constructed building,
- underground device in a private house.
It is also believed that wells should be dug only by hand. This is explained by several reasons. Here are some:
- stop exactly on the aquifer,
- do not get into the sand so that the water does not subsequently leave,
- stones and dense clay are only dug by hand,
- It is unacceptable to get engine oil into the barrel of the well.
In a word, digging a well is not easy, in addition to having specific knowledge, care and accuracy are required. There is no automatic or mechanical way to dig a well.
What determines the cost of 1m³
An analysis of the market for land works indicates that the ratio of the cost of manual and mechanized labor is the same. How much it costs to dig up 1m³ of land depends on several factors:
- soil type,
- order urgency,
- amount of work
- seasonality,
- terrain,
- trench parameters.
It also takes into account whether backfilling of the earth is needed. Pricing takes into account all factors, plus the qualifications and experience of the team.
Price formation depending on a separate factor
Why the prices of different brigades differ is understandable - the fitness and dexterity of workers has its price. Prices are formed differently in the capital region and on the periphery.
The assignment of the cost of work occurs after a direct study of the place of the forthcoming work, its features. Evaluate the location, how convenient it is to dig a hole, for example, under the cellar.
See how to lay a ditch under the sewer. They decide how to calculate the cost of work more correctly, take into account a running meter or a square meter. Determine the volume of the trench, depth and width, to this add the length of the object and how hard the soil is.
In winter, prices are higher, which is understandable. Frozen ground requires more effort, creating additional conditions for workers, special delivery of people.
Price per meter
Moscow and the Moscow region are distinguished by the highest prices, a cube costs on average from 1000 rubles. Wholesale prices, which come into force with a large amount of work, will reduce the price by about 100 rubles, no more. Winter doubles the price.
The price for a trench, 100 cm deep, for a cable, for example, will be 300 rubles per meter in the Moscow region. In a small regional center, for example, in the Lipetsk region, the same work will cost 140 rubles.
The rocky terrain of difficult terrain has its own increased prices, you can only dig there manually, because the equipment cannot fit there. This circumstance increases the cost of manual labor.
Approximately the same is the cost of manual labor on land works and payment for special equipment. Therefore, whether to hire a team of excavators to dig a foundation pit, whether to rent drilling rigs, excavators for laying water pipes or laying cables, it is necessary to decide according to the situation. And cost is not the main factor here.
Digging a trench by hand - how the price per linear meter is formedIn our time, when mechanization has reached a high level of development, when machines and mechanisms are actively used, the need for manual labor still exists. Earthworks by hand are still in demand, and there are objective reasons for this.
Best Answers
k131_Akela:
Start by finding a thick-walled half-inch pipe, at least 2.5 meters long.To its end, weld a glass from a pipe of at least 2 inches, having previously made a chamfer at the end of the glass. Dig a trench from the well so that the kitchen is right along the trench. Place the bolt made perpendicular to the wall and drive the glass of the device into the ground with a sledgehammer. Pull out and knock out the earth from the glass, insert it into the hole and again make a few blows with a sledgehammer. Take out and knock out the ground. You will get a round pit. The main thing here is to choose the right direction for the kitchen. In the kitchen, you will have to dig a pit where, according to your calculation, the water pipe should go. If everything matches, eventually your homemade jumper will fall into a pit in the kitchen. Drive a 1.5 inch pipe into the hole and insert a three-quarter inch water pipe into it. The task is completed and you can replace the leaky pipe at any time. I'd go with stainless steel though. Good luck. Hunting is worse than captivity.
sakha:
You need to wrap it with glass wool and that's it. If the foundation of the house is brick, then the pipe with cold water will not freeze to -32 degrees, since under the floor of the house at a floor height of 60 cm from the ground the temperature is kept in the range from +3 to +9.
Viktor:
a directed explosion will help you (if ... digging on your knees is not very convenient)
Sergey Ryabykh:
Better a puncture, now there are companies doing this work at any distance with a minimum deviation. Next to us, they made a puncture under the area for a length of about 150m - a super jewelry deviation of 3-5 cm. The cost was about $ 10 per meter.
Skilov:
In general, Akela sensibly told you, we pierced a pipe under an asphalt road when laying a telephone. I also laid a pipe from the well, the depth of the trenches is 1.7 meters, I threw off 10 meters for 5 kg of live weight (useful). The bottom of the trench was covered with sand about 5 cm and laid a plastic corrugation. A half-inch metal-plastic was normally squeezed into it. You can wrap the pipe with a special insulation, it is sold in the form of a foam rubber pipe - an excellent insulation!
How to dig a trench for plumbing or cable laying with your own hands
Very often in the garden or garden there is a need to lay a water pipe or cable.
Digging a trench by hand with a shovel is hard and time consuming, ordering an excavator is expensive and troublesome. We offer readers an original solution to this problem.
DIY trench
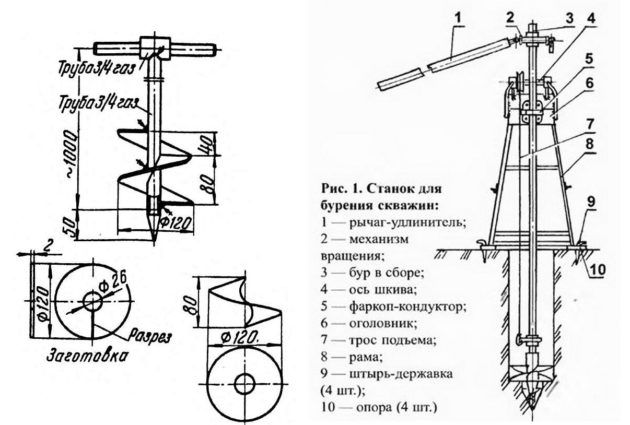
First, we drill wells (diameter 12-15 cm, depth depends on the specific case) at a distance of 3-5 m from each other along the line of the future trench.
When drilling, add water to the well. We lower metal containers into the wells, having longitudinal cuts approximately equal to the width of the trench. The diameter of the tanks is somewhat smaller than the diameter of the wells. Then, with a narrow chopper on a strong and long handle, we rake the earth along the trench line and dump it into containers. We periodically lift the containers up to free them from the soil (Fig. 1).
In sandy soil, work on a trench (excluding time for drilling wells) 5 m long and 10 wide cm at a depth of 60-80 cm takes 30 minutes, drilling a well with a depth of 1.3 m 20-30 minutes.
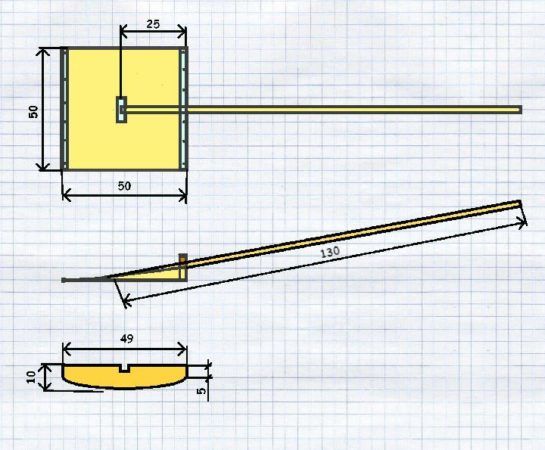
DIY trench tools
We make the tool for this work with our own hands.
First of all, we make a drill.
To do this, we need: a steel pipe 50 cm long and 12-15 cm in diameter, a metal bar 70 cm long and 14 mm in diameter, a 1/2 inch water tee, a steel plate 20 x 20 cm and 3 mm thick (Fig. 2) .
In the steel plate and the tee, we drill holes with a diameter of 16 and 14.5 mm, respectively. We cut the pipe in the lower part at an angle of 50 ° to half the diameter, and in the upper part we make recesses for installing a tee with a bar.
Next, we hammer the steel plate into the slot of the pipe so that the hole of the plate coincides with the axis.
We insert the bar into the hole of the plate, put a tee on it, place the tee itself in the recesses of the pipe. Using welding, we connect the structure into one whole.
After that, we cut off the protruding parts of the plate and the part of the pipe below it. And on the reverse side, we cut out a technological window in the pipe (about three quarters of the length and half the diameter of the pipe) and get the design of the drill.
Then we add a rod to our design, which we screw into the tee. And on the bar we wind a cross with collars. This design allows you to build additional rods.
We make a chopper from a pipe with a diameter of 50 mm, cutting it along the axis. The length of the chopper handle should be more than 2 m.
DIY - How to do it yourselfHow to dig a trench for plumbing or cable laying with your own hands Very often
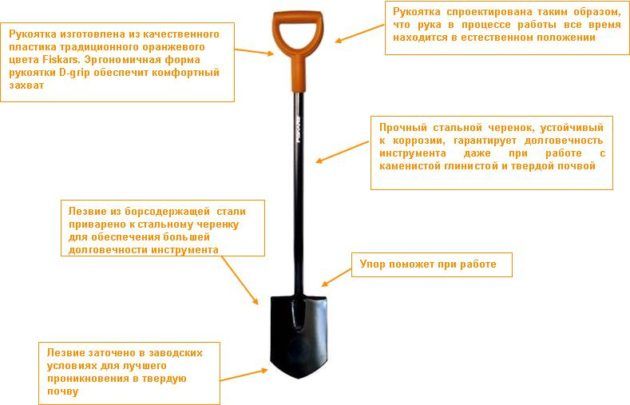
Improvement of a shovel for digging a trench
Digging a trench with a shovel is a rather tedious task, especially if the person doing it is not in good physical shape. You can hire workers, but you have to spend extra money.
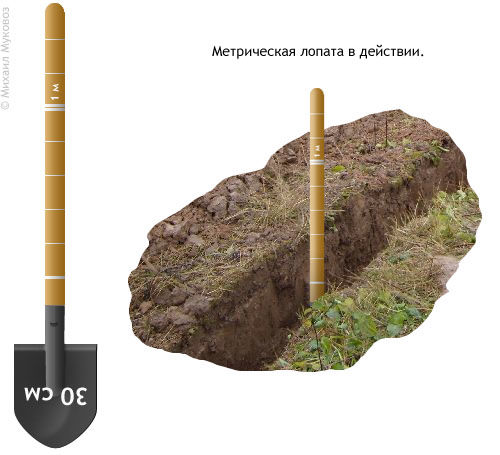 Metric shovel
The pit in which the water supply pipes will run must be at least a meter deep, otherwise they will freeze in winter. The width of the trench can be only 30 centimeters. It is practically impossible to turn around in such a ditch and it is very difficult to dig. And if you make it wider, then the amount of land that needs to be thrown over turns out to be more.
But if you use a special shovel designed for this type of work, you can greatly facilitate your task.
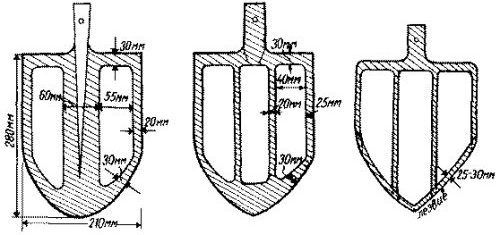
For the manufacture of a special shovel, the bayonet is cut on the sides so that its width is about 8–9 centimeters. With such a tool, digging a trench will become much easier even for a person with poor physical fitness. And if you lengthen the handle up to two meters, then digging can be done without practically bending over.
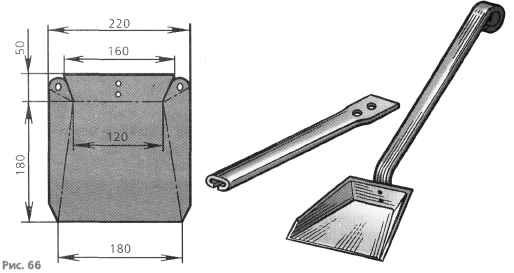
But there is one caveat. Due to the design features of such a shovel, it is very difficult to remove unnecessary earth from the bottom of the ditch. In order not to suffer, you can make yourself another tool, a sweep. To do this, you need an unnecessary bayonet, a welding machine and a grinder. The job will take about half an hour. The final result should resemble the shape of an excavator bucket.
Using such tools, you can greatly facilitate your work on digging a trench and reduce the amount of land that needs to be thrown over by at least half.
Related video: How to choose a shovel
A selection of questions
- Mikhail, Lipetsk — What discs for metal cutting should be used?
- Ivan, Moscow — What is the GOST of metal-rolled sheet steel?
- Maksim, Tver — What are the best racks for storing rolled metal products?
- Vladimir, Novosibirsk — What does ultrasonic processing of metals mean without the use of abrasive substances?
- Valery, Moscow — How to forge a knife from a bearing with your own hands?
- Stanislav, Voronezh — What equipment is used for the production of galvanized steel air ducts?