Work with pipelines of various types
Wiring diagram water heater to the water supply in the apartment and the choice of tools and materials also depends on the type of pipeline available.
Polypropylene pipelines
To work with polypropylene pipes, you will need a pipe cutter and a special soldering device. In this case, the tees are selected from a similar material, and MPH couplings are used to connect them to the taps.
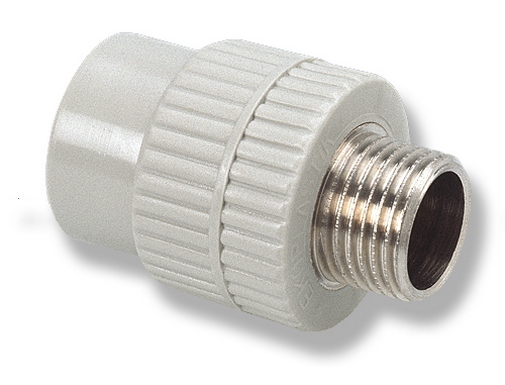 Polypropylene sleeve with metal thread
The process itself is not difficult if the pipes are open; with hidden communications, the process is complicated by the need to open the upper layer above the pipes. Only after that it will be possible to crash into the water supply.
 Installing a storage water heater with your own hands using polypropylene pipes
Metal-plastic pipelines
Metal-plastic pipes are usually laid on the surface, so the likelihood of complications is excluded. Installation is carried out using fittings, while their choice is large enough, so any water heater installation scheme can be implemented without additional problems.
The tie-in is carried out using tees, to which, depending on the location of communications and the location of the heater, additional pipes are connected or directly flexible hoses for input.
 The photo shows a variant of how you can install a water heater with your own hands using metal-plastic pipes and compression fittings
Steel pipelines
The original “vampire” tee will allow you to do without welding work when working with a steel pipeline. Structurally, it is a clamp with a branch, which is put on the pipe (of course, the water supply should be turned off before installation) and fixed with clamping screws. A rubber gasket is used for tight fit.
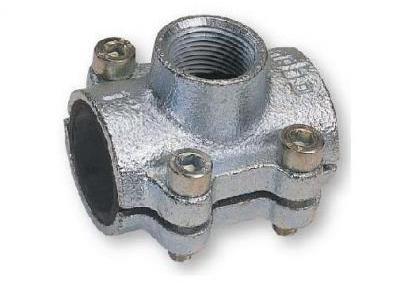 Using a repair tee clip is a fairly simple installation method, but not the most reliable
After installing the clamp with a branch through the latter, a hole is drilled in the main pipeline. To perform such work, the use of a protective sleeve is required. It will prevent damage to the internal thread when drilling. A tap is installed on the tap thread and then a supply hose to the boiler.
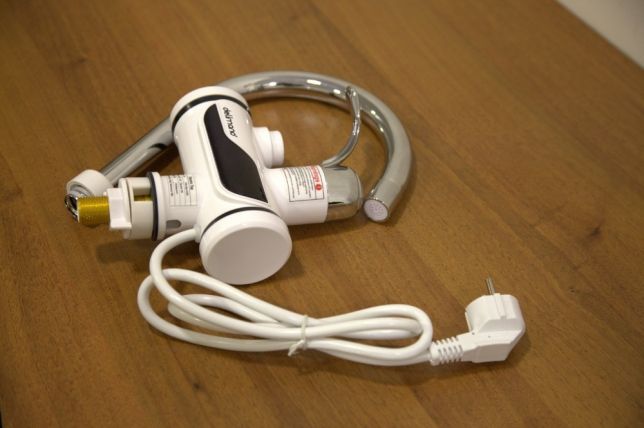
What is an instantaneous electric water heater?
An instantaneous water heater is a compact device that allows you to heat water immediately before it enters the faucet, without accumulation in the tank. The most popular heaters powered by electricity due to the ease of installation and control.
This device has its own features of operation, which you should pay attention to before buying. The main disadvantage of the device is the ultra-high energy consumption for heating water, and even the most modern models do not reduce this figure.
- A flow heater is usually installed in the following cases:
- when hot water is needed all the time, for example, in catering establishments in places for visitors, shopping centers;
- if there is no time to wait for heating, for example, in a country house or in the country;
- in cases of extremely cheap or even free electricity;
- in conditions of lack of space for a full-fledged storage heater.
It is worth remembering that, despite the durable materials and ease of operation, a flow-through water heater will in any case last less than a unit with a tank, and there is no question of saving at all.
How it works
The flow model differs from the storage boiler in that there is no tank for accumulating hot water in the design.Cold water is directly supplied to the heating elements and comes out already heated through a mixer or faucet.
Consider the example of a Termex instantaneous water heater device:
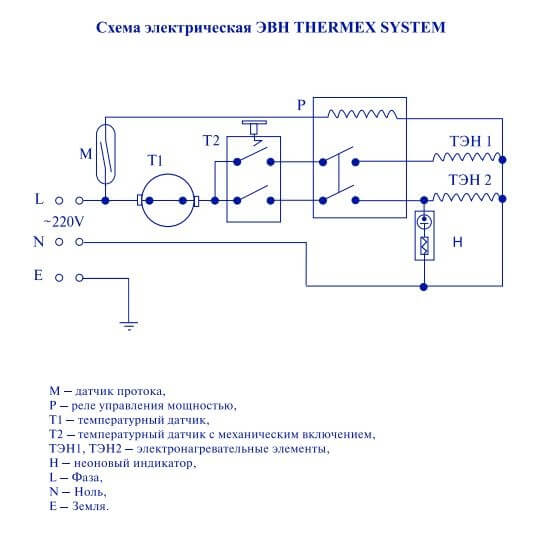

As you can see, the electrical circuit of the heater is quite simple. All structural elements can be easily found and purchased if the device fails.
Now let's move on to the second, no less important issue - consider how a tankless water heater works.
Operating principle
So, using the example of the Termex heater provided above, we will consider its principle of operation.
Connection to the mains is carried out with a three-core cable, where L is a phase, N is zero, and PE or E is ground. Further, power is supplied to the flow sensor, which is triggered and closes the contacts if the water pressure is sufficient for operation. If there is no water or the pressure is very weak, the heating will not turn on, for safety reasons.
In turn, when the flow sensor is triggered, the power control relay is turned on, which is responsible for turning on the heating elements. Temperature sensors, which are located further in the electrical circuit, are designed to turn off the heating elements in case of overheating.
In this case, the temperature sensor T2 is turned on after the heating elements have cooled down in manual mode. Well, the last element of the design is a neon indicator that displays the process of heating water.
That's the whole principle of operation of a flowing electric water heater. If suddenly the device fails, use this diagram to find the faulty element.
In other models, there may be a modified scheme of operation, for example, there will be a thermostat, as in the image below.
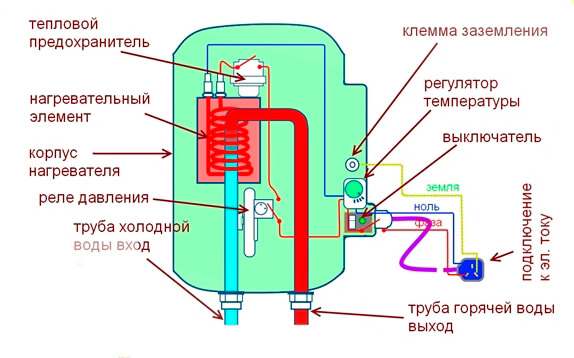
When cold water is supplied, this membrane is displaced, thereby pushing the activation lever through a special rod. If the pressure is weak, the displacement will not occur and the heating will not turn on.
How to install a flow water heater
The process of installing a instantaneous water heater with your own hands includes a preparatory period
First of all, it is important to correctly determine the model. To choose the device that is optimally suited for its characteristics, the following factors are taken into account:
- the number of people living in the house;
- maximum hot water consumption with all taps open at the same time;
- number of water points;
- desired water temperature at the outlet of the tap.
Having a clear idea of the requirements, you can proceed to the selection of a flow heater of suitable power
Separately, it is worth paying attention to other nuances: the complexity of installation, price, maintainability and the availability of spare parts for sale.
Organization of power supply
The power of household instantaneous heaters varies from 3 to 27 kW. The old electrical wiring will not withstand such a load. If a non-pressure device rated at 3 kW can still be connected to an existing electrical network, then powerful pressure models require a separate line.
A powerful water heater cannot be connected to a power outlet. From the device lay a straight line to the electrical panel. The circuit includes an RCD. The circuit breaker is selected according to the power of the flowing electrical appliance. According to the standard, the indicator is 50–60 A, but you need to look at the instructions for the device.
The cable cross section is selected in the same way, taking into account the power of the heater, but not less than 2.5 mm 2. It is better to take a copper wire and be sure to have a three-core one. The instantaneous water heater cannot be used without grounding.
Selecting an installation site
The choice of the location of the water heater is determined by the convenience and safety of using the device:
When installing a water heater in an apartment, it is important to choose a place so that there is a free approach to the device. There are control buttons on the body.
All family members will set the optimum water temperature according to their preference.
The installation of the electrical appliance is carried out so that during the use of a shower or sink, splashes of water do not fall on its body.
The device is placed as close as possible to the water points and the electrical panel, taking into account the convenient connection to the water supply.
The choice of installation location depends on the type of flow device:
- Non-pressure low-power models are designed to connect one draw-off point. The water heater is often made in the form of a faucet mounted on the sink. Non-pressure models are mounted under the sink or on the side of the sink. The device can be equipped with a hose with a shower head. It will be optimal to install a flowing water heater in the bathroom near the shower. If the question arises, how to connect a non-pressure instantaneous water heater, there is only one answer - as close as possible to the mixer.
- Powerful pressure models are able to provide hot water for more than two water points. It is allowed to install an electrical appliance near the cold water riser. With this scheme, hot water will flow to all the taps of the apartment.
The presence of IP 24 and IP 25 markings on the water heater means protection against direct water jets. However, it's not worth the risk. It is best to place the appliance in a safe, dry place.
Wall mounting
The instantaneous water heater is installed on the wall by hanging. Included with the product are dowels with self-tapping screws, mounting plate, brackets. When installing an electric flow-type water heater, two important nuances are taken into account:
- Support strength. A wall made of solid materials is perfect. The device is characterized by light weight. It can be fixed even on a plasterboard wall. The main thing is that the wall does not stagger, and a mortgage was provided under the plasterboard for reliable fixation of the brackets.
- During installation, the ideal horizontal position of the body of the flow device is observed. At the slightest inclination, an air lock is formed inside the water heater chamber. A heating element not washed by water in this area will quickly burn out.
Installation work begins with the markup. The mounting plate is applied to the wall and the places for drilling holes are marked with a pencil.
It is important at this stage to set the horizontal level. Holes are drilled according to the markings, plastic dowels are driven in with a hammer, after which the mounting plate is screwed with self-tapping screws
The supporting base is ready. Now it remains to fix the body of the water heater to the bar.
Common installation errors
Any person without plumbing skills and experience with electricity can install a flowing electric water heater.
In order for the device to work properly, it is important to take into account a number of common installation errors:
- if you do not want to lay a separate line, the general electrical wiring is overloaded, which leads to its burnout;
- connecting to the water supply with low-quality pipes with a narrowed section threatens to flood the apartment and the heater fails;
- if the power of the electrical appliance is not selected correctly, cold water flows from the tap or there is an overexpenditure of electricity;
- wires entangled at the terminals form a short circuit;
- if the water heater is installed far from the draw-off point, it is necessary to drain a lot of cold water until the liquid of the desired temperature appears.
Installation errors are thought out even before the selection of the model, as well as the location of the water heater.
A flowing water heater takes up little space in the apartment. The appliance is convenient for use as an auxiliary source of hot water supply when the centralized hot water supply is turned off.
When the central water supply is turned off, the output will be the purchase of a water heater. The industry produces different types of these devices. Compactness attract flow.
Installing an instantaneous water heater in an apartment or a country house is not difficult and can be done independently.How to properly connect an instantaneous water heater? This is a powerful home appliance that may require a dedicated line.
Installation of storage heater
For those who are interested in how to install an electric storage water heater, it is important to know that a safety check valve is required when installing such equipment. It will ensure the correct operation of the unit, reduce the likelihood of emergency situations.
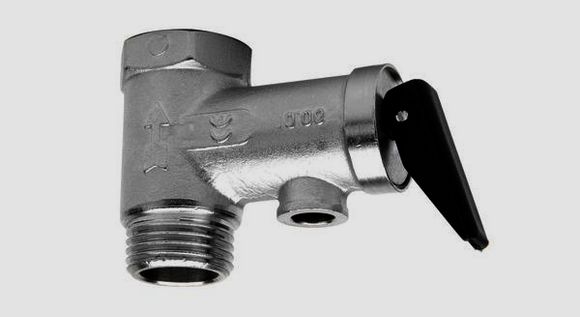 The safety check valve for the water heater prevents water from flowing out of the heater, and also, when the maximum pressure in the tank is exceeded, discharges excess liquid into the sewer through the drainage outlet
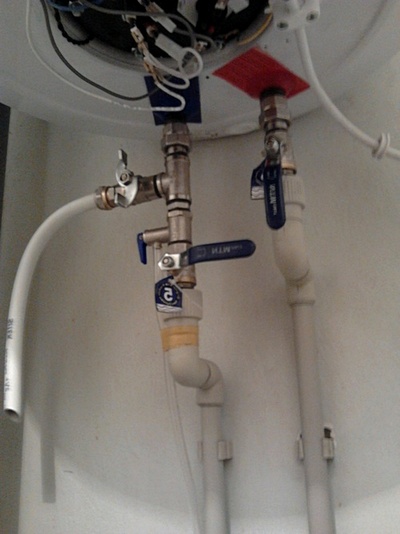
The water inlet of the water heater is marked in blue to avoid connection errors. During installation, a safety valve is installed on it in compliance with the tightness requirements (FUM tape, linen tow, etc. are used). To further connect the water heater to the water supply, use a flexible hose or hose in combination with pipes (steel, polypropylene or metal-plastic structures are selected according to the type of pipeline available. The so-called safety group (check safety valve) should work flawlessly, so if you use an inexpensive installation kit , it's better to purchase this item separately, choosing high quality.
With self-assembly, the sequence of installed elements in the direction from the inlet pipe of the water heater will be as follows:
- tee,
- ball valve, which is used to drain water and is connected to the side outlet of the tee,
- safety valve with drain outlet,
- shut-off valve for shutting down the system,
- pipeline.
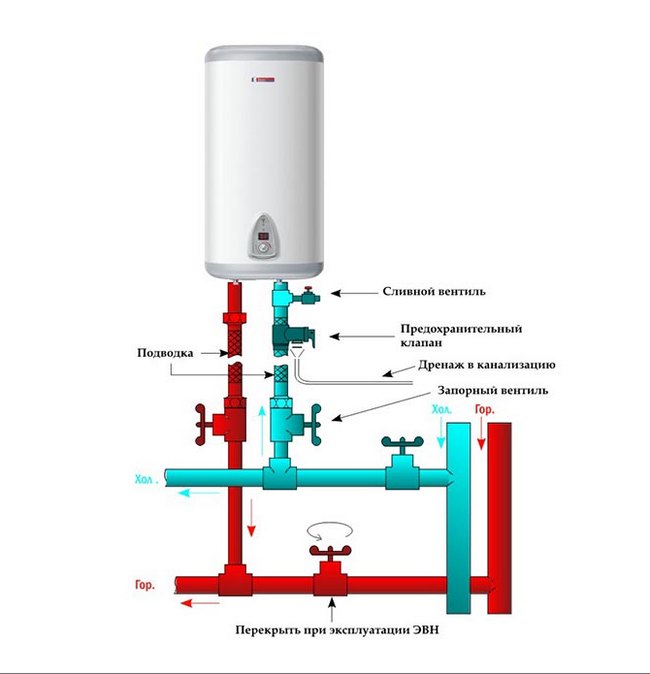 The diagram shows how to properly install a storage water heater.
This is a basic list of elements for installing a water heater in an apartment or a private house, which, if necessary, can be supplemented:
- a reducer (a device that lowers the inlet pressure to the nominal value for a water heater),
- filter (if the water in the pipeline does not meet the requirements, for example, in the presence of a large amount of insoluble impurities and salts that form deposits on the surface of the tank and on the heating element).
After performing these operations, it remains to connect a hot line to the boiler. To do this, a shut-off valve is mounted on the corresponding branch pipe of the water heater so that it can be turned off. The shut-off valve is connected to a flexible hose to drain the heated liquid.
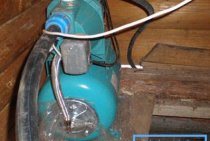
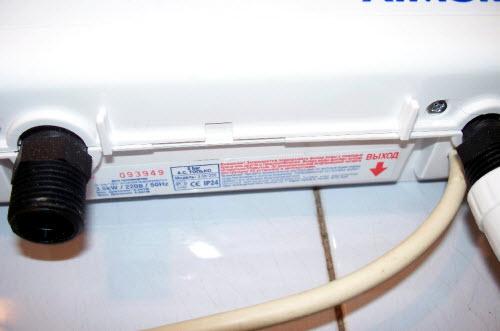
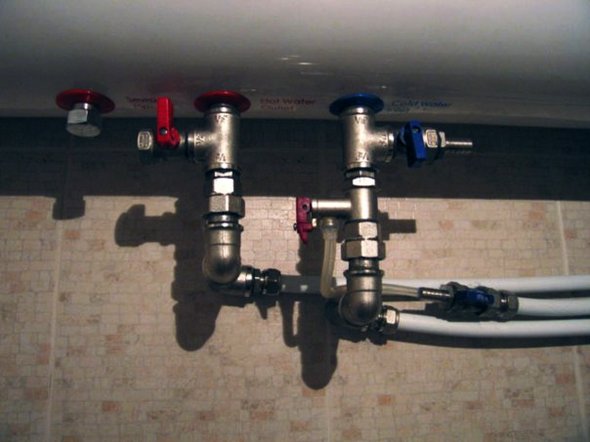 Boiler ready to go
Water connection
Connecting an instantaneous water heater to the water supply is carried out in different ways. The choice depends on the experience of the person performing this work and the time available to complete the operation.
The first method is more simple. Do-it-yourself installation will be possible even for beginners.
- Remove the shower head from the shower hose.
- Connect the hose to the cold water inlet located on the water heater.
- Set the faucet handle to the “Shower” position and make sure that warm water has flowed.
- To control, set the mixer knob to the "Faucet" position and make sure that cold water comes from the tap. This means that it does not pass through the heater. When restoring hot water in a centralized manner, the device is disconnected from the “Shower” and their own watering can is attached to it.
The second way is correct, but more complicated. But it also allows you to install a flowing water heater on your own. When deciding to heat water for several points of analysis, it is advisable to use the method of cutting into a water pipe. You can make a convenient wiring.
When choosing this option, you must follow the rules:
- make a tie-in closer to the points of analysis;
- install the valve near the tie-in;
- provide access to the valve so that it can be quickly closed;
- for safety, install additional valves - one for each pipe.
Additional valves are used to quickly close them in case of non-standard situations. However, they should not interfere.
The connection diagram of the device indicates that there are two valves at the bottom left. One serves to shut off all cold water, and the second only for the pipe that is directed to the device.
In the event of its failure or pipe breakage, it is possible to quickly close the pipes. But in this case, there is no risk that the shower and taps will be without cold water.
Cutting a tee into a water pipe depends on the material of the water pipes:
- Steel. Cut out a piece of pipe that matches the size of the tee. Cut threads at the ends. Outside, seal with FUM tape. Install a tee.
- Copper. Cut a piece of pipe to the desired length. Put clamping nuts on the ends of the pipes. Expand tubes. Install the tee and secure with nuts.
- Polypropylene. Cut a section of the pipe so that the remaining ends can fit into the tee. Solder the installed tee. To connect, you need a hose that can be bought at the store. Its length should be chosen with a margin.
The hose should be connected to a tee or valve. Tighten the clamping nut located at the end of the hose to the end. Finally squeeze it with the key. Screw the other end of the hose into the device and also clamp it with a wrench.
Before you start connecting the instantaneous water heater to the water supply, you should check whether filters are installed at the entrance to the apartment. This prevents the device from failing due to poor water quality.
Connection
Requirements for installing any water heater:
- The equipment is located closer to the input of the water supply, ideally between the input and the water intake point.
- Increased power consumption does not allow connection to a regular outlet. It is necessary to lay a separate line from the switchboard.
- To protect equipment that operates in conditions of high humidity, it is imperative to install an RCD (residual current device) that protects against electric shock, and an automatic device for protection against overvoltage and short circuit.
- The water heater is a source of heat, so when installing it, a distance must be observed on all sides from obstacles and other equipment, excluding overheating.
If there is a centralized hot water supply system, the water heater is installed as a jumper between hot and cold water pipes. The system of non-return valves and shut-off valves determines the flow of water only from cold water to the tank and from its hot outlet towards the consumer.
If there is no hot water inlet, then the water heater is installed on a branch from cold water and forms an internal wiring in the apartment from its outlet.
Any electric water heater is sensitive to water purity, so coarse and fine filters in front of it are a must.
Connection of cold water from the input after the meter and the fine filter to the cold (blue) input of the heater:
- Ball valve.
- Safety valve for water heater.
- A tee with a connected drain valve for water discharge.
- Fitting for connection to the cold input of the heater.
A hose with a diameter of 8-10 mm is led from the pressure relief valve of the safety valve to the sewer pipe. To do this, provide a special "dry" siphon or outlet from the pipe with a rise of at least 50 cm and a plug in which a hole for the hose is drilled.
Connecting hot water from the hot (red) output of the heater to the mixers:
- Fitting for connection to the water heater.
- Ball valve.
- Tee for connection to the DHW line
- Non-return valve, on the input side, preventing water from the boiler from entering the central DHW system.
For polypropylene pipes you will need: a soldering iron, a pipe cutter, a set of fittings, including tees, elbows and adapters from plastic to metal with an external thread, an American. For cold water, an unreinforced pipe PN16 (20) is used, for hot water - reinforced with fiberglass or aluminum PN20 (25).
For metal plastics, only a pipe cutter and a calibrator are needed from the tool when using clamp fittings. A set of fittings is selected with the same composition as in the first case (tees, elbows and adapters from plastic to metal).
Power connection
To connect the power, in most cases, a terminal block is used, located under a protective cover on the water heater body. Where exactly it is located and how to get to it, you should specify in the instructions. Only low-power heaters of 1.5-2 kW are supplied with a power cord with a plug for connecting to an outlet. However, in this case, it is also desirable to get by with a direct connection to a separate line, for which an automatic machine and an RCD are allocated in the shield.
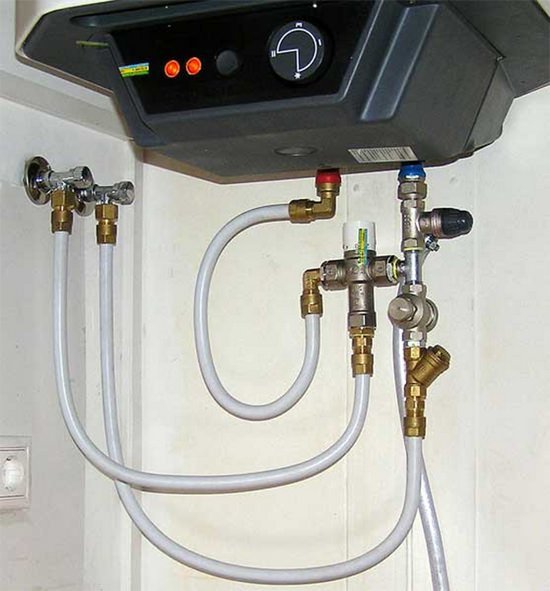
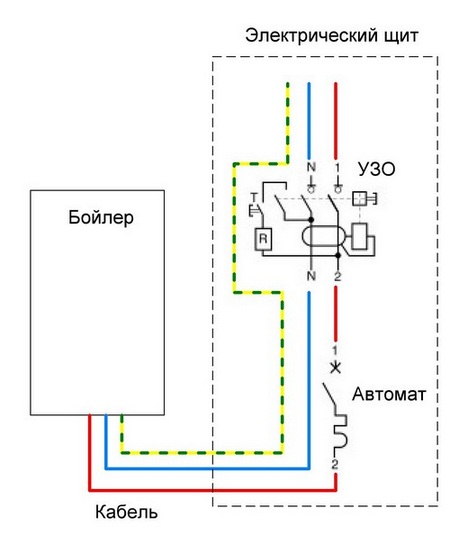 Scheme of connecting the water heater to electricity
The connection is made with a three-core copper cable with a cross section of at least 2.5 mm2, unless otherwise specified in the instructions. The higher the consumption, the thicker the cable should be. The table shows the requirements for the cable, based on power and current.
| Aluminum | Wire section, mm2 | Copper | ||
| Current strength, A | power, kWt | Current strength, A | power, kWt | |
| 14 | — | 1,0 | 14 | 3,0 |
| 15 | — | 1,5 | 15 | 3,3 |
| 19 | 3 | 2 | 19 | 4,1 |
| 21 | 3,5 | 2,5 | 21 | 4,6 |
| 27 | 4,6 | 4,0 | 27 | 5,9 |
| 34 | 5,7 | 6,0 | 34 | 7,4 |
| 50 | 8,3 | 10 | 50 | 11 |
There should no longer be equipment on the line for the water heater, as well as on the machine with RCD. It is allowed to install protection and the machine directly near the water heater, however, they should be mounted in special moisture-proof boxes
Water supply
After the issue with the electrician is resolved, it is time to bring cold water to the device.
Water heaters are supplied with three fittings:
- Cold water connection.
- Hot water supply.
- Discharge of water.
From the first two, the protective caps are removed and the rubber plugs are removed. The thread is sealed with flax and grease is applied. Then a safety valve is installed on the cold water fitting, which comes with the device. On it, as a rule, the direction of movement of water is indicated. The drawn arrow should point towards the body. If there is no marking, then install the valve so that its nose looks down.
Sooner or later, a situation may arise in which it is necessary to cut off the water supply circuit from the water heater. To do this, it is desirable to install a shut-off valve. The thread is sealed with fum tape or linen. Next comes lubrication. It remains to tighten the thread with the keys.
Connection to the mixer system is made with a flexible hose included in the kit. We collect tees and taps, connect them to the system.
Next, the device is connected to the supply pipe and hot water is distributed.
The device is now ready for use. It remains only to check the tightness of the joints. Facilitates the task of an ordinary paper napkin or toilet paper. If moisture is detected on the impromptu “tester”, then the connection is tightened and checked again until the test shows “dry”.
When the water heater is installed in the bathroom, you can connect the shower directly to the unit. To do this, use the shower head that comes with the device. The fact is that the holes in it are smaller in diameter than in a standard shower head. When installing a conventional shower, the water will pass through the heater at a higher speed and will not be able to warm up well.
When using a water heater, remember that it cannot be used without water. This will lead to overheating of the heating elements and their failure. Therefore, when the device is turned off, the electricity is first turned off, and then the water supply.If the heating element is constantly washed with water, it will serve faithfully for a long time.
And if there is a filter at the inlet that prevents the precipitation of hard salts, then it will be generally good. The heating elements will not so quickly become overgrown with a "fur coat" that interferes with proper heat transfer.
Installing a storage water heater
Location selection
Since installing a storage water heater is a more complex and time-consuming process, let's start with it.
Before buying a water heater, it is necessary to determine the place of its future location and make the necessary measurements.
Please note that the water heater cannot be placed in a closed, hard-to-reach place, since it must be freely accessible for maintenance and possible repairs. Storage water heaters can only be mounted on load-bearing walls.
Mounting wall mounts
Installation of a storage water heater begins with the installation of wall mounts. Most models are mounted on 2 (models up to 200 liters) or 4 (more than 200 liters) hooks. As hooks, it is best to use anchor bolts with a special tip. Such bolts are easy to install and at the same time provide reliable fastening of the water heater.
Water connection
Before connecting the heater, the water must be turned off. You also need to release the residual pressure in the pipes by opening the hot (if any) and cold water taps.
If you are not satisfied with the purity of the water in your home, then a cleaning filter can be installed on the cold water supply pipe after the valves. It would also be useful to install a pressure reducer, which will protect the device from possible pressure drops in the network.
Next, tees are installed on the pipes, from which a connection will be made directly to the water heater and hot water consumption points.
It is best to connect the heater to the water supply using plastic pipes or special flexible hoses. If you did not install shut-off valves immediately after the water riser, we recommend installing it directly in front of the water heater. But it is necessary to put a safety valve for discharging water at elevated pressure inside the device. It is installed on the cold water inlet line to the water heater (on most devices, the corresponding pipe is marked in blue).
All joints must be wrapped with tow or fum-tape.
When the water is connected, it is necessary to check the system for leaks. To do this, open the shut-off valves on the cold water supply pipe to the heater and the hot water tap above the washbasin or sink. When water runs out of the tap under normal pressure, this will mean that the water heater is full, it should be closed and all connections should be carefully checked for leaks. If it is found, sealant treatment is necessary, or everything should be reassembled by wrapping it with an additional layer of fum-tape.
Electrical connection
Since the water heater is a fairly powerful device, it cannot simply be plugged into the first available outlet.
First, the water heater must be grounded. Secondly, it is necessary to check the section of the electrical cable that fits the outlet chosen to turn on the device, and make sure that it meets the minimum allowable requirements for your water heater. You will find information about this in the instructions. Even if the cable section exceeds the minimum allowable, we strongly do not recommend plugging additional devices into the heater socket at the time of its use.
And in conclusion, an important tip: you should never turn on the water heater when the tank is not filled with water!
Common mistakes
It is actually very easy to connect a flowing water heater to various communication systems, however, if you do not understand this issue in advance, and also do not have work experience, then there is a high probability of making several serious mistakes. They negatively affect the performance and service life of all equipment.
The most common mistakes are:
- such powerful equipment is connected to the existing electrical system without isolating a separate line, which leads to a reboot of the system, since it cannot cope with such a load, therefore it often knocks out traffic jams, and there is also instability in the operation of various electrical devices;
- the appliance is switched on before it is connected to the water supply system, which may lead to a malfunction of its operation;
- unsuitable pipes or other elements are used to connect it to the water supply;
- pipes are laid in a convenient way, but it is not taken into account that they significantly spoil the appearance of any room, therefore, after installing the heater, the interior of the room may deteriorate;
- the power of the device is incorrectly calculated, therefore cold or hot water flows from the tap, which leads to a lack of comfort in its constant use for its intended purpose;
- the electrical wires were connected incorrectly, so there are short circuits or other problems in the equipment's performance;
- the location of the water heater is illiterately chosen, therefore, difficulties and inconveniences arise in the process of its use, associated with the lack of the possibility for free regulation of its functions.
Thus, each person who independently installed the instantaneous water heater on his own faced certain difficulties, therefore, in order to prevent possible errors, it is recommended that you first carefully study the correct instructions. As a result, a competent installation of the device is ensured, which guarantees a constant supply of warm water to residential real estate. This significantly increases the comfort of living in any apartment or house in which there is no connection to the central hot water supply. It is not uncommon to install an instantaneous water heater as an auxiliary source of hot water in case there are problems in the central system.
Installation of instantaneous electric water heater
The whole process can be divided into three stages:
- We hang the water heater on the wall.
- Supply cold water to the device.
- We connect the device to the mains.
What we need:
- Drill and drill for concrete.
- Dowels and anchors.
- Hammer with a screwdriver.
- Copper three-core wire with double insulation. The cross section is 2.5 squares.
- Gas and open-end wrench (22).
- Euro socket. Choose with grounding (make sure that it is connected to the point in advance).
- Pliers.
- fum tape.
- Pipe. In this case, metal-plastic.
- Tee, valve and faucet.
Typically, water heaters are placed in the kitchen or bathroom. In the first case, it is often convenient to install the device in the lower corner cabinet. At the same time, it is desirable to fix the device not to the cabinet wall, but to the wall itself through the MDF.
Water heaters do not like when they are placed in an inclined position or on an edge. Such experiments lead to the fact that the water entering the device does not completely cover the heating elements, as a result of which they quickly burn out.
Before proceeding with the installation, it is necessary to mark the place of fastening and drill holes for the anchor with a drill. Assemble the fasteners and fix it with dowels and anchors. Now you can hang the water heater in place.