Application of resin options for making designer
As we said above, 2 types of glue are used for furniture production - light-transmitting and matte, and any of them can be colored. Now we will consider two options in more detail. For a variety of combinations with wood or other inclusions, it is most optimal to use translucent mixtures, especially those used for optical castings. In this case, even through a thick adhesive layer, any part of the inclusion will be clearly visible, it will be wood trimming fibers or metal elements (for example, old badges or gears). When a specialized dye is added, the transparency decreases somewhat, but not completely, but the fill gets a rich color.
You can make fun interior items from colored epoxy
If you expect to get a well-colored mixture, add the color of the same manufacturer that made the adhesive mass.
Multi-colored mixtures are somewhat cloudy from the very beginning, they can be called rather translucent, and they are unsuitable as the main fill covering the wood. The reason is very simple - any inclusions simply will not be visible. But there is an opportunity to do the opposite and fill with such an epoxy grout a variety of voids in the cut of wood, voids from knots, the passages of woodworms that have opened on the cut. A luminescent dye that is consistent with the glue will look very nice. Then the slightest illumination will be enough for the furniture panel or countertop to begin to glow itself.
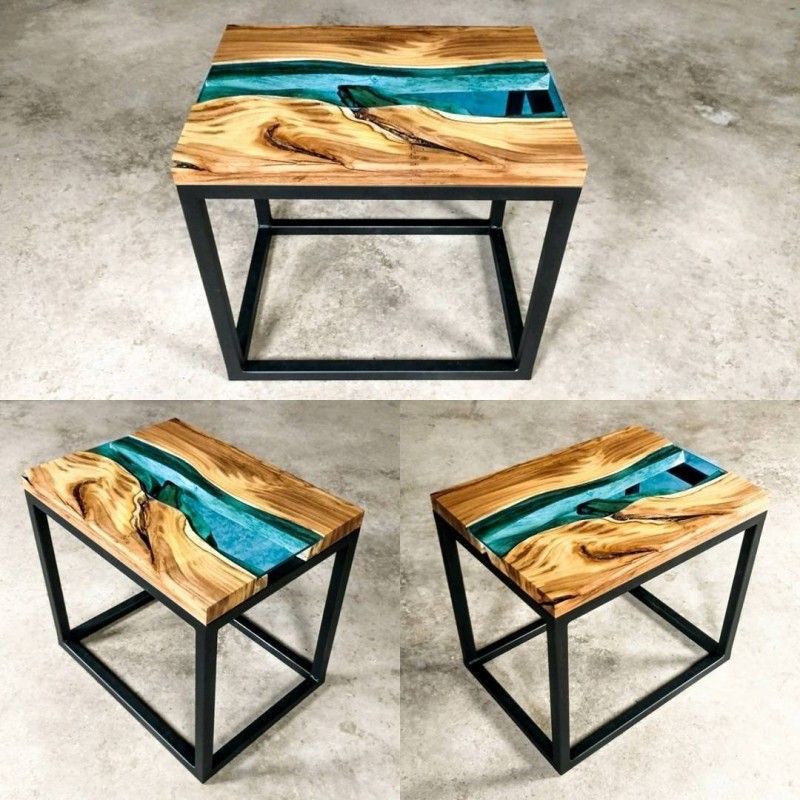
Such a combination, like epoxy and wood, proved to be excellent for the primitive reason that a perfectly flat surface is obtained, and at the same time the filling consumption is relatively small. The key volume is occupied by wood, which on each side will be covered with a thin layer of polymer resin. But you must be prepared for the fact that the expense will still be noticeable. It is very easy to calculate that 100 grams of glue will go to 10 square centimeters of filling with a thickness of 1 centimeter. Based on this, 10 liters of composition will be required per 1 square meter, and 20 liters per 1x2 meter countertop. And this is exclusively for the front layer, but if you make the epoxy layer thicker in order to load wood trimmings or a board shield into it, then you will need at least several times more mixture.
There are very, very many subtleties of using glue. In particular, an interesting effect can be achieved by adding a little water to the composition. Milky white stains appear here, similar to a nebula. In other words, small drops of water can create beautiful inclusions in the painted epoxy. You can perform a multi-color coating, portionwise filling portions painted with various colors or zoning them with small thin plastic barriers. However, such fills must be quite thin, no more than 0.5 centimeters, and on top you will need another 1, light-transmitting layer. You can color the composition with ordinary dry gouache, as well as writing ink (including paste from ballpoint pen refills), oil and nitro paints.
Manufacturing technology
To get a quality product, it is important not only to dilute the mixture correctly, but also to follow the instructions on how to properly make a table from epoxy. First, the surface to be treated is thoroughly cleaned of dust and dirt.
The wooden surface is primed. Ignoring this requirement leads to the fact that when the mixture is absorbed by the porous structure of the wood, bubbles form. They will spoil the look of the table.
After that, you can prepare a mixture of resin and hardener in the required proportions.Dyes and decorative components are added to the prepared solution. Then the wooden base is covered with the mixture.
Decorating the table with decorative elements must be thought out in advance. All required details are laid out on the surface of the wood before pouring the epoxy. Light parts, such as shells, should be pre-planted with glue, which will prevent them from rising to the surface of the mixture. The resulting bubbles are removed with a stream of air from a building hair dryer.
The first setting will begin in a quarter of an hour. However, this is not enough to start grinding. Sanding should only be done after complete drying. The product is aged for 7-10 days, after which it can be used.
It is important not to forget to coat the surface with a varnish with protective properties after completion of grinding work. And it is desirable to do this in several layers.
So you prevent even the smallest release of toxic components.
Advantages and disadvantages of epoxy resin as a material for furniture
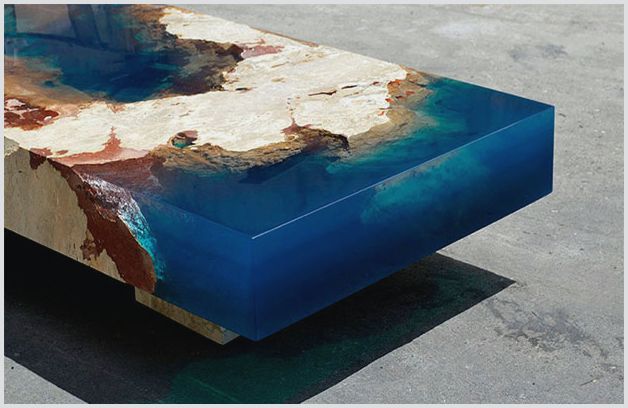
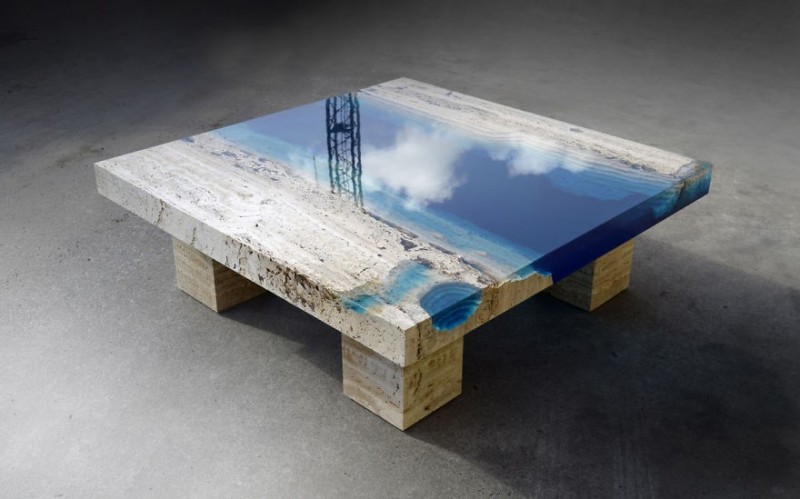
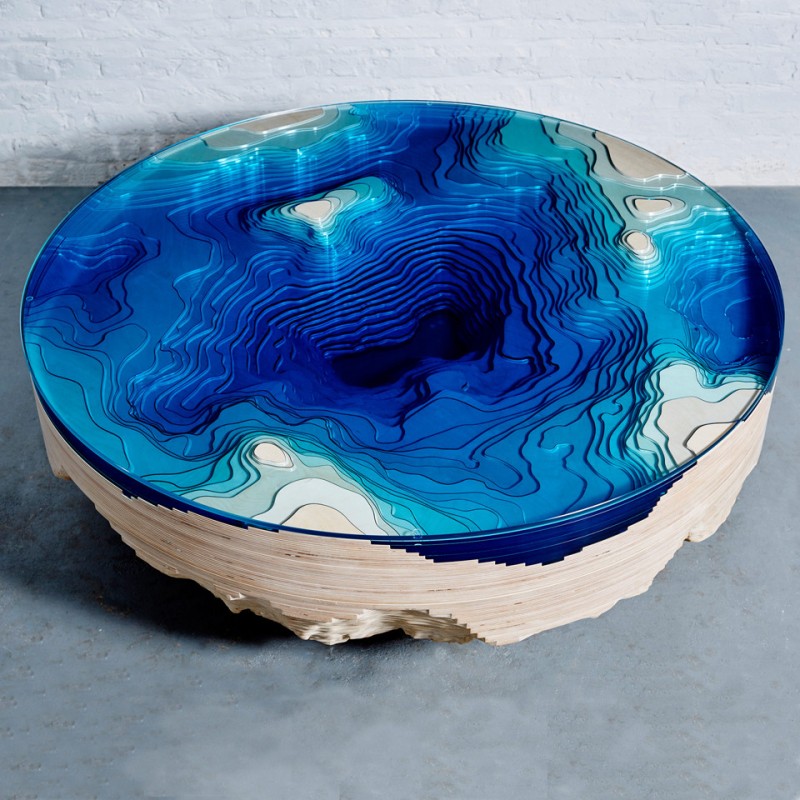
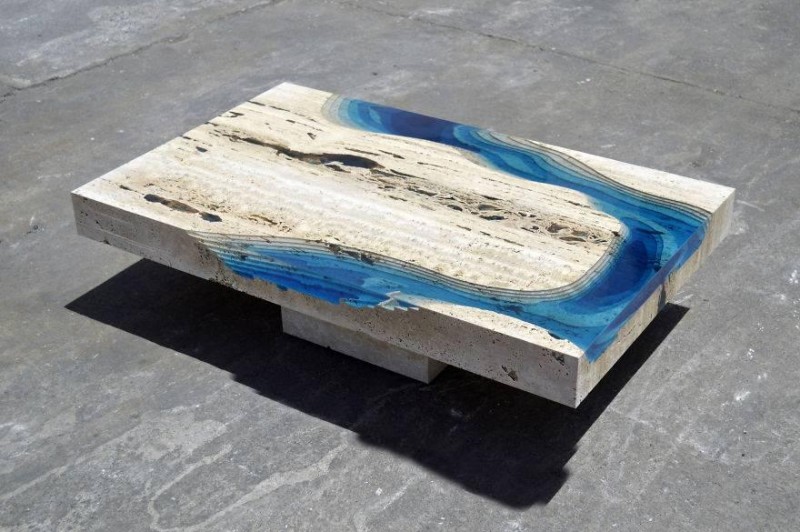
Until recently, this two-component adhesive was widely used mainly for high-quality bonding of different materials, after which it began to be used as an ingredient for self-leveling floors. At the same time, these properties were noted, such as low abrasion of the surface, high strength, and durability. Further, some translucent stamps began to be used for very interesting dioramas, where epoxy-based resin with dyes imitated water. Moreover, the creators made entire tables depicting different landscapes. Perhaps it was these experiments that served as an impetus for the creation of artistic furniture made of wood and epoxy glue.
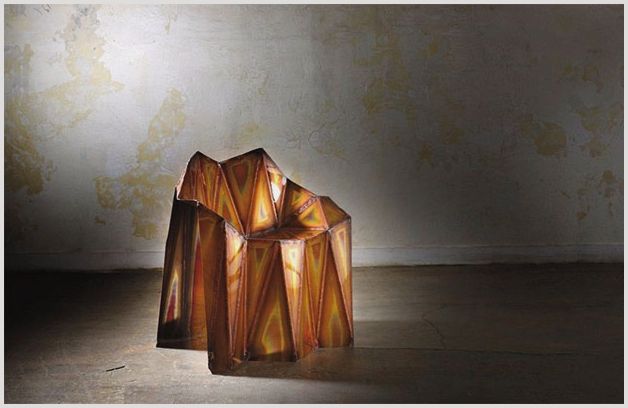
Epoxy resin can be molded into different shapes
The main thing that can be emphasized as a positive quality of the polymer resin mentioned above is the ability to give it a different shape due to fluidity in the liquid state and plasticity at the solidification step. Moreover, the hardened glue is very easy to get off, in particular: it is ground and polished, if necessary, it can be drilled, grooved in it. There are both completely translucent after the stamps harden, and having a red, brown, yellowish or whitish color to the full depth. At the same time, in a liquid consistency, it is allowed to add various elements that improve or simply change the properties of the composition. The main good property of the adhesive is the absence of shrinkage due to the fact that the composition hardens only due to chemical reaction, and, as a rule, a flat surface surface is preserved.
Now let's talk about the cons. The fact that the cured epoxy resin is easy to finish is sometimes also a disadvantage, because the surface is easily scratched. Otherwise, the wear resistance of this material is quite large. Another factor that hinders the widespread use of glue for furniture production is its price, which is very impressive and provides an excellent opportunity to create only single pieces of art. Especially expensive are brands that stand out after it hardens with complete transparency. And, of course, it is necessary to remember the toxicity of polymer resin fumes, work with which must be carried out in well-ventilated rooms and, first of all, in a respirator.
Designer bracelet
Amazing accessories with any filling are cast from epoxy resin. We offer an interesting lesson on creating an original bracelet.
 Bracelet with flowers
 Bracelet with weed and red berries
 Bracelet with delicate flowers
Useful for work:
- special mold for the bracelet;
- two-component resin with hardener;
- plastic container for mixing the mass;
- wooden stick;
- dry leaves or flowers.
Of the tools, simple toothpicks and scissors, as well as sandpaper for grouting, will come in handy.
DIY epoxy resin and wood bracelet
Let's get to work:
- Wash and dry form. We knead the epoxy "dough" in the proportion indicated by the manufacturer. Stir the mass until the bubbles come to the surface.
- Let's prepare a decorative filler. We cut the leaves so that they do not look out of the mold.
- When the resin has thickened and settled, carefully pour it into the mold.
Filling must be done slowly, in a thin stream. The more accurately the substance is poured into the mold, the less polishing is required for the product.
- Immediately lay the leaves in the resin in a circle, straightening them with a toothpick. In order for all air bubbles to come out of the resin, you can put the mold in the oven for 10 minutes, heated to 80 degrees, and then turned off.
- After heating, we take out the workpiece, leave to harden.
When the decoration has frozen, remove it from the mold, grind the bumps and sharp edges with fine-grained sandpaper. To make the surface of the bracelet glossy, open it with acrylic varnish.
DIY epoxy bracelet
Decoration with dried flowers
To create beautiful earrings, you need high-quality epoxy resin, a beautiful dried flower of heather, forget-me-not, oak veronica or any other flowering forest herbs. You will also need a hook for earrings. We will use the simplest method without special molds.
 Brooch and earrings with ferns
 The blue flower pendant looks like it's alive
 Round pendant with cute flowers
The algorithm of work is the following:
- Let's prepare the epoxy. Strictly according to the instructions, we knead all the ingredients, and then leave the resin to set the desired viscosity, for about 2-3 hours. Do not be afraid, initially a lot of air bubbles collect in the resin. After the mass settles, they gradually disappear.
- We draw several stencils on a sheet of paper. You can make them of any shape, oval, round or even irregular, so the product looks more interesting.
- While the mixture thickens, prepare the surface. This stage is very important, because every small speck of dust will break the delicate aesthetics of a transparent decoration. The surface should be perfectly flat, it can be covered with oilcloth or cling film on top.
- We lay out our stencils on oilcloth, and cover them with ordinary stationery files on top. We begin to pour the resin directly onto the file, distributing it according to the stencil, and adjusting the edges with a stick or a toothpick. The height of the workpiece should be equal to 2-3 centimeters. Cover the top with a domed lid.
- We leave the blanks until completely solidified for a day. After we remove them from the files, they are separated from the polyethylene surface without any extra effort. We give the correct shape with a nail file or sandpaper, slightly turning the edges of the product.
- We knead a new portion of the resin, and in the meantime lay out the dried flowers. We drip a little viscous mass onto the base and apply dried flowers, cover with a lid and let dry. To make the coating voluminous, like a lens, we cover it again with resin. We give the final shape with a file or sandpaper.
- We drill a hole at the base with a needle and thread the fasteners. The product is ready.
 Daisies on a red background
Epoxy resin and dried flower decorations
skeletal leaves
Other interesting questions and answers
How harmful is hookah smoking?
Ivan Guzyaev13
According to the World Health Organization, hookah smoking is hazardous to health. Below is a brief excerpt from this document (the document itself is available for download at who.int):
1) hookah smoke is toxic (laboratory analyzes of hookah smoke revealed the content of formaldehyde, benzene, nitric oxide, heavy metals, high levels of carbon monoxide and carcinogenic PAHs). All these substances together can be addictive, in addition, the use of these substances has been proven to be associated with heart and lung diseases and cancer;
2) analysis of the blood and urine of hookah smokers shows that hookah smokers are exposed to carbon monoxide, PAHs, nicotine, nitrosamines (in almost all cases, the effect is even greater than when smoking regular cigarettes);
3) it is reliably proven that hookah smoking leads to measurable adverse health effects;
4) there is evidence of possible links between hookah smoking and cancer of the oral cavity, esophagus, stomach and bladder; with chronic obstructive pulmonary disease, cardiovascular disease, stroke, chronic rhinitis, male infertility, gastroesophageal reflux and mental health disorders;
5) hookah smoking is addictive, as nicotine is present in significant quantities in hookah smoke; in addition, secondhand hookah smoking also poses significant harm.
Eugene K.88
Can epoxy resin be rubbed or washed with bath products?
How does the liquid glass coating react to all sorts of “domestos”, “purity” and other powders and vigorous liquids? Are there micro-scratches that spoil the appearance of the product?
Analostanka7
Liquid glass and epoxy resin are different compounds. Epoxy can be washed as long as it is not “aqua regia”, the main thing is that the product does not contain an abrasive. I don’t know about liquid glass - I won’t lie.
Vladimir7
Will it be possible to combine epoxy resin with indicators?
Mix the epoxy resin with dyes such as ERIOCHROME, FUXIN, etc. What happens if an epoxy resin hardener is added to this composition? Is it possible to split the composition?Guest1
The hardener for epoxy is various kinds of polyamines and their derivatives, they can change the color of the indicator, and when kneading it can play in one direction and when cured in the other. it's actually easier to try. stratification - a sedimentation process, will occur if your indicator has not dissolved in the resin, it may turn out that it should be dissolved not in somle, but just in the hardener. It's easier to try than to guess.
Guest7