Functional
The kitchen plinth for countertops is not an exclusively decorative element of the interior; to a greater extent, it has a purely practical function. By masking the joint between the table top and the wall, the profile, retaining moisture, protects materials from swelling.
The kitchen is a very specific room, with its own microclimate, in which the piled up debris and crumbs quickly decompose, forming an unpleasant smell, mold, fungi, which is fertile ground for the appearance of insects. The installation of a skirting board for a countertop in the kitchen is necessary to prevent such unpleasant consequences, the skirting board is a barrier that prevents the accumulation of waste in hard-to-reach places, which ultimately ensures the room is sterile and clean.
It's no secret that most of the premises are far from ideal geometry, and only the installation of skirting boards helps to cover up all the defects. When installing a kitchen set, gaps may form between the wall and the work surface, which do not contribute to aesthetics. Plinth furniture kitchen allows you to tightly close the joints between the countertop and the backsplash, uniting the surfaces, so the furniture harmoniously fits into the design of the room, and the interior takes on a complete look.

Installing a kitchen skirting board for countertops allows you to protect furniture from dirt and moisture, and also connects the set and interior into a single whole.
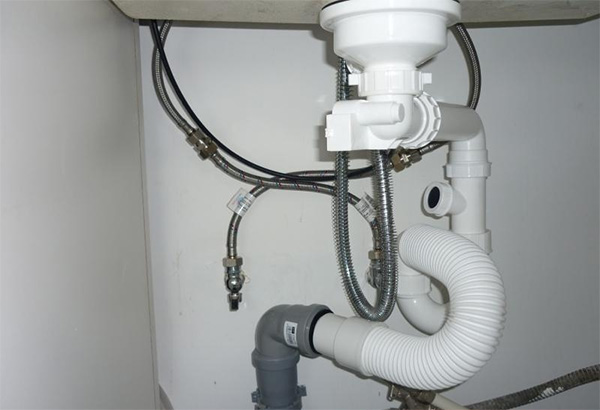
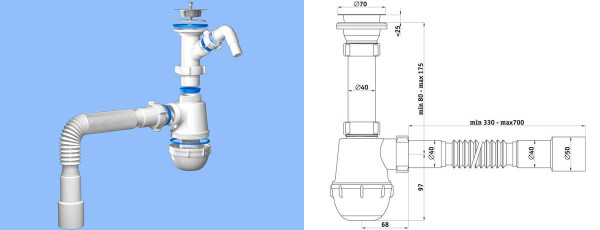
Siphon device
Siphons for drains are most often made of chrome-plated brass or plastic (propylene, polyethylene, PVC). Brass products oxidize over time and accumulate dirt. It is better to give preference to a plastic siphon. Such a product does not corrode, does not rot, it is wear-resistant and durable.
Consider the siphon device using the example of a plastic product. The standard set of the siphon includes:
- protective grid. It is installed directly in the drain hole of the sink and prevents large pieces of waste from entering the sewer.
- rubber stopper. Designed to block the drain hole of the sink (usually there are no siphons in cheap models).
- rubber gasket 3-5 mm thick. It is located between the sink body and the outlet pipe.
- outlet pipe. Some models of nozzles have an additional outlet to which the washer/dishwasher drain or outlet for faucets with a waste valve is connected.
- exhaust pipe rubber gasket
outlet plastic nut
connecting screw Ø 6-8 mm made of stainless steel. In cheap models of siphons, these screws are made of simple iron with a thin coating of chromium or nickel. Such a screw is unreliable, quickly begins to rust and collapse. To buy a siphon with a quality screw, it is recommended to take a small magnet with you to check the metal (stainless steel is not magnetized).
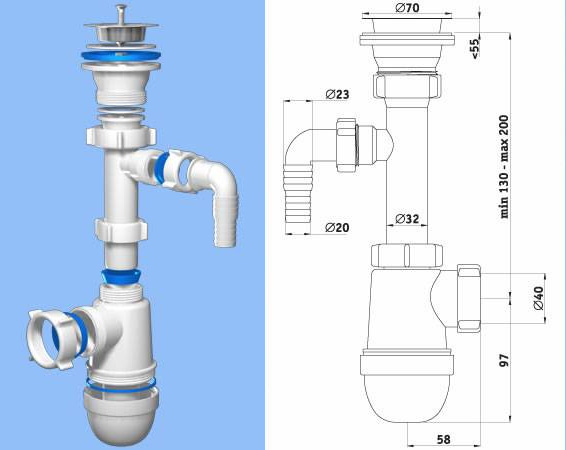
metal nut. It can be brass, copper or stainless steel. Do not take a siphon with an iron nut. It will also quickly rust and will last no more than a year.
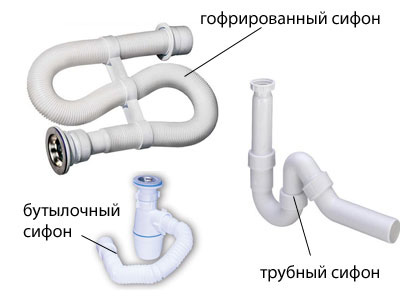
siphon body in the form of a bottle or knee.
clamping plastic nut.
2 cone gaskets made of rubber or plastic.
sewer outlet. It is located on the side of the siphon body.
a nut of the appropriate diameter for attaching a plastic adapter.
lid or glass of the siphon. This part more often than others has to be unscrewed to clean the siphon.
large flat rubber gasket. It serves to tightly adjoin the lid (glass) of the siphon to the body.
sewer outlet. It can be a flexible hose, a standard plastic pipe, a corrugated pipe, or a plastic spigot. It all depends on the model of the acquired siphon and the diameter of its outlet.
Furniture assembly
The first stage requires the preparation of the furniture itself so that plumbing can be installed. Usually delivered to the customer unassembled. If you do not know how to assemble a cabinet for a sink, the instructions that come with the furniture will help.
The standard set are:
- 2 side walls;
- 2 doors (or one);
- Bottom;
- 3 frames for rigidity;
- Accessories, corners, self-tapping screws.
- The side walls and front frames are connected with self-tapping screws and corners. One of the frames is attached from above, and the second - from below.
- Add a bottom to the structure, which lies with the front edge on the lower frame.
- Next, the back frame is attached.
- The doors are installed last. This is done after installing the sink.
Choice
The finished kitchen set in its kit has all the necessary fittings, including a wall-mounted furniture plinth with plugs and docking parts, as a rule, the profile is selected according to the type of countertop, in color. If the furniture is made to order, or you complete the set yourself, then the choice of kitchen plinth is your responsibility. Several options are possible here.
Most often, the kitchen plinth is selected under the work surface, manufacturing companies produce kits from the same plastic. But at the same time, one should not forget that plastics, even with the same number and name of decor, can be completely different from different companies.
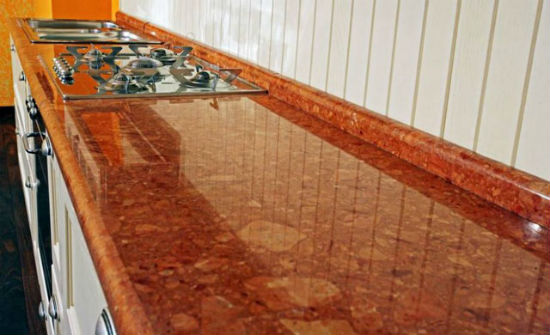
Border matched to the color of the countertop
The second selection method is based on the identity of the materials. If the countertop is made of artificial stone, then a strip is cut from the same material, which will be the plinth, for beauty, a chamfer of the desired shape is made on top, when installed, the plank is glued with special glue, which allows you to create a monolithic structure without visible joints. Under wooden countertops, the plinth is selected according to the type of wood, if the countertop is oak, then it is better to use the profile from oak, it is recommended to apply the finish coating of the plinth and work surface after installation, so the color will be monochrome on the entire work surface.
A skirting board in the color of the hardware unites the worktop with the main design of the kitchen
The third selection option is based on furniture fittings, the plinth is selected in the same metallic color as the handles on the facades of kitchen drawers. It can be various shades of gold, bronze, chrome, aluminum. The plinth, in this case, you can pick up ready-made, or find plastic for the profile in color and make the desired insert.
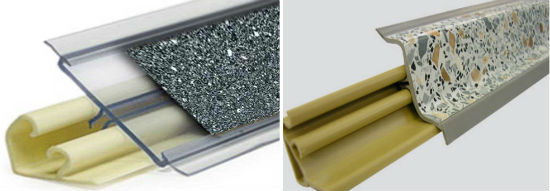
There are many types of skirting boards for countertops, and if the choice is difficult, use a profile into which an edge is inserted from the same plastic that covers the work surface.
Installation of an integrated sink
A sink purchased for installation by cutting into the countertop should be selected with a template included in the kit. Otherwise, marking and cutting the hole for the sink can be difficult and not accurate enough, which will lead to the penetration of moisture under the sink and ruin the wooden countertop.
Making a hole for a sink in an artificial stone countertop will have to be entrusted to a specialist. Doing it with your own hands is quite difficult without the necessary tools for processing such material.
Tools for work:
- jigsaw and drill;
- wrench or gas wrench - for the installation of communications.
https://youtube.com/watch?v=r-k7MDckjU0
- Step 1. Carefully cut out the template for installing the kitchen sink along the contour. Determine a place on the countertop where the installation of the inset sink will not be interfered with by the elements located under the countertop. Place the template on the countertop and carefully align it parallel to the edge, secure and trace around the contour with a pencil.
- Step 2. Paste the surface of the countertop along the contour with masking tape.This is done in order to protect its surfaces from damage by the jigsaw body when cutting a hole.
- Step 3. Drill a hole for the jigsaw blade with a drill. Cut the hole exactly along the contour. This must be done without pressure on the jigsaw, otherwise its blade will bend, and the cut will be uneven or oblique, deviate from the contour line. In any case, this will require additional refinement of the cut with a sherhebel, file, etc. Cut a hole for the sewer outlet and water pipes, if necessary.
- Step 4. Carefully treat the cut surfaces with silicone sealant. Allow the time required for curing. Try on a sink.
- Step 5. Install a siphon of the selected design on the sink. Install a drinking water faucet on the countertop (if necessary). Using the template, mark the holes on the sink panel for installing the faucet. Drill holes. Fasten the faucet with the flexible hose connected to the sink. Install the sink fixtures included in the product kit. With their lack of reliability. you can make a mount with your own hands from a metal mounting tape by threading it into the holes of the mounts.
- Step 6 Glue the edge of the countertop with a rubber seal or apply a layer of sealant. Install the sink panel. From the bottom side, inside the pedestal, fasten the mounting tape with tension using self-tapping screws to the details of the pedestal. Apply a layer of transparent sealant around the perimeter of the installed panel (its excess can be cut off after hardening).
- Step 7. Connect communications inside the cabinet.
A more difficult option for installing a mortise sink in the kitchen with your own hands is to install a panel under the countertop. To do this, after cutting the hole according to the template, an additional groove is made along the perimeter of the cutout on the reverse side of the tabletop.
- Step 1. Make a template that will repeat the dimensions and contour of the surfaces of the sink and the “wing” of the panel that should be opened. Draw a contour according to the template on the top side of the countertop.
- Step 2. Cut a hole along the contour, file the rough edge of the countertop with a file, and sand it. Flip the tabletop.
- Step 3. On the reverse side, select the groove so that the tabletop panel freely enters there.
- Step 4. Apply a layer of modified silane adhesive to the resulting groove and place the sink panel there (install the sink in the “upside down” position). Press the panel along the perimeter with your hands, then pull it through the substrate with clamps in several places and leave the glue to harden for 12-24 hours.
- Step 5. After the glue has hardened, the sink is additionally fixed with a two-component epoxy resin. The composition is prepared according to the instructions and poured into the gap between the panel and the countertop body. After hardening, the junction of the countertop and sink is glued with aluminum tape.
- Step 6. Turn over the countertop with the installed kitchen sink, install it on the cabinet. Carefully cut off excess glue around the sink. Make water and sewer connections.
Installing sinks in the kitchen is not as difficult as it might seem at first. The main requirements are the careful performance of work on sealing all possible points of water penetration and the exact correspondence of the hole for mounting the mortise sink.
Assembling a siphon for a kitchen sink
Each siphon purchased in a store or warehouse must be accompanied by an instruction with a product assembly diagram. The assembly will not cause difficulties even for the one who first picked up the siphon. But in order to avoid leakage in the future, when assembling the product, the following points must be taken into account:
The most important thing to observe when assembling the product is the tightness of all connections. The tightness test should be carried out from the bottom plug, because
it is under constant drain pressure.Even in the store, when purchasing a siphon, you should carefully check the product for defects (chips, burrs, etc.), as they can damage the gasket.
If the siphon was sold assembled, it must be disassembled and checked for the presence of all gaskets, and also to make sure that all parts of the product are well tightened and secured.
Siphons for the kitchen should be assembled by hand so that you can control the clamping force and not damage the device.
When installing the bottom plug and other connections, the gaskets must be fixed. For this purpose, a sealant is used. The twisting of the siphon parts should be carried out until it stops, but without strong pressure.
After installing the outlet pipe, it is necessary to tighten the fixing screw and remove excess sealant. Due to the release of the pipe, the installation height of the siphon is adjusted.