Types of drain devices under the sink
There are many device options.
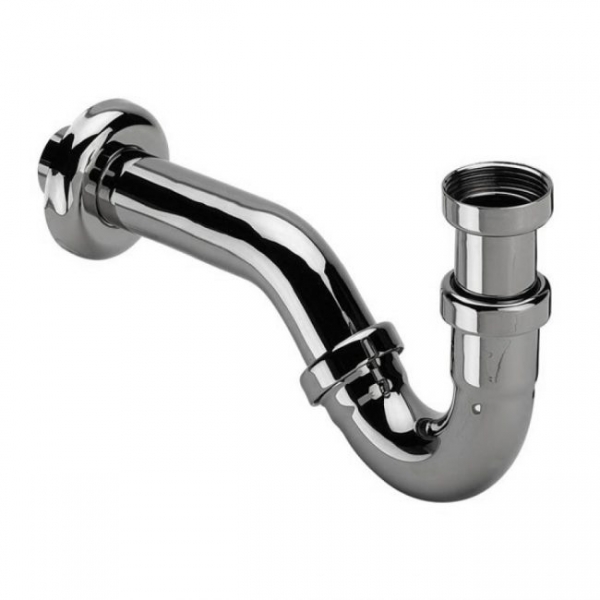
Trubny
The device is a curved pipe, which in most cases is metal. This old type of device is called a knee. The modern version of the siphon is characterized by low weight, a shiny bronze or brass surface and convenient connectors.
The curved area is located at the bottom of the structure, where waste accumulates. If there is a need to install 2 drain holes, then the pipe elbow is installed closer to the pipe leading to the sewer. Above the drain, pipes and adapters are assembled, making 2 drains into one up to the pipe elbow.

Tubular siphon design
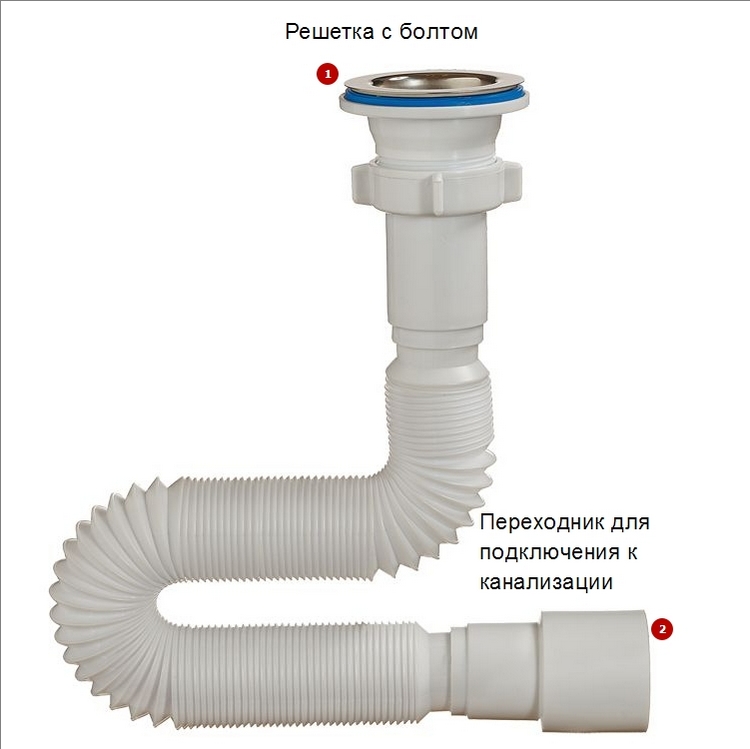
Corrugated
The corrugated device is a curved tube, where the bend is formed due to the corrugation. This area makes the fixture movable and makes it easier to connect to the drain. A soft hose is made of plastic, and a clamp is used to maintain the corrugations. It can be moved by straightening the fold area or making it more pronounced.
Corrugated folds have disadvantages, which include the accumulation of dirt and food deposits in them. It is difficult to clean the part. The downside is the thinning of the material, which can leak. Due to the properties of plastic, boiling water is not drained into the sink.
Corrugated siphon design
Bottle
In most cases, a bottle siphon is used for installation. It looks like a bottle, inside which water moves along a curved space formed by a double partition. The liquid moves inside through the tube and enters the lower part of the device. After that, the drains are directed upward through the space between the outer and inner partitions of the device and then, thanks to the side hole, flow into the sewer.
The main drains enter this adapter from above, and on the side there is another drain from the plumbing equipment. The bottle drain can be metal or plastic. Metal structures are durable, and plastic structures are affordable.
Bottle siphon design
Dry siphon
There is no constant accumulation of water in the design. Inside there are rubber seals that act as a water seal and block the passage of an unpleasant odor. When the liquid is drained, the rubber shifts, passing drains, and returns to its original position after passing them. The rubber part is called a dry water seal. Due to the lack of liquid, the device is mounted in cold rooms, where freezing of the water seal and pipe deformation can occur.
In such houses, a dry structure is installed, which is distinguished by its small size and the absence of a curved part. Dry siphon can be mounted in cold and hot rooms, in small areas, in objects subject to shaking and vibration, as well as in air conditioner drains.
Dry siphon design
Main varieties
According to their design, all siphons used for kitchen sinks can be divided into several types:
- Bottle. This is a rigid structure that can be unscrewed from below. Thanks to this, the device can be cleaned quickly and easily. In the lower removable part, not only garbage is retained, but also decorations or some solid objects that have accidentally fallen into the sink. A corrugated or rigid drain pipe can be connected to the "bottle". There is always water inside the case, which provides a water seal.
- Corrugated. In fact, this is a flexible pipe, bent in a certain place and fixed with a clamp. The bend is designed to create a water seal.The rest of the siphon can be freely bent in the desired direction. The corrugated siphon for washing has a significant drawback, expressed in the roughness of its inner surface, on which debris lingers. Because of this, the structure often has to be removed and cleaned.
- Pipe. This is a rigid, curved "S" pipe that takes up little space.
- Flat. This is an ordinary siphon, all elements of which are located in a horizontal plane. It is used in cases where there is a shortage of free space under the sink.
- Hidden. It can be a device of any design, which is hidden in a wall or in a box.
- With overflow. An additional element in the design is a rigid overflow pipe connecting the top of the sink with a drain hose.
- Siphon for a sink with a rupture of a stream. It differs from the usual siphon by the presence of a small gap (2-3 cm) between the outlet and inlet water holes. Thus, the path of penetration of microbes in the direction from the sewer pipe to the sink is stopped. Such products can often be found in catering establishments.
Elements
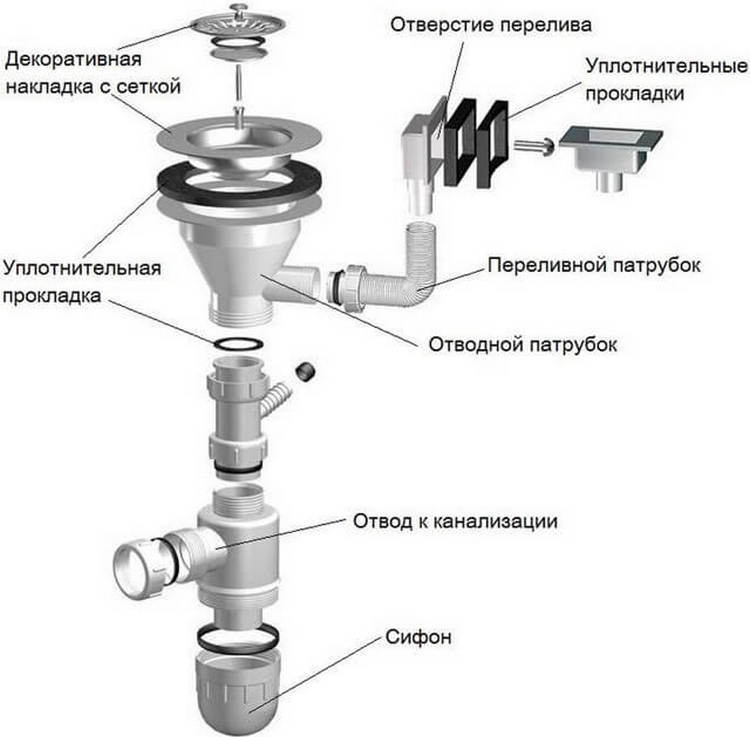
Different types of siphons have different designs, so let's take a closer look at the bottle-type siphon device, the most popular for installation under kitchen sinks.
Structurally, such a device consists of the following elements:
- body, usually collapsible;
- outlet pipe with embossed rings, connected to the sink from below;
- protective mesh with a cell diameter of not more than 1 cm;
- a connecting screw connecting the grid and the pipe;
- corrugated or rigid tube for draining water into the sewer;
- conical gaskets designed to ensure tight contact between the nozzles and the siphon body;
- wide rubber gasket for attaching the outlet pipe to the sink;
- rubber gasket designed to seal the protective grille;
- plastic cap nuts. They attach the pipes to the body of the device.
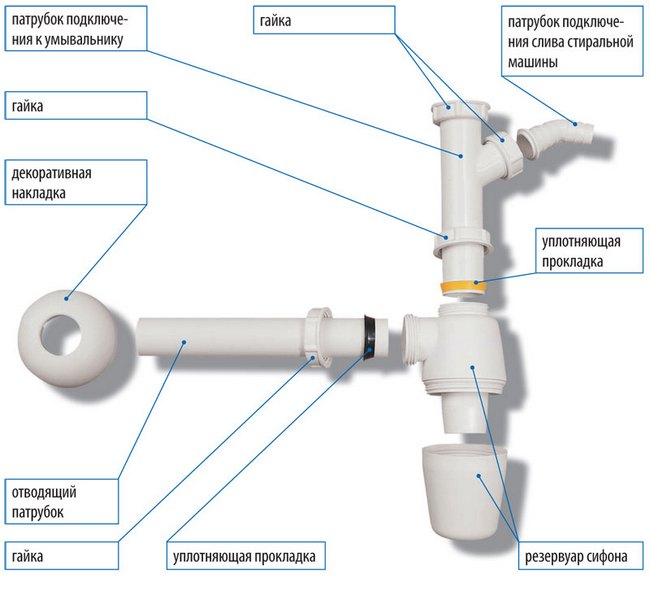 Components of a bottle type siphon
Practical recommendations
Installation of the hinged R-siphon.
The process of installing a siphon on a sink can be divided into stages:
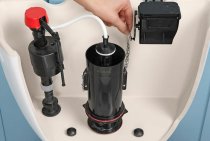
- First you need to attach the bottom plug to the right place, exactly where there will be a constant level of pressure in the structure. In the process of acquiring a siphon, many professionals recommend unscrewing this very plug to make sure of its quality and the absence of chips.
- At the second stage, the lower surface of the product should be checked, which will just dock with the body. The surface of this thread must be free of burrs. It is for this reason that home-installation equipment should be carefully checked and reviewed directly in the store where it is purchased.
- A rubber lining of small thickness, in the form of a ring, is installed in a specialized groove of the structure, after which the surface is carefully treated with a mixture of silicone sealant. Be sure, when working with this mass, to capture the composition and the lower area.
Installing siphons to drain liquid from the sink involves a fairly rigid installation.
But in the modern market, you can meet pipes and hoses with a flexible corrugated design, such products are stretched to the required size, but at the same time they have the necessary density indicators and the ability to keep their shape. For installation work, you can use nozzles 3.2, 4 and 5 cm in diameter, or even buy universal ones that are suitable for connecting almost any design. The installation of such a product is carried out directly to the thread using a union type nut. It is the nut that makes it possible to connect the pipe to the siphon thread using a flat lining.
The normal functioning of both the kitchen sink and the bathroom bowl and washbasin is impossible without a siphon, and its correct installation will ensure the comfort of using this kind of plumbing parts. In the modern building materials market, you can meet with a variety of designs that are suitable for solving various problems. But for sinks and kitchen sinks, bottle-shaped products with a drain hole with a diameter of 3.2 cm are still preferable. Installation of such a product is easy to do with your own hands in a small amount of time.
How to connect a siphon to a sink
- Types of siphons
- Bottle and knee designs
- Process details
- Washbasin connection
- Practical recommendations
Installation of plumbing equipment both in the kitchen and in the bathroom presupposes connection not only to the water supply, but also to the pipe of the sewer system. Most owners of apartments and houses mistakenly assume that the connection task must be performed by professionals. In fact, the installation of a siphon is not so complicated and the installation does not require any specialized tools and a lot of time. After reading the following, everyone can find the answer to the question of how to connect the siphon to the sink.

Washbasin connection
To arrange the connection of the sink in the kitchen and its subsequent comfortable operation, it is recommended to use products with a drain hole of 3.2 cm in diameter. It is these hole parameters that are considered the most convenient and at the same time compact, in addition, this parameter ensures ease of installation of the siphon for various sinks, as well as ease of subsequent operation.
Before undertaking the installation of the product, you should first get acquainted with its device. Any siphon for connecting sinks in the kitchen is a product consisting of such components as:
- throughput plastic pipe, equipped with a metal insert;
- pipe gasket made of latex;
- nuts with a diameter of 3.2 cm made of plastic;
- cuff-skirt made of elastic and soft plastic, with a hole in it 3.2 cm in diameter;
- tightening screw made of steel;
- overlay for the drain part, also made of steel;
- the body of the product, called the bottle;
- bottom plug;
- rubber gasket in the form of a ring;
- plug for locking the drain, consignment note.
In the process of installing siphons of this kind on a sink or washbasin, maximum attention should be paid to such a parameter as the tightness of each connection of the structure.
Bottle and knee designs
To connect the washbasin in the room for taking water procedures, that is, in the bathroom, professionals advise using a bottle-type siphon. To understand why this type is preferable, will allow consideration of the composition and features of this type of equipment.
Assembly diagram of a sink with a siphon.
Connecting a siphon of this type is a simple operation and may well be performed by the owners on their own. The installation procedure is to connect the device with one end to the sink or bath drain, and the other end to the outlet of the sewer pipe.
The product itself is extremely simple, and caring for it is not particularly difficult. The main thing during the installation process is to make sure that all sealing rubber gaskets are installed and not a single one is lost or forgotten. This moment is very important, and not so much for the installation process, but for the convenience and comfort of operation in the future, because such rubber products will ensure that there is no wastewater leakage.
For kitchen sinks, a metal or plastic knee siphon is the best choice. The installation of this kind of design as a whole practically repeats the connection of a bottle siphon.The differences lie in the fact that instead of an element that is just called a bottle, it is necessary to install a curved rigid type element called a knee.
The uniqueness of this design lies in the fact that it can only be installed if the sewer pipe is located in the wall.
Design
The drain system for sinks and sinks is the simplest system consisting of a siphon and a drain pipe that connects the sewer and a drain located on the bottom or wall of the bowl. This sanitary ware is usually made of plastic, metal, or a combination of these materials. The sink drain consists of the following structural elements:
- Case or "glass".
- Outlet pipe.
- Cuffs and seals made of plastic or rubber.
- Protective and decorative metal grate on the drain hole.
- Plastic nuts.
- Fixing screw.
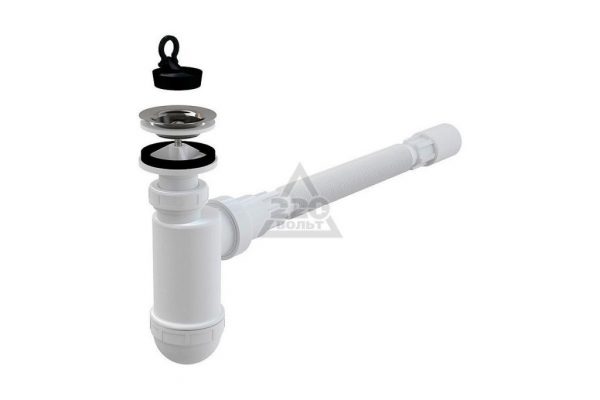
Bottle siphon design
Note! There are also drains for sinks with overflow, which differ from the usual ones in the presence of an additional drain hole located above the main one. This hole is connected by an additional corrugation to the siphon body
The overflow prevents the sink from overflowing and spilling water from the bowl if you forget to turn off the faucet or the drain is clogged.
Siphon for kitchen sinks types, device and installation
The article is posted in the heading|subheading
 The kitchen sink is the most important and indispensable element of kitchen plumbing equipment. It consists of several parts, which, when connected together, provide the functionality of the sink. One of the components through which water is drained is a siphon for kitchen sinks. Regardless of its appearance and size, this plumbing element is designed to fulfill its main function - to protect the kitchen from unpleasant odors emanating from sewer pipes. In other words, we have before us a typical water seal in which a curved tube is constantly filled with water. In addition, the kitchen sink drain prevents clogging of the sewer with solid particles that settle at the bottom of the siphon.
Features of the siphon for kitchen sinks
The materials for the manufacture of the kitchen drain device are polyethylene and polypropylene. It is from them that the vast majority of products are made. These materials have the following advantages over bronze or brass siphons:
- less weight, due to which the sink made of thin-walled metal is not loaded;
- fat and other types of deposits on plastic accumulate less;
- corrosion and decay from excess moisture are completely absent;
- long service life of plastic siphons;
- the cost of such a device is quite democratic.
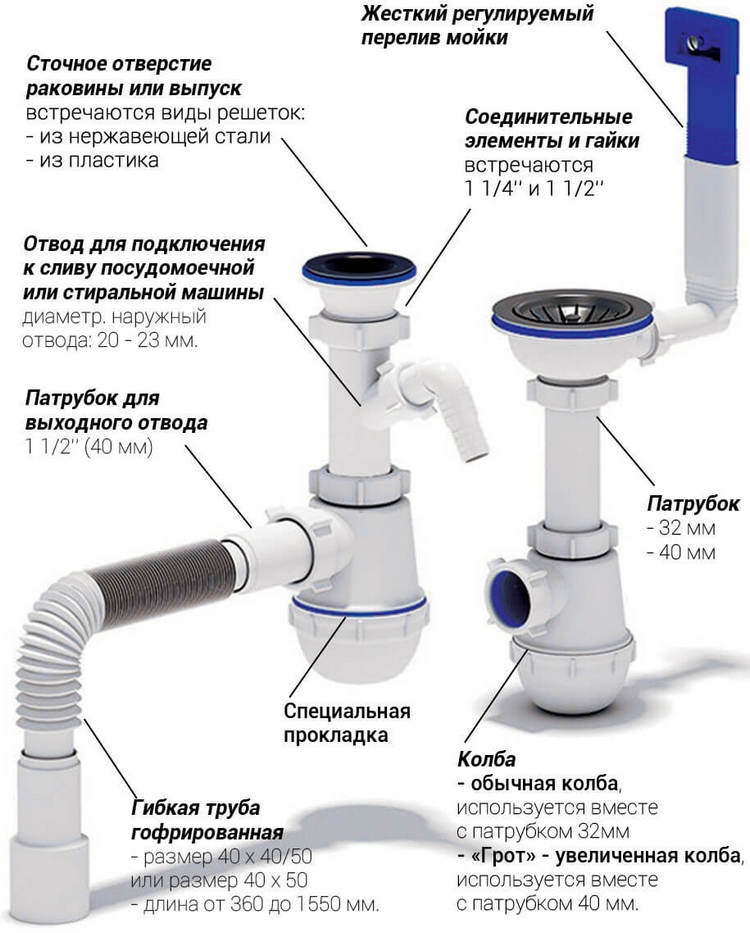
The siphon has a branch pipe to which a corrugated or rigid drain is connected. It is better to choose a sink siphon with a large drain hole. A diameter of 40 mm will suffice. In contrast, the 32mm standard clogs faster, resulting in more frequent cleaning.
Important: In order to be able to connect hoses from a dishwasher or washing machine to the drain, it is recommended to choose a device that has additional outlets. In addition to the siphon in the kitchen, you may also need a sewer pump.
In what situations you need to buy it, you will learn from our other article.
In addition to the siphon in the kitchen, you may also need a sewer pump. In what situations it is necessary to buy it, you will learn from our other article.
And about how to independently install a water filter under the sink. We also have information on our website.
When choosing, it is also desirable to prefer a drain for a kitchen sink with an overflow. This will protect you from overflowing the sink and flooding the kitchen.If the drain hole of the sink is clogged, then the water coming from the tap will simply go into the overflow hole, and from there into the sewer.
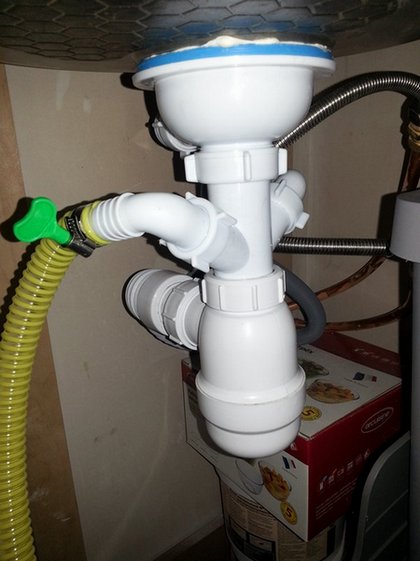
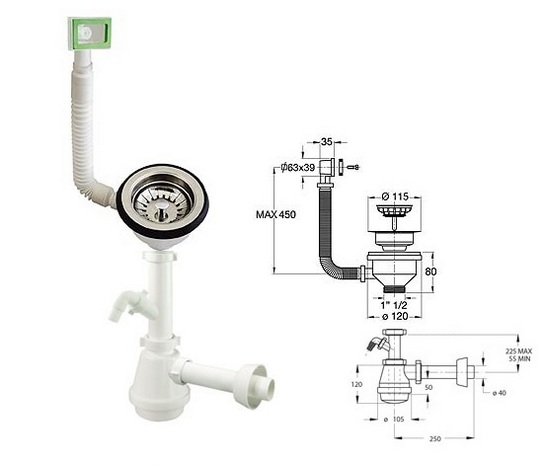 Pictured is a siphon for a kitchen sink with an overflow
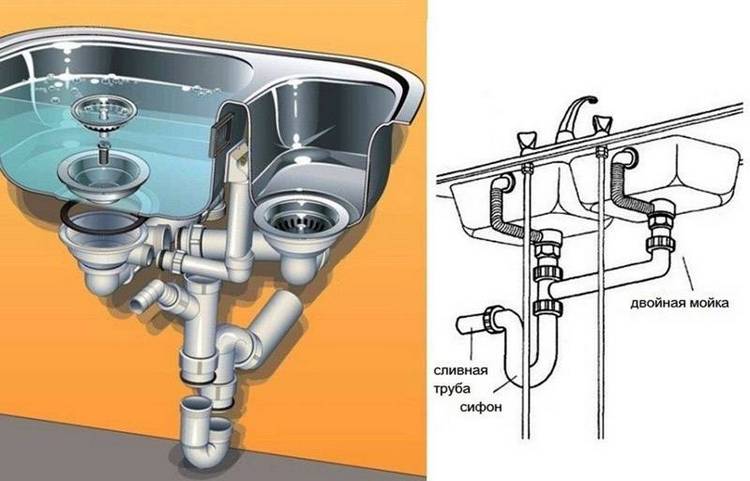
If the kitchen uses a sink that has two drain holes, then install a siphon for a double sink. Its feature is the presence of another adapter with a grate, as well as an additional pipe that combines both drain holes.
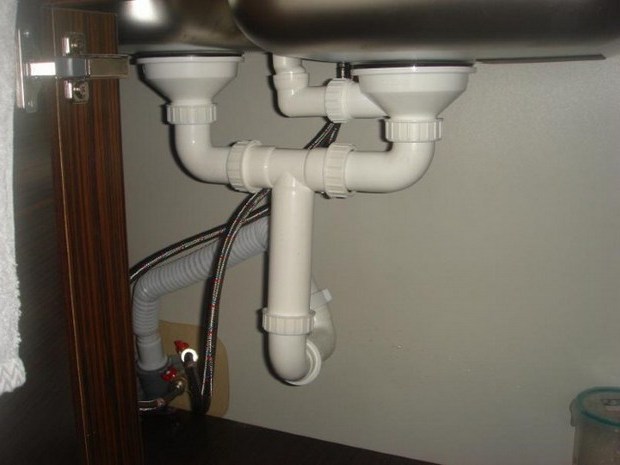 Siphon for double kitchen sink
Siphon for bathroom, washbasin or kitchen
Thanks to the siphon in the box, there is space under the sink in the bathroom and in the kitchen. To mount the device in the wall, make a hole of the appropriate size. The siphon is masked in the wall, and a tube is led to it. For the bathroom, you can take a curved pipe. In addition to it, there is a corrugated hose that connects the drain to the overflow.
Often, bath drains have a plug designed for installation in the drain hole. A siphon with a small height is suitable for a shower cabin, and a bottle drain is mounted under the sink. The hidden design is suitable for assembling a system for washing machines and dishwashers. In the kitchen, it is recommended to install a branched drain.
Assembly of the main part
The siphon itself is most often the largest part of the kit, consisting of two parts - a body and a removable bowl. It is removed to remove blockage that occurs during operation. During assembly, on the contrary, they need to be connected. Between them, a complete gasket of the appropriate size is usually installed. Its size should correspond to the diameter of the screw fastening of the bowl. This is how they usually connect. The bowl is screwed onto the base from below without the use of tools.
The main feature of the chrome siphon is durability and strength
At the top of the base there is a drain hole where a funnel is installed. It has a screw notch to which the connecting fitting will be attached. It is put on the funnel so that the notches on it and on the base match.
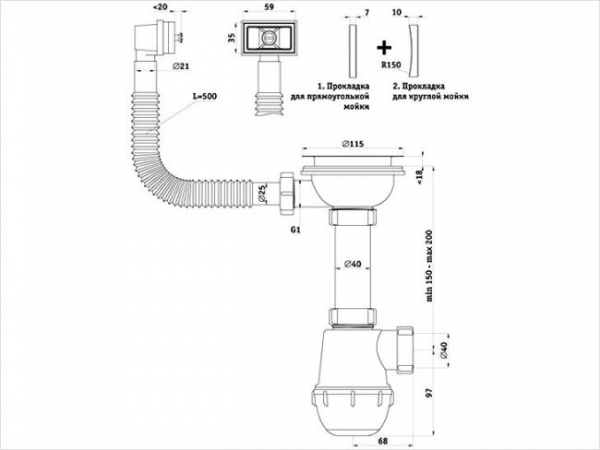
Brief visual instructions for installing a siphon for a rectangular and round sink
Between the fitting and the base, it is required to install a gasket, and only then connect them. The gasket for the fitting in the kit may not be one, but a pair at once. If there are 2 of them, then one in the form of a washer (a flat ring with a hole in the center) will fit inside the fitting, and the second cone-shaped one will be installed below, directly on the tubular part of the funnel. The narrow part of the tapered rubber gasket should be directed towards the base of the siphon in order to securely fix the funnel at the desired height. Then the fitting is tightened tightly enough to avoid future leaks.
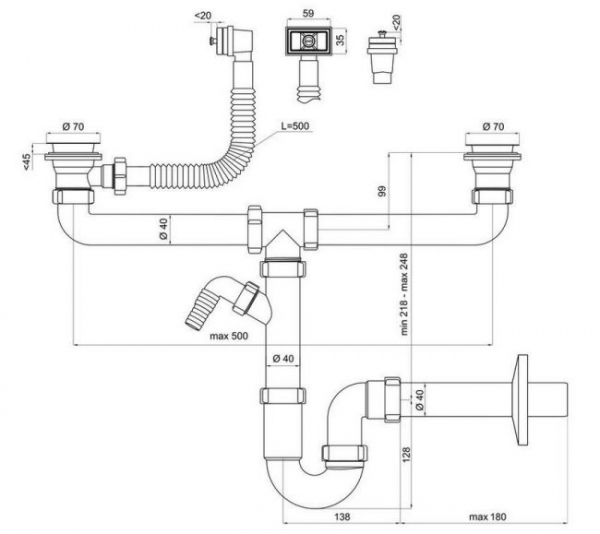
Installation dimensions of the siphon for a double sink with the possibility of connecting a washing machine or dishwasher
Purpose and design
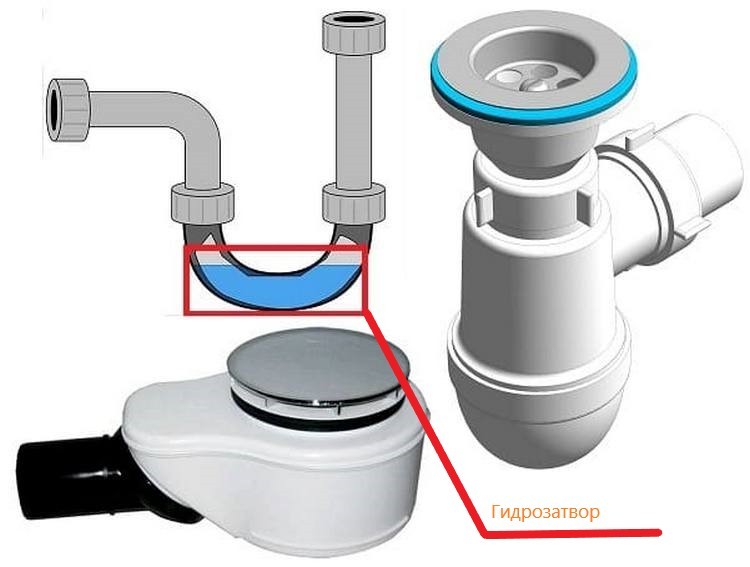
The device is divided into a pipe and a bent siphon, which helps protect the apartment from the unpleasant smell that spreads from the drain.
How does a siphon drain work?
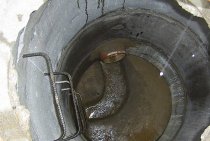
During the drain, the liquid flows into the siphon, passes along the bend, rises and enters the sewer. In this case, part of the water remains in the lower part of the curved tube. It is a hydraulic seal that does not allow odors to pass through. In the curved section of the siphon, solid particles and small objects are retained. To clean this area, the parts are dismantled and reinstalled after cleaning.
Features of installing a drain with overflow
Information on collecting the drain is present in the instructions that came with the siphon. For work you will need:
- flat screwdriver;
- insulating tape;
- siphon;
- bucket;
- sealant;
- wrench;
- tissue or paper napkin.
System assembly
First connect the drain to the sink. A structure is placed under it and the compliance with the dimensions is preliminarily checked.In the future, unscrew the plug from the bottom of the device and inspect it for damage, thereby checking the reliability of the design.
Before assembly, inspect the threads on the body
If there are burrs on it, then they are carefully cut off. If this deficiency is not corrected, damage to the O-ring may occur during installation.
Before installation, check all threaded connections, nuts, docking joints and gaskets.
To assemble the flask of the device, you will need:
Siphon assembly process
- put a gasket on the threads of the upper section of the structure;
- screw the bottom of the siphon;
- place a rubber seal of the appropriate diameter on the drain pipe and put on 2 tension nuts;
- insert the drain pipe into the hole at the bottom of the siphon, push it to the desired height and tighten the nut loosely;
- install a gasket in the cover of the fixture and screw the drain to the body.
The rubber seal placed in the groove is covered with a small amount of sealant. To ensure reliability, the lower region of the thread of the plug, which is screwed into the body, is lubricated with a substance. For hermetic connection of parts, winding is used to remove the element when necessary. Before collection, the length of the tube is selected, the height of which is determined by the depth of the shell.
The main branch pipe is connected to a tube with clamps. In the future, the part is mounted to the sink, placing a gasket between the elements. The section between the branch pipe and the overflow with a branch is fixed with a nut. It is recommended to twist plastic parts by hand to avoid breakage.
Assembly of the structure
First you need to turn off the water, connect the protective grill and the drain hole of the sink, placing a rubber seal between them no more than 5 mm thick. If the grille is larger than the hole, use a sealant, not a gasket. A rubber seal is placed on one edge of the outlet pipe, and a chamfer is removed from the other edge, improving the entry of the pipe into the siphon.
To connect the sink and the pipe, you will need a screw with a diameter of 6 mm. The part is inserted into the protective grid and twisted. Then, the drainage pipe is connected to the outlet pipe. In this case, it is necessary to monitor the connections. For reliable sealing, you can use sanitary winding.
Scheme of mounting the siphon to a two-section sink
The assembled siphon must be connected to the outlet pipe, which was previously connected to the drain. After that, the sewer is connected to the drain. Before installing the cuff in the pipe, a layer of sealant is applied to it and the outlet end of the outlet pipe is placed in the part. For connection, a rigid assembly is used, connecting the sewer outlet and the pipe with a cone gasket and a nut.
If a corrugation is used, then the length of the soft hose must be such that it does not sag during use. If the dimensions of the outlet and the sewer pipe do not match, a plastic adapter will be required. You can avoid getting smell into the apartment by using a rubber cuff, which is placed in the socket.
Health check
To check the tightness, turn on the water. Make sure there are no leaks by placing a tissue or paper towel under the system.
If there are no leaks in the connection area and the liquid flows into the sewer, the system is installed and working correctly.
Features of installing a siphon with overflow
If a siphon is installed for a kitchen sink with an overflow, then at the stage of assembling the siphon, a few more additional steps are performed. The lower edge of the overflow pipeline is attached to the outlet pipe. Fastening is carried out according to the already familiar pattern, using a conical washer and a union nut. The connection of the overflow pipe is made during the installation of the device on the sink.
The upper edge of the overflow pipe is brought to a specially cut hole in the upper part of the sink, from its outer side.The top edge is fastened with a screw connection on the sink side. The screw is simply screwed into the pipe with a screwdriver. Now, when a certain water level in the sink is exceeded, the water will overflow immediately into the siphon, bypassing the outlet of the sink.
Additional information on how to install a siphon in the kitchen correctly is presented in the video.
Siphon assembly for kitchen sinks
We will analyze the assembly of a kitchen drain using the example of its bottle type. The siphon for the kitchen sink is assembled in the following sequence:
- A thin gasket of large diameter is put on the upper part of the siphon body, at the location of the external thread. It will ensure the tightness of the fit of the removable bottom cover to the body;
- The bottom cover, which has an internal thread, is tightly screwed;
- A union nut is put on the pipe, which will be attached to the sink;
- From the bottom of the nut, a conical washer is put on the pipe with a blunt end. Depending on the level at which the conical washer will be, the depth of lowering the siphon under the sink is adjusted;
- The end of the pipe is inserted into the upper hole of the cone, after which the union nut is twisted;
- A drain hose is attached to the outlet on the body. To do this, a plastic nut is put on the hose nozzle, and then a cone gasket is pushed on with a blunt end. The hose branch pipe is inserted into the hole in the housing and tightened with a nut;
Process details
Distinctive features of the arrangement of the drain siphon for the bathroom lie primarily in the fact that the bathroom has not one, but a pair of drain holes. One of them, as expected, is located at the very bottom of the bowl, and the second is installed on the front side at the top of the product. It is this second product that protects the bathroom from overflow. The siphon for connecting the bathing bowl to the sewer consists of such components as:
Installation of a plastic siphon.
- corrugated flexible plastic tube, which is located on the outer side of the wall of the product to ensure the flow of used water directly into the sewer pipe;
- a polymer bowl that allows you to equip a drain at the bottom of the bathroom;
- knee;
- a connecting pipe that allows you to connect the siphon and the sewer.
For installation, no specialized tools are required; in the process of work, you will need:
- Corrugated tube.
- Silicone sealant.
- Adapter-coupling made of rubber.
- Tow or mounting tape.
The difference between the process of connecting the sink and arranging the drain in the bathroom is that before installing the siphon itself, it is necessary to install a metal rim on the drain hole in the upper part of the bathroom. After this element is installed. it is to it that the siphon is attached using a specialized bolt. As soon as these manipulations are completed, the knee of the product is installed and the process of connecting the structure to the central sewer is performed.
Types of siphons
First of all, you need to correctly select the siphon itself to ensure long-term and high-quality operation of plumbing. There is a big difference between designs for draining a bathroom bowl and siphons for connecting a kitchen sink. There are the following options for siphons for the washbasin in the bathroom and the bathing bowl itself:
Connecting a bottle siphon.
- Bottle design. This product has a fairly large size, so this type of siphon is chosen, taking into account the fact that there will be a sufficient amount of free space under the sink. The advantages of the design include the presence of a shutter, the provision of self-cleaning in a regular mode, an overflow drain device. In addition to these functions, this type of design allows you to connect the sewer drain not only to the sink, but also to the washing machine and dishwasher.
- Corrugated siphon.Such a product can complement the kitchen sink, bathtub and washbasins of various types. This design is endowed with one drawback associated with the complexity of cleaning the sewer, which is possible only with the use of special equipment. The advantages include flexibility, which makes it possible to install the siphon in the most inconvenient places.
- Pipe construction. This type of product is designed to create a sewer drain from shower and bath trays.
Installing a siphon on a sink
The work of installing siphon equipment is usually not difficult. It can be done independently. The difference is only in the number of connections to one siphon. So, if you have a double sink or there is another additional drain, then a siphon for a kitchen sink with two bowls is installed.
At the preparatory stage, they check whether the siphon will become under the sink in terms of its dimensions. After that, the entrance of the sewer pipe is prepared for docking with the sink drain. If the pipe is cast iron, then a rubber plug with a hole is installed in it. Plastic pipes are also connected through an o-ring.
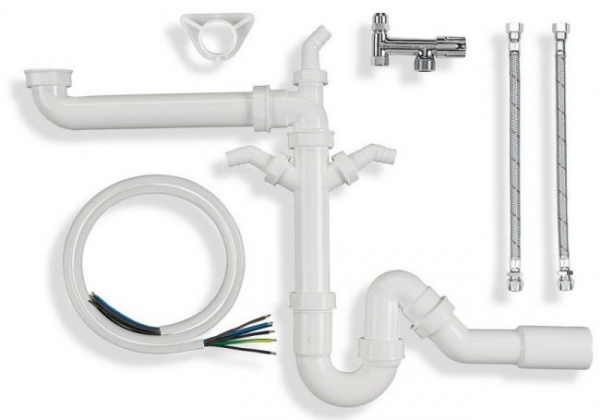
 Siphon with additional outlets for washing machine and dishwasher
Further installation of the siphon on the sink involves the following steps:
- A mesh is installed in the sink hole on a special gasket that comes with the kit;
- From the bottom side, a siphon is attached to the sink through a gasket, the outlet pipe of which is connected to the grid by means of a long metal screw. Using a flathead screwdriver or an ordinary coin, the screw is simply screwed into the pipe, in the body of which there is a built-in nut;
- The outlet siphon hose is connected to the sewer pipe;
- The device is tested for leaks. To do this, water is allowed into the sink for several tens of seconds. If there is a leak in some place, the corresponding nut is tightened. If water flows between the sink and the protective mesh, then the gasket under the mesh is installed skewed.
If you choose a bath and you have a question, which bath is better - acrylic or cast iron. then our article will help you answer it.
How to clear a blockage in the toilet yourself. read in another article. In it you will find a list of different ways.
The nuances of submitting water meter readings via the Internet are described here.
Kitchen sink siphon conclusions
As you already understood, it is not enough just to buy a siphon for the kitchen sink. It needs to be installed and requires some skills. Do not worry about not having them, because it is not difficult at all if the design of the siphon is simple enough. The kitchen sink siphon, which is less expensive, is always installed faster and with less problems.
Pipe trap with kitchen sink connection kit
But do not forget about the difference in price, and how it is formed. Since low-quality components will also cost less, but at the same time, their service life will be much shorter than that of a more expensive product.