What is the peculiarity of the installation of the sink
A washbasin with a pedestal is a functional and practical solution for the bathroom. Before proceeding directly to the installation process, take a look at your sink. Depending on the design, type of fastening and type of pedestal, the installation method will differ.
What to look out for
The pedestal - the sink stand - has two main functions:
- support;
- decorative.
The washbasin bowl is mounted on a leg so that part of the weight is distributed directly on the pedestal
This is especially important for bulky and heavy sinks, as a conventional wall mount may not withstand the load. This is the case when the installation of a tulip is a must.
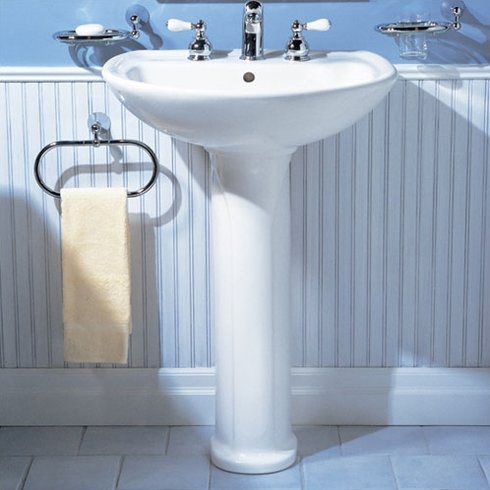
The decorative function of the pedestal is that it allows you to successfully disguise the siphon, water and sewer pipes that can spoil the appearance of the bathroom. Since the leg is hollow inside, all communications fit perfectly there.
To install the sink, it is important to determine the type of its design:
- monolithic;
- separate.
And also, with the location:
- angular;
- straight.
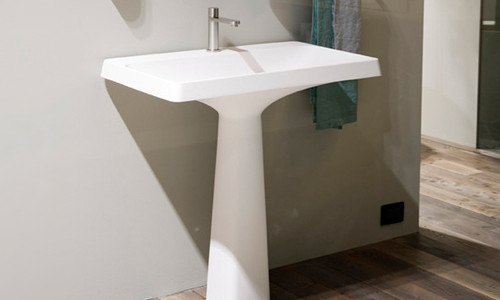
The monolithic tulip shell is an indivisible structure. Such a washbasin is stable, heavy and expensive. As a rule, these are premium models. This is not only about faience varieties. Apply natural and artificial stone, acrylic, glass.
Manufacturers often offer a separate version: a sink and a pedestal for it from the same series. They are united by the same design and full compliance in terms of technical parameters. But it is not at all necessary to buy a washbasin in the kit. The choice of sanitary ware is so large that it is not difficult to find the right pair.
How the sink will be located in your bathroom depends only on the availability of free space and your preferences. There are no big differences in installation technology.
What is a semi-pedestal and what are the features
A semi-pedestal is a popular type of washbasin stand. In the interior design of the bathroom, it is now fashionable to use suspended plumbing: a toilet bowl, a bidet and a washbasin, which do not rest on the floor, as usual, but are cantilevered on the wall.
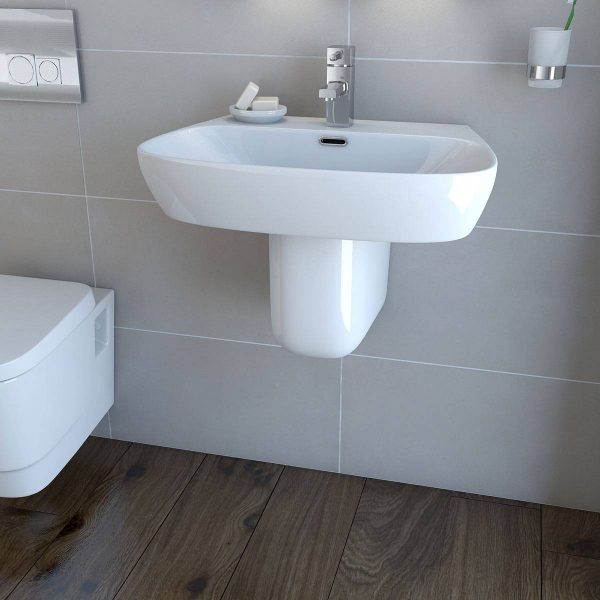
The semi-pedestal itself is a shortened leg. Between him and the floor there is free space. It can be rationally used for storage, which cannot be done when installing an ordinary tulip. In addition, this design greatly facilitates cleaning under plumbing - the floor remains free and no hard-to-reach places are formed.
As for the main functions, the semi-pedestal copes well with both the aesthetic component (masks communications) and the supporting part
This type of sanitary ware can also be purchased separately, but it is important to stick to the general idea of \u200b\u200bdecoration and avoid mixing styles
Sink selection
Modern bathroom equipment is very beautiful and high-tech. There is a huge selection of sanitary ware, which allows you to carry out a variety of design projects. In pursuit of the appearance of the bathroom, do not forget about convenience. The equipment should be as comfortable as possible for the person performing hygiene procedures. The dimensions of the equipment are important when choosing.
Before purchasing a sink with a pedestal, the first step is to take all the measurements in the place where it will stand, and then choose a sink with the appropriate dimensions.
A bulky sink can take up most of the space in a bathroom, while installing a sink that is too small can cause inconvenience.In specialized stores, there are a huge number of plumbing options that meet all these conditions and perform their functions. However, the installation of a traditional sink with a pedestal is still the most preferred. Such a washbasin has an aesthetic appearance, is quite compact and convenient, while the pedestal allows you to cover not too aesthetic plumbing pipes
How to install a sink with a pedestal will be described below, but now you should pay attention to the choice of equipment
Before going to the plumbing store, it is necessary to measure the place where it is supposed
Scheme of the structure of a shell with a pedestal.
The appearance of the sink bowl can be very different. Designers advise choosing a pedestal in a shape similar to the shape of a bowl. If the bowl is square or rectangular, then it is recommended to install a cubic pedestal, while a rounded sink, for example, will require the same rounded pedestal. The same recommendations apply to the material from which the plumbing equipment is made. The material must be the same. To increase functionality, you can choose a pedestal under the sink, which has various shelves where items necessary in the bathroom will fit.
It is also worth paying attention to the type of sink: it can be deaf or have
Now that the pedestal sink selection has been made, installation can begin.
Installation procedure
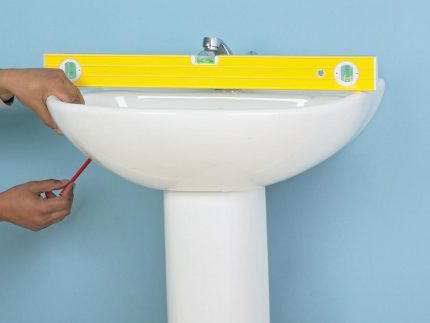
The installation of the sink is carried out in a certain order. First you need to determine the location of the sink. The optimal area for free access to the sink should have approximately the following dimensions: width - 70 cm, length - 110 cm, height of the sink from the floor - about 80-85 cm. equipment is planned. To do this, draw a horizontal line on the wall at the level of the upper border of the washbasin. For an aesthetic appearance, it is recommended to do this taking into account the seams of the tiles. Move the pedestal sink against the wall, aligning the top edge of the sink with the line on the wall. Mark with a marker or pencil through the recesses on the rear mounting surface of the sink the places where the holes for the dowels will be drilled.

Diagram of the sink with dimensions.
Then move the sink with a pedestal and drill holes in the marked places with a hammer drill or drill (it is best to use a drill with a carbide tip for drilling concrete). The diameter of the holes should be slightly smaller than the diameter of the dowel itself. Then expansion dowels are hammered into the holes with a hammer. It is recommended, for reliability, to pour a little glue before driving the dowels. If the wall is strong enough to support the weight of the sink, screw fixing should be used. If the reliability of the wall is in doubt, it is necessary to use a supporting frame.
Then start preparing the place for the pedestal. Make sure the floor at the installation site is level. If it has significant differences in height, it should be leveled. When properly installed, the sink should rest on a pedestal.
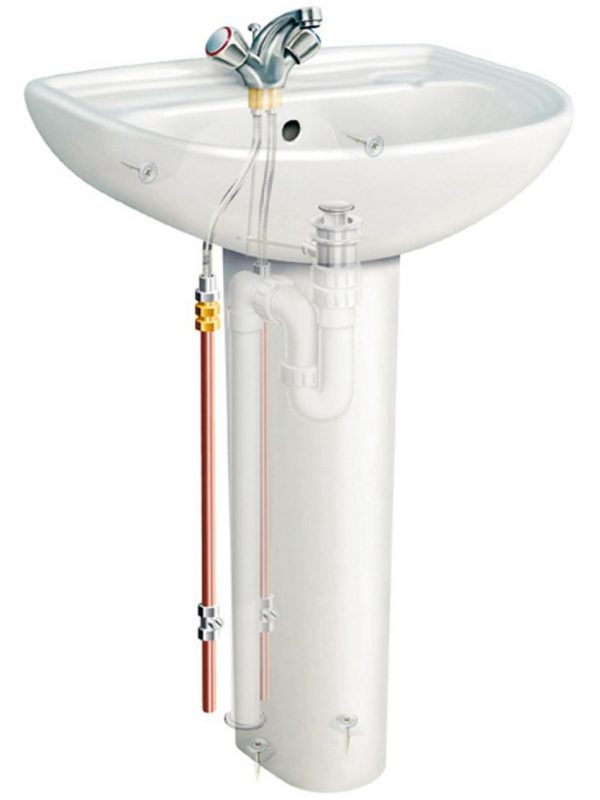
Siphon installation is the next step. Attach the outlet element to the sink. On the other hand, insert a mesh with a screw and gasket into the drain hole. Be sure to install the outlet with the installation of gaskets, which should tightly fit the sink drain, while there should be no gaps and displacements. Then bait and tighten the screw with a screwdriver. Connect the siphon to the outlet, then fix the outlet pipe in the sewer socket.
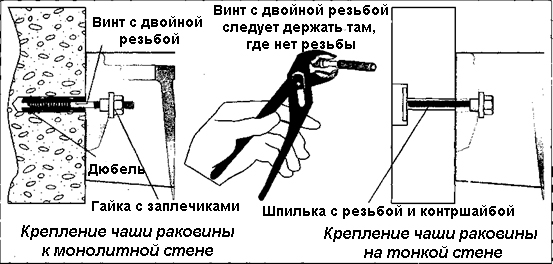
Bowl attachment scheme: to a monolithic wall, to a thin wall.
Then it is necessary to screw plumbing self-tapping screws into the holes with dowels and put the sink on them. Move a pedestal under it. Try to match them in such a way that the drain hole of the sink is placed in the center of the pedestal.Put the washers on the self-tapping screws and tighten the nuts. Screw the sink to the wall. It is recommended to do this with the calculation of two turns per screw. After tightening the nuts, they can be closed with decorative plastic plugs. Remember that you should not tighten the nuts too much, as the sink may crack at the attachment points.
Then the mixer is installed, which should be equipped with any sink. The installation of the mixer is carried out using a flexible connection, which is connected to the water supply. The design consists of hoses with fittings or other assemblies, which allows you to attach the hoses to the pipeline. To install the structure, a special winding is used, most often it is a fum tape, which is designed to prevent leaks and seal the connection. It is necessary to connect the faucet outlets to the outlets for hot and cold water and tighten the connections.
After installing the sink, it is necessary to open the water to check the structure for leaks.
https://youtube.com/watch?v=J4DY9Ttzavs
https://youtube.com/watch?v=J4DY9Ttzavs
Sources
- https://aqua-rmnt.com/santehnika/unitaz-rakovina/kak-ustanovit-rakovinu-s-pedestalom.html
- https://repaireasily.ru/plumbing/ustanovit-rakovinu-s-pedestalom.html
- https://kanalizaciyaseptik.ru/santexnika/kak-ustanovit-rakovinu-s-pedestalom.html
- http://DekorMyHome.ru/remont-i-oformlenie/ystanovka-rakoviny-s-pedestalom.html
- https://www.usantehnika.ru/articles/rakovini/kak-ustanovit-rakovinu-s-pedistalom/
Expert answers
UriaH Heep:
sure .. otherwise it may fall when leaning on it ... and then it will be difficult to glue it with silicone to tear it off together with the tile. . and you always unscrew the screws ...
Allah:
well, if she stands without staggering and does not walk on this pedestal, then it’s enough just to silicone between the sink and the wall
Alexander Pustovoy:
I also use silicone .. I don’t install fasteners
Irima:
it is necessary to fix either a sink or a cabinet. . the water supply and drain must have the rigidity that the sink with the cabinet will provide with proper installation. . do not be lazy, in order to avoid problems in the future
Alexander Bakushev:
without fastening, she staggers in love
Andrey Volkov:
The sink must be fixed to the wall if holes for fastening are provided in it.
I hate Putin
often, fearing to actually get into the pipes (no traces are already visible under the tiles), I apply silicone sealant (a lot) on the back of the sink. Sticks firmly. One day, a couple of years later, we decided to change the underframe; I “twisted” my legs, I had to break the two back ones, took out the bedside table - the sink did not stir .. The toilet bowls are still great glued to the floor! I'm not kidding. If there is a risk of getting into the underfloor heating, always glue.
Dmitry Nikitenko:
Fastened to the fullest - the children are at home.
Sleepwalker:
We wanted to attach, but changed our minds. No matter what situation arises. Blockage, leak. Attached only to the curbstone. And they didn't regret it. Literally a week later, our washer, like a mad mare, galloped out of its place, tore out the water drain hose and flooded the bathroom floor. I had to move everything and wipe it dry. And if they were tightly attached to the wall, they would have to break everything.
Vladimir Laptev:
The sink should have holes in the back. Pins are attached to the wall. The sink is mounted on pins.
Edward:
if you find fasteners, then you can
Andrey Volkov:
Those with a pedestal are still attached to the wall. The main thing is that the holes in the sink are for mounting the Masters, you need to change
Turanga Leela:
if she does not have a structure for fasteners, then it is impossible ... it is either placed on a leg or mounted in a floor cabinet.
Stas Shabanov:
sink brackets available
Cloths:
Elementary, it is necessary to tinker. It is clear that the easiest way to put on a pedestal. The main thing is that the wall should withstand the sink attachment, because there will be a strong overhang and a decent pull-out load on the anchor. Can. The current needs to be done very competently—preferably with a metal bar edging around the entire perimeter (from below, so as not to be seen)
Semyon Semenych!:
All porcelain sinks are attached to anchor screws through the ears in the rear wall, adjusted in level with plastic insert nuts and then attracted to the wall with steel washers and nuts. The pedestal itself performs mainly a decorative role, hiding the siphon and the eyeliner.Perhaps you have a model that needs to be cut into the dressing table top? So this is a completely different plumbing and there are no pedestal legs in it.
Dismantling the old washbasin
Before starting dismantling work, be sure to turn off the water (hot and cold) by closing the shut-off valves. Drain the remaining water by opening the taps, and proceed to remove the old washbasin.
- The first step is to disconnect the mixer. If your bathroom has one sink and bath faucet, you can skip this step. On the mixer, the fixing nuts are unscrewed (under the sink) and the flexible hoses of hot and cold water supply are disconnected. Don't forget to place a bucket or basin under the sink to keep the rest of the water from the system from flooding the floor.
- Step two - dismantling the siphon. This part is detached after unscrewing the fixing bolt from the strainer that closes the sink drain. Next, all the fixing nuts are untwisted, and the outlet pipe is pulled out of the sewer pipe. It is recommended to plug the hole with a rag until the new parts are installed.
- The third step is to detach the sink from the fixtures. Brackets are located under the sink. It is necessary to unscrew all the existing bolts, remove the fasteners, the washbasin and take out everything unnecessary in the trash.
Best Answers
Sergey Dmitriev:
put a semi-pedistal
Andrey Petrov:
It would make more sense to post a photo...
Viktor Poltavsky:
Either pull out the washbasin, or make a cutout in the pedestal.
Online magazine Tips for hosts:
Nothing. Just push or lift. That is, actually "bypass" the pipe. As an option, remove this unfortunate pipe, and throw a plastic one. (If the pipe interferes, apparently it is outside, that is, such work will not be particularly difficult?).
Of course, it would be better to see, then you can advise something more productive. If you want, and there is an opportunity, throw off a photo in a personal, we will try to help.
Alexei:
remove the pipe into the wall
Victor Victor:
Bypass pipe. Or a sink on brackets, and a decorative pedestal with a cutout for a pipe. Close the pipe with a box-support for the pedestal.
Washbasin pedestal
This additional element of the bathroom today is very popular among the population, because. is an integral part of the design of various interiors of a modern bathroom.
Pedestals allow you to hide various communications, and also decorate the bathroom, because. has an elegant shape, a beautiful faience, porcelain or ceramic structure and a variety of colors that can be matched to any interior.
Often the pedestal and the sink are sold as a single set, but today the option is widespread when it is offered to the buyer separately, because. is an independent element of decor, bathroom decoration and performs other functions.
Characteristics of pedestals
The pedestal for the sink is the leg located under it. It can be in the form of a vase, a cylinder, a parallelepiped, a drop, etc. There is also a semi-pedestal that does not stand on the floor, does not have a back panel, but is attached to the wall, hiding the siphon and pipes.
Thanks to such a support or pedestal, the bathroom space is not visually overloaded with plumbing and sewer communications, and the space of a small room is also significantly saved.
The sink and the leg to it must be made of the same material. Also, it must match the sink in size, shape, color, decor, location, i.e. harmonize with her. Therefore, the sink is selected first, and then the pedestal.
Installation errors, their causes and solutions
Sometimes, after the installation is completed or some time after installation, it turns out that the sink with the pedestal was installed poorly. A number of symptoms that indicate this:
- the sink is wobbly;
- the pedestal is tottering;
- there is a gap between the bowl and the pedestal;
- there is a gap between the bowl and the wall.
Most of these problems can be solved without dismantling the product.If your washbasin on the pedestal began to walk and tremble from one touch, the problem is in the level. During editing, of course, you used the spirit level, but perhaps not hard enough.
If it turns out that the fasteners are not at the same level, this must be corrected. A large difference in height is corrected only with new fasteners, and a small one can be corrected by slightly twisting the mounting pin.
If the washbasin itself is held evenly, and only the pedestal staggers, the problem is in the base. A perfectly flat floor is a rarity. Maybe your pedestal hit the junction of the floor slabs or the problem is in the screed itself, but if you do not want to level the floor, use silicone. Drying, it creates a fairly dense layer that compensates for the distortion. Walk silicone along the junction of the “legs” and the floor.
The same solution is suitable for eliminating the gap near the wall or between the bowl and the pedestal. Silicone sealant is an indispensable item in the plumbing arsenal.
Installation procedure
The installation of the sink is carried out in a certain order. First you need to determine the location of the sink. The optimal area for free access to the sink should have approximately the following dimensions: width - 70 cm, length - 110 cm, height of the sink from the floor - about 80-85 cm. equipment is planned. To do this, draw a horizontal line on the wall at the level of the upper border of the washbasin. For an aesthetic appearance, it is recommended to do this taking into account the seams of the tiles. Move the pedestal sink against the wall, aligning the top edge of the sink with the line on the wall. Mark with a marker or pencil through the recesses on the rear mounting surface of the sink the places where the holes for the dowels will be drilled.
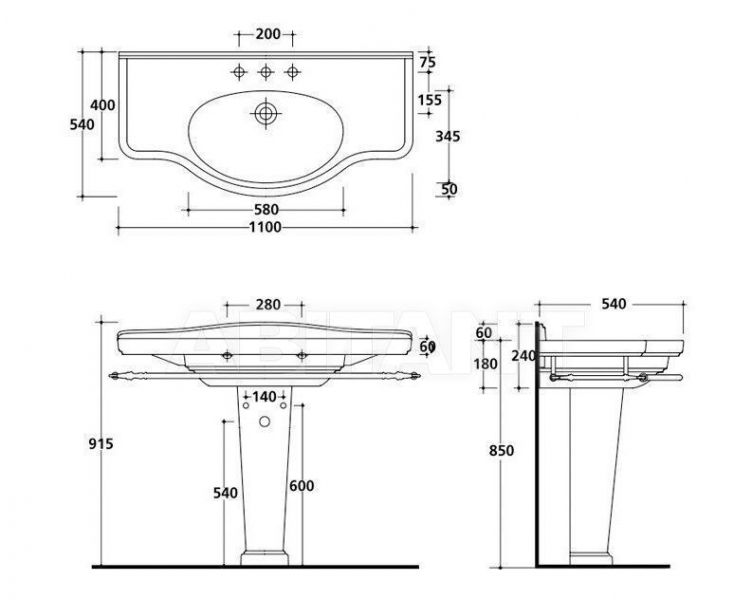
Diagram of the sink with dimensions.
Then move the sink with a pedestal and drill holes in the marked places with a hammer drill or drill (it is best to use a drill with a carbide tip for drilling concrete). The diameter of the holes should be slightly smaller than the diameter of the dowel itself. Then expansion dowels are hammered into the holes with a hammer. It is recommended, for reliability, to pour a little glue before driving the dowels. If the wall is strong enough to support the weight of the sink, screw fixing should be used. If the reliability of the wall is in doubt, it is necessary to use a supporting frame.
Then start preparing the place for the pedestal. Make sure the floor at the installation site is level. If it has significant differences in height, it should be leveled. When properly installed, the sink should rest on a pedestal.
Siphon installation is the next step. Attach the outlet element to the sink. On the other hand, insert a mesh with a screw and gasket into the drain hole. Be sure to install the outlet with the installation of gaskets, which should tightly fit the sink drain, while there should be no gaps and displacements. Then bait and tighten the screw with a screwdriver. Connect the siphon to the outlet, then fix the outlet pipe in the sewer socket.

Bowl attachment scheme: to a monolithic wall, to a thin wall.
Then it is necessary to screw plumbing self-tapping screws into the holes with dowels and put the sink on them. Move a pedestal under it. Try to match them in such a way that the drain hole of the sink is placed in the center of the pedestal. Put the washers on the self-tapping screws and tighten the nuts. Screw the sink to the wall. It is recommended to do this with the calculation of two turns per screw. After tightening the nuts, they can be closed with decorative plastic plugs. Remember that you should not tighten the nuts too much, as the sink may crack at the attachment points.
Then the mixer is installed, which should be equipped with any sink.The installation of the mixer is carried out using a flexible connection, which is connected to the water supply. The design consists of hoses with fittings or other assemblies, which allows you to attach the hoses to the pipeline. To install the structure, a special winding is used, most often it is a fum tape, which is designed to prevent leaks and seal the connection. It is necessary to connect the faucet outlets to the outlets for hot and cold water and tighten the connections.
After installing the sink, it is necessary to open the water to check the structure for leaks.
https://youtube.com/watch?v=J4DY9Ttzavs
https://youtube.com/watch?v=J4DY9Ttzavs
Sources
- http://sovet-ingenera.com/santeh/rakovina/kak-ustanovit-rakovinu-s-pedestalom.html
- https://repaireasily.ru/plumbing/ustanovit-rakovinu-s-pedestalom.html
- https://home-santehnika.ru/rakoviny/pedestaly_polupedestaly/pedestaly-dlya-rakoviny/
- http://DekorMyHome.ru/remont-i-oformlenie/ystanovka-rakoviny-s-pedestalom.html
Calculations and dimensions for wiring diagram
Before proceeding with the installation, you need to decide on the project. To get started, read the recommendations for installing a washbasin with a pedestal in the bathroom, and then proceed to build a plan and calculate materials.
First of all - the size of the washbasin itself. It is better not to buy bowls less than 50 cm wide for your home. They will be inconvenient to use. The traditional size is 55-65 cm. The height of the sink should be selected depending on the height of potential users.
There are standards that require the installation of a sink at a height of 80-82 cm from the floor. This size is optimal for most adults with a height of 160-180 cm. If you are planning to buy a swivel faucet with spout for sink and bath, then you can deviate a little from the standards and install it at a height of 85 cm.
Nothing can prevent you from installing the tulip washbasin higher, if you feel more comfortable that way. The height of the pedestal is usually about 65 cm, so you will not be able to mount the bowl lower. But to make an elevation-podium under a tulip is not difficult.
Another important parameter, which is often neglected due to the limited space in the bathroom, is the space in front of the washbasin. There must be at least 70 cm of free space in front of the sink, otherwise it will be inconvenient to use it. It is a bad idea to install the washstand bowl in a narrow niche in the wall or between other interior items.
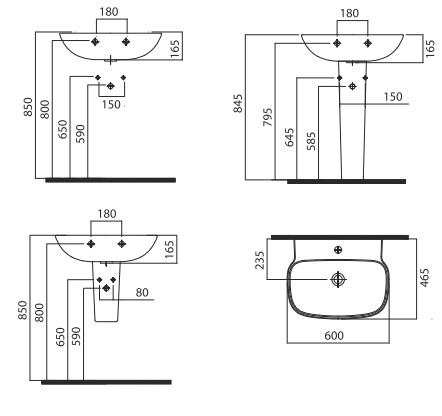
Each plumbing fixture has its own wiring diagram provided by the manufacturer. It contains the basic information for installation:
- from which side the water is supplied;
- height of fasteners and main structural elements;
- location relative to the wall;
- the presence of overflow and holes for the mixer;
- dimensions of the device itself.
It is recommended that you familiarize yourself with the wiring diagram of your washbasin with a pedestal even before the installation begins, and if we are talking about laying water supply and sewerage from scratch, then this should be done taking into account the features of the selected plumbing model.
How to install a pedestal sink
Before installation, the sink + pedestal set looks exactly like this
When the bathroom is completely ready for the installation of new plumbing, you can take a new sink and pedestal and put them in place for future installation. With the help of the construction one, the horizontality of the washbasin and the verticality of the “legs” should be achieved, after which, with a pencil on the wall, make markings in the places of the mounting holes.
With the help of a construction tool, you should achieve the horizontality of the washbasin and the verticality of the “legs”, after which, with a pencil on the wall, make markings in the places of the mounting holes
It is necessary to check the correctness of the markup by measuring the distance between the mounting holes on the sink and between the pencil marks with a tape measure. The sink and pedestal for this must be set aside for a while for convenience.
It is necessary to check the correctness of the markup by measuring the distance between the mounting holes on the sink and between the pencil marks with a tape measure.
If your sink is going to have a faucet, it's a good idea to start installing it before the sink is attached to the wall. This will allow you to make installation efficiently and with convenience.The mixer is installed in the technological hole on a rubber gasket, it is fixed from below with one or two fixing nuts, which are attached to the kit.
The next stage of work is the noisiest. Using a perforator (drill diameter 7 mm), you need to carefully gouge holes for the brackets exactly according to the marking (holes in ceramic tiles are drilled with a drill).
Using a perforator (drill diameter 7 mm), you need to accurately mark out the holes for the brackets exactly according to the marking
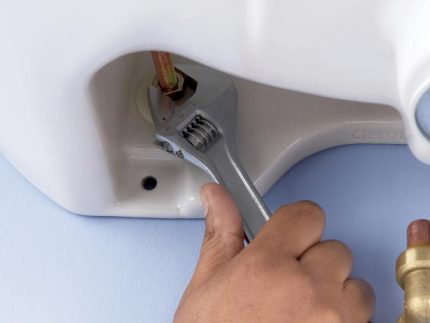
Pre-prepared plastic dowels are inserted into the holes (you can use a small amount of glue for the strength of the installation of the dowels), into which metal brackets are screwed with an adjustable wrench. Next, plastic expansion nuts (eccentrics) are screwed onto the threaded part of the brackets. Fasteners are checked for horizontality and adjusted by eccentrics.
Pre-prepared plastic dowels are inserted into the holes (you can use a small amount of glue for the strength of the installation of the dowels), into which metal brackets are screwed with an adjustable wrench
Now the pedestal and sink are re-installed, the horizontal and vertical structure of the structure is checked. If everything is perfect, you can tighten the nuts - clamps on the brackets (do not forget to install rubber gaskets), and then proceed to connect the water supply and siphon.
If everything is perfect, you can tighten the nuts - clamps on the brackets
From below, we connect flexible water hoses to the mixer and pipelines of hot / cold water
It is important not to damage the rubber seals. If you do not plan to install a faucet, and a technological hole is provided in the washbasin, it can be closed with a special decorative plug
From below, we connect flexible water hoses to the mixer and pipelines of hot / cold water
How to install a sink siphon is described in detail in one of the articles on the site. After reading the step-by-step instructions, you can easily assemble this drainage element.