Methods for fixing a steel bath
Taking into account all the features of the installation of a steel bath, it is possible to provide excellent stability and increase the service life of the product.
Brick base for steel bath
Fixing a bathtub to bricks is the most popular method recommended by experienced craftsmen. The fact is that the brick "cushion" guarantees a stable and immovable position of the font.
For the manufacture of the podium, red brick is used, without voids inside. It is laid around the entire perimeter of the future bath, leaving a niche in the middle, into which the bowl is installed directly in the next step.
Installation of a steel bath on brick supports
Of course, a wonderful method of fastening, however, in this case, a podium is not constructed from bricks, but only supports are made, which subsequently fix the bath on both sides. The font is additionally attached to the wall or mounted on legs.
Fixing a steel bath to metal corners
The method involves fixing the font on the corners built into the wall. As a result, the bath "hangs" on metal corners without auxiliary support. The advantage of this method is the free space under the washing container.
Fixing the bathtub to the wall
In this case, the metal bowl is first attached to the legs. This is followed by the installation of a drain pipe and other plumbing equipment on the bath. After completing all the previous steps, the steel bath is leaning as close as possible to the wall.
Next is the connection of the siphon to the sewer. Well, the last stage is the treatment of cracks with sealant and giving an attractive appearance to the whole structure.
It is recommended to install the bath on pieces of rubber or tiles glued to the floor in advance. This prevents the destruction of the floor covering due to intense weight load.
Bath cladding around the perimeter with brick
A very simple method - the bath is placed on legs and lined with bricks for reliability around the perimeter. However, do not forget that it is imperative to leave a window in the masonry for plumbing service in case of an accident or any breakdown.
Brick with this method of fixing the font, after laying, should not protrude beyond the edges of the bath, otherwise further design and lining will become more complicated.
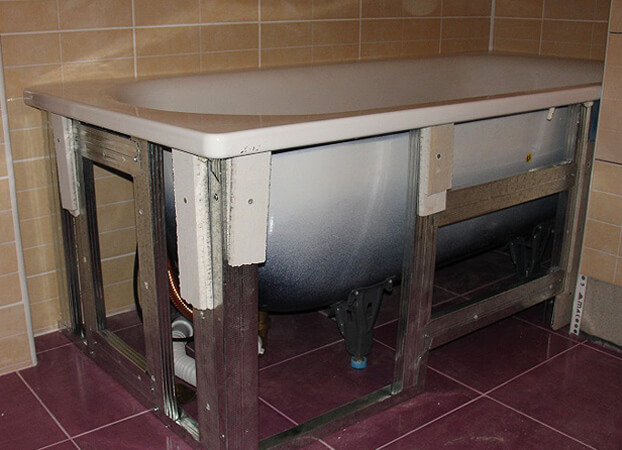
Installation on an additional wall profile frame
The bath, as in the previous method, is placed on legs, and then it is additionally fixed to a frame made of a wall profile, which is easy to make with your own hands.
In the case of using this method, markings are made on the floor around the perimeter of the bowl, along which the frame is placed. As in all other methods, the design will have to be hidden.
As a result, if it is planned to sheath the frame with drywall or any other material, the markings are shifted by the thickness of the sheathing.
If the bathtub does not have a ready-made factory slope, during installation it is necessary to adjust the legs, forming a slight slope towards the drain. This prevents stagnation of water after the adoption of water procedures.
Even more details here:
Fabrication for steel bath podium
Mounting a bathtub on a podium is an excellent installation method that provides protection against tipping over, which can lead to such troubles as damage to the interior, injury to residents and possible flooding of neighbors from below.
The podium can be made from different materials, more on that later in the article.
Making a metal frame
The metal frame is made of galvanized profile. If you have the skill to use a welding machine and a room where you can use it, the frame can be made with your own hands.
The finished frame is placed as close as possible to the wall and after that a font is placed in it. As well as the podium, the frame should be masked in any convenient way.
If possible, the frame should be additionally fixed to the wall in order to avoid its displacement.

Making a podium from foam blocks
This method is similar to making a brick podium. However, you should know that the brick is not afraid of water, but the foam block is unstable to moisture, so it must be treated with a water-repellent agent before installation.
First you need to determine the height of the bath and carry out installation only after the necessary calculations. The calculation is simple to make - you need to understand what height will be convenient for all residents when using the bathroom.
The subsequent actions are extremely simple - a rectangular frame is formed from the foam blocks, inside which a bowl is subsequently inserted and, after fixing, the structure is lined.
Making a podium from a wooden beam
The beam, as well as the foam block, is covered with a moisture-proof agent. In addition, it is treated with an antiseptic composition to prevent the development of fungus.
Similarly to the method of using foam blocks, a rectangular frame is made from a bar. It is necessary to fix it only on stainless steel screws.
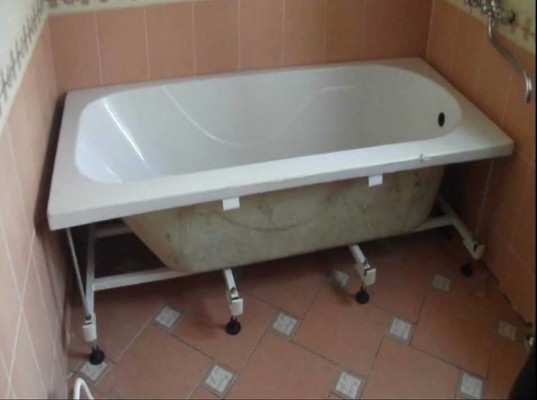
How to install an acrylic bathtub with legs
Stage 1. We fix the beam to the bottom and fasten the legs.
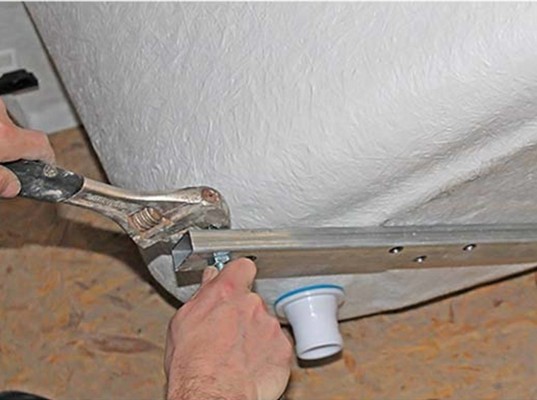
Stage 2. We bring and install the bath in place
Stage 3. We adjust the height. With the adjusting bolts screwed in, the drain will be located at a height of no more than 5-10 cm from the floor level. It is necessary to select the height so that the drain level is 2-3 cm higher than the sewer level. If the desired difference cannot be made, the substrates should be made of a material that does not absorb moisture.
Attention! If the free space under the bath is not planned to be used, the gap between the bottom and the floor can be filled with mounting foam. Such a decision will increase its stability and remove the question of increasing the height.
However, it will not be possible to quickly clean the siphon or eliminate the leak in this case.
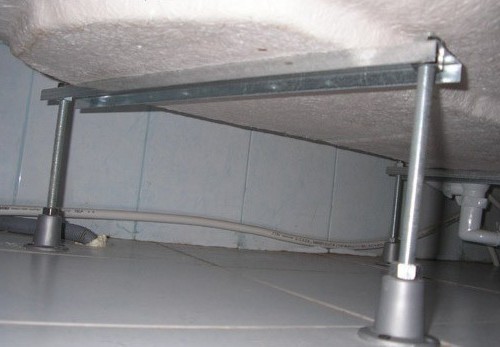
Stage 4. Using the building level, we carry out adjustment in the longitudinal and transverse directions. Any bathtub has a bottom slope, so it must be installed strictly horizontally in all directions. After that, it is necessary to tighten the lock nut on the adjusting screws of the legs.

Stage 5 Installing a sewer. The entire drain goes on sale in a disassembled state, so the first thing to start with is to assemble it.
All parts of the system are connected to each other. At the end of one part there is a cone-shaped gasket that enters the inner diameter of the other part and is pressed with a nut. Thanks to this connection, the entire drain system is sealed, and any leaks are eliminated by tightening the nuts.
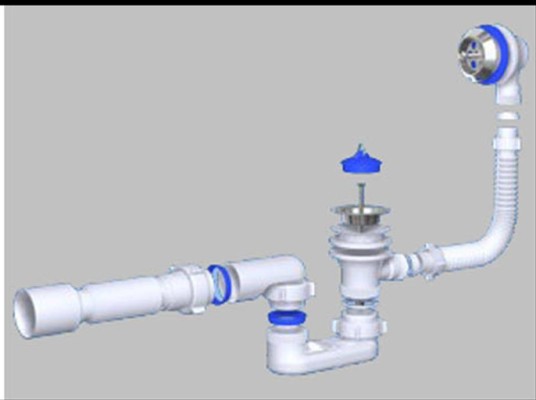
An important part of the drain is the water seal. The water seal has a U-shape. Thanks to this, after draining, water always remains in it, which prevents the release of unpleasant odors from the sewer. We install the drain part.
Next, we assemble the overflow separately and install it. Next, we connect the drain and overflow to each other. Once again, check that all nuts are securely tightened.
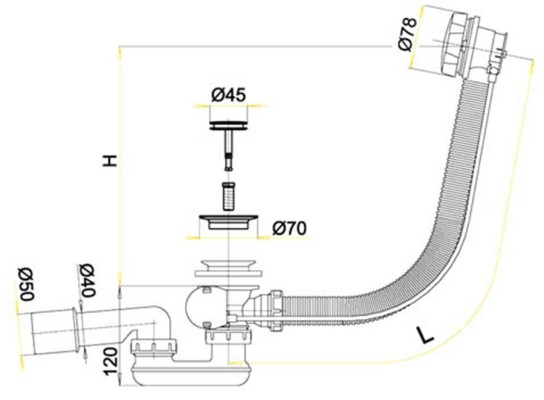
Attention! All plastic nuts are hand-tightened without the use of tools. This is enough to assemble a sealed system
Steel bath installation options
Installing a steel bath requires great care and attention, because the bowl can easily be deformed if the load on it is not evenly distributed. How to install a metal bath in various ways - read on.
On stock legs
Usually, special legs come with a steel bathtub. It is not difficult to attach them - bolts or wedges are used for installation, through which fastening is done on the bowl.

But how to hide unsightly-looking legs? It's simple - just for this purpose, decorative overlays are made in the form of paws of animals, stucco and other interesting items, as well as special protective screens made of plastic, which perfectly hide the surface of the support.
To the corner of the room
A common way in which the edges of the bath are in contact with two walls.
Where can I get an additional bath support in such a situation? The answer is simple - in any building materials store you can find brackets for attaching the bath to the wall. The brackets are fixed in pre-calculated places on the wall, and then the sides of the font are fixed on them.
As a result, small gaps or cracks may remain between the edges of the bathtub and the wall - this does not matter, they can be easily eliminated with a sealant. After carrying out all the work, a ceramic border is placed on the bath.
Between the walls
The method involves the installation of a bath, ensuring its contact with three walls. Supports in this situation are fixed near two small sides.
This is a reliable installation method, because in this case the bowl is held on three sides, which reduces the possibility of tipping over at the most inopportune moment.
After installation, all cracks are also treated with sealant and hidden under a decorative element. The unsightly appearance of the side of the bath that does not come into contact with the walls can be masked using a drywall sheet or a ready-made plastic screen.
Some homeowners purchase or make their own curtains from water-repellent material for this purpose.

In the middle of the room
This method is more suitable for installing cast iron bathtubs, since these products, due to their weight, have good stability than acrylic and steel tubs.
It must be remembered that this installation method can only be used in rooms with a large area. In addition, it should be possible to install a non-standard drain system.
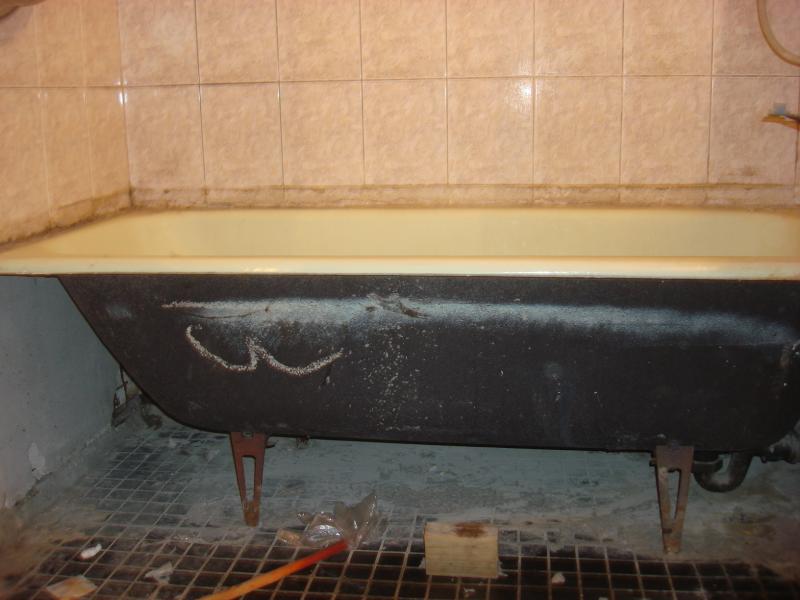
Features of steel baths
Currently, homeowners are more likely to opt for steel baths than cast iron products. Now you can find these plumbing fixtures in almost any home. What are their advantages?
- a light weight. Perhaps the most important advantage of steel bathtubs. Such bowls weigh less than cast iron baths by about five times, thereby facilitating the installation and transfer process;
- enamel stability. The coating of these products is very wear-resistant and prevents the formation of chips, as it is applied to the bowl under high temperature;
- price. Baths made of steel have a fairly low cost in comparison with models made of cast iron and acrylic;
- durability. The special properties of the material provide a long service life of the font;
- variety of shapes and sizes. Thanks to the ductility of steel and modern technology, finding a bathtub that meets the requirements of any taste is not difficult;
Undoubtedly, steel baths have many advantages, but there are also disadvantages. The disadvantages of steel baths are low sound insulation and the inability to retain heat for a long time.
But these problems can also be solved with the help of mounting foam, which can be used to process the bowl, thus eliminating all the shortcomings.