Main stages of construction
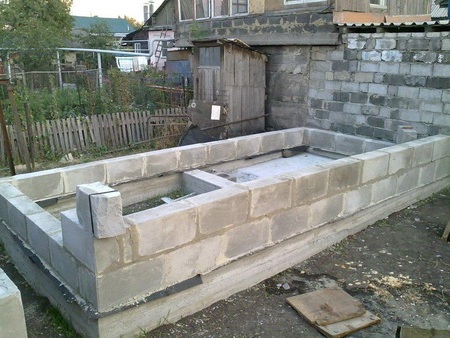
1. Laying the foundation. The choice is influenced by the soil of the site. Under normal conditions, it is best to equip it from pillars interconnected by reinforced concrete beams. On complex soil (clay or mixed type), a strip base will look more reliable.
Due to the considerable degree of water absorption of cinder blocks, the height of the base of the bath should be at least half a meter from ground level. After the concrete has completely cured, the laying of waterproofing begins. For this purpose, it is recommended to use molten bitumen and roofing material.

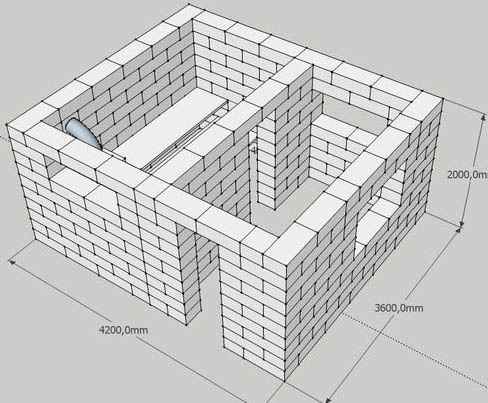
2. Installation of walls. Before starting masonry work, it is necessary to deal with the construction of the foundation of the heating furnace. The construction of external walls and internal partitions should be carried out in strict accordance with the approved project. At the planned points, openings are left for windows and doors. For additional strengthening of the bath, reinforcing bars 10-12 mm thick are placed every two or three rows of block masonry.
3. The roof device begins with the preparation of floor beams and the installation of rafters. A roofing sheet is laid on the finished structure. After that, proceed to the ceiling.
4. Insulation of the walls of the bath from cinder blocks. First, a basalt thermal insulator is fastened to the outer walls with their own hands, then foil paper. The inner surfaces of the bath are finished with several layers of protective materials. Mineral wool is laid between the beams of the wooden frame. A vapor barrier with foil is fixed on top.
5. Exterior finish. The building is decorated with cheap clapboard, beautiful siding or practical plaster. The most presentable and solid appearance will be cladding with timber imitation or facade slab.

6. Interior design. It is better to cement the floor in the bath, and then insulate it and protect it from moisture with a reliable layer of waterproofing. For this purpose, molten bitumen and roofing material are suitable. Ceramic tiles or wooden floors are used as flooring. The walls are decorated with clapboard or wood.
approximate cost
To calculate the required number of building materials for the box, they rely on the main parameters - the size of the structure and the price of one block. First, the volume of the building as a whole is determined, for which the length of all walls is summed up and multiplied by their height and thickness. From the result obtained, the volumes of windows and doors are subtracted. The residual indicator is divided by the volume of one cinder block. The final number will be the desired number of elements. Multiplying it by the cost of betonite (30-35 rubles), we get the amount of expenses for the construction of a bath structure.
The final costs for the construction of a bathhouse consist of a combination of prices for materials, loading and unloading and installation work, and transportation. A standard one-story structure, consisting of three rooms with an open veranda, but without internal insulation, can cost about 200-250 thousand rubles.
Reviews of cinder block baths
“A cinder block bathhouse had to be built due to lack of money. At first I thought it was temporary, then I will build something more solid. On the advice of experts, he insulated the walls of the house from the outside and from the inside, lined them with clapboard, raised the floor higher. The result was such an excellent bath that now I can not get enough of it. And I definitely won't change it."
Grigoriev N.N., Yekaterinburg.
“A few years ago we bought a nice country house. On the site they found a box made of cinder block of a small bath. Since there was little money left after the purchase, we decided to equip it with minimal forces. Instead of wooden bars, the facade was covered with plaster, under which a layer of foam was laid. And inside they made a frame from the profile, into which mineral wool and siding were fixed.It turned out to be an excellent economical option for a bath.”
Alexander, Sverdlovsk.
“I always dreamed of having my own bathhouse with a steam room and whisks. When the opportunity arose, he swung at the log house. But harsh calculations showed that I could not afford such an amount, so I had to save money - I replaced it with a cinder block. But from the inside, the walls were finished with a wooden bar. Now in the steam room there is just a fabulous forest smell. The beauty was appreciated by my family and all my friends.”
Zadorin Nikolay, Kostroma.
“I built a small bathhouse in the country with my own hands. I tried to properly insulate the walls, floor, ceiling and protect from moisture. The sauna is heated by an ordinary wood-burning stove. Literally two hours later, such a temperature “runs up” in the steam room that any sauna will envy. We have been using the sauna regularly for the whole family for the past three years. Since then, neither adults nor children have ever had a cold.
Evgeny Ilchenko, Moscow region.
Laying the foundation for a cinder block bath
Walls built from hollow blocks have a small weight compared to other building materials. There is no need to lay a strong foundation. The forces of frost heaving arising in the ground in winter, due to the ease of construction, can squeeze its foundation out of the ground. Therefore, for a cinder block structure, an unburied strip foundation or a columnar base with a reinforced concrete grillage is used.
Cinder blocks quickly absorb moisture, so the foundation is raised above ground level by at least half a meter. When the base is ready, it is covered with a layer of waterproofing. Before erecting walls, lay the foundation for the stove. Only a specialist can fold a brick oven, so you should hire a craftsman or buy a finished metal structure. If you do not want to mess with firewood, get an electric heater.
Work order
The blocks are laid on a mortar, which is kneaded from 1 part of M400 or M500 cement and 3 parts of sand. To improve the plasticity parameters, red clay or a similar plasticizer is added to the solution. The laying of cinder blocks with their own hands is performed in the following sequence:
-
Mark the locations of door and window openings on the foundation.
-
A small amount of mortar is placed at the corners of the foundation, the lighthouse cinder blocks are leveled and installed exactly at an angle of 90o. To fine-tune the next blocks, pull the cord, securing it in the corners.
-
Applying the solution to the foundation and the end of the block, I lay the first row of the wall. Excess solution is removed with a trowel. The thickness of the seam is no more than 1.5-2 cm. If the backfilling of blocks with expanded clay is not provided, they are laid with voids down.
-
Check the levelness of the surface with a level. A rubber mallet is used to level the masonry.
-
The corner blocks of the second and subsequent rows are placed in a checkerboard pattern (similar to brickwork).
When building walls from cinder blocks with your own hands, it is important not to rush. Carefully check the horizontal and vertical planes of the walls
To do this, often pick up a plumb line and level. Remodeling rickety walls is much more difficult.
To give the structure additional strength, after 3-4 rows of masonry, reinforcing with a metal mesh is carried out. The internal walls in the bath can be laid out both before the construction of the roof, and after it.
Roof installation
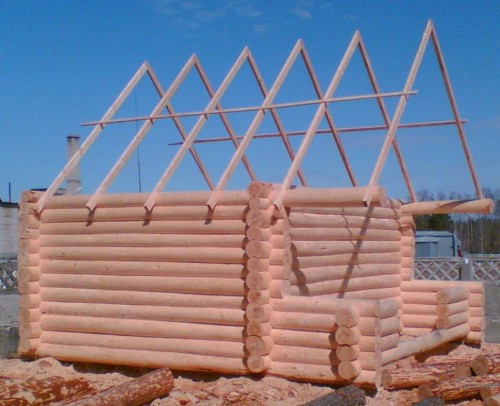
One of the most popular types of roofs for a bath is a gable design. Its construction begins with the installation of a Mauerlat - wooden beams located around the perimeter of the cinder blocks. It is on them that the rafter system and ceilings will be mounted. Mauerlat is laid a few days after the walls are erected.
A waterproofing layer is laid on top of the cinder blocks, on which wooden beams are mounted. After that, a rafter system, attic floors are erected and the roof is sheathed with roofing material (ondulin, slate, metal profiles or other suitable material).A layer of waterproofing is laid between the ceiling and the attic floor.
Floors in the bath
In the washing room and the steam room, a concrete floor is equipped, on which a wooden grate is laid on top. The floors are made with a slope towards the drainage of water into the sewer. The joints of the walls with the floor are coated with bitumen for better waterproofing.
You can lay tiles on a concrete base. The grate is placed to prevent contact of the legs with cold concrete. After bath procedures, it is easy to take it out to dry. In other rooms, you can lay a regular wooden floor.
Bath decoration inside and out
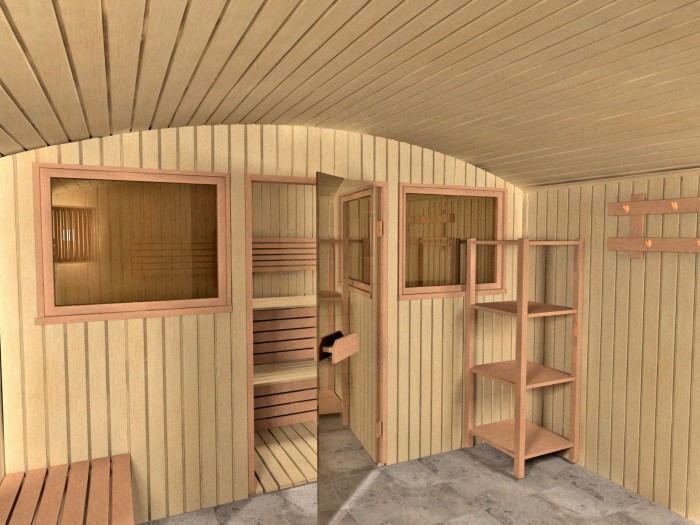
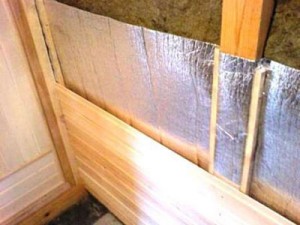
Before proceeding with the interior decoration, waterproofing and insulation of the internal walls are carried out. A layer of waterproofing is attached to the cinder concrete with the help of a crate with a beam with a section of 50x50. Between the rows of the crate, a heater is laid (polystyrene, mineral wool or other base insulation). As a finishing material inside the building, a clapboard or a facing wooden board is used.
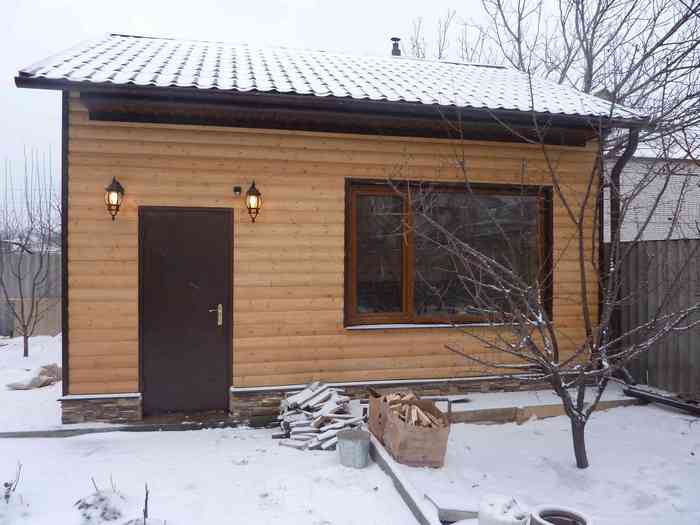
Outside, the bath is finished in any way convenient for you. Walls can be plastered, sheathed with clapboard, siding or overlaid with facing bricks.
Everyone can build a cinder block bath with their own hands.
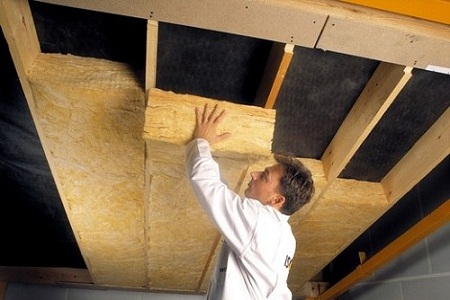
Features of ceiling insulation
Insulation finishing the ceiling of the bath
When installing the ceiling in the bath, it is necessary to take into account not only the fact that it accounts for up to a third of heat loss, but also the fact that the accumulation of condensate on the surface nullifies any insulation measures.
Therefore, vapor barrier from the inside is required here much more than for walls, actually coming to the fore. This type of work in this case requires much more effort than the same in the sauna.
Initially, it is recommended to upholster the ceiling with hewn and dried boards 40 mm thick.
The wider you can find boards, the prettier they will look, no matter what grade they are. Even with bitches, it will be even more beautiful
It is not advisable to use lining, it can lead. A large thickness of the boards is not desirable due to the accumulation of a large amount of cold during the absence of heat. This leads to condensation on the ceiling during the heating of the steam room. A layer of waterproofing is necessarily placed on them, it can be an ordinary greenhouse film or other vapor barrier material. Everything can be covered with a 15 cm layer of dry sawdust or mineral wool, and covered with ordinary clay on top. This is a very good way, which was used by our grandfathers. If it is glass wool, then a fiberboard plate is additionally placed on it.
How to insulate a bath ceiling
panel type ceiling
Panels for such a ceiling are usually sold with all the necessary layers of waterproofing, insulation and moisture resistance. The standard width of the layer of mineral wool contained in the ceiling tiles is about ten centimeters.
Since such panels have a solid weight, it is better to lift them first, and then connect them in parts at the top.
Suspended ceiling
The basis for the insulation of the false ceiling is the frame of the attic. A waterproofing layer should be placed in these floor beams, which will eventually cover the entire inner surface. The next layer is the installation of wooden flooring. Then, the required amount of insulation, such as mineral wool, is placed in the gaps between the beams.

After insulation, it is necessary to ensure moisture isolation using foil material. Now you can sheathe the ceiling with a clapboard made of wood.
deck type ceiling
Floor ceilings do not depend on the attic frame. Since they are mounted directly to the walls. For its construction, wooden boards about thirty centimeters wide are used.
Warming is carried out from the side of the attic. All necessary materials (vapor barrier, insulation, waterproofing, and plywood flooring) are placed on top of the floor ceiling.This method of ceiling insulation is the fastest, but is only suitable for a small area bath.
Bath floor insulation
Wooden floors are often installed in log baths.
Concrete can be poured if the walls are built of brick, cinder block, foam block or frame method.
Sometimes, according to the personal preference of the owner, a concrete floor is also made in a wooden bath.
Wherever concrete is used, it always needs special insulation, since cold and moisture affect it destructively, and also create discomfort in.
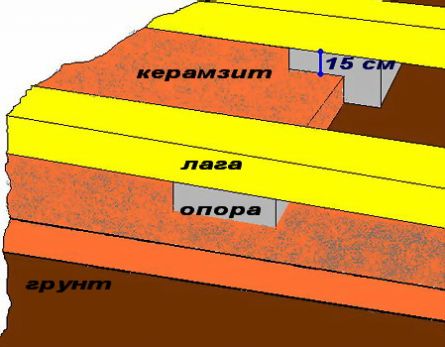
The warming of the floor in the bath should be approached with particular scrupulousness, because it is most exposed to moisture, and must also withstand the contrast between the temperature of the soil and the air in the room.
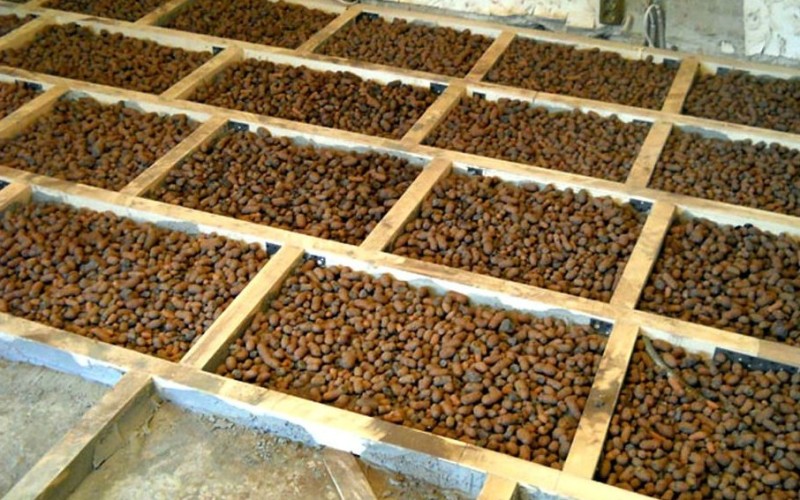
Before installing any floor in the bath, you need to clean the surface of the soil and cover it with a thick layer of expanded clay (medium size) or slag. The height of the embankment of this insulation must be at least twice the width. If there is an opportunity to make the layer even thicker, it should definitely be used. In the case of a concrete foundation, expanded clay should be covered to its entire height.
concrete floor
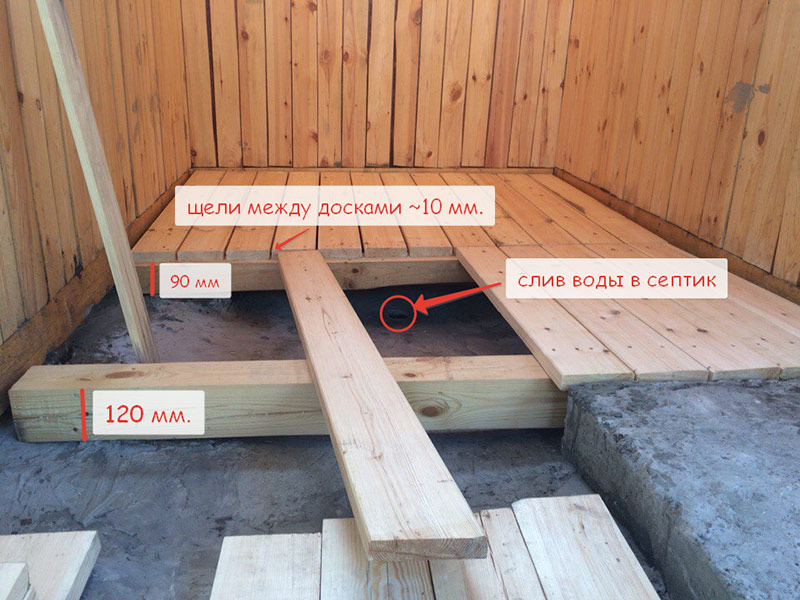
Before insulating and pouring the floor in the bathhouse, a drain pipe should be laid. Then it must be attached to the level where the screed will later be. After that, you can start working with the floor:
- First you need to compact the soil.
- Then cover the walls with materials for.
- Sand is poured on top of the soil (from eight to ten centimeters), after which it must be moistened and compacted.
- The next layer is roofing material, which should protrude 15 centimeters on the walls. Overlapped material sheets must be joined with moisture-resistant adhesive tape. You can also use tar mastic.
- Then a layer of expanded clay is poured onto the floor, the height of which should not reach the highest point of the foundation by 5 centimeters.
- After the expanded clay is evenly distributed, it should be covered with a plastic film. Then XPS boards (about five centimeters) are laid on it.
- Now you need to lay the reinforcing mesh, leaving cells from five to ten centimeters.
- Then you can set beacons for alignment. They should be placed at a slight angle towards the sewer so that the concrete floor has an imperceptible slope and any excess water can enter the drain.
- The next step is to attach the damper tape. This ensures the safety of the screed and its evenness even with sudden temperature fluctuations.
- Then you can pour the concrete mixture, evenly distribute it over the entire surface of the floor and level with the rule.
- When the screed is completed and the concrete has begun to gain strength, it is covered with a special primer that penetrates into the depth of the concrete and has waterproofing properties.
After the concrete and primer have completely dried, you can begin laying the tiles. Also, often in the bath, wooden flooring is used on the floor.
wood floor
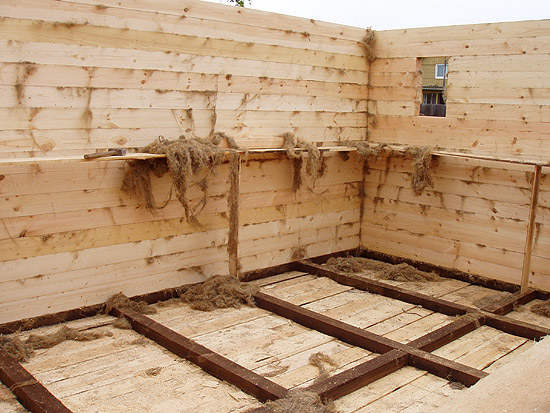
The traditional wooden floor in the bath requires a lot of trouble. Particular attention should be paid to waterproofing, good ventilation and keeping the floor warm. For good ventilation, it is necessary to leave several channels in the foundation, which will serve as the ventilation system of the bath.
Step by step guide to work:
- First you need to attach the drain pipe and determine the location of the drain (often it should be in the center).
- Then the soil is rammed. A layer of roofing material is laid on it, rising to the surface of walls up to twenty centimeters high.
- A large amount of expanded clay is poured over the waterproofing layer. But it should not reach the floor beams of about 25 centimeters.
- Then the beams are installed. Before using a tree to build a floor in a bath, it must be treated with antiseptic agents.
- At the bottom of the beams, it is necessary to carry out the installation of cranial bars, to which the draft will later be attached.
- After making the subfloor, it should be covered with a film. Which does not pass steam and moisture.
- Then it is covered with insulation, such as mineral wool or expanded clay.
- Now the entire structure should be covered again with a vapor-isolating film.
- The logs should be fixed so that they are perpendicular to the beam frame. A drain hole is cut in the center.
- Boards are attached to the flooring, cut at an angle of about seven degrees. They should increase the angle of cut as they approach the drain.
- In the holes between these rails, insulation should be laid (with a layer equipped with foil to the top). Sheets of foil material are connected with waterproof tape. Subsequently, the entire crate must be closed.
Now you can lay the flooring on the wooden floor. It must be new, of high quality and waterproof.
Criteria for the selection of thermal insulation materials
Modern heat-insulating materials for warming the bath make it possible to work on the insulation of the floor, walls and ceiling, using a variety of options. The choice of materials depends on the finances of the developer, the time he is willing to spend on work. The higher the quality of the material, the higher its price: the bath will be insulated in the best possible way.
As heat-insulating means intended for warming, use:
- expanded clay;
- slag;
- polymeric materials;
- glass wool.
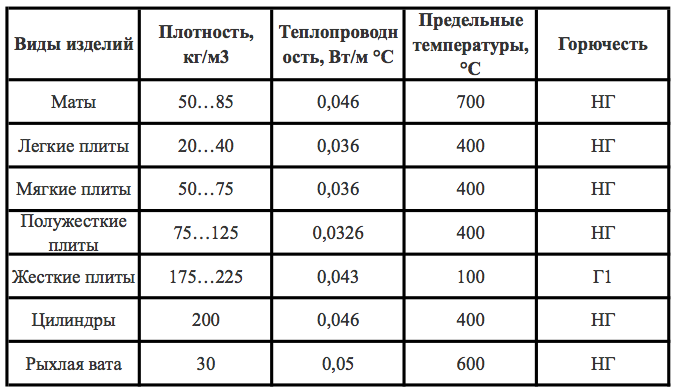
Comparison table of thermal insulation materials.
It should be determined what insulation is needed to eliminate heat loss through the ceiling or floor in the bath. Before work, builders study the fire resistance and structure of the material. When insulating the walls of the bath, you should choose environmentally friendly materials.
The most important characteristic is the thermal conductivity of the insulation. The conditions for its installation in the bath are also taken into account.
To eliminate heat loss, materials from expanded polystyrene or mineral wool are used.
To avoid wetting the insulation during operation, do not use cheap materials that are not recommended for these purposes.
Insulation of the ceiling and roof of the bath from cinder block
You can insulate the ceiling and roof of a cinder block bath with polystyrene foam, or even better, spray it with polyurethane foam. Warming of the bath structure is carried out with a mandatory vapor insulation device, which is often confused with thermal insulation, but there is a difference, and it is quite significant. Vapor barrier is necessary to maintain a normal level of humidity in combination with a certain temperature. Thermal insulation retains heat and nothing more. The differences between the processes become apparent when the ceiling of the bath is insulated.
For thermal protection of the ceiling, the already repeatedly mentioned foam is usually used. Plates are installed in the part of the ceiling structure, inaccessible to moisture. As for the vapor barrier device, it comes down to finishing the surface of the bath ceiling with various vapor-retaining materials.
With a roof, everything is much simpler. It is enough just to choose a good material that is not able to transmit heat. You can use the same foam or polyurethane foam. The material is sprayed onto the insulated surface, forming a heat-resistant and durable coating.
Who doesn't want to arrange a steam room near their home to have an excellent place to spend pleasant leisure time!? But it’s one thing to drive out a block box, but you still need to know how to insulate a bathhouse from blocks from the inside in order to minimize heating resources.
Your attention will be provided with instructions, as well as a video in this article.
What needs to be done to insulate the bath
Below we will separately consider how to insulate a bath from expanded clay concrete blocks (cinder blocks, foam blocks), but at the same time we will talk about each plane separately. That is, will be described separately.
We insulate the wall
In order to insulate a bath from foam blocks, expanded clay or slag blocks, first of all, you need to choose a heater. Let's say right away that the most environmentally friendly product in this situation will be felt, but since it is not available on the construction market, we will have to choose from what is available. It should be borne in mind that the installation will be carried out in a hot and damp room and due to with this pick up the material.
| Type of insulation | Expanded polystyrene (styrofoam) | Extruded polystyrene foam | Mineral wool |
| Environmental friendliness of the material | Not recyclable | Not recyclable | Not recyclable. Releases phenols |
| Chemical resistance | Destruction from diesel fuel, gasoline, acetone, oil paints and ultraviolet rays. Resistant to weak acidic alkalis. Swells and crumbles when exposed to water. | When exposed to water, the material shrinks, as the binder is washed out. Resistant to alkalis. Releases phenol at high temperatures | |
| Lifetime | 30 years | 50 years | 50 years |
| thermal insulation | After 60⁰C material degradation occurs | Excellent thermal stability |
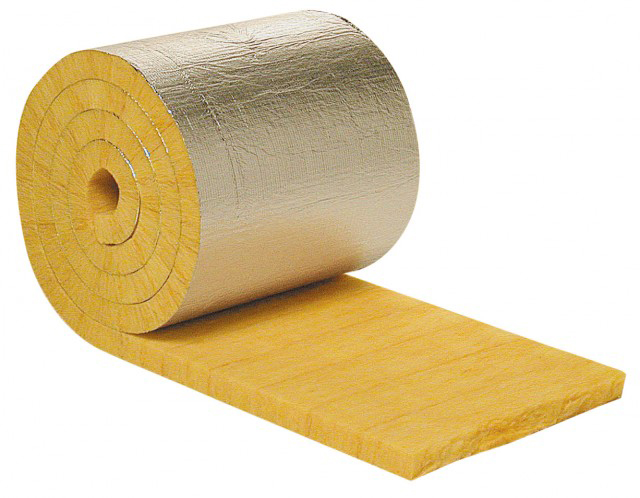
Based on the above data, we can conclude that in order to insulate a bath from expanded clay concrete blocks, of all the materials listed, mineral wool will be the most suitable (this includes stone wool, glass wool and slag wool). Its price is not very high, and you can also choose the required thickness (from 20 to 200 mm) depending on the climate of your region. But in any case, you will need foil for waterproofing.
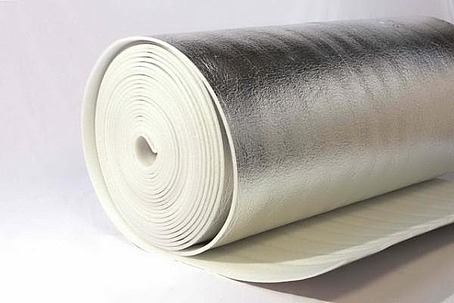
If mineral wool does not have a foil layer, then it needs to be added, and foil polyethylene foam, which you see in the photo above, is excellent for this. The thickness of such a material varies from 2 to 20 mm, and by covering this layer of mineral wool, you significantly increase the effectiveness of thermal insulation.
For a wooden lining, that is, for lining a steam room, you need a crate that will be mounted on brackets, or it will be thick bars between which it will be installed. The second option is simpler, but mounting a bar on a block wall is not so easy, even if it's plastered. The fact is that if the thickness of the crate is 100 mm, then anchor bolts will be needed for its fastening, which is not entirely acceptable for a wall made of such material.
We continue to consider how to insulate a cinder block bath from the inside and we will mount the crate. On the wall, under the brackets, put some kind of waterproofing material, and then fasten the bod profiles themselves. Mineral wool is threaded straight through the pawns, and then carefully covered with foil polyethylene foam, trying not to leave holes.
Ceiling
Do-it-yourself thermal insulation and waterproofing of the ceiling takes place, in principle, in the same way as it does, only the installation plane changes. Considering that there can be no foam blocks on the ceiling, and, for example, a wooden floor or a concrete slab, you can successfully use it as a crate use a beam.
Floor
For the floor in the bath, almost any materials are suitable, for example, those that go to warm the loggia, that is, extruded polyethylene foam or expanded clay. After all, you will still be pouring a cement screed, so both will do, but expanded clay is much cheaper. The thickness of the thermal insulation layer will depend on the degree of freezing of the soil and on the general temperature in your area.
Construction of the walls of the bath from cinder block
cinder block wall construction
Laying walls from cinder blocks is a simple procedure and practically no different from laying brick walls. Every three rows, it is desirable to lay a reinforcing mesh, which will increase the rigidity of the walls and the strength of the masonry. The first layer of masonry is made with a bonder, then three spoon layers follow.Bonded masonry is carried out across the walls, and spoon masonry - along. Blocks are recommended to be stacked together using a construction tool - a trowel, using a cement-sand mortar to connect the elements. If the cinder block needs to be divided into two parts, it is cut using the sharp edge of a construction hammer or trowel. A cement cushion is laid on each new row of cinder blocks, and the next layer of material is already pressed into it. In order to provide the cinder block masonry with high strength, a reinforcing mesh is laid under each bonded row. Between the elements of the formed wall there should not be large gaps and continuous seams.
Interior finishing final works
Preferences have always been on the side of wood. It is convenient, hygienic, easily replaced if necessary. Not to mention that different types of wood have different healing effects on the human body, and their very atmosphere is an integral part of the traditional bath culture.
The tree must be such that it is not able to overheat and cause burns to a person. Initially, only deciduous varieties were used for the interior decoration of the steam room: ash, alder, birch, poplar, larch, aspen, linden.
Resinous tree species and any conifers are unsuitable for interior decoration. And the choice in the design of the washing room is practically unlimited: ceramic tiles, drywall, and any moisture-resistant decorative materials are appropriate here.
- The material must be in the required condition. At least a day, the lining should spend in climatic conditions comparable to bathhouses. Otherwise, it may dry out to cracks (if too wet) or swell (if dry), which will greatly impair its appearance and performance.
- Nail thin laths onto the finished thermal insulation with a step corresponding to the width of the finishing panels. Use stainless nails (bronze, copper). The best way is to assemble the panels into a groove.
- Always fasten the lining in the steam room horizontally - this will allow you to easily change the lower beams as they wear out, which will prolong the operation of the bath for a long time.
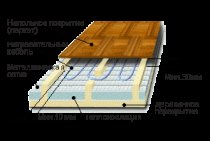
- Wood is best for flooring. Any synthetic coating is poisonous at bath temperatures, and therefore is not suitable. It is impractical to use oak - it is slippery, and therefore traumatic. In addition, it has a low heat capacity. Underfloor heating can be installed in the dressing room and rest room.
If you approach the construction and decoration of the bath creatively and wisely, then it will delight more than one generation of lovers of steam procedures with its unique design and healing warmth.
Choosing materials and insulating a cinder block bath is not as easy as it might seem at first glance. There are a number of thermal insulation products that transform the bath and keep it warm.