Advantages of Dcke plastic gutters
Immediately, we note a very eloquent fact: a written warranty from the manufacturer is 25 years. This is the result of multi-level control in the production process.
-
- Ease of installation. This is perhaps one of the main advantages of these systems. We can say that it is practically brought to perfection - its design is so well thought out. Glueless connection of parts using rubber seals ensures its complete tightness. What could be easier than installing plastic gutters? You insert the structural elements one after the other into each other and snap them into place. In addition, each of the connections becomes a compensator that perceives temperature deformation.
- Versatility. Since the design of the gutter is symmetrical, it allows you to interchange the plugs at the ends and corners of the gutter. Pipes and fittings are fastened using a single universal clamp, which, on the one hand, provides free fastening of pipes, and on the other hand, tightly fixes the fittings. The gutter bracket is very handy. It can be fixed directly to the windboard and with the same success use metal extension cords for this.
- A light weight. Compared to metal gutters, plastic Döcke are more versatile. The weight of 1 p.m of a plastic pipe is only 0.69 kg. This is such a small value that the load from it is not taken into account when designing a building. This makes it possible to effectively use such systems in reconstructed buildings.
- They are not afraid of extreme climatic conditions. Döcke gutters withstand temperature fluctuations ranging from -50°C to +50°C. The use of innovative materials in the production makes them resistant to corrosion, the effects of aggressive substances contained in the precipitation, such as acids and salts. Due to the weak adhesion of the surface with ice, the ice crust frozen in gutters and downpipes easily peels off.
- Fade resistant. Another condition for the quality of the drain is the resistance of its color to the sun's rays. The top layer of Döcke gutter elements is made according to a unique recipe that prevents them from fading throughout their entire service life.
- Clear tube technology. Leaves sticking to the inside of the gutter elements can create a lot of trouble when freezing in autumn and thawing in spring. It can even completely clog the system and you will have to restore its performance. These problems are maximally devoid of Döcke drainage systems, thanks to the company's "know-how" - a special Clear Tube technology that prevents leaves from sticking to the inner surface of the system. The main "protective" role is played by additional longitudinal ribs provided inside the gutters, as well as fittings.
Do-it-yourself installation of deck gutters
Attachment to front board
This method involves attaching a thick board to the facade of the house and is used in cases where:
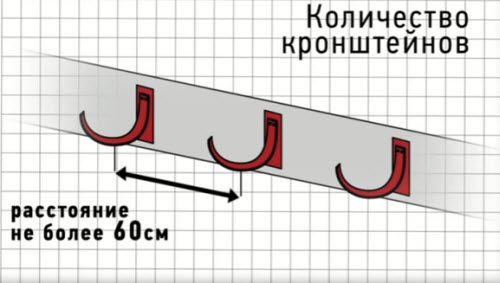
- the distance between the rafters is more than 60 cm, which makes it impossible to securely fix the gutter;
- installation of a drain is carried out in a residential building, that is, already with a roof.
 Mounting brackets to the front board
Thus, mounting the deck drain on the front board allows you to fix the funnels and brackets exactly where you need them.
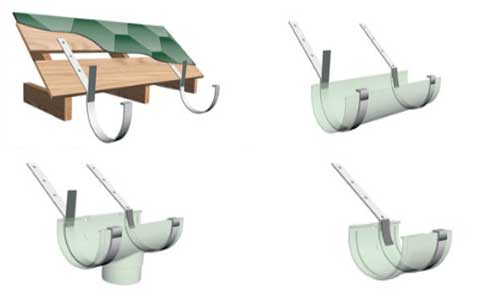
Deck gutters are installed on the frontal board using special plastic brackets.
Mounting on rafters and lathing
In the event that the installation of gutters is carried out before roofing, the need for installation on the frontal board is eliminated. In this case, fastening is carried out in one of the following ways:
- if the distance between the rafters does not exceed 60 cm, then long metal brackets are fixed to the underside of the rafters, which can be bent to provide the necessary slope towards the funnel;
- if it is impossible to securely fix the gutter due to the large pitch of the rafters, proceed as follows: metal extension plates are attached directly to the wooden roof lathing, bending them at the desired angle, and plastic brackets are already fixed on them.
Both methods of installing gutter brackets have their own advantages and disadvantages. Experts recommend the simplest and at the same time frequently used method - mounting brackets on the frontal board.
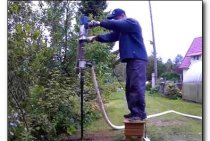
Quick Guide to Installing Deck Gutters
In order for the storm sewer to work properly, a fairly simple instruction should be followed during installation. Let's analyze step by step the procedure for installing Deke stormwater with our own hands:
Install suitable brackets using one of the above methods.
Installation of water intake funnels.
Fastening gutters to brackets with clamps.
Installation of special protective nets on the drain and drain funnel, preventing the penetration of foliage and debris into the storm sewer drain system.
Fastening drain pipes with clamps to the walls of the house.
Connecting pipes with 45° elbows to funnels.
The lower ends of the drainpipes are brought into the storm water inlet or connected to the corner bends to drain water from the foundation.
For proper operation of the drainage system, gutters should be installed in such a way that the roof overhangs are located approximately in their center.
Installation of a drainage system is the main stage of the external decoration of a private house. Properly installed Deke storm sewers of the Standard or Lux series will ensure not only uninterrupted operation of the roof and provide an attractive appearance, but also prevent premature destruction of the foundation and the house as a whole.
( 1 rating, average 5 out of 5 )
Installation of drains Dcke installation instructions

The general rules for installing Döcke gutters are quite simple.
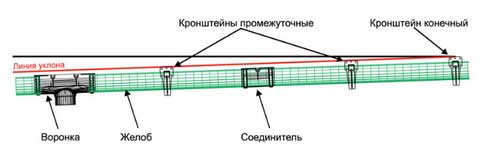
How to fix the gutters and ensure the required slope
Fastening to the front board on a plastic bracket
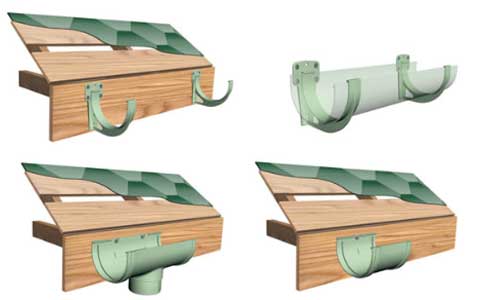
The plastic bracket, funnel and connector are attached to the frontal board using self-tapping screws. In the bracket, the gutter is fixed as follows: first, the edge of the edge of the gutter, which is closest to the frontal board, is brought into its clamp, after which it is lowered into the bracket receiver and, pressing hard at the clamp on the opposite edge, lead the edge into the clamp until a click appears.
The brackets are placed at the level of the cord, which is pulled between the funnel and the end bracket, and the height difference between these points should provide a slope of up to 3 mm per unit length.
Fastening without a frontal board on a metal bracket
This option is used for roofs with a small batten pitch. First, the brackets are attached to the roof structure. The edge of the gutter closest to the roof is led under the hook of the bracket and lowered into its receiving socket, the clamping bar is bent and the opposite edge is fixed. The height difference is provided by bending the bracket in the calculated place. As the intermediate brackets move away from the end, the distance between the end of the supporting part and the bend should be reduced.
How to ensure the optimal position of the elements of the drain relative to the roof
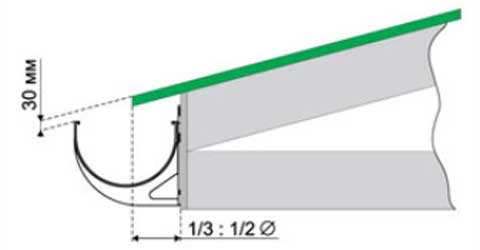
The roof overhang is placed on the gutter at a distance of 30–50% of its diameter.
The gap that needs to be kept between the bracket, its upper part and the roof extension line is 25–30 mm. It is provided by bending the final metal bracket (extension), or by moving the plastic one.
How to ensure stability against deformation under vertical load
- The spacing of the gutter brackets must not exceed 600 mm.
- The funnel must be fixed at two points (respectively, two extensions / brackets).
- The gutter connector is fixed at one point (respectively, extension / bracket).
- The distance between the end part of the corner element and the nearest bracket is up to 150 mm.
- The distance between the plug and the nearest bracket is no more than 250 mm
How to compensate for linear thermal expansions
The gutter is installed in the mating elements until the inscription “Insert until now” is reached - micro-stops are formed along the edges of the line for ease of installation.
Between the end surface of the plug and the structural elements of the house, a distance of 30 mm is maintained.
System sealing
The mating surfaces are cleaned of contamination before the start of installation work. The rubber seals must be firmly seated in the sockets and extend to their edges. It is also necessary to install plugs.