Choosing a battery for the balcony
After the main issues have been resolved, it is necessary to decide on the type of radiator.
All radiators on the market can be conditionally divided into three types: economy class batteries, the middle segment of the product and premium class radiators. The difference between them lies in the quality of the materials of manufacture and, as a result, the service life.
 Types of radiators
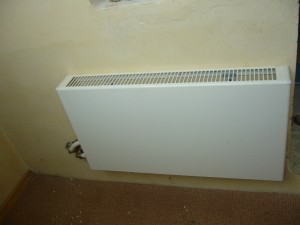
According to what the radiators are made of, it is worth noting the features of their operation: cast-iron batteries will last about 35-40 years. They are extremely durable. However, cast iron radiators weigh a lot and take a long time to warm up. The appearance of a cast-iron battery does not always fit into the modern interior of city apartments.
Aluminum radiators have an original design, weigh a little, and have a high level of thermal conductivity. But with all the positive characteristics, aluminum is very sensitive to the composition of water. Therefore, it is good to install aluminum radiators in houses with an autonomous heating system.
The best option for a battery that can be installed in an apartment in a multi-storey building is a bimetallic radiator. It perfectly withstands pressure drops in the heating system and the low quality of the coolant. The bimetallic battery has good heat dissipation and fits perfectly into the style of a modern city apartment.
Initial work
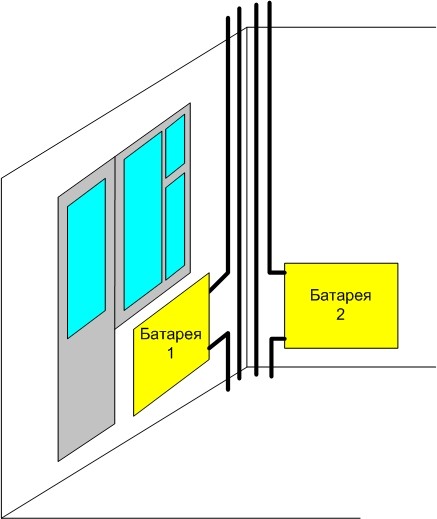
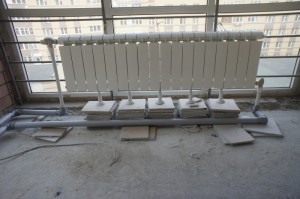
The layout of the radiators on the balcony.
- Bulgarian.
- Perforator.
- Steel plates.
- File.
- Cement mortar (1 share of cement, 3 shares of sand, as much water as required).
- Mounting foam.
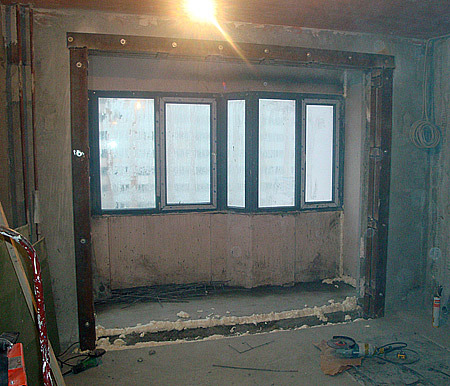
The next step is to install the mounting system in the load-bearing wall. The easiest way to do this is to use a steel plate, which has a thickness of up to 2 mm and a width of 25-30 mm. The length of such a plate will be arbitrary, but preferably 300-350 mm, in order to expose it to a sufficient distance outside the load-bearing wall, but at the same time fully maintain the strength of its fixation. To do this, a series of holes is hollowed out with a puncher to a depth of 50 mm, then they are cleaned and you can try to install a steel plate there. If the plate enters freely enough, then it is possible to fill the hole with a cement solution, where the plate is immediately reintroduced. Some people prefer to use mastic or other available material instead of cement, which is quite possible, but the thermal effect should be taken into account when choosing.
Further, at the place where the radiator will be directly installed, you should use a grinder to make small recesses so that you can mount the entire structure there and not be afraid of any surprises. The ideal option is to finalize everything with a file at the end so as not to leave pointed ends and round off existing corners.
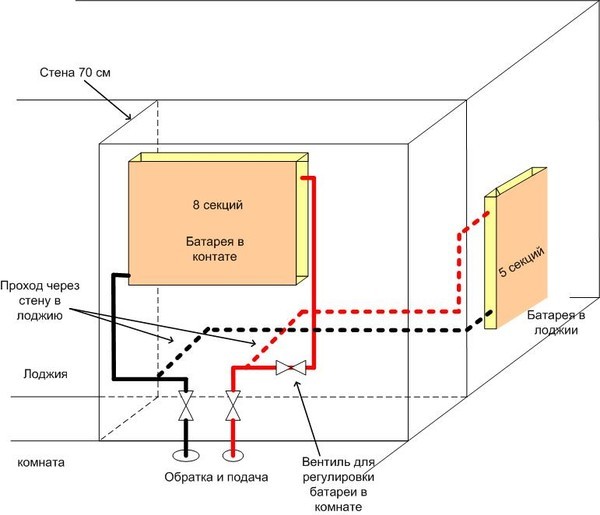
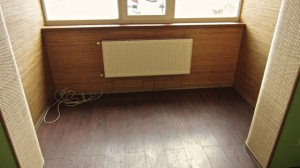
Loggia heating scheme.
After that, 2 places are selected on the main pipe, where additional batteries will be connected, one of which will supply water, and through the other it will be output. Opposite these places, with the help of a perforator, through wall chasing should be organized. Bearing walls have one characteristic feature - they are often so wide that it is extremely difficult to pick up a drill, and often you have to make 2 holes opposite and carefully try to guess the joint. After the holes are made, they can be expanded to the diameter of the pipe plus 0.5 cm, because. pushing a pipe into a hole made end-to-end will be physically impossible. After complete installation, it will be possible to fill the hole with foam or other filler that will be sufficiently tight and resistant to temperatures. Weaknesses should not be left near the walls, because.although they will not play a role as heating, they will let in drafts.
Radiator installation
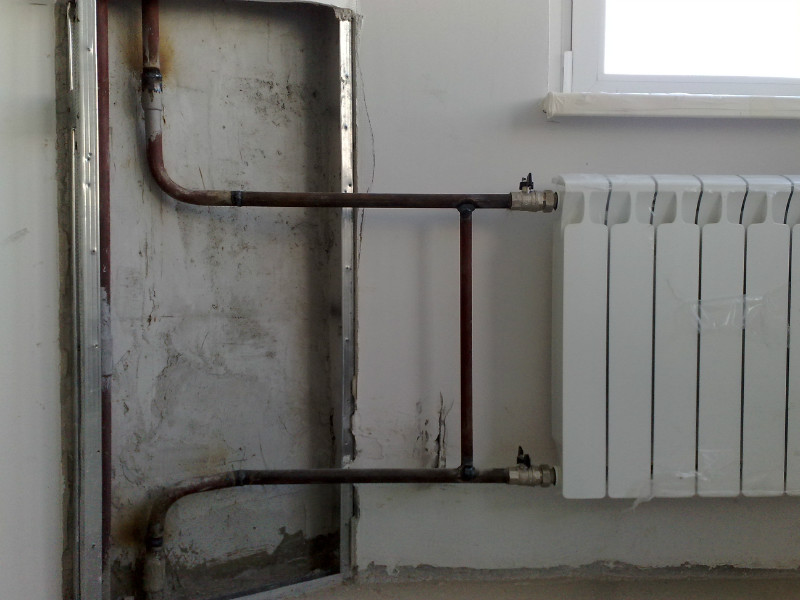 If there is a jumper, the battery on the balcony can be turned off at any time
It is difficult to carry out all the installation work on your own without experience. To save money and time, it is better to invite a professional plumber to do the work. If this option is excluded, and the work will be carried out independently, you need to prepare working equipment:
- sealant;
- Mayevsky's crane;
- welding machine;
-
control and shut-off valves;
- roulette;
- futor nuts and plugs;
- die and vise;
- pipes;
- perforator;
- Bulgarian;
- fitting.
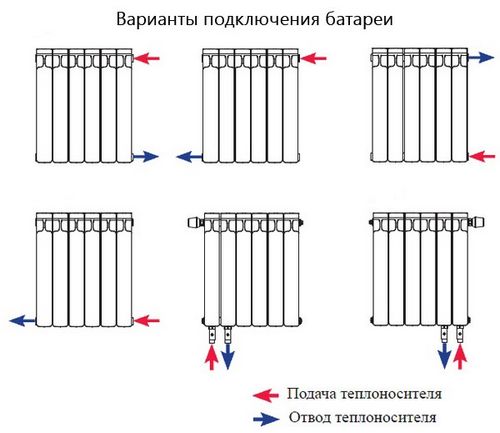
 Various schemes for the movement of the coolant in the balcony radiator
Connection is carried out using the following technology:
- Connection to the main pipe. Using a grinder, small cuts are made on the outside of the threads on the pipes and fastened with fittings that have additional branches. To provide waterproofing, fum-tape or tow is used.
- Pipes are threaded through holes in the wall. They should protrude beyond the wall by approximately 8-9 cm. An angle fitting is attached to the second end of the pipe, which must occupy a strictly vertical position in space.
- Hang a radiator. It is necessary to mark on the wall with a pencil the places where the brackets will be attached. Using a puncher, a hole is made in the wall and the bracket is fixed.
-
The battery is fixed by laying a rubber washer between the parts and the bracket.
- Using the building level, adjust the location of the radiator.
- The plumbing is being connected. Two pipes about 25-30 cm long are removed from the radiator, one end is connected to the battery, and the other is closed with a fitting.
- In conclusion, they proceed to the vertical installation of pipes, which are necessary for the supply and removal of coolant from the radiator. They are screwed into ready-made fittings, all connections must be tight.
Installation of the battery on the balcony. Central heating on the balcony
15.09.2013
On cold days of the winter and autumn seasons, even on a well-insulated balcony it is cold and uncomfortable. Neither insulation nor double-glazed windows will provide good warmth if there are severe frosts outside. Therefore, many are interested in whether it is possible to install a battery on a balcony with their own hands. It is possible, but this method of insulation has many difficulties, and if you are patient, a battery will appear on your balcony.
You will have to go through the following steps:
 – an engineering calculation of the thermal conductivity of insulation is carried out;
- you need to get the conclusion of a specialist who has a special certificate that the battery will not freeze on the balcony;
- get permission to install a battery on the balcony;
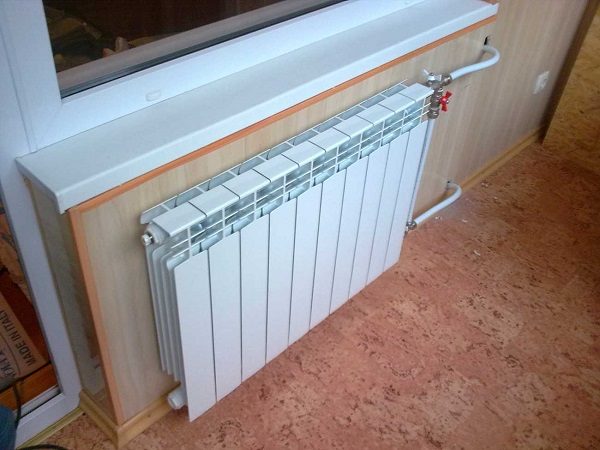
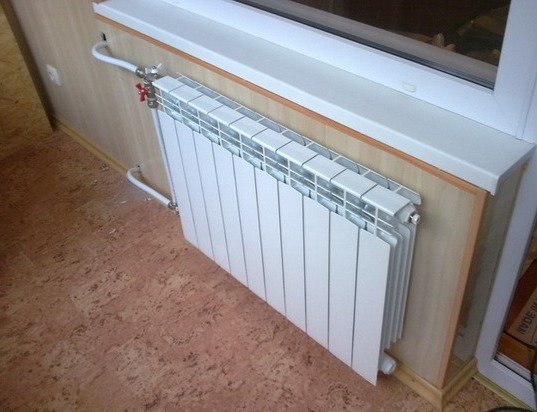
- put a battery on the balcony. The most suitable choice is a sectional aluminum radiator
It is lightweight, which is important for a balcony and has a high thermal conductivity. To find out how many sections you need, divide the area of \u200b\u200bthe balcony by two, if the water in the risers is not very hot, add another section
Installing the battery
 1. You have received permission to bring the battery to the balcony. First of all, do not be too lazy to glue the wall behind the battery with a foil screen. In this case, you will ensure maximum heat transfer from the radiator, since the outer wall of the balcony will not warm up and all the heat will go to the balcony itself.
2. Installation of the battery should be carried out with the heating riser at the entrance blocked. To do this, you need to contact the plumber of the Housing Office, which serves your home. Is it possible to take the battery to the balcony from the room or kitchen? This is usually how it is done. From the room connected to the balcony, it is removed from the old place and the battery is transferred to the balcony on the same wall, only from the other side.
3. Drill holes in the wall for pipes. For these purposes, a flexible plastic-aluminum hose is usually used. Then a tee with a valve is installed and now you can hang the battery.
3.Position the radiator sections strictly vertically and horizontally. Level check the correctness of their location. To install the battery, you will need three brackets: two are mounted on top, and one on the bottom. If the radiator has more than 12 sections, then an additional top mount will also be required. The main weight of the battery must be supported by the upper brackets.
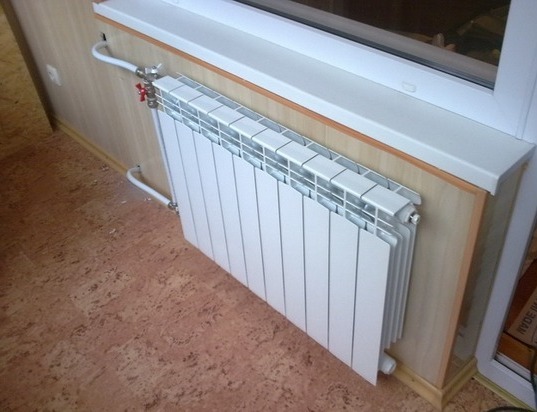
4. Take out the battery as follows. It is necessary that the distance from the window sill to its upper part be 100 mm or even more. The window sill itself should not close the radiator. The battery should recede at least 120 mm from the floor, and 20 mm or more from the wall.
5. Connect radiators. This must be done so that there are no kinks in the upper pipe in the direction from the battery down, and the lower pipe in the opposite direction. Otherwise, there is a possibility of an air lock in the pipe. If the battery has more than 12 sections, then it is better to make a diagonal connection, since more sections may be cold.
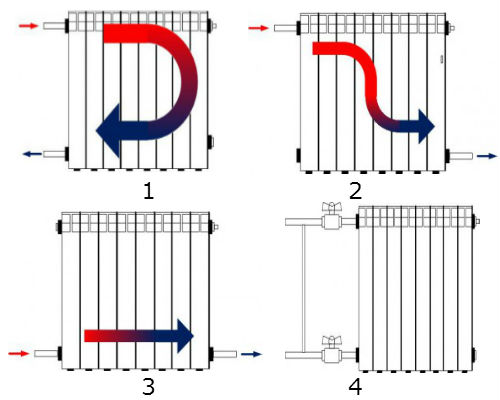
Connection diagrams for aluminum radiators
 1. Radiator with a tap, but without a jumper. Thanks to the presence of an American tap, you can turn off the water and remove the battery if you need to clean up after it, glue the wallpaper, or add more sections to it. If there is no jumper, then such procedures can be performed only in summer and spring, when it is not the heating season.
2. Radiator without a tap, but with a jumper. This jumper will allow you to close the battery at any time of the year, regardless of the heating season.
3. Radiator with tap and jumper. Due to the fact that there is a tap on the jumper, all the heat passes through the battery without any loss.
Why you can not take out heating
The requirements of the law are unambiguous, but still: why not, even if it is very necessary?
Heating can not be taken out to the balcony, and there are good reasons for that
First, there is the risk of flooding. In winter, when the temperature is below 0 degrees on the balcony, the radiator or water floor can freeze and break through. In many cities, in order to get permission, they simply insulate the balcony. However, in Moscow, even for insulated balconies and loggias, the ban remains.
Secondly, if you connect a radiator or water floor to a central heating system, they will create an additional load. The water pressure in the system will weaken, and the pipes throughout the house will become colder. Who will like it?
Thirdly, the cost of heating, when the house has a central system, is calculated by square meters. And if you connected an additional device, all tenants will pay for it. As long as they don't know, you're safe. But if the deception is discovered, they will sue or begin to deal without a trial - which is even worse ...
Fourthly, if you are going to sell an apartment, you need a new technical plan (as the technical passport is now called), which you will order from the BTI. This includes the boundaries of the thermal contour of the apartment, which you have arbitrarily changed. Therefore, you have two options: to dismantle all additional heating elements, or to reveal your deception and seek legalization of the changes.
Also on the site there is an article on how to properly operate PVC windows. It discusses the main problems that arise with windows and how to prevent them.
Types of batteries installed on balconies and loggias
If your decision to move the heating radiator to the balcony is final and firm, and you have received the necessary documentation and permissions for it, you should be puzzled by another important issue: choosing the right type of battery.
Today, the range of products of this kind, made from various materials, on the market is quite wide. It includes batteries of the following classes:
At the same time, it should be noted that heating batteries made of cast iron, which are characterized by high strength and durability, have the longest service life (about 35 years).However, radiators of this type do not have a very high inertia, that is, they warm up for a long time and cool down for a long time.
Batteries made of steel, which are usually divided into two types, depending on the design features: tubular and panel, will last about 10-15 years. Their plus: high heat transfer. Moreover, panel-type radiators with excellent technological characteristics and affordable cost are in the greatest demand.
Steel tubular heating batteries are much more expensive, but they have a more interesting design solution and can be produced in a large number of colors and sizes. Among them, it is worth highlighting stainless steel products, which have the highest cost and the best consumer qualities.
The average service life of aluminum radiators. It is 15-20 years old. Their advantages: original design, minimum weight, high thermal conductivity and small size. Due to these advantages, aluminum sectional batteries, along with bimetallic ones, are the most popular.
Important: Aluminum radiators are sensitive to the PH level of the coolant, so it is recommended to install them in private houses with an autonomous heating system. For a city apartment, the best option would be bimetallic radiators that are resistant to water hammer, independent of the quality of the coolant and having good heat dissipation
For a city apartment, the best option would be bimetallic radiators that are resistant to water hammer, independent of the quality of the coolant and having good heat dissipation.
You can calculate the required number of sections for a heating battery on a balcony as follows: divide the area of \u200b\u200bthe room by 2 (if you plan to install a radiator on an aluminum balcony) or by 1.5 (if you use a bimetallic battery). As a result, we get the required number of sections. If necessary, one or two sections can be added if the water in the pipes is not high enough temperature.
Preparing for installation
Radiator selection
https://youtube.com/watch?v=Ur_SpsKOPso
You need to choose the type of radiator based on its technical characteristics, the most important of which is the working pressure. It must comply with the limits of pressure drops in the heating system of the house. As a rule, in old five-story buildings, the value of this indicator is 6 - 8 atmospheres, and in multi-storey buildings (10 - 14 floors), the pressure level already reaches 12 - 15 atmospheres.
The second important indicator is resistance to water hammer. The service life of the radiator and the quality of heating depend on this characteristic.
With a centralized heating system, it is almost impossible to avoid water hammer, therefore, when choosing equipment, you need to pay attention to this technical characteristic. Additional important factors include service life, ease of installation and radiator design.
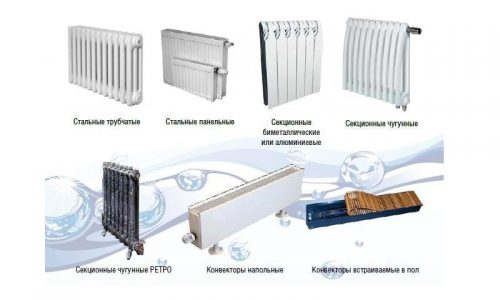
Types of radiators
- Cast iron. They have the longest service life (up to 35 years). The main disadvantage is the long heating and cooling.
- Steel panel. Will last about 15 years. They are valued for high heat transfer rates and other technical characteristics, as well as low cost.
- Steel tubular. Available in a variety of colors and designs to suit any interior. Differ in excellent consumer properties. The disadvantages include high cost.
- Aluminum. The average service life is 15 - 20 years. They are characterized by high thermal conductivity and low weight. The main disadvantage is the sensitivity to the PH of the filler, therefore they are recommended for private houses with an autonomous heating system.
- Bimetallic. The best option for an apartment, as they are unpretentious in terms of the composition and quality of water, have good heat dissipation, and are resistant to water hammer.
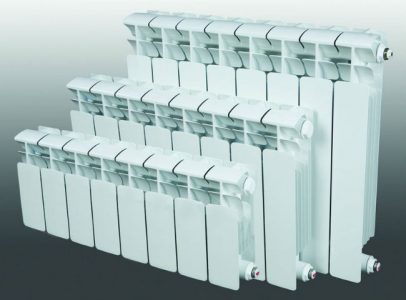
Calculation of the number of sections
All types of radiators are composite, so you can choose the number of sections needed to heat a particular room, depending on the area. The calculation must be made on the basis of generally accepted norms:
- one aluminum section per 2 sq.m;
- one bimetallic section per 1.5 sq.m;
- add 1-2 sections for reinsurance.
Selecting a connection option
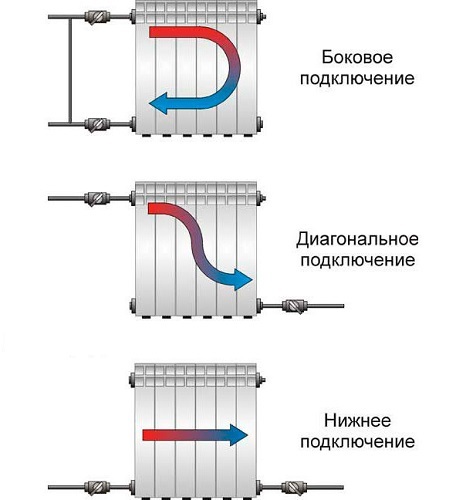
- Side. The most common mounting method. The inlet and outlet pipes are mounted on one side of the radiator. The main requirement is to observe the distance between the fittings, otherwise the radiator will not warm up enough.
- Lower. With this option, both pipes are mounted at the bottom of the radiator - inlet on one side, outlet on the other. The main disadvantage is a small heat transfer.
- Diagonal. The input is mounted on the top on one side of the radiator, and the output is mounted on the bottom on the other. With this method, the smallest heat loss is achieved, so it is considered the best.
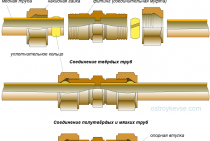
Which pipes to choose

For work, it is recommended to choose reinforced polypropylene pipes, because they:
- easy to bend, which allows for installation of any complexity;
- do not deform during operation;
- do not require welding - flux is applied to the joints and sealed with a special blowtorch;
- have a high heat transfer coefficient.
It is possible to use copper pipes, but this is a more expensive and difficult to install option. Ordinary propylene quickly deform and lose their attractive appearance.
Stages of work
Before heating the loggia, it is necessary to dismantle the old battery in the room, if it is planned.
In most cases, the installation of a heating radiator in a loggia is carried out in the following sequence:
- The first step is to cut the battery in the room (kitchen, living room, bedroom). You need to cut in two places: at the battery and pipe (about 100 mm from the area of \u200b\u200bthe intended connection). After that, it is required to drill holes in the wall with a diameter of 20 mm, which will allow the removal of the riser to the loggia. First, the kalach is removed, after which fittings, eyeliners are mounted, and finally, the riser itself.
- A good solution would be to choose polypropylene pipes, which have excellent performance. In addition, when using them, it will be easier to do all the installation work yourself.
- Next, you need to attach a new battery to the wall in the loggia in order to mark the zones of future fasteners using a level. Then the brackets are mounted. It has already been noted above - it is necessary to install two lower and one upper bracket. For a small radiator, this will be enough.
- Hanging the battery on the loggia, on the installed brackets is quite simple. After installing the radiator, plugs and Mayevsky taps, taps are installed.
- If polypropylene pipes were used, then various elements (fittings, connections) were attached to them.
- After that, taps are installed and pipes are connected. Be sure to check the tightness of the installed pipes and all connections.
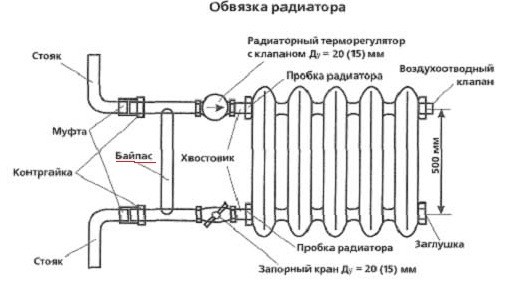
Possible connection schemes
In the loggia, the battery can be connected in three ways:
- With jumper and faucet. An excellent solution for this room, because all the heat will pass through the battery without any loss;
- With a jumper, but without a faucet. The presence of a jumper allows you to close the flow of hot water in case of excessive heating of the air in the room;
- Without jumper, but with a tap. The presence of such a solution allows not only to block the flow of water, but also to temporarily dismantle the radiator for the necessary work.
The removal of the battery allows you to make a full-fledged room in the loggia for permanent residence or for solving any other problems. Of course, everything must be coordinated with the housing inspection and other regulatory authorities.
https://youtube.com/watch?v=olrD9qxCAhM
In the event that permission from the authorities has not been obtained, then as an alternative, you can consider installing a system of underfloor heating, which are also ideal for loggias and balconies.
If possible, it is best to entrust the work to professionals who are familiar with the features of installing heating radiators and putting them into operation.
The nuances of moving the radiator to the balcony
 In a house with central heating, you need to take permission to transfer the radiator to the balcony
At the stage of designing a residential building, many criteria are taken into account: the operating temperature of the coolant and the number of batteries installed in the house, internal system pressure. As soon as an additional battery is installed in the loggia, the pressure in the closed circuit and the temperature of the coolant drops.
If 100 radiators are installed according to the project, and there will be 101, the changes will be imperceptible. But if the majority of homeowners decide to move the radiators to the balcony, the temperature in the apartments in winter will be several degrees lower. Therefore, it is difficult to obtain special permission to carry out these works.
If the temperature in the loggia drops below zero, the system may become blocked due to freezing of water in the pipes, and the heating radiator will break. In this case, you will have to restore the system and pay a fine for an administrative offense. Therefore, it is recommended to consider alternative methods of heating.
If the decision is made to transfer the heating devices, you need to be patient to implement the following steps:
- Carrying out engineering calculations of the thermal conductivity of the insulation.
- Obtaining a conclusion from a specialist that freezing of the system is impossible even at abnormally low temperatures outside the window.
- Obtaining permission to install a radiator in the loggia.
- Installation directly.
Self-transfer battery tools, materials, instructions
Self-installation of a battery on a balcony or loggia is a rather difficult task that requires certain skills and abilities. Therefore, in this case, it is much more rational and practical to invite a professional plumber to perform this work.
If you plan to cope with such an alteration on your own, for starters, you will need to stock up on the appropriate materials and tools.
In addition to the radiator itself, you will also need a set of plumbing fixtures, including:
- Mayevsky crane;
- Shut-off and control valves;
- Plugs and futorny nuts;
- Pipes;
- Fitting;
- Bulgarian;
- Perforator;
- Vice and die;
- Roulette;
- Apparatus for welding;
- Sealant.
Before you conduct heating on the loggia, you need to decide according to which scheme the connection will be made. In this case, it is better to use the option with a jumper, since it will allow you to perform any operations with the radiator both in winter and in summer, without causing inconvenience to others.
Getting to the main work, follow the instructions:
1. We make a connection to the main pipe. To this end, with the help of a grinder, we make a small incision, cut the external threads on the pipes and fasten them with a fitting that has an additional branch.
An important point of this stage: waterproofing of all joints, for which you can use tow or modern fum tape.
2. Through the holes cut in the wall, we pass pipes with external threads applied to them on both sides so that they come out about 8-9 cm. At the second end of the pipe, we fasten the corner fitting so that it “looks” vertically.
3. We hang the radiator. To do this, you must first mark the fixation points and install the brackets (for cast iron - anchor or reinforced), drilling the wall with a puncher and fixing them on a pre-prepared wall that has been fully finished using wallpaper, decorative paint or plaster.
4.We fix the radiator by laying rubber washers between the parts of the battery and the brackets.
5. We adjust its location using the building level.
6. We make the connection of the eyeliner. From the radiator we release two pipes 25-30 cm long, one end of which will be attached to the battery, and the other - closed with an angle-type fitting.
7. We proceed to the installation of vertical pipes that serve to supply and drain water from the radiator. They must be screwed into the finished fittings, be sure to seal all connections.

A few tips:
- To take the battery to the balcony and fix it there, use 2 brackets at the top and one at the bottom.
- Place the radiator at a distance no closer than 2-4 centimeters from the wall, 10 centimeters from the windowsill and 12 centimeters from the floor.
- Place a foil heat-reflecting screen on the wall behind the radiator.
- It is advisable to use plastic polypropylene pipes, which are connected to the fittings by soldering.
Performing work on installing a battery on a loggia requires great care and attention. This is especially true for the quality of welding and sealing of all joints, on which the entire subsequent operation of the system depends.
This video shows detailed instructions on how to bring the battery to the balcony with your own hands.
Main job
- Pipes.
- Fitting.
- Sealant.
- Bulgarian.
- Plate and vise.
- Welding machine.
- Roulette.
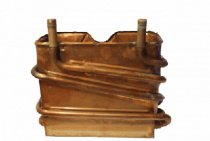
Scheme of the device of the heating radiator.
At this stage, it is best to start by connecting to the main pipe. To do this, a small cut is made with a grinder, external threads are cut on the pipes and they are fastened with a fitting that has 1 additional branch
At the same time, it is important not to forget about waterproofing, which can be laid both with tow and modern tape, which will completely protect the threaded connection from the passage of water.
Pipes are brought out through the holes made so that they extend 8-9 cm beyond the wall. Before installing these pipes, external threads should be cut in the same way at both ends, because. this segment will only be an intermediary for the passage of the walls. At the second end, a corner fitting is screwed on, which will already “look” vertically.
During this step, you will need to place the batteries as accurately as possible in the place where they will be located further. Pipes 25-30 cm long are removed from them, at the end of which the corner fitting will again be screwed on, the second end is welded tightly to the battery, and the seams must be made so high quality that even after 100 years they remain in their original form. It is better to cook pipes not on the balcony, but elsewhere in advance.
After these steps have been completed, you can proceed with the installation of the last element - vertical pipes, which will supply and drain water from the battery. These pipes are also screwed, but already in ready-made fittings
During all fastenings, it is important not to forget about the sealing of the joints, because. otherwise, all the work will not only not benefit, but also greatly harm
After the successful completion of work on the balcony, everything is covered with paint and you can begin to create a protective external frame, which will be designed not only to hide the battery itself from the eyes, but also not to interfere with the heat exchange of the batteries with the environment.
Additional aspects:
- PVC pipes.
- Scissors for cutting polypropylene.
- Apparatus for diffusion welding.
All work can be done not only with metal, but also with modern PVC pipes, the removal of which will be inferior only in pricing, while a more aesthetic appearance will be created on the balcony. This type of installation will be even more convenient, because. the pipe connection will no longer be threaded, but soldered, which will ensure the complete absence of leaks.
Removal of batteries should be carried out as quickly and efficiently as possible, because. do not forget that their installation is illegal and penalties may follow.
All the time for take-out, if we exclude the fastening system, will take no more than a day, because. cutting, assembly and installation take a matter of minutes, and only high-quality welding can delay the process a little.
We adhere to the letter of the Law
Carrying out the removal of the battery to the balcony without completing the relevant documentation, you need to understand that after this event you run the risk of "running into trouble", the most minimal of which will be the imposition of a fine on you.
Note: Currently, the fine for unauthorized transfer of heating equipment is 2,500 rubles for individuals and 70,000 rubles for enterprises.
But, in this case, the case will not be limited to the payment of a fine. You will either have to dismantle the battery installed outside the apartment, or, having received written confirmation from all the owners of the living space, prove in court that such an alteration is safe for the heating system and does not affect the quality of life in the house of other residents.
Based on your application, the court will make an appropriate decision. He can allow the changes you made, after which they will be made to the Technical plan of the apartment or declare them illegal. Then you will have to dismantle the installed equipment within the specified time frame.
If you doubt the need to move the radiator, we recommend that you familiarize yourself with an alternative heating option. How to make a warm floor on the balcony with your own hands, read on our website. The article discusses the features of all variants of this system.
It is also possible to use ceiling infrared heating on the balcony. It has a number of advantages and is much easier to install.
But whichever option you choose, in any case, heating will only make sense if the room is well insulated. How to do it right, we told here.
Is it legal to bring the battery to the balcony
The husband is insulating the balcony and wants to bring a battery from the room there. Wouldn't it be a problem? Won't freeze? Has anyone done this?
It is illegal to display heating systems on balconies and loggias. According to the LC RF art. 15 point 5, loggias and balconies are not residential premises
It is also worth paying attention to Decree of the Government of Moscow No. 73-PP of February 8, 2005, which states:
Heating on the balcony is not included in the list.
The fine for such an installation seems to be 2500 rubles.
To legalize the heating on the balcony, you need to prove through the court that it is safe, and collect the signature of all the owners.
In old houses, it is very difficult to get permission for redevelopment and make heating legal by moving batteries to a balcony or loggia. In new buildings, such an action as the removal of a heating battery to a balcony can be carried out, it only needs to be coordinated with the necessary authorities, otherwise there may be problems!
By law, it is forbidden to take batteries to the balcony, because this increases the load on the entire heating system, and if the water in the battery freezes in winter, the battery will not withstand and burst, and residents will be flooded.
In addition, if you make heating on the balcony and take out another radiator there, it may automatically become not so warm for other residents, so their approval is necessary.
But permission can be achieved if you contact the BTI:
If you install the battery on the balcony yourself, then you may need to pay a fine for this - 2.5 thousand rubles for a private trader and 70,000 rubles for an enterprise. Perhaps they will force them to dismantle!
However, it can be proved that there will be no water freezing in the system in winter and the installation of a heating battery is safe, go through all the instances, obtain permission and heat the balcony in winter with a battery.
I have 2 batteries moved to an insulated loggia, but I don’t know for sure whether it’s legal or not. And that's why. I bought the apartment with the arches already cut through and the windows to the room and kitchen removed.The apartment was unrepaired, the batteries had already been moved by the former owner. Then she stood like that for 6 years, and I bought it.
But the plan of the apartment already included a loggia in the living area, that is, if the initially heated area was 36 sq. m, then I already bought it with a heated area of 41 (36 +5) sq. m. All these years and the next 4 years that I live in an apartment, a heated area of 41 square meters was paid. m.
Of course, it is forbidden to transfer batteries to the loggia, and even more so to the balcony, without the consent of the BTI and the project, since fines and difficulties in selling the apartment are possible.
If we do not consider the legality of this action in relation to the Housing Code, and the fundamental possibility of taking the steam heating battery to the balcony, let's try to turn to common sense:
For example, in the case of my balcony, I would not dare to take such a step - despite the fact that it is glazed and upholstered with boards inside and out, the temperature on it drops to 0 in winter, and to -5 degrees (when it is -25 outside, - thirty). Will the remote battery cope with sub-zero temperatures? I doubt. Perhaps for some time it will withstand night-day temperature fluctuations, but soon it will probably burst, creating problems for you and the neighbors below.
Perhaps the solution to this issue will be to combine a balcony or loggia into one living space?
(by placing double-glazed windows and a "warm" floor system on it)
In this case, the battery (radiator) does not need to be taken out anywhere.
It is illegal to take central heating batteries to the balcony on your own.
When a residential building project is calculated, everything is taken into account in it - the number of radiators in the house, a certain water temperature in the batteries, pressure in the heating system, permissible deviations from the calculated values.
If additional batteries appear in the house, the pressure in the system drops, and the water temperature drops. If an additional battery appears in one apartment, then this will hardly change anything, but if everyone does this, then the water temperature will drop by several degrees, it will be cold in winter. Now it is clear why it is not at all easy to get permission to install a central heating battery on the balcony.
But if a person decides to get a legal permit, he will have to carry out an engineering calculation of the thermal conductivity of the insulation, get a specialist’s opinion that freezing water in the radiator on the balcony is impossible, and only after that get permission to install the radiator on the balcony.