Balcony preparation for insulation
The crumbled filling of the joints is cleaned, and holes, cracks and cracks are blown out with foam. Moreover, seams with a width of more than 6 cm are recommended to be filled gradually - in several stages.
Irregularities are eliminated on the surfaces of walls and ceilings. Removes dust and heavy contaminants
The floor is carefully swept (it is better to vacuum). If there is electrical wiring on the balcony, it is important to make sure that it is intact.
To make the insulation of the balcony with penofol, you will need the following construction tools and materials: a drill, a knife, self-tapping screws, a stapler, dish-shaped dowels, mounting foam, wooden blocks and slats, foam plastic, foil tape, foam plastic and others.
How to prepare a balcony for waterproofing
The arrangement of a moisture-resistant barrier begins with the preparation of the surface to be protected.
Moreover, the preparation of a balcony for applying a layer of waterproofing can be divided into two stages:
- Preparation of horizontal planes.
- Preparation of vertical planes.
The horizontal preparation stage begins with the dismantling of the weakened sections of the main balcony slab. Moreover, loose inclusions are broken open with a jackhammer, and cracks are expanded by a grinder. After that, the entire surface is cleaned with a metal brush. After all, waterproofing the main balcony slab involves the penetration of the insulating composition into the very structure of concrete. And for this it is necessary to destroy all fatty and paint-and-lacquer membranes that prevent contact of the insulator with the capillaries of the plate.
The stage of preparation of the horizontal is completed by the formation of a new slope-forming layer. To do this, pour a concrete screed over the cleaned slab with a thickness of no more than 3-4 centimeters and a slope of 1-2 degrees (from the wall to the railing).
Vertical planes are prepared after hardening of the slope-forming layer. Moreover, waterproofing on a balcony or loggia involves the arrangement of a hydrophobic barrier, both on the surface of the wall to which the enclosing structure adjoins, and along the perimeter of this architectural element (from the inside or outside).
Therefore, in the process of preparing the vertical, the same softened areas of concrete are removed, cracks are expanded and a fence is formed (or updated) along the perimeter of the balcony slab.
At the end of this stage, the vertical plane is re-plastered or the embroidered cracks are simply filled with fresh cement patches.
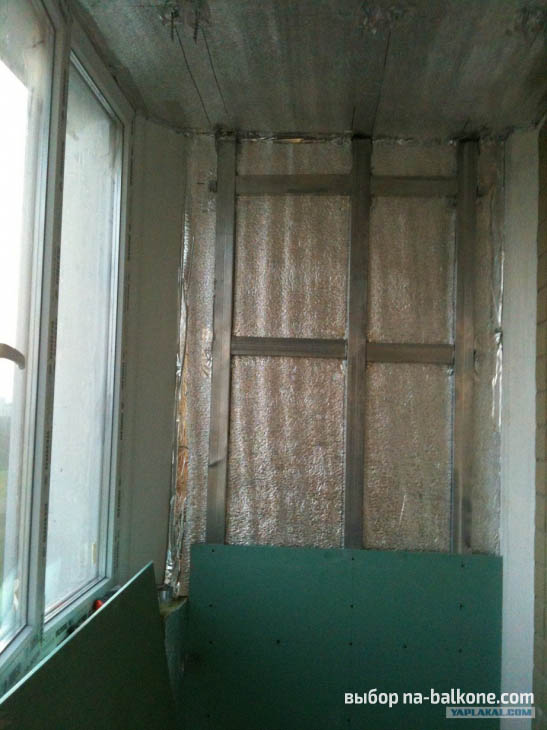
Insulation installation
Despite the ease of installation and versatility, when insulating the loggia with penofol, all technical conditions and instructions for use should be observed. Only in this case it is possible to create an effective heat-insulating circuit. For the installation of penofol, see this video:
Like any finishing work, the installation of heat-insulating material begins with preparatory work.
Surface preparation
First of all, it is necessary to close up all the cracks and through holes in the balcony structure with mounting foam or putty. Then the surfaces are cleaned from loosely holding finishing elements - bubbling paint, crumbling plaster, etc. If necessary, you can repair too large flaws in the walls with plaster.
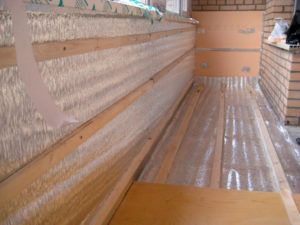
Wall insulation
When installing the material, it should be remembered that the main working element in it is isolated air bubbles. Therefore, in no case should it be allowed to reduce its internal volume, compress the foam sheet. To do this, it is even recommended, after fixing it to the wall, to create a crate of thin laths on top of it. This will prevent the inner lining of the balcony (drywall, chipboard, plywood) from pressing too tightly against the insulation. Penofol is attached to the walls with liquid nails, self-tapping screws or plastic dowels - "fungi".
Rolled material is quite simply cut into sheets of the desired size using simple scissors. It is recommended to mount such sheets in two layers, with the second layer offset relative to the first. Thus, greater tightness is achieved by overlapping the butt joints.
Floor insulation
For effective insulation of the supporting balcony slab, a complex option should be used, consisting of a wooden crate, foam (as an option - foam) and foam sheets. This is again due to the fact that penofol is not recommended to be crushed, reducing its thickness. Using dowels, we fasten the slats or bars to the concrete slab. Then we fill the gaps between them with pieces of foam, and from above we lay the foam sheets with foil up. We seal the joints between the sheets with adhesive tape, and close them with plywood. As a finish, any floor covering is laid on top of plywood - laminate, linoleum, tile.
Ceiling insulation
Another mandatory step in the insulation of the balcony is the installation of insulation on the ceiling. Many owners neglect this, however, quite a lot of heat can escape through the top plate. This is especially noticeable if the balcony of the neighbors from above is not insulated. Also, on a cold concrete ceiling slab, condensation and frost may form, which ultimately leads to the appearance of dampness, fungus and mold.
Initially, a frame should be built from longitudinal rails, which are attached to the ceiling plate with dowels. Then sheets of penofol are attached to it, in two layers, overlapping with offset joints. A second layer of rails is attached over the insulation, but already in the transverse direction. This layer of lathing will serve as the basis for attaching decorative cladding - plastic panels or plasterboard sheets. For choosing penofol and its analogues, see this video:
Due to the fact that penofol is a very technological and functional material, its installation will not cause any difficulties even for a non-professional. Interior decoration of a balcony or loggia with this material will allow you to turn them into a full-fledged living space, protected from any external influences - cold and heat, dampness and dust, noise and exhaust gases.
Preparatory work
Before starting the main work, it is necessary to prepare two types of surfaces: horizontal and vertical. First you need to inspect the ceiling, determine the places of leakage, traces of mold, destruction. It is these areas that will have to be cleaned of plaster residues, covered with sealant.
It is necessary to remove the coating from the floor, to determine the areas where the concrete crumbles or flakes off. They should be processed with a perforator, cleaned of dirt and dust.

Rice. 3. Preparatory work.
Small cracks expand with a grinder, the floor is cleaned again. If the reinforcement is exposed, it is necessary to remove rust from it, then apply an anti-corrosion compound. Concrete is restored using cement mortar applied with a slope of 1-2% to the parapet.
After the mortar on the floor is completely dry, the part of the concrete that has peeled off the walls is removed, the fence is updated or changed. Concrete patches can be applied to the walls, but it is better to plaster all planes. If glazing and insulation are planned after the repair, it is necessary to make a base from foam blocks in place of the railing (parapet).
External processing may require the roof and walls. Surfaces are prepared in the same way as the inside. Extensive cracks are filled with mounting foam, small ones with sealant. The concrete roof is covered with a penetrating compound.
Warming of different surfaces on the balcony
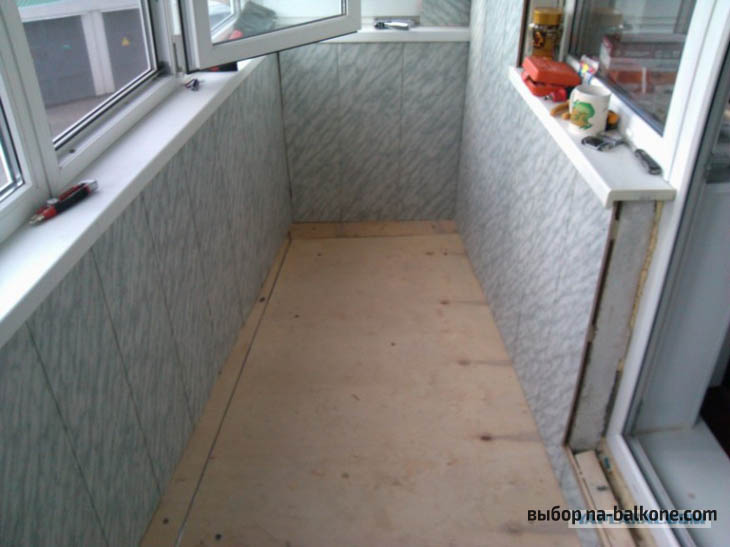
Floor
A rough floor is laid out and fixed with a crate of bars. Be sure to keep gaps of at least 20-30 mm between the wall / parapet of the balcony and the extreme structural elements of the crate.
Styrofoam is laid between the lags
At this stage, it is important to avoid the appearance of gaps between the parts of the insulation (visible gaps are filled with foam, the excess is carefully cut off) and the protrusion of the coating sheets above the crate.
Markings are left on the walls according to the location of the lag.
Penofol sheets are laid along the balcony (300-350 mm are added in length to fit).
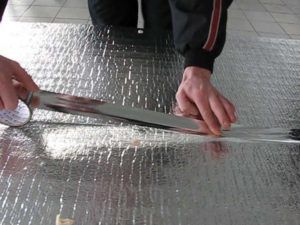
It is better to fasten the material to the frame with a furniture stapler. Strips of insulation are cut with a knife and arranged end-to-end
The seams are sealed with aluminum tape.
Sheets of plywood or chipboard are stacked and fixed with self-tapping screws (for the correct location of the fasteners, they are guided by the markings on the wall).
Excess insulation is trimmed.
A decorative coating is laid.
Penofol with one-sided foiling is laid with foil inside the balcony. The sections of the canvases are mounted end-to-end, the joints are closed with foil tape

The joints of the foam strips are closed with foil tape
Walls
- Penoplex sheets are fastened with dish-shaped dowels. In order not to form long vertical seams, each subsequent level of sheets is laid out with an offset (like brickwork). Penoplex sheets are cut to size and contours of the walls.
- The joints of the plates are filled with foam, and the protruding parts are cleaned.
- A roll of penofol is cut into the necessary pieces, which are applied to the walls.
- The insulating coating is fixed with screws with wide caps. The joints of the plates are glued with foil tape.
- On the walls sheathed with foam, a rack lath is mounted (the size of the rails is 20 × 40 mm), the fixing strips are located parallel to the floor, at a distance of 400-450 mm from each other.
- Covering surfaces with decorative material.
To preserve the insulating properties of the insulation, it is recommended to glue the sections of the sheets with adhesive tape on a flat surface (avoid joining the sheets in the corners)

Penofol is fixed on the walls with self-tapping screws
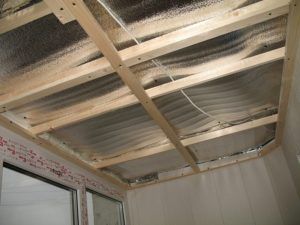
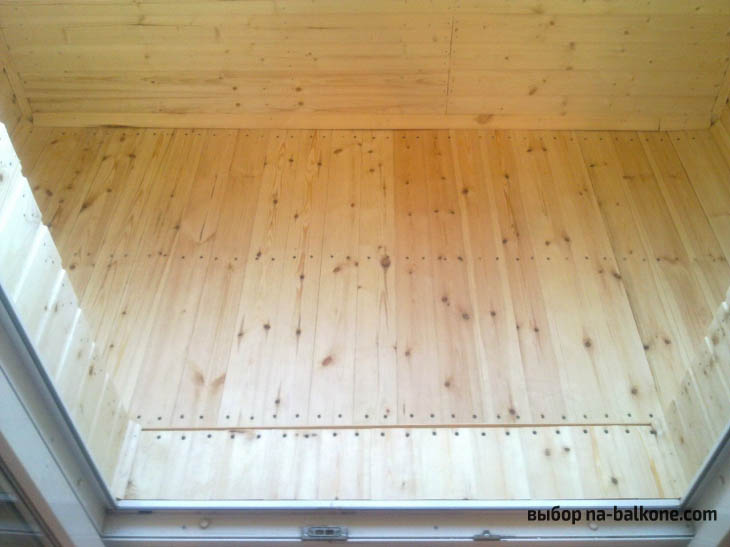
Ceiling
- The first layer of penofol is fixed with slats directed across the balcony.
- The second layer of the coating is fixed with slats, placing them in the longitudinal direction. One line of rails fixes the insulation in the center of the ceiling, the other two lines are placed in parallel, at a distance of 100 mm from the borders of the ceiling. The coating is cut out taking into account the allowances, which are fastened with foil tape end-to-end with the lines of the paintings on the wall.
- The slats are first attached loosely so that it is possible to level the surface (they serve as the basis for the subsequent decorative coating). The correct location of the crate is set using a level. Wooden wedges will help provide the right height in the right places.
- Then the straps are fixed firmly.
- In the future, the ceiling is covered with a decorative layer.
The variety of types of penofol creates opportunities for selecting a heater of a suitable price, as well as taking into account the characteristics of the building, the climatic zone. The technology of covering the balcony with this material allows you to do the repair work yourself.
In order to take into account all the nuances of the construction stages (assessment of the quality and structure of the walls, the choice of the type of insulation, the calculation of the amount of materials), and to correctly perform thermal insulation, it is advisable to first consult with a specialist.
Loggia waterproofing outside technology
First, learn two simple rules. The first is that the surface is cleaned before any finishing, the same here. If there are cracks, fix them. Secondly, all outdoor work is carried out in dry and warm weather, at least from +5 degrees.
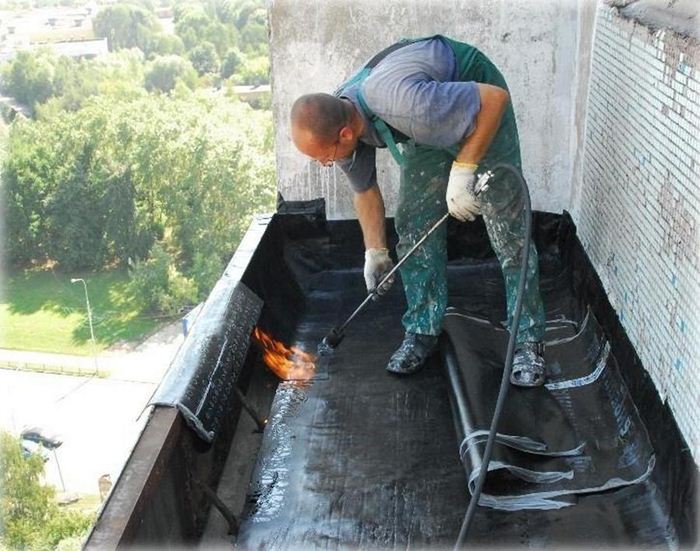 You can waterproof the roof with coating materials, or you can use roll materials, which is more efficient. The best option is several layers of roll material
And then the work goes according to this plan:
- Roof insulation. This stage is desirable for residents of the last floors and private houses.
- Partition wall insulation.External insulation should only be carried out by specialists using special climbing equipment. In most cases, coating materials are used.
- Floor insulation. How to do? Yes, according to the same principle as the isolation of the visor. But the possibilities for waterproofing the floor are many times greater. For example, to make the floor of a loggia or balcony warmer, lay a small layer of expanded clay.
And then about how to insulate a closed loggia from the inside.
Necessary materials for waterproofing
For high-quality waterproofing, appropriate materials will be required. They can be divided into separate types:
- Cast waterproofing - implies polymers that, under the influence of heating, take on a liquid state. In such a handicap, floors are poured. After hardening, the material does not pass moisture. The downside is the fragility of the frozen polymers.
- Painting waterproofing - consists in applying moisture-resistant paint. This option is low cost and easy to apply. However, wooden materials need to be coated permanently. Also, paint waterproofing does not tolerate sub-zero temperatures.
- Penetrating materials are a versatile type used for concrete and wood surfaces. Such compounds fill all kinds of cracks, crevices and chips, strengthen the surface to be coated.
- Pasting materials - purchased in rolls. For reliability, it is recommended to use several layers, fastening them with bituminous mastic. The main disadvantage of such waterproofing is the high price.
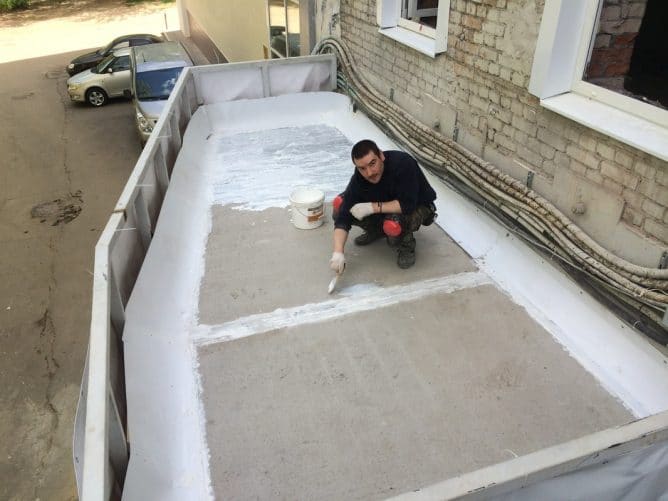 Waterproofing the floor of an open balcony with a paint composition
During the work, you will need additional materials and tools, namely:
- metal brush;
- sand and cement;
- sharp knife;
- metal mesh or wire;
- self-tapping screws;
- wooden bars;
- perforator;
- screwdriver;
- moisture resistant plywood or osb boards;
- sealant;
- grinder with stone discs;
- Styrofoam;
- gun and mounting foam.
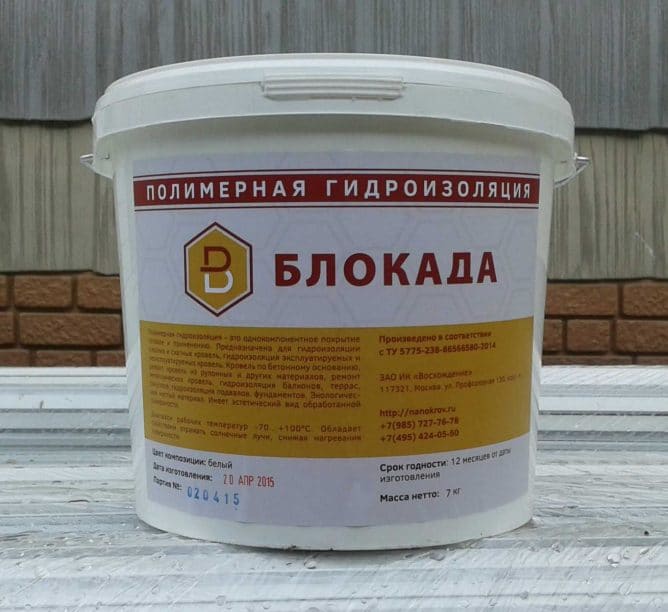 Ready-to-use waterproofing compound
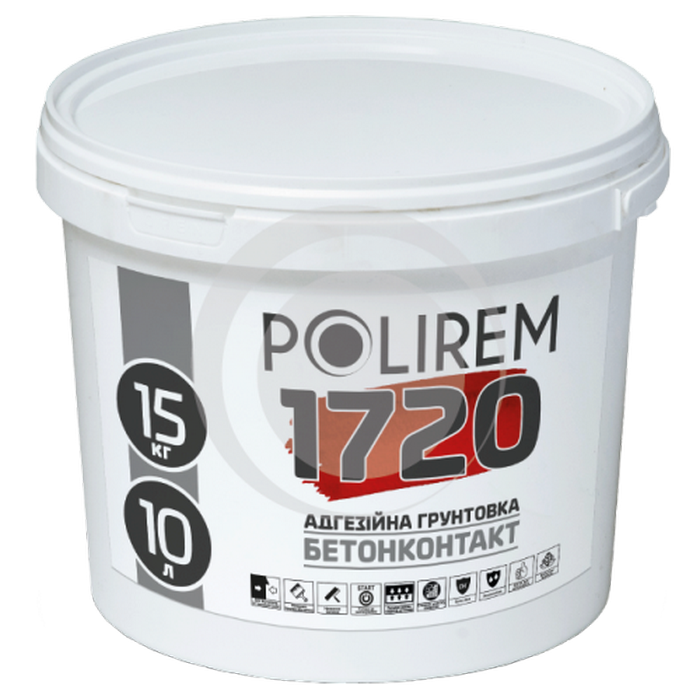
Primer for pre-mixed waterproofing
Under each waterproofing there is a type of primer. Dry cement waterproofing with water dilution may require different primers (read the instructions carefully). Sometimes it is a deep penetration primer, and in other cases, you can simply moisten the surface with plenty of water.
This is important so that the layers of waterproofing do not dry out.
Acrylic or rubber base - as a rule, requires a deep penetration primer to exclude dust (both construction and street). Liquid waterproofing should be applied on a good sticky surface. Some manufacturers require that the surface be treated with a primer that is designed specifically for this type of waterproofing.
Bitumen bases - a primer is strictly required! A very liquid soil of this composition is often sold ready-made in hardware stores. However, finding such a primer is quite difficult. In order to make it yourself, you can buy a minimum amount of bituminous waterproofing (mainly based on kerasin or its derivatives), diluted with water in a ratio of 1:10 or 1:7. You should get a liquid that penetrates well into all pores. The substance will visually resemble highly diluted coffee (light brown tint).
It should be noted that sometimes there are bitumen-rubber mastics (also water-based). The instruction will indicate which soil should be used - deep penetration, water or prepare it yourself
Step by step process of waterproofing the floor on your balcony

The waterproofing of the floor on the balcony is carried out in order to protect the reinforced concrete structure from destruction. This is due to dampness, and also when water enters the cracks, expanding when it freezes.Such an impact tears off pieces of concrete, and water seeps deeper and deeper and the reinforcement begins to rust. In very many cases, the destruction starts from the ends of the balcony.
Loggia waterproofing begins precisely with the side and front walls. Thin sidebar space will collapse faster. Therefore, it is logical that in order to keep the structure safe and sound, it is necessary to waterproof the balcony with your own hands (the procedure is not complicated and will save a significant amount of money at work).
Penofol types characteristics and subtleties of application
A - one-sided foiling. They insulate walls, ceilings inside premises (residential, industrial). It can be used in the construction of buildings and the repair of old structures;
B - double-sided foiling. Suitable for arranging loggias, balconies - as it retains heat in winter and creates coolness in summer. It is also used in construction and repair work in new and old buildings.
C - one-sided foiling and self-adhesive layer. Designed to insulate walls, ceilings, floors, various metal surfaces of car interiors, air ducts, pipelines. It comes with a less smooth adhesive surface - blue and a smoother adhesive surface - white.
Advantages:
- thin (insulation thickness grade A - 2-10 mm, grades B, C - 2-40 mm);
- flexible;
- light;
- eco-friendly;
- ease of installation for balconies of any configuration;
- ease of transportation (roll width 120 mm, weight 5-7 kg);
- affordable price;
- variety of types;
- excellent performance.

One of the advantages of penofol is its small thickness.
Flaws:
- softness - can not be used for finishing with wallpaper or plaster;
not used under the screed (when interacting with cement, the useful properties of the foil are lost); - type A, B material is difficult to fix on the surface, it is advisable to use special adhesives for installation (if the coating is nailed, the thermal insulation performance will decrease significantly);
- when insulating the outside of the building, it is mounted under the surface finish, as it performs the function of an additional layer.
Wall and roof insulation
Foamed polystyrene foam is most often used for waterproofing walls. It is glued to the walls using frost-resistant glue. Joints are sealed. Apply mastic on polystyrene foam for waterproofing. Lay a vapor barrier layer.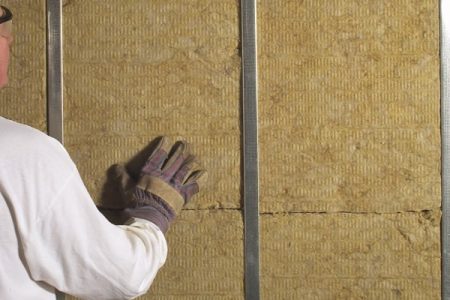
The outer part of the balcony is treated with mastic. The surface is pre-moistened. Mastic is applied in a layer of 1 mm. After it has set, after a few hours, the next layer is applied perpendicular to the previous one.
When waterproofing the roof of a suspended balcony, we first process all the joints between the sheets of roofing material. Then, under the crate, we lay the material chosen for waterproofing. Outside, we process the joints of the wall and roof with mounting foam. After the foam hardens, cut off the protruding parts of it. We process with sealant. We fix a strip of tin over the junction of the roof and wall. The joint is sealed.
Stages of waterproofing the concrete roof of the loggia:
- we lay the vapor barrier layer;
- lay a layer of insulation;
- we make a screed on the roof and process it with mastic, as described above;
- laying rolled waterproofing material;
- we lay roofing material on it;
- we fix it along the edge with a rail, process it with mastic.
If the waterproofing of the balcony is done correctly, there will be no leaks guaranteed. All finishing materials will serve for a long time.
After high-quality waterproofing, you can start finishing work.
Features of the use of polyurethane coatings
The finished substance is dissolved in the amount of water specified in the instructions. After that, the mass is applied to the prepared and moistened surface of the concrete base. Seams and corners are carefully processed.They are glued with waterproofing tape and coated with special protective compounds.
After applying a thin layer of waterproofing to the entire surface of the slab, it is imperative to reinforce the surface of the screed with fiberglass mesh, pressing the material into the insulating layer over the entire surface. After complete drying and hardening of the first layer, a second one is applied using the same technology. The application of each next layer is carried out after the final drying of the previous one. In this case, it is necessary to ensure that the floor receives the necessary slope towards the street.
The thickness of the insulating layer of an open balcony must be at least twenty millimeters.
It must be remembered that work is best done in the absence of direct sunlight, since the rapid drying of the coating will inevitably lead to cracking. After the installation of the waterproofing is completed, at least five days must pass before the laying of tiles or other finishing materials, only after complete drying and hardening of the waterproofing, finishing work can begin.
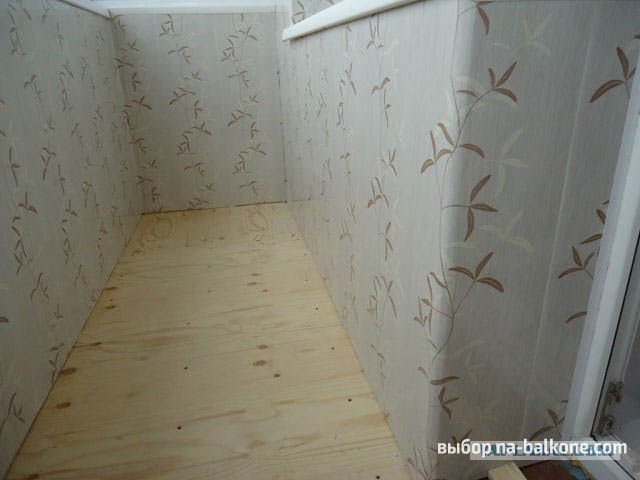
Balcony decoration
Purposes of creating interior decoration:
- External masking of the heat insulator;
- Organization of a favorable internal environment in the room.
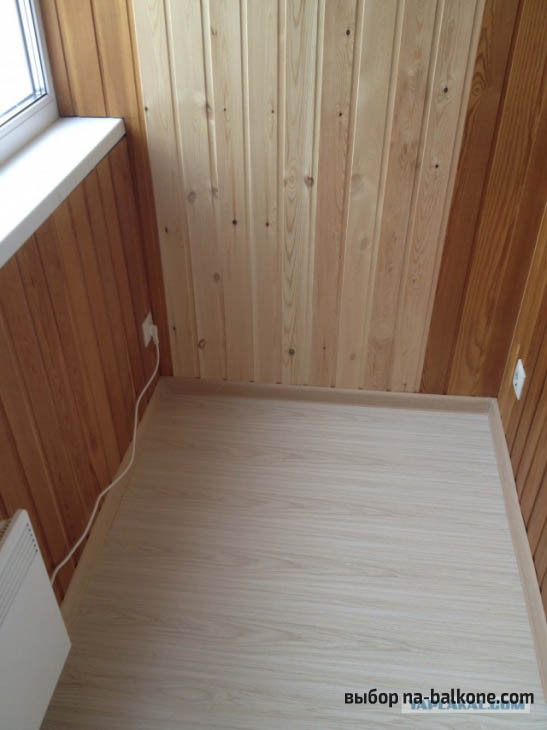
To create an interior balcony, you can choose from various finishes. Plaster, plastic panels, MDF, lining, plywood, plasterboard sheets and even a block house are perfect for the finishing layer.
The lining panels are environmentally friendly and reliable. One of the main advantages of the finishing material is rigidity. The lining is fixed on a wooden frame crate.
The walls of the loggia are lined with clapboard, the flooring is laminate.
Facing the balcony with a block house.

The plastic panels have grooves for connecting elements. The plastic version of the lining has less rigidity and strength than wood.
Installation of GKLV sheets on metal profiles. Plasterboard slabs can be decorated with wallpaper, painted, or lined with decorative plaster.
Wall decoration with wallpaper over GKLV sheets.
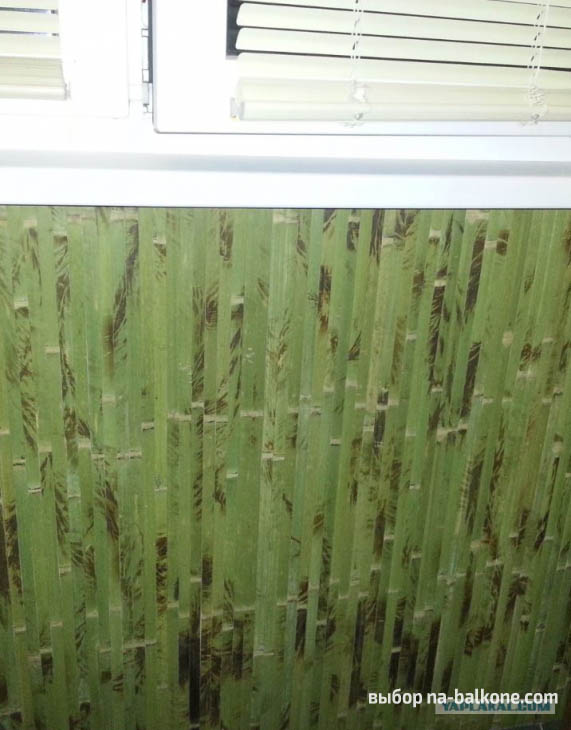
Bamboo wallpaper. The base for finishing is drywall.
Loggia sealing
Sometimes it happens that after the completion of waterproofing work, water still gets into the room. There may be several reasons:
- gaps in window frames;
- gaps between the supporting structure and frames;
- large gaps at the joints of the walls and the slab forming the ceiling;
- large gaps between the ceiling and the visor.
Glazing leakage is eliminated with the help of flashings (self-adhesive parts).
Rice. 7. PVC corner.
To eliminate all other gaps, various sealants are used, mainly based on silicone. These substances are distinguished by their versatility and high sealing performance. Gaps at the joints can also be sealed with mastic made on the basis of polyurethane.
Sealing an open loggia
The open structure is forced to withstand all the surprises that the climate brings. If there is no drain on the bottom plate, the fence is partial, there is no floor slope, then moisture inevitably accumulates, which can destroy even concrete. Sealing joints and gaps as a preventive measure is required even if water is not leaking anywhere.
Sealant in the open space must be elastic, durable, resistant to atmospheric influences. It is necessary to process all joints and details
On the upper floors, special attention is required to the roof. If mounting foam is used, then after drying it should also be covered with a thin layer of sealing mixture
It is necessary to process all joints and details.
Rice. 8. Seam sealing.
Sealing closed loggia
If the space is glazed and insulated, this does not mean that atmospheric water does not flow anywhere. Additional finishing of ebbs, slopes, seams is still required.Mounting foam, which is used in the glazing process, is unstable with respect to ultraviolet rays, so it must be covered with a layer of sealing mixture inside and out. The weak point is the joints between the screen and the metal or wooden parapet under the window frame.
The parapet also needs to be finished with an elastic, durable, environmentally resistant substance.

Rice. 8. Sealing the loggia inside.
Only in this case the design will be reliable and durable.
Loggia sealing
The measures listed above will be effective only if the preparatory work is carried out correctly. Before processing the joints, the surfaces must be thoroughly cleaned with a wire brush or sandpaper. Fungus and mold are removed with disinfectants. There should not even be dust on the ceiling, floor and walls. Processing should be carried out only on dry surfaces. Sealing mixtures are applied with a spatula. A sealing cord is placed in wide recesses. Even the highest quality glazing is not able to provide good thermal insulation without measures to seal seams and cracks.
If insulation is planned, the sequence of actions is clearly visible in the video:
https://youtube.com/watch?v=YKO00flP1tA
Waterproofing the ceiling of a balcony or loggia
If the balcony is glazed, then waterproofing the floor may not be required. But what if, after glazing, the balcony is still flooded from above - water flows from neighbors through cracks in the floor slab? The answer is clear - repair and waterproofing of this structural element is required. And here a new question arises: who should repair the loggia in order to eliminate the leak?
The law states that if the situation is an emergency, then measures to eliminate it must be taken by the housing and communal organization. However, it is quite problematic to recognize a balcony or loggia as emergency. This requires the presence of clear signs of destruction of the structure. It is also sometimes impossible to convince the neighbors from above to carry out the work necessary on their part. The only way out remains - waterproofing the ceiling of the balcony from the inside.
Here is a step-by-step instruction for waterproofing the ceiling of a loggia or balcony using penetrating mastic:
- Preparation of the ceiling surface: cleaning the floor slab from plaster and other finishing materials.
- Abundant moistening of the ceiling surface with water using a spray and roller.
- Application of the first layer of penetrating mastic with a brush with synthetic bristles. In this case, strokes are made in one direction (for example, along the floor slab).
- Application of the second layer of mastic. It is made after setting the first layer and re-wetting the surface thoroughly. Brush movements are perpendicular to the original direction (for example, across the floor slab).
After covering the ceiling of the balcony with mastic for the first day, it is necessary to keep it moist in order to avoid cracks.
To ensure a more thorough waterproofing of a balcony or loggia, it is advisable to treat with mastic, not only the ceiling, but also the walls adjacent to it to a height of about 20 cm.
Balcony canopy waterproofing Water drainage from the balcony
The canopy on the balcony is the waterproofing of the balcony, because this design protects the balcony from precipitation, which, of course, prolongs its service life.
If you are going to install a visor, you will have to choose how it will look, what it will be made of. It can be steel sheets, for example, corrugated board or metal tiles. It can also be polymeric materials, they cover the roof well and reliably protect it.
And, of course, the third option is the installation of double-glazed windows. In this case, triplex, tempered glass is used. This is the most expensive way to design a visor, but it is not only a reliable way to drain water from a balcony, but also the most aesthetic and modern.
As for, for example, waterproofing terraces, the most popular option is the combination of special sealing tapes and liquid solutions. As an alternative - polyurethane adhesive.
Insulation and waterproofing of the balcony from the inside ()
Waterproofing is necessary for both closed and open balconies. It is necessary for the roof, and for the floor, and for concrete lintels, as well as the outer cornice.
It doesn’t matter what composition, coating or penetrating, you use, the main thing is the high degree of moisture resistance of this material
Good afternoon. Please tell me, we removed the floor tiles from the unglazed brick loggia, we want to put porcelain tiles on the glue, the slope is correct. Do I still need to do waterproofing or can I do without it.
It is better, of course, to make waterproofing for reliability. Nevertheless, you do it for yourself and for a long time, so it’s better not to hack and save on it, especially since you want to lay tiles on an unglazed loggia
Good afternoon. Please tell me, we removed the floor tiles from the unglazed brick loggia, we want to put porcelain tiles on the glue, the slope is correct. Do I still need to do waterproofing or can I do without it.
In my opinion, the concepts of waterproofing and vapor barrier are a little confused. The roof above the loggia or balcony is waterproofing, it protects from rain, and the vapor barrier film, which is attached from the side of the room to the insulation, is a vapor barrier, because it protects the insulation from water vapor. Penofol from the inside will also be a vapor barrier, but it will not be enough to insulate the balcony, and the fence will still need to be insulated with polystyrene foam, or a mineral wool board.
What consequences can cause a violation of balcony insulation from water
When answering the question why and why moisture protection is needed on the loggia and balcony, it must be borne in mind that damaged waterproofing of the loggia and balcony can lead to the following unpleasant consequences:

- Loss of quality of finishing materials with constant contact with liquid - warping and twisting of wooden frames made for fixing PVC panels, cracking of plaster, peeling of tiles, swelling of laminate, leakage of a hatch on a balcony. Formation of fungus and mold that damage the finish and worsen the appearance of the room. corrosion of steel trim parts and internal load-bearing reinforcement of concrete slabs located in a closed humid environment without air access.
Rice. 2 Waterproofing the loggia from the inside during insulation
Types of materials
The building goods market today offers dozens of different types of materials. A builder can easily choose a suitable product from this range, but a beginner in this business will have a hard time. It is better not to rely on the advice of consultants in the store, but to choose the right building material in accordance with building codes and requirements.
In this case, waterproofing the balcony from the inside will give a good result. All coatings are divided into just a few groups.
- Coating (they are also often called cast polymer coatings). This option is one of the most reliable and easy to install with your own hands. Typical representatives of this class are asphalt pavements, mastics. The only drawback of this technology is its high cost.
- Impregnation. These materials penetrate deep into the building material and reliably protect it. There are special penetrating compounds for concrete, wood, and other materials.
- Roll. Installation of such protection against moisture will not allow residents to regret their choice. These polymer-bitumen coatings guarantee high reliability and a long service life, however, laying requires a lot of labor and experience.
- Coloring compositions. The main purpose of such materials is to protect metal elements from moisture. Among the advantages - the relative cheapness, ease of application of insulation.
- Plastering.This method is considered one of the most famous and simple. However, over the years of use, it has proven its high efficiency.
- Sheet protection. This class is represented by metal and plastic sheets. It is rational to use them only in cases where other options cannot be applied for some reason.
- injection protection. This type is used for spot isolation of cracks, seams. Such sealing of the balcony becomes possible with the use of binder solutions.
Materials used
In order for all work to be completed quickly, efficiently and reliably, it is necessary to select the most suitable materials for a particular situation. The following is a standard list of materials for waterproofing and insulation work on the loggia. Such a list can be modified to take into account the complexity of the task due to the presence of, for example, large gaps, gaps between ceiling concrete slabs, etc. So, it is advisable to use the following set of materials:
- sealant (silicone, acrylic, bituminous, polyurethane) for sealing cracks;
Moreover, many of them will not be needed due to the fact that the area of \u200b\u200bthe balcony and ceiling is not so large;
- penetrating concrete waterproofing compound is a reliable way to make the loggia ceiling slab 100% waterproof. After applying such a composition, the waterproofing of the ceiling becomes as effective as possible;
- folgoizolon - a material that will perform both the function of an additional waterproofing barrier and a heater;
- extruded polystyrene foam sheets are an excellent material for thermal insulation of small rooms. It is very easy to attach to the ceiling and does not greatly reduce the space of the balcony, which is limited in size;
- construction glue, a knife, scissors and other tools that may be useful for cutting and fastening the materials listed above. The sealant is applied using special tubes, in which it is sold.
Thus, a small set of materials and tools is needed in order for the waterproofing on the loggia to be done with high quality and reliably with your own hands. In addition, given the small area of \u200b\u200bthe room, not very many such materials are needed, which is why the costs will be negligible.
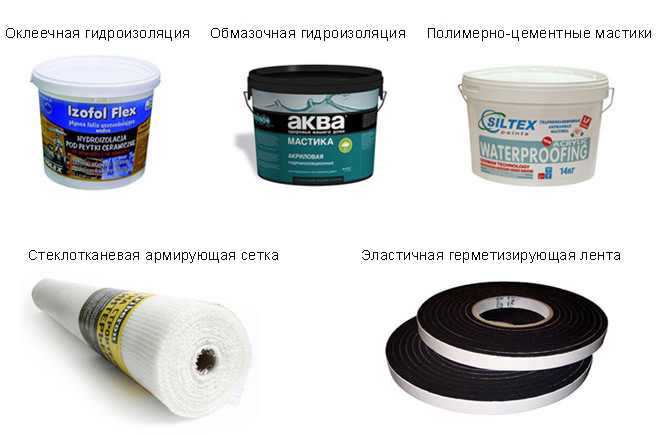
Materials for waterproofing and sealing the loggia
Waterproofing from the inside is performed using 3 types of materials:
- rolled (welded, adhesive);
- painting (coating);
- penetrating.
Roll technology is quite laborious and complex. There should be no irregularities with a depth of more than 2 mm on the base. It must be dry. To attach a waterproofer, precision, accuracy, and certain skills are needed. But these coatings are the most reliable and durable. The easiest option is painting with oil paint. But this method is unreliable, since the quality of the coating decreases at sub-zero temperatures, new painting is required almost every year.
Water-repellent putties are much more reliable. They are no more difficult to apply than paint. Coating putties also include various ready-made sealants and polyurethane foams.

Rice. 2. Materials for waterproofing.
Penetrating compounds are supplied in the form of powders, diluted with water. These are ideal materials for concrete structures. Penetrating sealants also include putties made of polymers, which are applied in a heated form. The coating is elastic and reliable on all planes, except for the floor.